BGP transmits packets in the clear. Therefore for strong security, Dell SonicWALL recommends configuring an IPSec tunnel to use for BGP sessions. The configurations of the IPSec tunnel and of BGP are independent of each other. The IPSec tunnel is configured completely within the VPN configuration section of the SonicOS GUI, while BGP is enabled on the Network > Routing page and then configured on the SonicOS Command Line Interface. When configuring BGP over IPSec, first configure the IPSec tunnel and verify connectivity over the tunnel before configuring BGP.
|
1
|
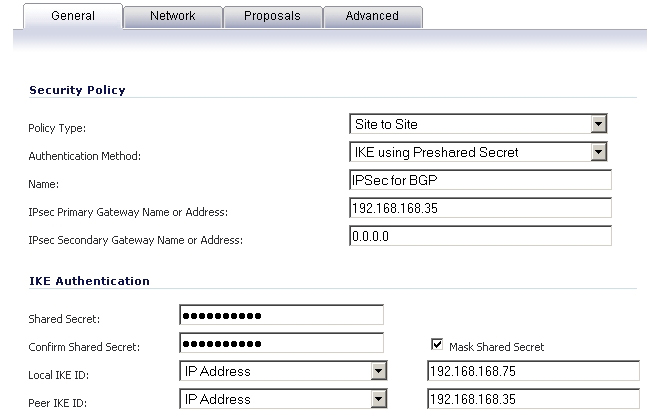
Navigate to the VPN > Settings page and click the Add button under the VPN Policies section. The VPN Policies window displays.
|
|
2
|
|
3
|
|
4
|
Enter a Name for the VPN policy.
|
|
5
|
In the IPsec Primary Gateway Name or Address field, enter the IP address of the remote peer (for this example it is 192.168.168.35).
|
|
6
|
In the IPsec Secondary Gateway Name or Address field, enter 0.0.0.0.
|
|
7
|
Enter a Shared Secret and confirm it.
|
|
8
|
In the Local IKE ID field, enter the IP address of the SonicWALL (for this example it is 192.168.168.75)
|
|
9
|
In the Peer IKE ID field, enter the IP address of the remote peer (192.168.168.35).
|
|
10
|
Click on the Network tab.
|

|
11
|
|
12
|
For the remote network, select the remote peer’s IP address from the Choose destination network from list drop-down menu, which is 192.168.168.35 for this example. If the remote IP address is not listed, select Create new address object to create an address object for the IP address.
|
|
13
|
Click on the Proposals tab. You can either use the default IPSec proposals or customize them as you see fit.
|
|
14
|
Click on the Advanced tab.
|
|
15
|
Check the Enable Keep Alive checkbox.
|
|
16
|
Click OK.
|
The VPN policy is now configured on the firewall. Now complete the corresponding IPSec configuration on the remote peer. When that is complete, return to the VPN > Settings page and check the Enable checkbox for the VPN policy to initiate the IPSec tunnel.
|
1
|
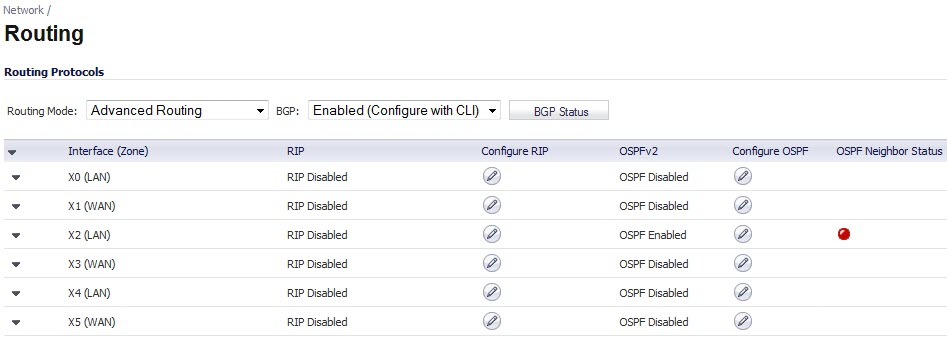
On the SonicOS GUI, navigate to the Network > Routing page.
|
|
2
|
|
3
|
|
NOTE: After BGP has been enabled through the GUI, the specifics of the BGP configuration are performed using the SonicOS command line interface (CLI). For detailed information on how to connect to the SonicOS CLI, see the SonicOS Command-Line Interface Guide at: http://www.sonicwall.com/us/support/230_3623.html
|
|
5
|
Enter configuration mode by typing the configure command.
|
|
6
|
Enter the BGP CLI by typing the route ars-bgp command. You will now see the following prompt:
|
|
7
|
You are now in BGP Non-Config Mode. Type ? to see a list of non-config commands.
|
|
8
|
Type show running-config to see the current BGP running configuration.
|
|
9
|
To enter BGP Configuration Mode, type the configure terminal command. Type ? to see a list of configuration commands.
|
|
10
|
When you have completed your configuration, type the write file command. If the unit is part of an High Availability pair or cluster, the configuration changes will be automatically conveyed to the other unit or units.
|
|
Network or Aggregate paths
|
|
The weights assigned using the set weight command override the weights assigned using this command.
: neighbor 12.34.5.237 weight 60
: neighbor group1 weight 60
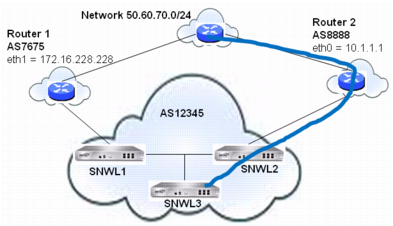
Figure 49. BGP local preference topology

|
•
|
route-map rmap1 permit 10: This permit condition matches access list 100 that is configured to permit traffic from AS 8888 and set routes from AS 8888 to a Local Preference of 200.
|
|
•
|
route-map rmap1 permit 10: This permit condition sets all other traffic that doesn’t match access list 100 (i.e. traffic coming from ASs other than 8888) to a Local Preference of 150.
|
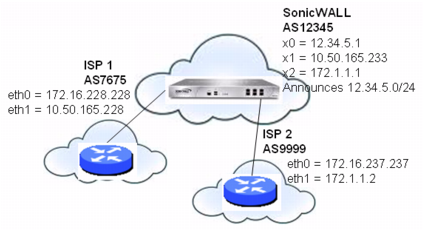
This configuration leads to a route being installed to the neighbor 10.50.165.233 with the AS_Path Prepended as 12345 12345. This can be viewed by entering the show ip bgp command.
ARS BGP>show ip bgp
*> 12.34.5.0/24 10.50.165.233 0 0 12345 12345 12345 i
The set metric command can be used in a route map to make paths more or less preferable:
The Multi Exit Discriminator (MED) is an optional attribute that can be used to influence path preference. It is non-transitive, meaning it is configured on a single appliance and not advertised to neighbors in update messages. In this section, we will consider the uses of the bgp always-compare-med command and bgp deterministic-med command .
The bgp always-compare-med command allows comparison of the MED values for paths from different ASs for path selection. A path with lower MED is preferred.
As an example, consider the following routes in the BGP table and the always-compare-med command is enabled:
If the always-compare-med command was disabled, MED would not be considered when comparing Route1 and Route2 because they have different AS paths. MED would be compared for only Route1 and Route3.
The selected route is also affected by the bgp deterministic-med command, which compares MED when choosing among routes advertised by different peers in the same autonomous system.
When the bgp deterministic-med command is enabled, routes from the same AS are grouped together, and the best routes of each group are compared. If the BGP table showed:
Figure 51. Transit peers vs. Non-transit peers
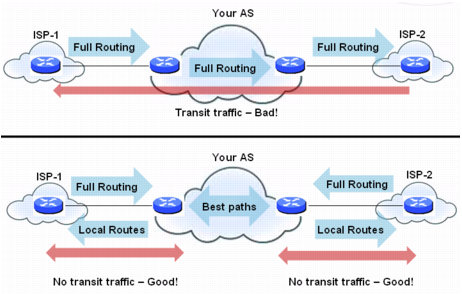
Figure 52. Multi-homed BGP for load sharing topology