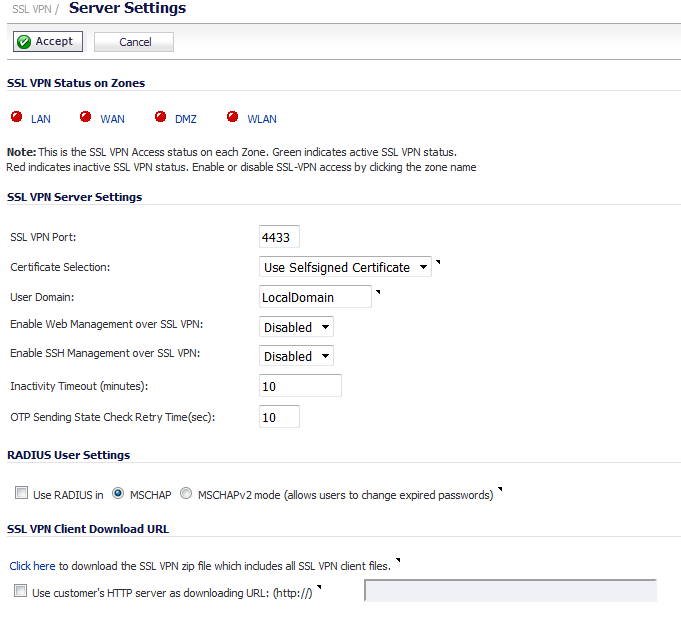
The SSL VPN > Server Settings page configures details of the SonicWALL security appliance’s behavior as an SSL VPN server.
You configure the Virtual Office portal through settings as follows:
This section displays the SSL VPN Access status on each zone:
To enable or disable SSL VPN access, click the zone name.
The following settings configure the SSL VPN server:
|
•
|
SSL VPN Port - Enter the SSL VPN port number in the field. The default is 4433.
|
|
•
|
Certificate Selection – From this drop-down menu, select the certificate to use to authenticate SSL VPN users. The default method is Use Selfsigned Certificate.
|
|
•
|
User Domain – Enter the user’s domain, which must match the domain field in the NetExtender client. The default is LocalDomain.
|
|
•
|
Enable Web Management over SSL VPN – To enable web management over SSL VPN, select Enabled from this drop-down menu. The default is Disabled.
|
|
•
|
Enable SSH Management over SSL VPN – To enable SSH management over SSL VPN, select Enabled from this drop-down menu. The default is Disabled.
|
|
•
|
Inactivity Timeout (minutes) – Enter the number of minutes of inactivity before logging out the user. The default is 10 minutes.
|
|
•
|
OTP Sending State Check Retry Times (sec) – Enter the number seconds for OTP sending state check retries. The default is 10 seconds.
|
|
•
|
Use RADIUS in – Select this checkbox to have RADIUS use MSCHAP (or MSCHAPv2) mode. Enabling MSCHAP-mode RADIUS will allow users to change expired passwords at login time. Choose between these two modes:
|
|
If this option is set when is selected as the authentication method of log in on the Users > Settings page, but LDAP is not configured in a way that allows password updates, then password updates for SSL VPN users are performed using MSCHAP-mode RADIUS after using LDAP to authenticate the user. |
|
•
|
This section allows you to download client SSL VPN files to your HTTP server.
|
•
|
Click here to download the SSL VPN zip file which includes all SSL VPN client files – To download from the appliance, click the Click here link to display an Opening application.zip dialog:
|
Open and unzip the file, and then put the folder on your HTTP server.
|
•
|
Use customer’s HTTP server as downloading URL: (http://) – Select this checkbox to enter your SSL VPN client download URL in the supplied field.
|
\\wwwroot\applications\netextender\windows\7.0.197\NXSetupU.exe