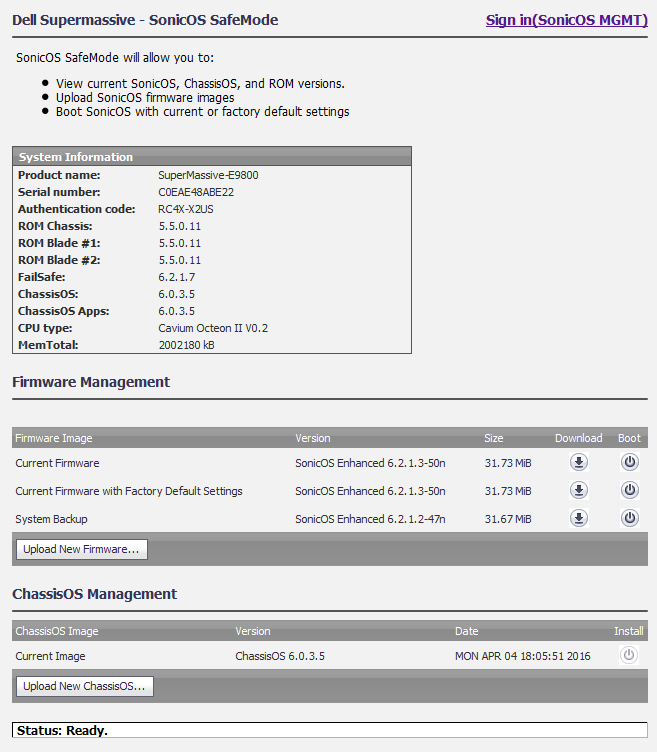
The Firmware Management section provides settings that allow for easy firmware upgrade and preferences management by allowing you to:
|
NOTE: SafeMode, which uses the same settings used by Firmware Management, provides quick recovery from uncertain configuration states.
|
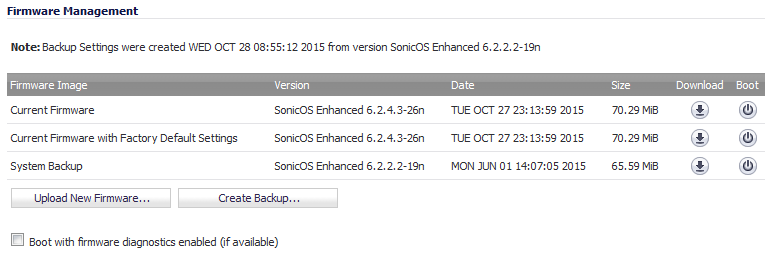
The Firmware Management table displays this information:
|
Firmware image created by clicking the Create Backup Settings button. |
|||
|
Latest uploaded version from mysonicwall.com. |
|||
|
Backup firmware image and backup settings for the appliance. |
|||
|
Clicking the Download icon saves the firmware file to a new location on your computer or network. Only uploaded firmware can be saved to a different location. |
|||
|
Clicking the Boot icon reboots the firewall with the firmware version listed in the same row. |
|||
|
1
|

|
3
|
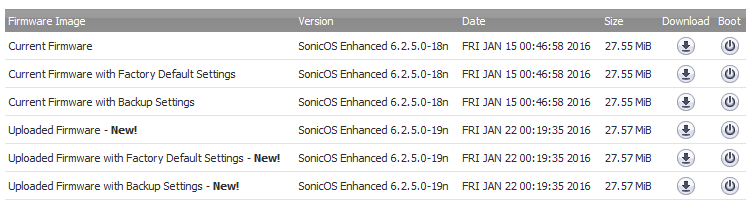
Click the Upload New Firmware button to upload the new firmware to the Dell SonicWALL Security Appliance.
|
|
4
|
|
5
|
Click the Download icon for the version of the uploaded firmware you want. The Opening <filename> dialog displays.
|
|
6
|
![]()
|
7
|
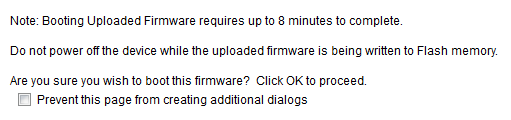
Click the Boot icon for the firmware you just downloaded. A warning message displays.
|

|
8
|
Click OK. A information message about the time to boot the firmware displays.
|
|
9
|
![]()

|
10
|
Log back in when the log in dialog displays. Both the System > Status and System > Settings pages reflect the firmware update.
|
When you click the Create Backup Settings button, the Dell SonicWALL Security Appliance takes a “snapshot” of your current system state, firmware and configuration preferences, and makes the snapshot the new System Backup firmware image. Clicking Create Backup Settings overwrites the existing System Backup firmware image as necessary.
Use the System Backup file for saving good configurations and then booting them if upgrades or future configurations cause instability or other serious issues. The file is conveniently saved onboard. The date and time the file was created as well as the firmware version in use at the time is displayed in the NOTE above the Firmware Management table. The dates for each item listed in the Firmware Management table are the build dates for the firmware images themselves.
|
1
|
Click the Create Backup button. A warning message displays.
|
![]()
|
2
|
Click OK. It may take a few minutes to create the backup file. When the file has been created, the Note above the Firmware Management table displays the date and time of the file was created.
|
|
1
|
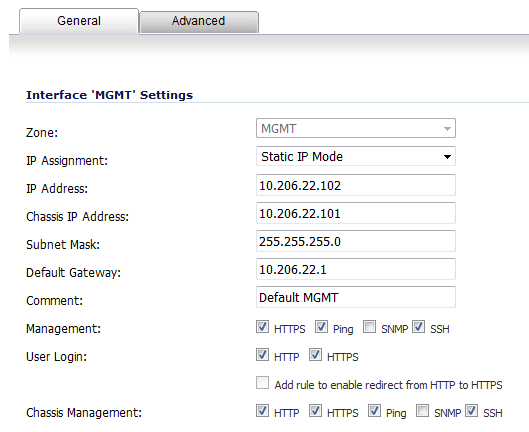
Navigate to Network > Interfaces.
|
|
2
|
In the Network Settings table, click the Edit icon for the MGMT interface. The Edit Interface – MGMT dialog displays.
|
|
•
|
An HA pair, the primary and secondary HA units from the Chassis IP Address (Primary) and Chassis IP Address (Secondary) fields.
|
|
4
|
|
5
|
Click OK.
|
|
8
|
Click Upload New Firmware, and then browse to the location where you saved the SonicOS firmware image.
|
|
9
|
Select the file, and click the Upload button.
|
|
10
|
Select the Boot icon in the row for one of the following:
|
|
•
|
Uploaded Firmware - New! – Use this option to restart the appliance with your current configuration settings.
|
|
•
|
Uploaded Firmware with Factory Default Settings- New! – Use this option to restart the appliance with default configuration settings.
|
|
11
|
|
12
|
After successfully booting the firmware, the log in screen displays. If you restarted with factory default settings, enter the default user name and password (admin/password) to access the SonicOS management interface.
|
|
13
|
Navigate to Network > Interface.
|
|
14
|
|
15
|
|
16
|
Click OK.
|