The Wireless Wizard provides an easy way to configure WLAN 802.11n, WLAN security, and WLAN VAP settings.
|
1
|
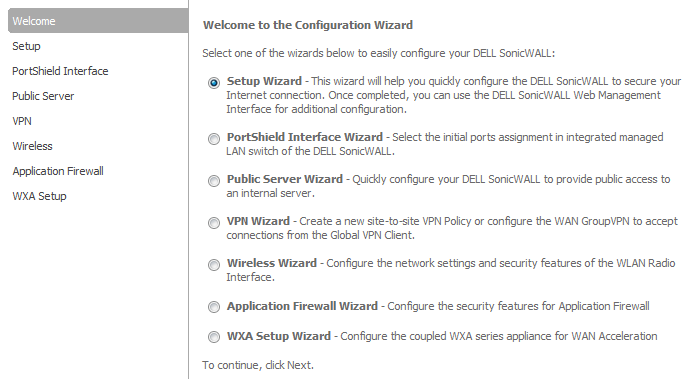
Click Wizard on the top right corner of the SonicOS management interface. The Configuration Wizard Welcome dialog displays.
|
|
2
|
Select the Wireless Wizard radio button
|
|
3
|
|
4
|
Select the IP assignment from the IP Assignment drop-down menu:
|
|
•
|
|
•
|
Static, go to Configuring Static Assignment.
|
|
1
|
Enter the default gateway WLAN IP address in the WLAN IP Address field. The Wireless Wizard creates a default IP address that you can change.
|
|
2
|
Enter the default WLAN IP address of the subnet mask in the WLAN Subnet Mask field. The Wireless Wizard creates a default IP address that you can change.
|
The options change of the Wireless LAN Settings page.
|
1
|
Select the bridged-pair interface from the Bridged to drop-down menu.
|
|
2
|
Click Next. An information message displays regarding the interface bridge not changing zone.
|
|
3
|
Click OK. The message closes.
|
|
1
|
Click Next. A information message recommending maintaining wireless drivers displays.
|
|
2
|
Click OK.
|
|
3
|
|
4
|
Enter the Service Set ID (SSID), which serves as the primary identifier for your wireless network, in the SSID field. The SSID may be up to 32 alphanumeric characters long and is case sensitive.
|
|
•
|
Radio Mode – Select from these options”
|
|
•
|
2.4GHz 802.11n/g/g Mixed (default)
|
|
•
|
County Code – Options change depending on the agency specified in the Regulatory Domain.
|
|
•
|
Radio Band – Select from
|
|
•
|
Auto (default)
|
|
•
|
Primary Channel – Select from:
|
|
•
|
|
•
|
Secondary Channel – Select from:
|
|
•
|
|
6
|
Optionally, select Enable Short Guard Interval. This option is not selected by default.
|
|
7
|
Optionally, select Enable Aggregation. This option is not selected by default.
|
|
8
|
Click Next. The WLAN Security Settings page displays.
|
|
•
|
WPA/WPA2 Mode – Wi-Fi Protected Access (WPA) is the security wireless protocol based on 802.11i standard. It is the recommended protocol if your wireless clients also support WPA.
|
|
•
|
|
10
|
Click Next.
|
|
•
|
|
1
|
Configure the authentication type from the Authentication Type drop-down menu:
|
|
•
|
|
•
|
|
3
|
|
•
|
WPA-PSK, WPA2-PSK, or WPA-AUTO-PSK, enter the Preshared Key Settings (PSK) in the Passphrase field. The passphrase must be at least eight alphanumeric characters.
|
|
•
|
WPA-EAP, WPA2-EAP, or WPA-AUTO-EAP, enter the Extensible Authentication Protocol Settings (EAP) settings in these fields:
|
|
•
|
Radius Server 1 IP and its Port
|
|
•
|
|
•
|
Optionally, Radius Server 2 Secret
|
|
5
|
Click Next.
|
The WLAN LAP (Virtual Access Point) Settings page displays.
|
1
|
|
•
|
Want to create another VAP SSID, select the Yes, I want to create another virtual access point checkbox. More options are displayed.
|
|
2
|
Enter a name for the VAP in the VAP NAME field.
|
|
3
|
Enter an SSID for the VAP in the VAP SSID field.
|
|
5
|
|
6
|
Enter a VLAN tag in the WLAN VLAN TAG field. This tag is a number with a range of 1 - 4094.
|
|
7
|
|
8
|
|
9
|
Optionally, select a zone from the WLAN Zone drop-down menu.
|
|
10
|
Optionally, to create a new zone, select the Create a new zone and bound the new subnet to it check box.
|
|
•
|
Enter the zone name in the New Zone Name field.
|
|
11
|
|
12
|
|
•
|
Want to create more VAP SSIDs, repeat Step 1 through Step 11 for each VAP SSID up to a total of seven.
|
|
•
|
Have created all the VAP SSIDs you want, click Next. The Wireless Configuration Summary page displays.
|
|
NOTE: What is displayed on the Wireless Configuration Summary page depends on how you configured the settings.
|
|
2
|
Make any changes by clicking Back to the appropriate page.
|
|
3
|
Click Accept to apply the configuration to your SonicWall appliance.
|
When the configuration has been updated, the Wireless Wizard Complete page displays.
|
4
|
Click Finish.
|