To verify your policy configuration, you can send some traffic that should match your policy. You can use a network protocol analyzer such as Wireshark to view the packets. For information about using Wireshark, see Wireshark .
Be sure to test for both included and excluded users and groups. You should also run tests according to the schedule that you configured, to determine that the policy is in effect when you want it to be. Check for log entries in the Log > View or the Dashboard > Log Monitor page in the SonicOS user interface.
You can view tooltips on the Firewall > App Rules page when you hover your cursor over each policy. The tooltips show details of the match objects and actions for the policy. Also, the bottom of the page shows the number of policies defined, enabled, and the maximum number of policies allowed.
Wireshark is freely available at: http://www.wireshark.org
|
1
|
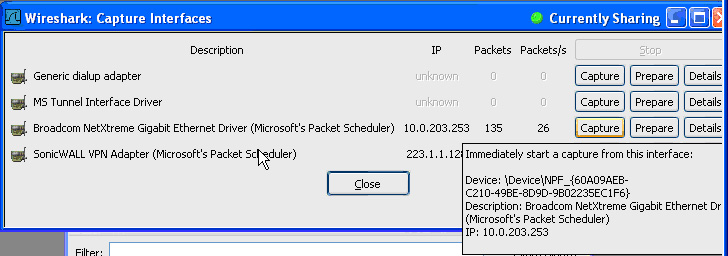
In Wireshark, click Capture > Interfaces to view your local network interfaces.
|
|
2
|
|
3
|
In the captured output, locate and click the HTTP GET command in the top pane, and view the source for it in the center pane. In the source code, locate the line beginning with User-Agent.
|
|
4
|
|
5
|
|
6
|
Click OK to create a match object that you can use in a policy.
|
You can use a hexadecimal (hex) editor to view the hex representation of a file or a graphic image. One such hex editor is XVI32, developed by Christian Maas and available at no cost at the following URL:
http://www.chmaas.handshake.de/delphi/freeware/xvi32/xvi32.htm
Using the SonicWALL graphic as an example, you would take the following steps:
|
1
|
|
2
|
In the left pane, mark the first 50 hex character block by selecting Edit > Block <n> chars… and then select the decimal option and type 50 in the space provided. This will mark the first 50 characters in the file, which is sufficient to generate a unique thumbprint for use in a custom match object.
|
Alternatively you can mark the block by using the following sequence:
|
•
|
Click on the first character (#0).
|
|
•
|
Press Ctrl+B.
|
|
•
|
Press Ctrl+B.
|
|
NOTE: You must click on the corresponding location in the left pane before you press Ctrl+B to mark the block.
|
When the block is marked, it changes to red font. To unmark a block of characters, press Ctrl+U.
|
3
|
After you mark the block, click Edit > Clipboard > Copy As Hex String.
|
|
4
|
In Textpad or another text editor, press Ctrl+V to paste the selection and then press Enter to end the line.
|
This intermediary step is necessary to allow you to remove spaces from the hex string.
|
5
|
In Textpad, click Search > Replace to bring up the Replace dialog box. In the Replace dialog box, type a space into the Find text box and leave the Replace text box empty. Click Replace All.
|
The hex string now has 50 hex characters with no spaces between them.
|
6
|
Double-click the hex string to select it, then press Ctrl+C to copy it to the clipboard.
|
|
7
|
|
8
|
|
9
|
|
10
|
For Input Representation, click Hexadecimal.
|
|
11
|
|
12
|
Click Add.
|
|
13
|
Click OK.
|
You now have an Match Object containing a unique identifier for the image. You can create an App Rules policy to block or log traffic that contains the image matched by this Match Object. For information about creating a policy, see Configuring an App Rules Policy .