|
1
|
Navigate to SSL VPN > Virtual Office.
|
|
2
|
|
3
|
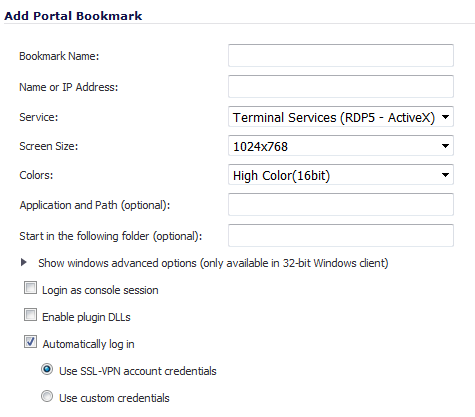
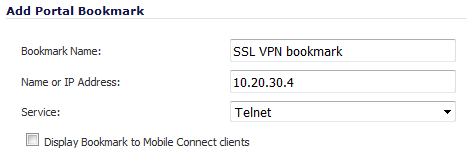
Type a descriptive name for the bookmark in the Bookmark Name field.
|
|
4
|
Enter the fully qualified domain name (FQDN) or the IPv4 address of a host machine on the LAN in the Name or IP Address field. In some environments you can enter the host name only, such as when creating a VNC bookmark in a Windows local network.
|
Some services can run on non-standard ports, and some expect a path when connecting. Depending on the choice in the Service field, format the Name or IP Address field like one of the examples shown in Table 91.
|
10.20.30.4:5901 (mapped to session 1) JBJONES-PC.sv.us.sonicwall.com TIP: For a bookmark to a Linux server, see the Tip below this table. |
||
|
TIP: When creating a Virtual Network Computing (VNC) bookmark to a Linux server, you must specify the port number and server number in addition to the Linux server IP in the Name or IP Address field in the form of ipaddress:port:server. For example, if the Linux server IP address is 192.168.2.2, the port number is 5901, and the server number is 1, the value for the Name or IP Address field is 192.168.2.2:5901:1.
|
|
5
|
For the specific service you select from the Service drop-down menu, available options may change. Complete the information for the service you selected from the Service drop-down menu:
|
|
•
|
|
NOTE: If you select Terminal Services (RDP - ActiveX) while using a browser other than Internet Explorer, the selection is switched automatically to Terminal Services (RDP - Java). A popup message notifies you of the switch.
|
|
1
|
In the Screen Size drop-down menu, select the default terminal services screen size to be used when users execute this bookmark:
|
|
•
|
|
•
|
|
•
|
1024x768 (default)
|
|
2
|
In the Colors drop-down menu, select the default color depth for the terminal service screen when users execute this bookmark:
|
|
•
|
High Color(16 bit) (default)
|
|
3
|
Optionally, you can provide a path to where your application resides on your remote computer by entering the local path for this application in the Application and Path (optional) field.
|
|
4
|
In the Start in the following folder (optional) field, optionally enter the local folder in which to execute application commands.
|
|
5
|
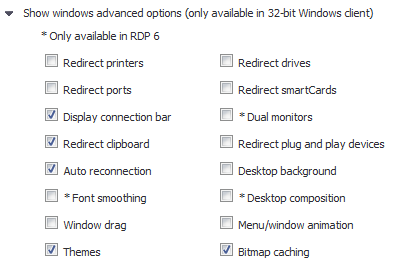
Expand Show advance Windows options. More options display; which options display depend on whether you selected Terminal Services (RDP5 - Active X) or Terminal Services (RDP5 - Java) from the Service drop-down menu.
|
|
•
|
|
•
|
|
7
|
For RDP - ActiveX on Windows clients, to redirect any of the following devices or features on the local network for use in this bookmark session, select the appropriate checkboxes:
|

|
NOTE: To see local printers on your remote machine (Start > Settings > Control Panel > Printers and Faxes), select Redirect Ports as well as Redirect Printers.
|
|
9
|
For RDP - Java on Windows clients or on Mac clients running Mac OS X 10.5 or above with RDC installed:
|
|
NOTE: To see local printers on your remote machine (Start > Settings > Control Panel > Printers and Faxes), select Redirect Ports as well as Redirect Printers.
|
|
•
|
Redirect clipboard (selected by default)
|
|
b
|
|
•
|
Display connection bar (selected by default)
|
|
•
|
Auto reconnection (selected by default)
|
|
•
|
Themes (selected by default)
|
|
•
|
Bitmap caching (selected by default)
|
|
10
|
Select the Login as console/admin session checkbox to allow login as console or admin.
|
|
11
|
For RDP - ActiveX on Windows clients:
|
|
a
|
![]()
Ensure that any necessary DLLs are located on the individual client systems in %SYSTEMROOT% (for example: C:\Windows\system32).
|
13
|
To forward credentials from the current SSL VPN session for login to the RDP server, select the Automatically log in checkbox. This option is selected by default.
|
|
•
|
Use SSL VPN account credentials (default)
|
|
•
|
Use custom credentials to enter a custom username, password, and domain for this bookmark. When you select radio button, more options display.
|
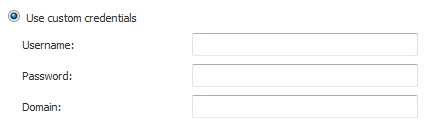
You can configure custom Single Sign On (SSO) credentials for each user, group or globally in RDP bookmarks. This feature is used to access resources that need a domain prefix for SSO authentication. Users can log into SonicWALL SSL VPN as username and click a customized bookmark to access a server with domain\username. Either straight textual parameters or variables may be used for login credentials.
Enter the appropriate username and password, or use dynamic variables:
|
15
|
For RDP - Java on Windows clients or on Mac clients running Mac OS X 10.5 or above with RDC installed, select whether to display bookmarks to Mobile Connect clients by selecting the Display Bookmark to Mobile Connect clients checkbox. This option is not selected by default.
|
|
16
|
Click OK.
|
If you chose Virtual Network Computing (VNC) from the Service drop-down menu, the options change.

|
1
|
Select the type of encoding from the Encoding drop-down menu:
|
|
•
|
Raw (default)
|
|
•
|
|
•
|
|
•
|
|
•
|
|
•
|
|
2
|
Select a compression level, 0 (default) – 9, from the Compression Level drop-down menu.
|
|
3
|
|
4
|
Select whether to update cursor shape from the Cursor Shape Updates drop-down menu:
|
|
•
|
Enable (default)
|
|
•
|
|
•
|
|
5
|
To use CopyRect, select the Use CopyRect checkbox. This option is not selected by default.
|
|
6
|
To restrict the color level, select the Restricted Colors (256 Colors) checkbox. This option is not selected by default.
|
|
7
|
To reverse the mouse buttons, select the Reverse Mouse Buttons 2 and 3 checkbox. This option is not selected by default.
|
|
8
|
To restrict the user to view only, select the View Only checkbox. This option is not selected by default.
|
|
9
|
To enable users to share their desktop, select the Share Desktop checkbox. This option is not selected by default.
|
|
10
|
To display the bookmark to Mobile Connect users, select the Display Bookmark to Mobile Connect clients checkbox. This option is not selected by default.
|
|
11
|
Click OK.
|
If you chose Telnet from the Service drop-down menu, the options change.
|
1
|
To display the bookmark to Mobile Connect users, select the Display Bookmark to Mobile Connect clients checkbox. This option is not selected by default.
|
|
2
|
Click OK.
|
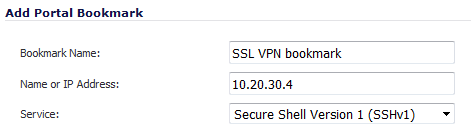
If you chose Secure Shell version 1 (SSHv1) from the Service drop-down menu, there are no further options. Click OK.
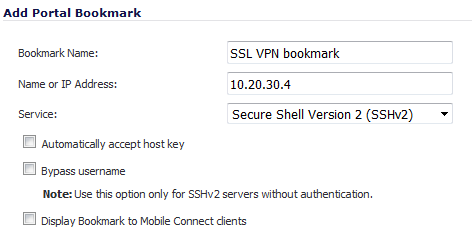
If you chose Secure Shell version 2 (SSHv2) from the Service drop-down menu, the options change.
|
1
|
Optionally, select the Automatically accept host key checkbox. This checkbox is not selected by default.
|
|
2
|
If using an SSHv2 server without authentication, such as a SonicWALL firewall, you can select the Bypass username checkbox. This checkbox is not selected by default.
|
|
3
|
To display the bookmark to Mobile Connect users, select the Display Bookmark to Mobile Connect clients checkbox. This option is not selected by default.
|
|
4
|
Click OK.
|