Anti-Spyware protection provides two methods for managing global spyware threats:
|
•
|
Detection (Detect All).
|
|
•
|
Prevention (Prevent All).
|
By default, global prevention and detection of spyware is disabled. For anti-spyware to occur on a global level on the SonicWALL security appliance, you must specify a Prevent All action in the Signature Groups table.
When Prevent All is enabled for a signature group in the Signature Groups table, the SonicWALL security appliance automatically drops and resets the connection to prevent the traffic from reaching its destination.
When Detect All is enabled for a signature group in the Signature Groups table, the SonicWALL security appliance logs and alerts any traffic that matches any signature in the group, but does not take any action against the traffic. The connection proceeds to its intended destination. You view the SonicWALL log on the Log > View page as well as configure how alerts are handled by the SonicWALL security appliance in the Log > Automation page.
When Detect All and Prevent All are both enabled for a signature group in the Signature Groups table, SonicOS:
|
•
|
|
1
|
Navigate to Security Services > Anti-Spyware.
|
|
2
|
For each level of spyware—High, Medium, and Low—select its checkbox for Prevent All and/or Detect All. None of the checkboxes are selected by default.
|
|
IMPORTANT: Dell SonicWALL recommends enabling Prevent All for High Danger Level Spyware and Medium Danger Level Spyware to provide network protection against the most damaging spyware.
|
|
3
|
In the Log Redundancy Filter (seconds) field for each spyware level, enter the number of seconds to delay between log entries for the same detected spyware. The default is 0 (no delay).
|
If set to 0, a log entry is created for each spyware level match found in passing traffic. Other values specify the minimum number of seconds between log entries for multiple matches to the same spyware level. For example, a log redundancy setting of 10 logs no more than one message every 10 seconds for each spyware level match. Log redundancy can also be set on a per-category and/or per-signature basis in the Edit Anti-Spyware Category and/or Edit Anti-Spyware Signature dialog, respectively, where each individual configuration has its own log redundancy filter setting that can override the global log redundancy filter setting.
|
4
|
Click Accept.
|
|
1
|
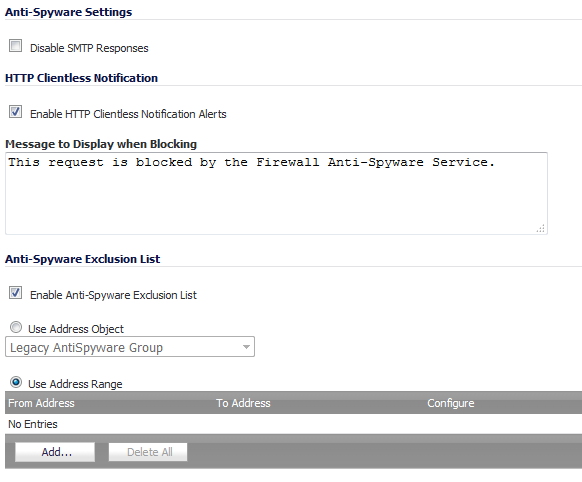
In the Anti-Spyware Global Settings section, click the Configure Anti-Spyware Settings button. The Anti-Spyware Config View dialog displays.
|
|
2
|
SMTP allows Address Objects for construction a white list (explicit allow) or black list (explicit deny) of SMTP servers. Entries in either list bypass the RBL querying procedure. To disable this feature, select the Disable SMTP Responses checkbox. This setting is not selected by default.
|
|
3
|
To redirect requests blocked by the Anti-Spyware Service to an HTTP alert for notification, select the Enable HTTP Clientless Notification Alerts checkbox. This setting is selected by default.
|
|
4
|
In the Message to Display when Blocking field, you can create a custom message to be displayed when a request is blocked. A default message is provided.
|
|
5
|
You can create exclusion lists of IP addresses that are not blocked by Anti-Spyware. Select the Enable Anti-Spyware Exclusion List checkbox. This setting is not selected by default. When selected, the radio buttons become active.
|
|
a
|
Select the Use Address Object radio button.
|
|
b
|
Choose an address object from the drop-down menu or create a new one. Legacy AntiSpywareGroup is chosen by default.
|
|
a
|
Select the Use Address Range radio button. This setting is selected by default.
|
|
b
|
|
c
|
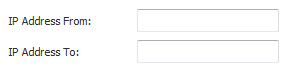
Enter the beginning address in the IP Address From field.
|
|
d
|
Enter the ending address in the IP Address To field.
|
|
e
|
|
8
|
Click OK.
|
You can remove all custom category and signature settings you created as well as reset global Prevention and Detection settings and Log Redundancy Filter settings.
|
1
|
In the Anti-Spyware Global Settings section, click Reset Anti-Spyware Settings & Policies. A confirmation message displays.
|
![]()
|
2
|
Click OK.
|
You can specify what inbound traffic is to be inspected according to the traffic’s protocol.
|
1
|
Select any or all of the checkboxes for the protocols in the Protocols table:
|
|
2
|
Click Accept.
|
Depending on when the Anti-Spyware Service was installed on the firewall, spyware may have been installed on a LAN workstation already. To have Anti-Spyware Service examine outbound traffic for streams originating at spyware-infected clients and reset those connections, select the Enable Inspection of Outbound Spyware Communication checkbox. This setting is selected by default.