|
1
|
|
2
|
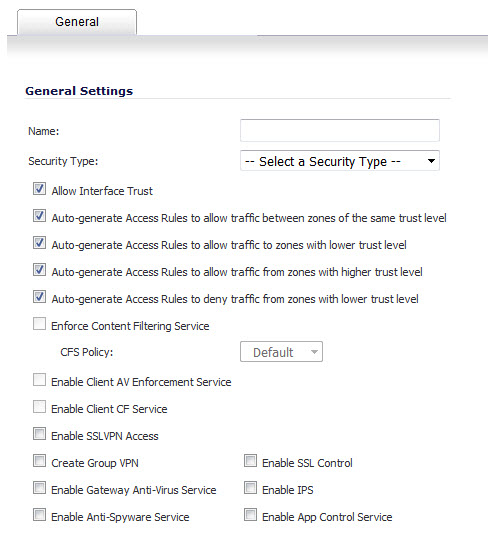
Type a name for the new zone in the Name field.
|
|
3
|
From the Security Type drop-down menu, select:
|
|
•
|
Trusted – For zones with the highest level of trust, such as internal LAN segments.
|
|
•
|
Public – For zones with a lower level of trust requirements, such as a DMZ interface.
|
|
•
|
Wireless – WLAN and wireless options are used with SonicPoints. SonicPoints are not supported in SonicOS 6.2.1.
|
|
•
|
SSLVPN – For interfaces on which content Filtering, Client AV enforcement, and Client CF services are enabled.
|
|
4
|
If you want to allow intra-zone communications, select the Allow Interface Trust checkbox. An Access Rule allowing traffic to flow between the interfaces of a Zone instance is created automatically. This option is selected by default.
|
|
5
|
To have SonicOS automatically generate access rules to allow traffic between this zone and other zones of equal trust, select the Auto-generate Access Rules to allow traffic between zones of the same trust level checkbox. For example, CUSTOM_LAN -> CUSTOM_LAN or CUSTOM_LAN -> LAN. This option is selected by default.
|
|
6
|
To have SonicOS automatically generate access rules to allow traffic between this zone and other zones of lower trust, select the Auto-generate Access Rules to allow traffic to zones with lower trust level checkbox. For example, CUSTOM_LAN -> WAN or CUSTOM_LAN -> DMZ. This option is selected by default.
|
|
7
|
To have SonicOS automatically generate access rules to allow traffic between this zone and other zones of higher trust, select the Auto-generate Access Rules to allow traffic from zones with higher trust level checkbox. For example, LAN -> CUSTOM_DMZ or CUSTOM_LAN -> CUSTOM_DMZ. This option is selected by default.
|
|
8
|
To have SonicOS automatically generate access rules to deny traffic between this zone and zones of lower trust, select the Auto-generate Access Rules to deny traffic from zones with lower trust level checkbox. For example, WAN -> CUSTOM_LAN or DMZ -> CUSTOM_LAN. This option is selected by default.
|
|
9
|
To enforce content filtering on multiple interfaces in the same Trusted and Public zones, select the Enforce Content Filtering Service checkbox. This option is not selected by default.
|
If this option is not selected, the CFS Policy drop-down menu is dimmed.
|
a
|
To apply a Content Filtering Service (CFS) policy to the zone, select the policy from the CFS Policy drop-down menu. The default policy is Default.
|
|
10
|
To enforce managed Client Anti-Virus protection on clients connected to multiple interfaces in the same Trusted and Public zones using the Client Anti-Virus client on your network hosts, select the Enable Client AV Enforcement Service checkbox. This option is not selected by default.
|
|
11
|
To enforce managed Client Content Filtering on clients connected to multiple interfaces in the same Trusted and Public zones using the Client CF client on your network hosts, select the Enable Client CF Service checkbox. This option is not selected by default.
|
|
12
|
To enable SSLVPN secure remote access on the zone, select the Enable SSLVPN Access checkbox. This option is not selected by default.
|
|
13
|
To create a SonicWALL Group VPN Policy for this zone automatically, select the Create Group VPN checkbox. You can customize the Group VPN Policy in the VPN > Settings page. This option is not selected by default.
|
|
14
|
To enable SSL Control on the zone, select the Enable SSL Control checkbox. All new SSL connections initiated from that zone are now subject to inspection. This option is not selected by default.
|
|
NOTE: SSL Control must first be enabled globally on the Firewall > SSL Control page. For more information, see Firewall Settings > SSL Control .
|
|
15
|
To enforce gateway anti-virus protection on your firewall for all clients connecting to this zone, select the Enable Gateway Anti-Virus Service checkbox. SonicWALL Gateway Anti-Virus manages the anti-virus service on the firewall. This option is not selected by default.
|
|
16
|
To enforce intrusion detection and prevention on multiple interfaces in the same Trusted or Public zones. select the Enable IPS checkbox. This option is not selected by default.
|
|
17
|
To enforce anti-spyware detection and prevention on multiple interfaces in the same Trusted or Public security type, select the Enable Anti-Spyware Service checkbox. This option is not selected by default.
|
|
18
|
To enforce application control policy services on multiple interfaces in the same Trusted or Public security types, select the Enable App Control Service checkbox. This option is not selected by default.
|
|
19
|
Click OK. The new zone is now added to the firewall. This option is not selected by default.
|