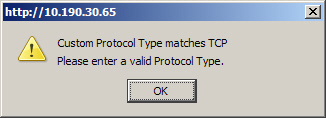
NOTE: The generic service Any will not handle Custom IP Type Service Objects. In other words, simply defining a Custom IP Type Service Object for IP Type 126 will not allow IP Type 126 traffic to pass through the default LAN > WAN Allow rule.
The following list provides configuration tasks for Custom Services:
This section provides a list of pre-defined IP protocols for custom services:
|
•
|
ICMP (1)—(Internet Control Message Protocol) A TCP/IP protocol used to send error and control messages.
|
|
•
|
IGMP (2)—(Internet Group Management Protocol) The protocol that governs the management of multicast groups in a TCP/IP network.
|
|
•
|
TCP (6)—(Transmission Control Protocol) The TCP part of TCP/IP. TCP is a transport protocol in TCP/IP. TCP ensures that a message is sent accurately and in its entirety.
|
|
•
|
UDP (17)—(User Datagram Protocol) A protocol within the TCP/IP protocol suite that is used in place of TCP when a reliable delivery is not required.
|
|
•
|
GRE (47)—(Generic Routing Encapsulation) A tunneling protocol used to encapsulate a wide variety of protocol packet types inside IP tunnels, creating a virtual point-to-point link to firewalls or routing devices over an IP Internetwork.
|
|
•
|
ESP (50)—(Encapsulated Security Payload) A method of encapsulating an IP datagram inside of another datagram employed as a flexible method of data transportation by IPsec.
|
|
•
|
AH (51)—(Authentication Header) A security protocol that provides data authentication and optional anti-relay services. AH is embedded in the data to be protected (a full IP datagram).
|
|
•
|
EIGRP (88)—(Enhanced Interior Gateway Routing Protocol) Advanced version of IGRP. Provides superior convergence properties and operating efficiency, and combines the advantages of link state protocols with those of distance vector protocols.
|
|
•
|
OSPF (89)—(Open Shortest Path First) A routing protocol that determines the best path for routing IP traffic over a TCP/IP network based on distance between nodes and several quality parameters. OSPF is an interior gateway protocol (IGP), which is designed to work within an autonomous system. It is also a link state protocol that provides less router to router update traffic than the RIP protocol (distance vector protocol) that it was designed to replace.
|
|
•
|
PIMSM (103)—(Protocol Independent Multicast Sparse Mode) One of two PIM operational modes (dense and sparse). PIM sparse mode tries to constrain data distribution so that a minimal number of routers in the network receive it. Packets are sent only if they are explicitly requested at the RP (rendezvous point). In sparse mode, receivers are widely distributed, and the assumption is that downstream networks will not necessarily use the datagrams that are sent to them. The cost of using sparse mode is its reliance on the periodic refreshing of explicit join messages and its need for RPs.
|
|
•
|
L2TP (115)—(Layer 2 Tunneling Protocol) A protocol that allows a PPP session to run over the Internet. L2TP does not include encryption, but defaults to using IPsec in order to provide virtual private network (VPN) connections from remote users to the corporate LAN.
|
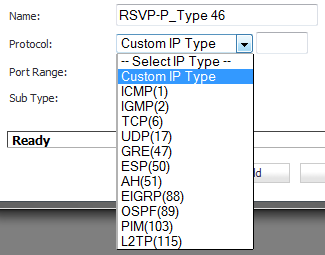
You can add a custom service for any of the predefined service types:
All custom services you create are listed in the Custom Services table. You can group custom services by creating a Custom Services Group for easy policy enforcement. If a protocol is not listed in the Default Services table, you can add it to the Custom Services table by clicking Add.
|
1
|
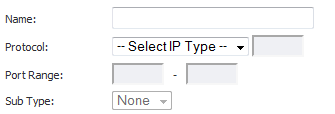
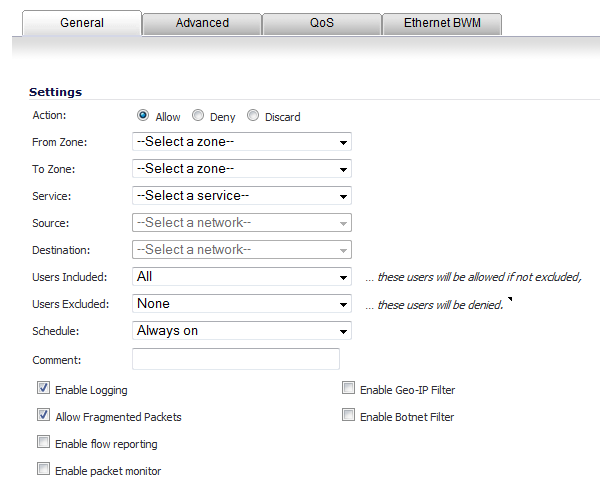
Enter the name of the service in the Name field.
|
|
2
|
Select the type of IP protocol from the Protocol drop-down menu.
|
|
4
|
|
5
|
Click the Enable Logging checkbox to disable or enable the logging of the service activities.
|
Using only the predefined IP types, if the security appliance encounters traffic of any other IP Protocol type it drops it as unrecognized. However, there exists a large and expanding list of other registered IP types, as governed by IANA (Internet Assigned Numbers Authority): http://www.iana.org/assignments/protocol-numbers, so while the rigid practice of dropping less-common (unrecognized) IP Type traffic is secure, it was functionally restrictive.
|
NOTE: The generic service Any will not handle Custom IP Type Service Objects. In other words, simply defining a Custom IP Type Service Object for IP Type 126 will not allow IP Type 126 traffic to pass through the default LAN > WAN Allow rule.
|

|
1
|
From the Network > Services page, click on the Go to Service Objects link at the top right of the page to jump to the Services section.
|
|
2
|
|
3
|
Name the Service with a friendly name.
|
|
4
|

|
|
|
6
|
Click Add.
|
|
8
|
|
9
|
From the Network > Services page, click on the Go to Service Groups link at the top right of the section to jump to the Service Groups section.
|
|
10
|
|
13
|
Click the -> button to move the service to the Custom Service list.
|
|
14
|
|
15
|
|
16
|
|
17
|
Click OK.
|
Click the Edit icon under Configure to edit the service in the Edit Service window, which includes the same configuration settings as the Add Service window.
Click the Delete icon to delete an individual custom service. You can delete all custom services by clicking the Delete button.
|
1
|
|
2
|
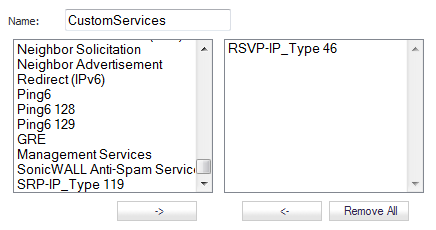
Enter a name for the custom group in the Name field.
|
|
3
|
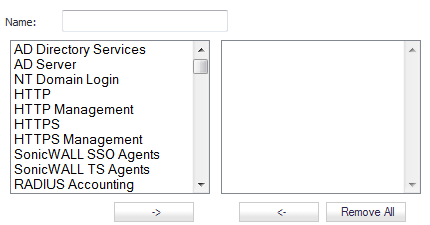
Select individual services from the list in the left column. You can also select multiple services by pressing the Ctrl key while clicking on the services.
|
|
4
|
Click - > to add the services to the group.
|
|
5
|
To remove services from the group, select individual services from the list in right column. You can also select multiple services by pressing the Ctrl key on your keyboard and clicking on the services.
|
|
6
|
Click < - to remove the services.
|
|
7
|

Click the Edit icon in the Configure column to edit the custom service group in the Edit Service Group window, which includes the same configuration settings as the Add Service Group window.
You also can edit individual services of a custom service group by expanding the group, and clicking the Edit icon for the service. The Edit Service window displays, which is the same as the Add Service window.
Click the Delete icon to delete the individual custom service group entry. You can delete all custom service groups by clicking the Delete icon. You also can delete individual services of a custom service group by expanding the group, and clicking the Delete icon for the service.