CDP_DataRecovery
Recovering Data Using SonicWALL CDP
Recovering Files and Folders
SonicWALL CDP allows you to recover lost data directly from the appliance. Recovery can be performed to replace a file set that has been deleted, or to restore a previous version of a file or folder that has been changed or otherwise damaged. Recovery can be performed on any agent and recovered files are restored directly from the appliance.
If necessary, before restoring a file set, first follow the prescribed restore procedures of the system which may include the re-installation of the operating system, applications or replacement of hardware.
To recover files and folders from the SonicWALL CDP appliance, perform the following steps:
|
|
Launch the SonicWALL CDP Agent software on the agent machine on which you want to recover the file set. |
|
|
If necessary, click the Change Appliance icon |
|
|
Click the My Backups tab. |
|
|
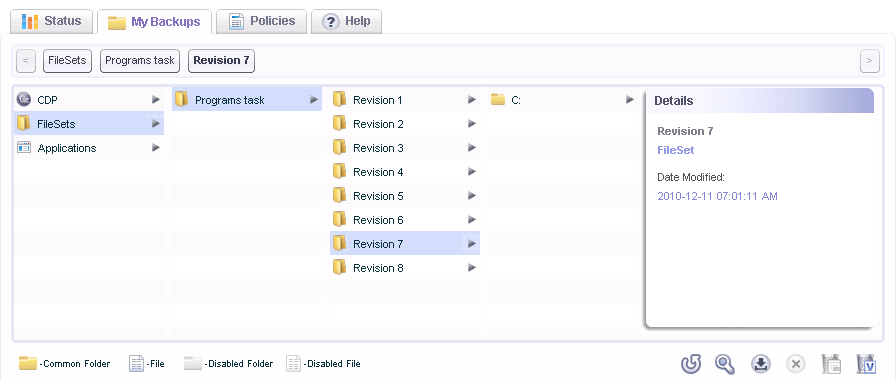
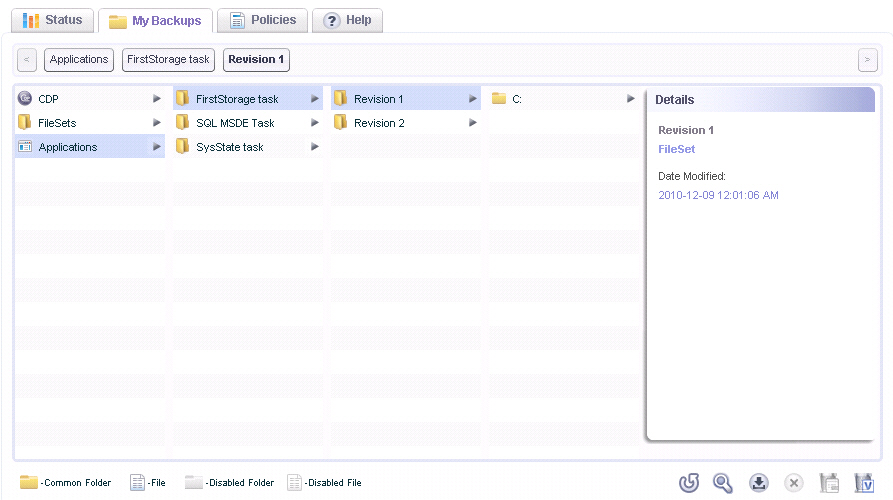
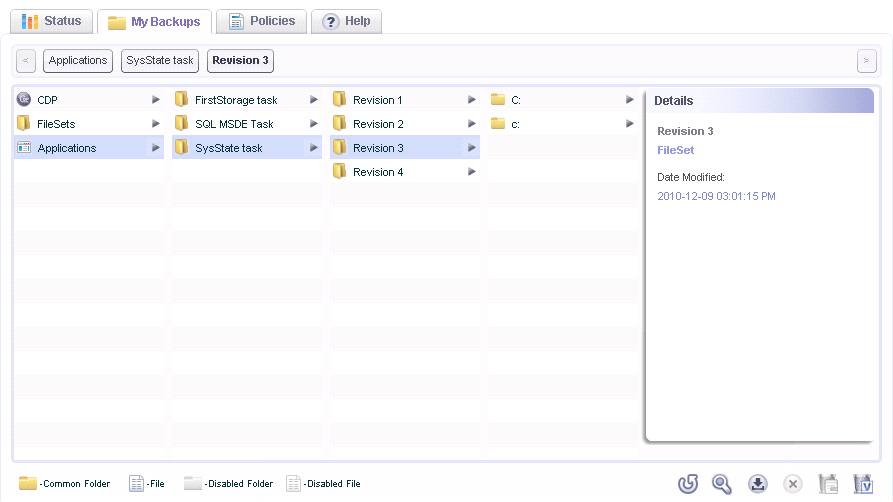
In the left pane, click FileSets . The display expands to show available backup tasks. |
|
|
Click the desired revision. The root folder and details about the revision are displayed, including the date and time. |
|
|
At the bottom right corner, click the Restore
icon |
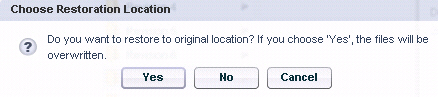
Click Yes to restore the files on top of the original files. Click No to save the files to another location on disk. Click Cancel to exit the restoration process without restoring the files at all.
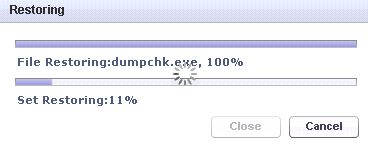
The Restoring window displays the progress of the restore.
|
|
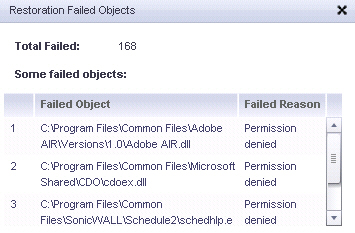
If any files cannot be restored, the Restoration Failed Objects window displays a list of files and the reasons for their failure to restore. Click the X to close the window. |
|
|
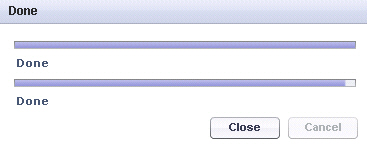
When the restore process is finished, the Restoring window changes to Done. Click the Close button to close the window. |
Recovering Data from Microsoft Exchange
Recovery of data from Microsoft Exchange using SonicWALL CDP allows users to retrieve Microsoft Exchange revisions from an agent machine previously configured to backup that data.
|
|
|
Microsoft Exchange data can be restored using the Web Management Interface or Agent User Interface. Exchange restore using Web Management Interface can restore to disk any Exchange database, even for servers on different agents than the Web Management Interface. |
Recovering a Microsoft Exchange User Mailbox
This section describes how to restore an individual user mailbox backup to the Exchange server, by using the Microsoft Exchange User Mailbox Backup and Restore server application in the SonicWALL CDP Agent User Interface.
|
|
|
You must log into the agent machine as cdpadmin before restoring a User Mailbox. For more information about account privileges to access the Exchange server, see KB821897 . |
A mailbox must exist in Exchange in order for the restore to work properly. For cases in which the mailbox has been deleted from Exchange, special procedures are necessary.
Restoring the Contents of an Existing Mailbox
To restore an individual user mailbox to the Exchange server, perform the following steps:
|
|
In the SonicWALL CDP Agent User Interface, click the My Backups tab. |
|
|
In the left pane, click Applications . The display expands to show available backup tasks. |
|
|
Click the desired revision. The root folder and details about the revision are displayed, including the date and time. |
|
|
At the bottom right corner, click the Restore
icon |
|
|
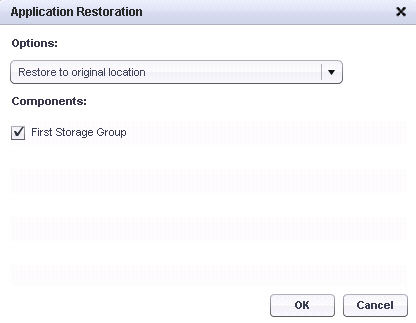
In the Restore Mailbox dialog box, select the backup that you want to restore. The Application Restoration window opens. |
|
|
In the Options drop-down list, select one of the following: |
|
|
|
Restore to original location – This option restores the files to the Microsoft Exchange application location. |
|
|
|
Restore to alternate location – This option restores the files to the disk of the agent machine. |
|
|
Under Components , select the checkboxes for the user mailboxes you want to restore. |
|
|
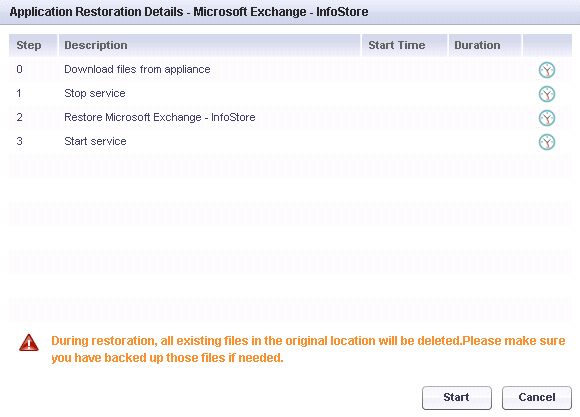
Click OK . The Application Restoration Details window appears. |
|
|
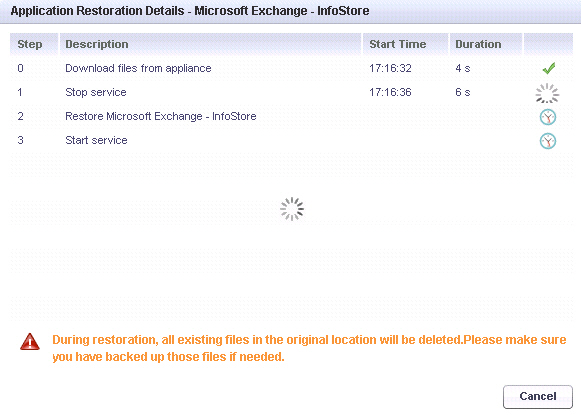
The restoration steps are listed, along with a Start Time column, a Duration column, and an in-progress indicator. The steps are: |
During restoration, all existing files in the original location will be deleted. Please make sure you have backed up those files if needed.
To start the restore process, click Start . To exit without restoring any files, click Cancel .
The in-progress indicators become active for each step as it is executed, and the Start Time and Duration values are updated.
|
|
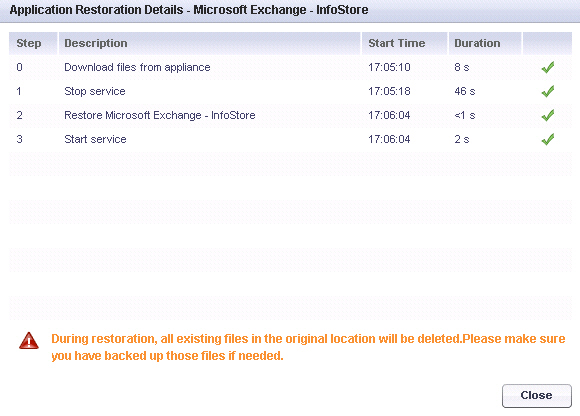
When the restore is finished, click Close . |
|
|
|
After the data is restored to the Exchange server, you may need to synchronize your local mail client (Outlook) in order to see restored emails. |
Restoring Deleted Mailboxes in Exchange 2003
Once a mailbox is deleted from Exchange, there is no container to hold the emails, even though SonicWALL CDP has a copy of the mailbox backup. This container (in our case an empty mailbox) must be created prior to restoring the mailbox.
In Exchange 2003, you can either “purge” or “delete” a user mailbox. Mailbox deletion leaves the user account in Exchange, but purging a mailbox removes the user account from Exchange. In either case, the user account in Active Directory still exists (unless removed separately). See the following procedures for each case:
Restoring a Deleted Mailbox in Exchange 2003
|
|
In Exchange, right-click the user mailbox and select Reconnect . This reconnects the mailbox to the Active Directory account. |
|
|
Follow the instructions in the procedure “Restoring the Contents of an Existing Mailbox” to restore the mailbox. |
Restoring a Purged Mailbox in Exchange 2003
|
|
Follow the instructions in the procedure “Restoring the Contents of an Existing Mailbox” to restore the mailbox. |
Restoring Deleted Mailboxes in Exchange 2007
Once a mailbox is deleted from Exchange, there is no container to hold the emails, even though SonicWALL CDP has a copy of the mailbox backup. This container (in our case an empty mailbox) must be created prior to restoring the mailbox.
In Exchange 2007, deleting a user mailbox removes the user account from both Exchange and Active Directory. In this case, there are two methods that can be used to restore a user mailbox. See the following procedures for each case:
Restoring a Deleted Mailbox by First Restoring Active Directory
|
|
Follow the instructions in the procedure “Restoring the Contents of an Existing Mailbox” to restore the mailbox. |
Restoring a Deleted Mailbox by Creating a New Active Directory Account
|
|
Create a new user mailbox in Exchange using the same account name and connect to the Active Directory account. |
|
|
Follow the instructions in the procedure “Restoring the Contents of an Existing Mailbox” to restore the mailbox. |
|
|
|
This process might take a long time to complete due to the recovery procedure between Active Directory and Exchange. |
Recovering a Microsoft Exchange Storage Group
You can restore an Exchange Storage Group by using the SonicWALL CDP Microsoft Exchange InfoStore Backup and Restore server application in the SonicWALL CDP Agent User Interface.
This section describes how to restore an individual Storage Group. You can restore the Storage Group in two ways:
|
|
|
Restore to Disk - Copies the data to a folder on the local disk, then you can copy it to the Exchange database |
A storage group must exist in Exchange in order for the restore to work properly. For cases in which the storage group has been deleted from Exchange, special procedures are necessary.
|
|
|
The current account must have privileges to access the Exchange server. See KB867704 and KB824126 |
Restoring a Storage Group
To restore a Storage Group using the SonicWALL CDP Agent User Interface, perform the following steps:
|
|
In the SonicWALL CDP Agent User Interface, click the My Backups tab. |
|
|
In the left pane, click Applications . The display expands to show available backup tasks. |
|
|
Click the desired revision. The root folder and details about the revision are displayed, including the date and time. |
|
|
At the bottom right corner, click the Restore
icon |
|
|
In the Options drop-down list, select one of the following: |
|
|
|
Restore to original location – This option restores the files to the application in their original location in Microsoft Exchange. |
|
|
|
Restore to alternate location – This option restores the files to the disk of the agent machine. |
|
|
Under Components , select the checkboxes for the storage groups you want to restore. |
|
|
Click OK . The Application Restoration Details window appears. |
|
|
The restoration steps are listed, along with a Start Time column, a Duration column, and an in-progress indicator. The steps are: |
During restoration, all existing files in the original location will be deleted. Please make sure you have backed up those files if needed.
To start the restore process, click Start . To exit without restoring any files, click Cancel .
The in-progress indicators become active for each step as it is executed, and the Start Time and Duration values are updated.
|
|
When the restore is finished, click Close . |
|
|
|
After the data is restored to the Exchange server, you may need to synchronize your local mail client (Outlook) in order to see restored emails. |
Restoring Deleted Storage Groups
Once a storage group is deleted from Exchange, there is no container to hold the contents, even though SonicWALL CDP has a copy of the storage group backup. This container (an empty storage group) must be created prior to restoring the storage group.
For both Exchange 2003 and 2007, the recommended way to recover deleted storage groups is to restore Active Directory first and then restore the InfoStore storage group and the user mailboxes. This is because Exchange relies on the Active Directory directory service for its directory operations. Active Directory provides all mailbox information, address list services, and other recipient-related information. Active Directory also stores most Exchange configuration information.
Restoring a Deleted Storage Group, Recommended Method
The recommended method to recover deleted storage groups is to restore Active Directory first and then restore the storage group. This is recommended for both Exchange 2003 and 2007.
See the “Recovering System State and Active Directory” section .
|
|
Follow the normal steps to restore the storage group with SonicWALL CDP, by using Restore to original location to restore files to the application. See “Restoring a Storage Group” . |
Restoring a Deleted Storage Group in Exchange 2003, Alternate Method
This method does not involve restoring Active Directory first, and is available as an alternate method for Exchange 2003, but not for Exchange 2007. In Exchange 2007, when you delete a user mailbox from the Exchange Management Console, the user is also deleted from Active Directory.
If you restore a deleted storage group with this method, there will be two instances of SMTP and SystemMailbox under <Storage Group>/<Mailbox Store>/Mailboxes after the restore.
One instance of SMTP and SystemMailbox is created when you re-create the Mailbox store. This pair has a new ID number. The other instance is from the SonicWALL CDP restore of the storage group. This pair has the original ID number.
Despite the duplicate mailbox pair, there are no problems when sending or receiving emails or when backing up or restoring the original (restored) storage group.
|
|
Select one backup revision of your deleted storage group, then choose Restore to alternate location to restore the files to disk. |
|
|
Browse to the restored folder Backup0001 , find the *.edb files. |
|
|
Create a new mailbox database for each .edb file. |
For example, if there are two .edb files:
Then create two new mailbox databases using these same names ("Mailbox Database1.edb" and "Mailbox Database2.edb") under the newly created storage group.
|
|
Follow the normal steps to restore an InfoStore storage group by using Restore to original location to restore the files to the application. See “Restoring a Storage Group” . |
|
|
After the storage group is restored, open the Exchange system manager and Reconnect the user mailboxes. |
Recovering System State and Active Directory
Recovery of data from System State and Active Directory using SonicWALL CDP allows users to retrieve Active Directory revisions from agent machines previously configured to backup that data. When restoring Active Directory from a SonicWALL CDP backup, you need to restore all associated, interdependent System State files to provide a consistent environment. Active Directory data cannot be restored from the Web Management Interface.
This section contains the following subsections:
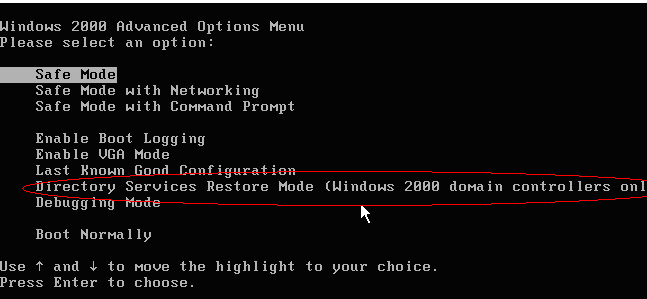
Restarting the Domain Controller in Safe Mode
With the exception of Active Directory on Windows Server 2008, you cannot restore Active Directory in normal Windows mode. This is because the service is already active. Before restoring Active Directory on Windows Server 2003 or 2000, you must boot your computer into safe mode. Once in safe mode, you can restore the Active Directory as an application. This is because in safe mode the Active Directory is disabled.
|
|
|
Do not boot your computer into safe mode when restoring Active Directory on Windows Server 2008 or higher. |
To boot your computer into safe mode, perform the following steps:
|
|
Boot your computer and press F5 or F8 after POST/BIOS and before the Windows splash-screen, depending on hardware specs of the server. |
|
|
Select the Directory Services Restore Mode (DSRM) . |
Restoring Active Directory and System State
Restoring Active Directory will cause the loss of any changes to Active Directory since the date of the backup that is being restored.
SonicWALL recommends the use of redundant Active Directory domain controllers. In the case of mirrored Active Directory domain controllers, you can optionally restore a small part of the database rather than the entire database (for example, because some people were deleted by mistake by the administrator or a script/program), keeping the remainder of the database up to date. In this case, the administrator selects the old data that needs to be pushed on top of the latest data during replication, after the server (2003/2000 only) is rebooted out of Recovery Mode.
Restoration steps can be different depending on the computer's operating system and configuration.
To restore System State and Active Directory using the SonicWALL CDP Agent User Interface, perform the following steps:
|
|
In the SonicWALL CDP Agent User Interface, click the My Backups tab. |
|
|
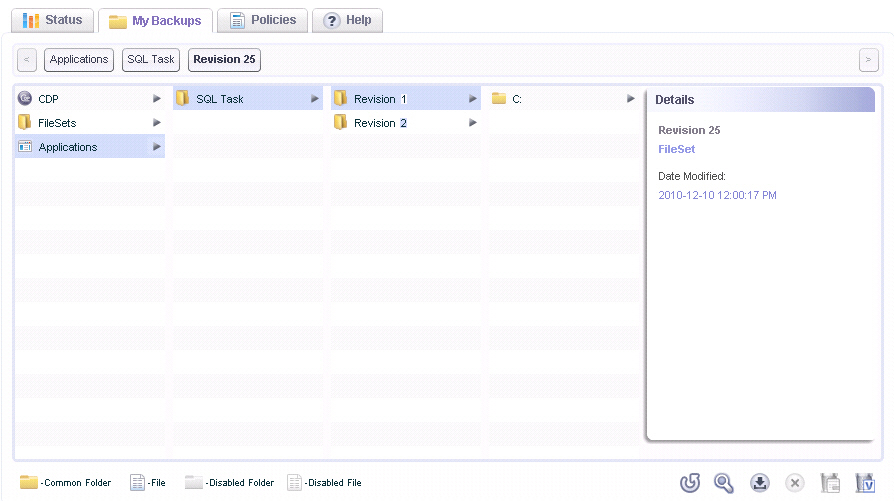
In the left pane, click Applications . The display expands to show available backup tasks. |
|
|
Click the desired revision. The root folder and details about the revision are displayed, including the date and time. |
|
|
At the bottom right corner, click the Restore
icon |
|
|
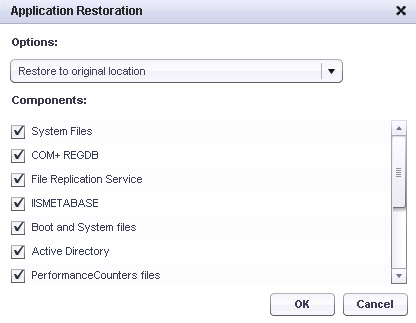
In the Options drop-down list, select one of the following: |
|
|
|
Restore to original location – This option restores the files to the application in their original location, and to original System State file locations. |
|
|
|
Restore to alternate location – This option restores the files to the disk of the agent machine. |
|
|
Under Components , select the checkboxes for the files you want to restore. To ensure a consistent environment after the restore, select all files. |
It is not recommended to restore certain System State subcomponents individually (like Certificate Services database, and COM+ Class Registration database) due to dependencies. For more information, see:
http://technet.microsoft.com/en-us/library/cc785306%28WS.10%29.aspx
|
|
Click OK . The Application Restoration Details window appears. |
|
|
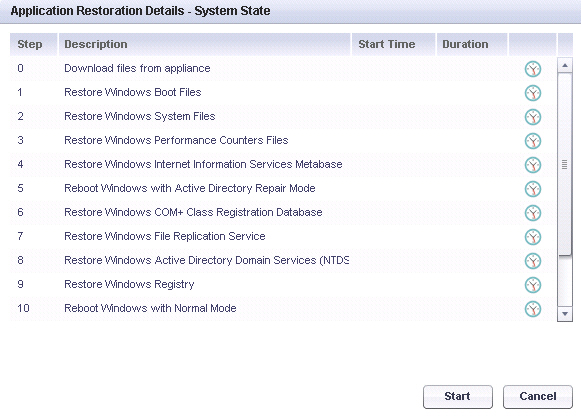
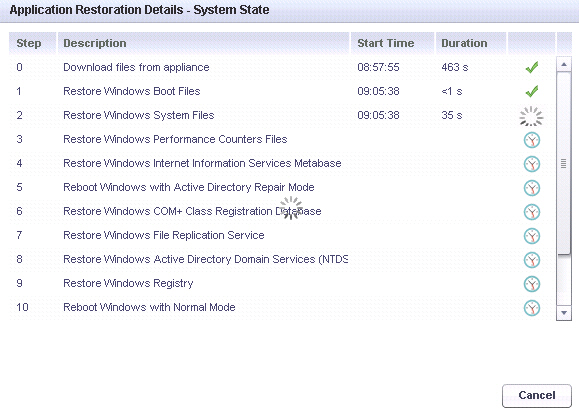
The restoration steps are listed, along with a Start Time column, a Duration column, and an in-progress indicator. The steps are: |
To start the restore process, click Start . To exit without restoring any files, click Cancel .
The in-progress indicators become active for each step as it is executed, and the Start Time and Duration values are updated.
|
|
When the Reboot Windows with Active Directory Repair Mode step is reached, the restore process pauses and prompts you to select one of the following options: |
|
|
|
Run MSConfig – Click this button to continue with the reboot. The SonicWALL CDP Agent exits and must be restarted. |
MSConfig is a utility that is configured by SonicWALL CDP to perform a diagnostic startup. It can also be used to modify which programs run at startup, edit certain configuration files, and control Windows services.
|
|
|
Run Later – Click this button to stop the restore process and return to the previous screen in the SonicWALL CDP Agent User Interface. |

|
|
When the restore is finished, click Close . |
Using Authoritative Restore
An authoritative restore is most commonly used to restore corrupt or deleted objects. For example, a deleted user account can be recovered from an Active Directory backup that precedes the deletion of the user account. An authoritative restore should not be used to restore an entire domain controller, nor should it be used as part of a change-control infrastructure.
Proper delegation of administration and change enforcement will optimize data consistency, integrity, and security.
MSDN Engineering recommends the following as the most helpful to see what is happening:
Recovering Data from Microsoft SQL Server
Recovery of data from Microsoft SQL using SonicWALL CDP allows users to retrieve Microsoft SQL revisions from an agent machine previously configured to backup that data. Microsoft SQL recovery can be made directly to the SQL database.
Restoring the database can be done in two ways. The database can be either restored to disk or to application. When restoring the database to disk, the database is downloaded as a set of files from the SonicWALL CDP Appliance.
Restoring to application, on the other hand, applies the database directly to the same SQL server.
If an SQL database system fails, the first step is to recover all databases and transaction log files from the server. These databases contain the latest information, up to the point of failure. Next, the SQL system should be brought up on the same server or a different server. Having spare hardware will speed up database recovery.
Each recovered database should be run through a data consistency check (using “DBCC CHECKDB”) because it is possible that these are corrupted databases and may have been the reason for failure. If the databases are corrupted, these could either be fixed, which normally includes data loss, or the latest backed up database (from CDP) could be used instead.
Recovering SQL Using the Agent User Interface
To restore Microsoft SQL databases using the SonicWALL CDP Agent User Interface, perform the following steps:
|
|
In the SonicWALL CDP Agent User Interface, click the My Backups tab. |
|
|
In the left pane, click Applications . The display expands to show available backup tasks. |
|
|
Click the desired revision. The root folder and details about the revision are displayed, including the date and time. |
|
|
At the bottom right corner, click the Restore
icon |
|
|
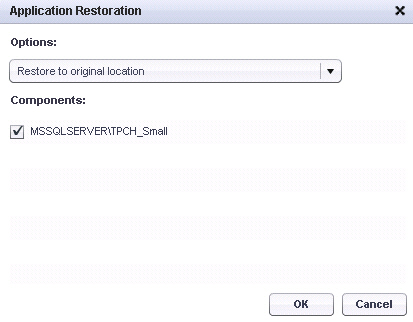
In the Options drop-down list, select one of the following: |
|
|
|
Restore to original location – This option restores the files to the application in their original location for Microsoft SQL. |
|
|
|
Restore to alternate location – This option restores the files to the disk of the agent machine. |
|
|
Under Components , select the checkboxes for the databases you want to restore. |
|
|
Click OK . The Application Restoration Details window appears. |
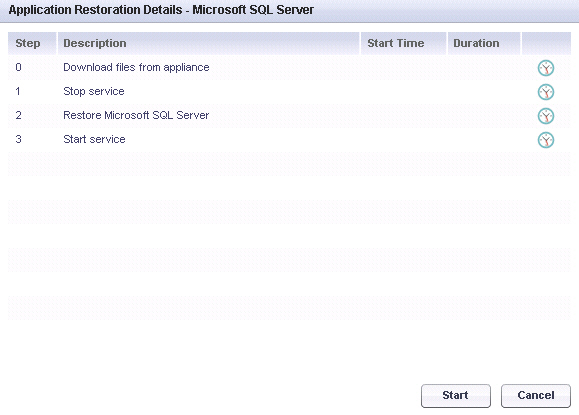
|
|
The restoration steps are listed, along with a Start Time column, a Duration column, and an in-progress indicator. The steps are: |
To start the restore process, click Start . To exit without restoring any files, click Cancel .
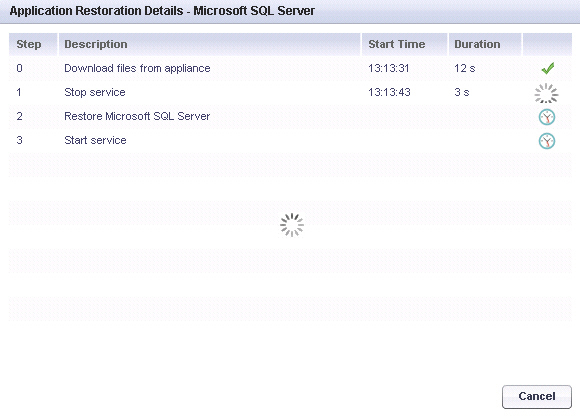
The in-progress indicators become active for each step as it is executed, and the Start Time and Duration values are updated.
|
|
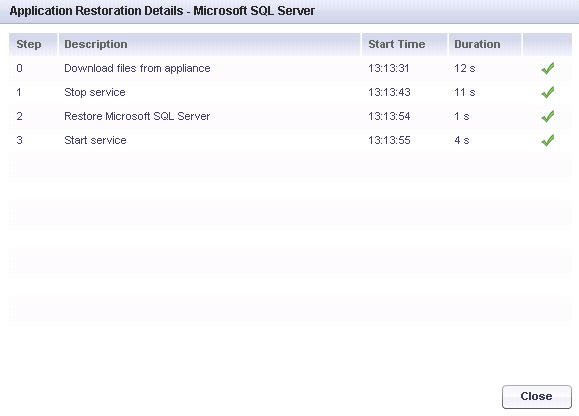
When the restore is finished, click Close . |
Additional Information
More information can be found here:
SQL Forum on Disaster Recovery run by Microsoft: http://forums.microsoft.com/MSDN/ShowForum.aspx?ForumID=744&SiteID=1
Handling Large Log Files: http://mkruger.cfwebtools.com/index.cfm?mode=entry&entry=CFEA536D-FC85-271F-691D1A974BA71B07
Database Locked Error
Actions that can lock the database and prevent the restore process include:
|
|
|
Querying |
Revisions may not appear immediately or even for some time due to a number of reasons including, but not limited to, large databases, single user mode databases, 24x7 databases, or other databases with high access frequency.