Using any Dynamic DNS service begins with settings up an account with the DDNS service provider (or providers) of your choice. It is possible to use multiple providers simultaneously. Refer to the links for the various providers listed above. The registration process normally involves a confirmation email from the provider, with a final acknowledgment performed by visiting a unique URL embedded in the confirmation email. After logging in to the selected provider's page, you should visit the administrative link (typically 'add' or 'manage'), and create your host entries. This must be performed prior to attempting to use the dynamic DNS client on SonicOS. The Network > Dynamic DNS page provides the settings for configuring the Dell SonicWALL Security Appliance to use your DDNS service.

|
1
|
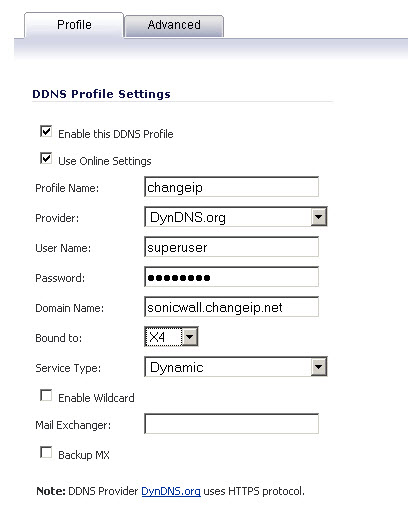
From the Network > Dynamic DNS page, click the Add button. The Add DDNS Profile window is displayed.
|
|
2
|
If Enable this DDNS Profile is checked, the profile is administratively enabled, and the firewall takes the actions defined in the Online Settings section on the Advanced tab.
|
|
3
|
If Use Online Settings is checked, the profile is administratively online.
|
|
4
|
Enter a name to assign to the DDNS entry in the Profile Name field. This can be any value used to identify the entry in the Dynamic DNS Settings table.
|
|
5
|
In the Profile page, select the Provider from the drop-down list at the top of the page. DynDNS.org and changeip.com use HTTPS, while yi.org and no-ip.com use HTTP. This example uses DynDNS.org. Dyndns.org requires the selection of a service. This example assumes you have created a dynamic service record with dyndns.org.
|
|
6
|
|
8
|
Optionally, select a WAN interface in the Bound to drop-down to assign this DDNS profile to that specific WAN interface. This allows administrators who are configuring multiple-WAN load balancing to advertise a predictable IP address to the DDNS service. By default, this is set to ANY, which means the profile is free use any of the WAN interfaces on the appliance.
|
|
9
|
When using DynDNS.org, select the Service Type from the drop-down list that corresponds to your type of service through DynDNS.org. The options are:
|
|
•
|
Dynamic - A free Dynamic DNS service.
|
|
•
|
Custom - A managed primary DNS solution that provides a unified primary/secondary DNS service and a Web-based interface. Supports both dynamic and static IP addresses.
|
|
•
|
Static - A free DNS service for static IP addresses.
|
|
10
|
When using DynDNS.org, you may optionally select Enable Wildcard and/or configure an MX entry in the Mail Exchanger field. Check Backup MX if this is the backup mail exchanger.
|
|
11
|
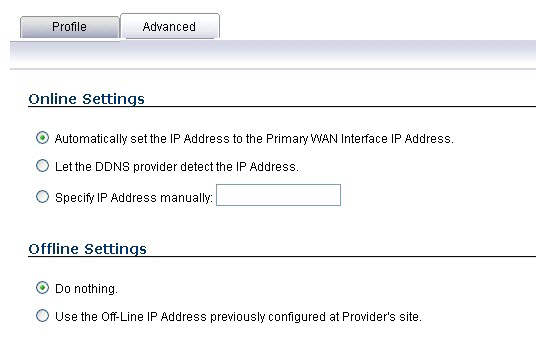
Click the Advanced tab. You can typically leave the default settings on this page.
|
|
12
|
The On-line Settings section provides control over what address is registered with the dynamic DNS provider. The options are:
|
|
•
|
Let the server detect IP Address - The dynamic DNS provider determines the IP address based upon the source address of the connection. This is the most common setting.
|
|
•
|
Automatically set IP Address to the Primary WAN Interface IP Address - This will cause the firewall to assert its WAN IP address as the registered IP address, overriding auto-detection by the dynamic DNS server. Useful if detection is not working correctly.
|
|
•
|
Specify IP Address manually - Allows for the IP address to be registered to be manually specified and asserted.
|
|
13
|
The Off-line Settings section controls what IP address is registered with the dynamic DNS service provider if the dynamic DNS entry is taken off-line locally (disabled) on the firewall.
The options are: |
|
•
|
Do nothing - the default setting. This allows the previously registered address to remain current with the dynamic DNS provider.
|
|
14
|
Click OK.
|