The following sections describe global configurations that are done on the panels of the Security Services > Summary page:
To synchronize your mysonicwall.com account with the Security Services Summary table, click the Synchronize button after Synchronize licenses with www.mysonicwall.com.
To manage your licenses, click the link in To Manage your licenses go to www.mysonicwalll.com.
The Security Services Settings section provides the following options for fine-tuning SonicWALL security services:
|
•
|
Security Services Settings - This drop-down menu specifies whether SonicWALL security services are applied to maximize security or to maximize performance:
|
|
•
|
Maximum Security (Recommended) - Inspect all content with any threat probability (high/medium/low). For additional performance capacity in this maximum security setting, utilize SonicOS UTM Clustering.
|
|
•
|
Performance Optimized - Inspect all content with a high or medium threat probability. Consider this performance optimized security setting for bandwidth or CPU intensive gateway deployments or utilize SonicOS UTM Clustering.
|
The Maximum Security setting provides maximum protection. The Performance Optimized setting utilizes knowledge of the currently known threats to provide high protection against active threats in the threat landscape.
|
•
|
Reduce Anti-Virus traffic for ISDN connections - Select this feature to enable the SonicWALL Anti-Virus to check only once a day (every 24 hours) for updates and reduce the frequency of outbound traffic for users who do not have an “always on” Internet connection.
|
|
•
|
Drop all packets while IPS, GAV and Anti-Spyware database is reloading - Select this option to instruct the firewall to drop all packets whenever the IPS, GAV, and Anti-Spyware database is updating.
|
|
•
|
HTTP Clientless Notification Timeout for Gateway AntiVirus and AntiSpyware - Set the timeout duration after which the firewall notifies users when GAV or Anti-Spyware detects an incoming threat from an HTTP server. The default timeout is one day (86400 seconds).
|
|
1
|
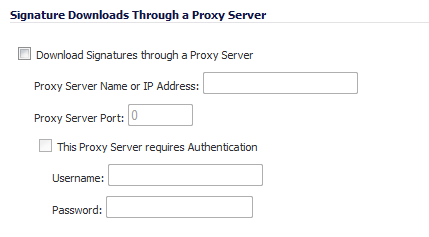
Select the Download Signatures through a Proxy Server checkbox.
|
|
2
|
In the Proxy Server Name or IP Address field, enter the host name or IP address of the proxy server.
|
|
3
|
In the Proxy Server Port field, enter the port number used to connect to the proxy server.
|
|
4
|
Select the This Proxy Server requires Authentication checkbox if the proxy server requires a username and password.
|
|
5
|
|
•
|
MySonicWALL Username - Enter the username for the MySonicWALL.com account that the appliance is to be registered to.
|
|
•
|
MySonicWALL Password - Enter the MySonicWALL.com account password.
|
|
6
|
Click Accept at the top of the page.
|
The Manual Signature Update feature is intended for networks where reliable, broadband Internet connectivity is either not possible or not desirable (for security reasons). The Manual Signature Update feature provides a method to update the latest signatures at the network administrator’s discretion. The network administrator first downloads the signatures from
http://www.mysonicwall.com to a separate computer, a USB drive, or other media. Then the network administrator uploads the signatures to the firewall. The same signature update file can be used on all Dell SonicWALL network security appliances that meet the following requirements:
http://www.mysonicwall.com to a separate computer, a USB drive, or other media. Then the network administrator uploads the signatures to the firewall. The same signature update file can be used on all Dell SonicWALL network security appliances that meet the following requirements:
|
1
|
On the Security Services > Summary page, scroll to the Update Signatures Manually heading at the bottom of the page. Note the Signature File ID for the device.
|
|
2
|
Log on to http://www.mysonicwall.com using the mysonicwall.com account that was used to register the Dell SonicWALL network security appliance.
|
|
3
|
|
4
|
In the pull down window next to Signature ID:, select the appropriate SFID for your firewall.
|
|
5
|
Download the signature update file by clicking on Click here to download the Signature file.
|
|
6
|
Return to the Security Services > Summary page on the firewall management interface.
|
|
7
|
Click on the Import Signatures box.
|
|
8
|
In pop-up window that appears, click the browse button, and navigate to the location of the signature update file.
|
|
9
|
Click Import. The signatures are uploaded for the security services that are enabled on the firewall.
|

