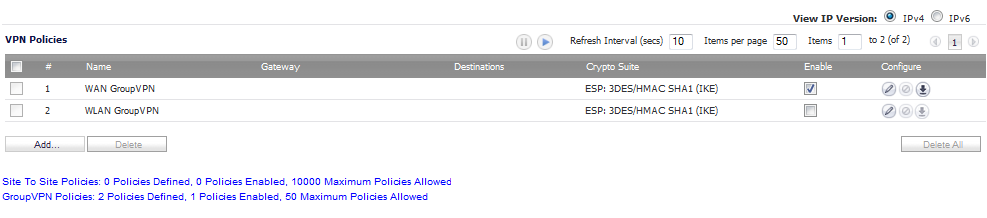
You can create or modify existing VPN policies using the VPN Policy window. Clicking the Add button under the VPN Policies table displays the VPN Policy window for configuring the following IPsec Keying mode VPN policies:
This section also contains information on configuring a static route to act as a failover in case the VPN tunnel goes down. See Configuring VPN Failover to a Static Route for more information.
|
VIDEO: Informational videos with Site-to-Site VPN configuration examples are available online. For example, see How to Create a Site to Site VPN in Main Mode using Preshared Secret or How to Create Aggressive Mode Site to Site VPN using Preshared Secret.
Additional videos are available at: https://support.software.dell.com/videos-product-select.
|
|
1
|
|
2
|
|
3
|
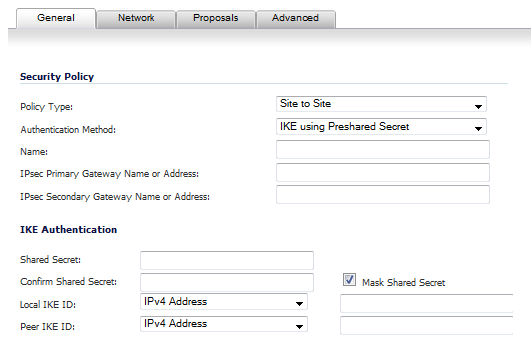
From the Policy Type drop-down menu on the General tab, select the type of policy that you want to create:
|
|
NOTE: If you select Tunnel Interface for the Policy Type, the IPsec Secondary Gateway Name or Address option and the Network tab are not available.
|
|
4
|
|
5
|
Enter a name for the policy in the Name field.
|
|
6
|
Enter the host name or IP address of the remote connection in the IPsec Primary Gateway Name or Address field.
|
|
7
|
If the Remote VPN device supports more than one endpoint, you may optionally enter a second host name or IP address of the remote connection in the IPsec Secondary Gateway Name or Address field.
|
|
8
|
In the IKE Authentication section, enter in the Shared Secret and Confirm Shared Secret fields a Shared Secret password to be used to setup the Security Association. The Shared Secret must be at least 4 characters long, and should comprise both numbers and letters.
|
|
10
|
Optionally, specify a Local IKE ID and Peer IKE ID for this Policy. By default, the IP Address (ID_IPv4_ADDR) is used for Main Mode negotiations, and the firewall Identifier (ID_USER_FQDN) is used for Aggressive Mode.
|
|
11
|
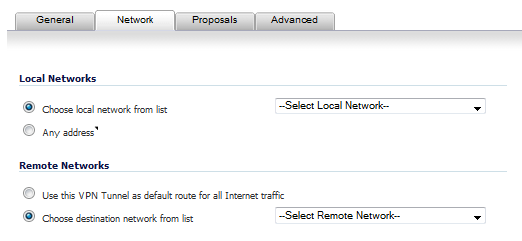
Click the Network tab.
|
|
12
|
Under Local Networks, select one of these
|
|
•
|
If a specific local network can access the VPN tunnel, select a local network from the Choose local network from list drop-down menu.
|
|
•
|
If traffic can originate from any local network, select Any Address. Use this option if a peer has Use this VPN tunnel as default route for all Internet traffic selected. Auto-added rules will be created between Trusted Zones and the VPN Zone.
|
|
13
|
Under Destination Networks, select one of these:
|
|
•
|
If traffic from any local user cannot leave the firewall unless it is encrypted, select Use this VPN Tunnel as default route for all Internet traffic.
|
|
•
|
Alternatively, select Choose Destination network from list, and select the address object or group.
|
|
14
|
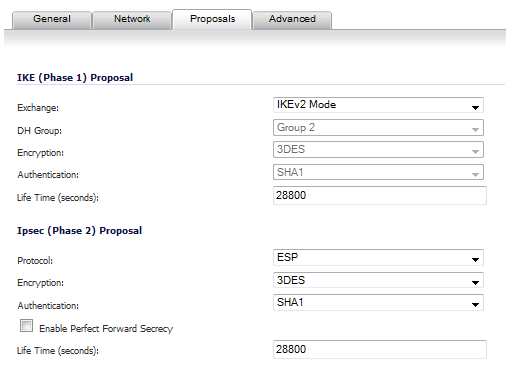
Click Proposals.
|
|
15
|
|
•
|
Main Mode - Uses IKE Phase 1 proposals with IPsec Phase 2 proposals. Suite B cryptography options are available for the DH Group in IKE Phase 1 settings, and for Encryption in the IPsec Phase 2 settings.
|
|
•
|
Aggressive Mode – Generally used when WAN addressing is dynamically assigned. Uses IKE Phase 1 proposals with IPsec Phase 2 proposals. Suite B cryptography options are available for the DH Group in IKE Phase 1 settings, and for Encryption in the IPsec Phase 2 settings.
|
|
•
|
IKEv2 Mode – Causes all negotiation to happen via IKE v2 protocols, rather than using IKE Phase 1 and IPsec Phase 2.
|
|
16
|
Under IKE (Phase 1) Proposal, the default values for DH Group, Encryption, Authentication, and Life Time are acceptable for most VPN configurations.
|
|
17
|
In Main Mode or Aggressive Mode, for the DH Group you can select from five Diffie Hellman groups that are included in Suite B cryptography:
|
|
18
|
If you selected Main Mode or Aggressive Mode, select one of 3DES, DES, AES-128, AES-192, or AES-256 from the Encryption drop-down list. 3DES is the default.
|
|
19
|
If you selected Main Mode or Aggressive Mode, for enhanced authentication security you can choose one of SHA-1, MD5, SHA256, SHA384, or SHA512 from the Authentication drop-down list. SHA1 is the default.
|
|
20
|
In the IPsec (Phase 2) Proposal section, the default values for Protocol, Encryption, Authentication, Enable Perfect Forward Secrecy, and Life Time (seconds) are acceptable for most VPN SA configurations.
|
|
21
|
If you selected ESP in the Protocol field, then in the Encryption field you can select from six encryption algorithms that are included in Suite B cryptography:
|
|
22
|
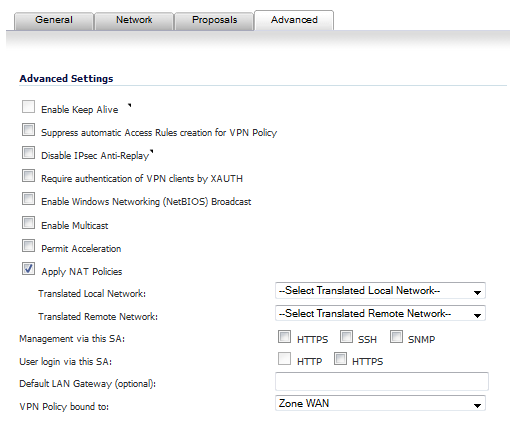
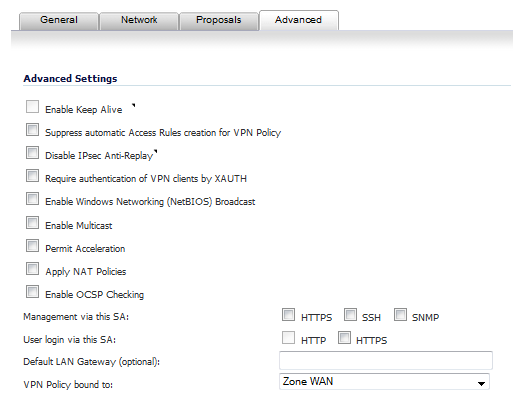
Click the Advanced tab and select any of the following optional settings you want to apply to your VPN policy. The options change depending on whether in the Proposals tab you selected
|
|
•
|
Select Enable Keep Alive to use heartbeat messages between peers on this VPN tunnel. If one end of the tunnel fails, using Keepalives will allow for the automatic renegotiation of the tunnel once both sides become available again without having to wait for the proposed Life Time to expire.
|
|
•
|
The Suppress automatic Access Rules creation for VPN Policy setting is not enabled by default to allow the VPN traffic to traverse the appropriate zones.
|
|
•
|
Select Disable IPsec Anti-Replay to disable anti-replay, which is a form of partial sequence integrity that detects the arrival of duplicate IP datagrams (within a constrained window).
|
|
•
|
To require XAUTH authentication by users prior to allowing traffic to traverse this tunnel, select Require authentication of VPN client by XAUTH and then select a User group to specify allowed users from the now displayed User group for XAUTH drop-down menu.
|
|
•
|
Select Enable Windows Networking (NetBIOS) Broadcast to allow access to remote network resources by browsing the Windows® Network Neighborhood.
|
|
•
|
Select Enable Multicast to allow IP multicasting traffic, such as streaming audio (including VoIP) and video applications, to pass through the VPN tunnel.
|
|
•
|
Select Permit Acceleration to enable redirection of traffic matching this policy to the WAN Acceleration (WXA) appliance.
|
|
•
|
Select Apply NAT Policies if you want the firewall to translate the Local, Remote or both networks communicating via this VPN tunnel. Two drop-down menus display:
|

|
•
|
To perform Network Address Translation on the Local Network, select or create an Address Object in the Translated Local Network menu.
|
|
•
|
To translate the Remote Network, select or create an Address Object in the Translated Remote Network drop-down menu.
|
|
NOTE: Generally, if NAT is required on a tunnel, either Local or Remote should be translated, but not both. Apply NAT Policies is particularly useful in cases where both sides of a tunnel use either the same or overlapping subnets.
|
|
•
|
|
•
|
|
•
|
If you wish to use a router on the LAN for traffic entering this tunnel destined for an unknown subnet, for example, if you configured the other side to Use this VPN Tunnel as default route for all Internet traffic, you should enter the IP address of your router into the Default LAN Gateway (optional) field.
|
|
•
|
Select an interface or zone from the VPN Policy bound to drop-down menu. A Zone WAN is the preferred selection if you are using WAN Load Balancing and you wish to allow the VPN to use either WAN interface.
|
The Advanced Settings are the same as for Main Mode or Aggressive Mode Options with these exceptions:
|
•
|
The Enable Keep Alive option is dimmed.
|
|
•
|
The Require authentication of VPN clients by XAUTH option is not displayed.
|
|
•
|
The Do not send trigger packet during IKE SA negotiation checkbox is not selected by default and should be selected only when required for interoperability if the peer cannot handle trigger packets.
|
The term Trigger Packet refers to the use of initial Traffic Selector payloads populated with the IP addresses from the packet that caused SA negotiation to begin. It is recommended practice to include Trigger Packets to assist the IKEv2 Responder in selecting the correct protected IP address ranges from its Security Policy Database. Not all implementations support this feature, so it may be appropriate to disable the inclusion of Trigger Packets to some IKE peers.
When the Accept Hash & URL Certificate Type option is selected, the firewall sends an HTTP_CERT_LOOKUP_SUPPORTED message to the peer device. If the peer device replies by sending a “Hash and URL of X.509c” certificate, the firewall can authenticate and establish a tunnel between the two devices.
When the Send Hash & URL Certificate Type option is selected, the firewall, on receiving an HTTP_CERT_LOOKUP_SUPPORTED message, sends a "Hash and URL of X.509c” certificate to the requestor.
|
23
|
Click OK.
|
|
1
|
|
2
|
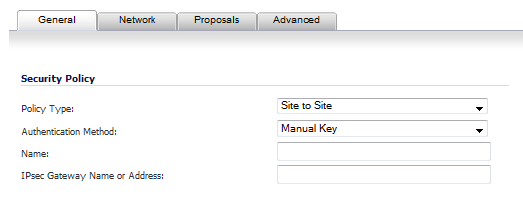
In the General tab of the VPN Policy window, select Manual Key from the Authentication Method drop-down menu. The VPN Policy window displays only the Manual Key options.
|
|
3
|
Enter a name for the policy in the Name field.
|
|
4
|
Enter the host name or IP address of the remote connection in the IPsec Gateway Name or Address field.
|
|
5
|
Click the Network tab.
|
|
6
|
Under Local Networks, select one of these
|
|
•
|
If a specific local network can access the VPN tunnel, select a local network from the Choose local network from list drop-down menu.
|
|
•
|
If traffic can originate from any local network, select Any Address. Use this option if a peer has Use this VPN tunnel as default route for all Internet traffic selected. Auto-added rules will be created between Trusted Zones and the VPN Zone.
|
|
7
|
Under Destination Networks, select one of these:
|
|
•
|
If traffic from any local user cannot leave the firewall unless it is encrypted, select Use this VPN Tunnel as default route for all Internet traffic.
|
|
•
|
Alternatively, select Choose Destination network from list, and select the address object or group.
|
|
8
|
Click on the Proposals tab.
|
|
9
|
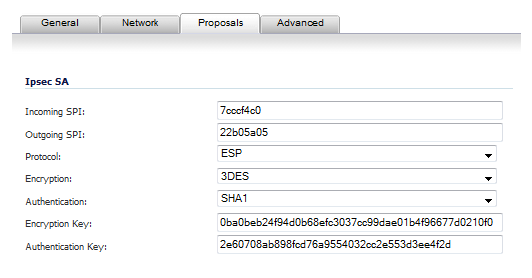
Define an Incoming SPI and an Outgoing SPI. A Security Parameter Index (SPI) is hexadecimal (0123456789abcedf) and can range from 3 to 8 characters in length.
|
|
10
|
The default values for Protocol, Encryption, and Authentication are acceptable for most VPN SA configurations.
|
|
NOTE: The values for Protocol, Encryption, and Authentication must match the values on the remote firewall.
|
|
11
|
Enter a 48-character hexadecimal encryption key in the Encryption Key field or use the default value. This encryption key is used to configure the remote SonicWALL encryption key, therefore, write it down to use when configuring the firewall.
|
|
12
|
Enter a 40-character hexadecimal authentication key in the Authentication Key field or use the default value. Write down the key to use while configuring the firewall settings.
|
|
13
|
Click the Advanced tab and select any of the following optional settings you want to apply to your VPN policy.
|

|
•
|
The Suppress automatic Access Rules creation for VPN Policy setting is not enabled by default to allow the VPN traffic to traverse the appropriate zones.
|
|
•
|
Select Enable Windows Networking (NetBIOS) broadcast to allow access to remote network resources by browsing the Windows® Network Neighborhood.
|
|
•
|
Select Permit Acceleration to enable redirection of traffic matching this policy to the WAN Acceleration (WXA) appliance.
|
|
•
|
Select Apply NAT Policies if you want the firewall to translate the Local, Remote or both networks communicating via this VPN tunnel. Two drop-down menus display:
|
|
•
|
To perform Network Address Translation on the Local Network, select or create an Address Object in the Translated Local Network menu.
|
|
•
|
To translate the Remote Network, select or create an Address Object in the Translated Remote Network drop-down menu.
|
|
NOTE: Generally, if NAT is required on a tunnel, either Local or Remote should be translated, but not both. Apply NAT Policies is particularly useful in cases where both sides of a tunnel use either the same or overlapping subnets.
|
|
TIP: Informational videos with interface configuration examples are available online. For example, see How to Configure NAT over VPN in a Site to Site VPN with Overlapping Networks.
Additional videos are available at: https://support.software.dell.com/videos-product-select.
|
|
•
|
To manage the local SonicWALL through the VPN tunnel, select HTTPS, SSH, SNMP, or any combination of these three from Management via this SA.
|
|
•
|
|
•
|
|
•
|
Select an interface from the VPN Policy bound to drop-down menu.
|
|
14
|
Click OK.
|
|
15
|
|
1
|
|
2
|
|
3
|
Enter a name for the SA in the Name field.
|
|
4
|
Enter the host name or IP address of the local connection in the IPsec Gateway Name or Address field.
|
|
5
|
Click the Network tab.
|
|
6
|
Under Local Networks, select one of these
|
|
•
|
If a specific local network can access the VPN tunnel, select a local network from the Choose local network from list drop-down menu.
|
|
•
|
If traffic can originate from any local network, select Any Address. Use this option if a peer has Use this VPN tunnel as default route for all Internet traffic selected. Auto-added rules will be created between Trusted Zones and the VPN Zone.
|
|
7
|
Under Destination Networks, select one of these:
|
|
•
|
If traffic from any local user cannot leave the firewall unless it is encrypted, select Use this VPN Tunnel as default route for all Internet traffic.
|
|
•
|
Alternatively, select Choose Destination network from list, and select the address object or group.
|
|
8
|
|
9
|
Define an Incoming SPI and an Outgoing SPI. The SPIs are hexadecimal (0123456789abcedf) and can range from 3 to 8 characters in length.
|
|
10
|
The default values for Protocol, Encryption, and Authentication are acceptable for most VPN SA configurations.
|
|
NOTE: The values for Protocol, Encryption, and Authentication must match the values on the remote firewall.
|
|
11
|
Enter a 48-character hexadecimal encryption key in the Encryption Key field or use the default value. This encryption key is used to configure the remote SonicWALL encryption key, therefore, write it down to use when configuring the remote SonicWALL.
|
|
12
|
Enter a 40-character hexadecimal authentication key in the Authentication Key field or use the default value. Write down the key to use while configuring the remote SonicWALL settings.
|
|
13
|
Click the Advanced tab and select any of the following optional settings you want to apply to your VPN policy:
|
|
•
|
The Suppress automatic Access Rules creation for VPN Policy setting is not enabled by default to allow the VPN traffic to traverse the appropriate zones.
|
|
•
|
Select Enable Windows Networking (NetBIOS) broadcast to allow access to remote network resources by browsing the Windows® Network Neighborhood.
|
|
•
|
Select Permit Acceleration to enable redirection of traffic matching this policy to the WAN Acceleration (WXA) appliance.
|
|
•
|
Select Apply NAT Policies if you want the firewall to translate the Local, Remote or both networks communicating via this VPN tunnel. Two drop-down menus display:
|
|
•
|
To perform Network Address Translation on the Local Network, select or create an Address Object in the Translated Local Network menu.
|
|
•
|
To translate the Remote Network, select or create an Address Object in the Translated Remote Network drop-down menu.
|
|
NOTE: Generally, if NAT is required on a tunnel, either Local or Remote should be translated, but not both. Apply NAT Policies is particularly useful in cases where both sides of a tunnel use either the same or overlapping subnets.
|
|
•
|
To manage the remote SonicWALL through the VPN tunnel, select HTTP, SSH, SNMP, or any combination of these three from Management via this SA.
|
|
•
|
|
•
|
|
•
|
Select an interface from the VPN Policy bound to menu.
|
|
14
|
Click OK.
|
|
15
|
|
1
|
|
2
|
In the Authentication Method list in the General tab, select IKE using 3rd Party Certificates.The VPN Policy window displays the third-party certificate options in the IKE Authentication section.
|
|
3
|
Type a Name for the Security Association in the Name field.
|
|
4
|
Type the IP address or Fully Qualified Domain Name (FQDN) of the primary remote SonicWALL in the IPsec Primary Gateway Name or Address field.
|
|
5
|
If you have a secondary remote SonicWALL, enter the IP address or Fully Qualified Domain Name (FQDN) in the IPsec Secondary Gateway Name or Address field.
|
|
6
|
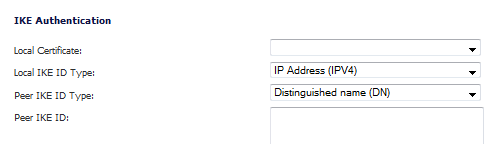
Under IKE Authentication, select a third-party certificate from the Local Certificate list. You must have imported local certificates before selecting this option.
|
|
7
|
Select one of the following Peer ID types from the Peer IKE ID Type menu:
|
|
•
|
Email ID (UserFQDN) and Domain Name (FQDN) - The Email ID (UserFQDN) and Domain Name (FQDN) types are based on the certificate's Subject Alternative Name field, which is not contained in all certificates by default. If the certificate contains a Subject Alternative Name, that value must be used. For site-to-site VPNs, wild card characters (such as * for more than one character or ? for a single character) cannot be used.
|
|
NOTE: To find the certificate details (Subject Alternative Name, Distinguished Name, etc.), navigate to the System > Certificates page and click on the Export button for the certificate.
|
|
•
|
Distinguished Name (DN) - Based on the certificates Subject Distinguished Name field, which is contained in all certificates by default. As with the Email ID and Domain Name above, the entire Distinguished Name field must be entered for site-to-site VPNs. Wild card characters are not supported.
|
|
•
|
IP Address (IPV4) - Based on the IPv4 IP address.
|
|
8
|
|
9
|
Click on the Network tab.
|
|
10
|
Under Local Networks, select one of these
|
|
•
|
If a specific local network can access the VPN tunnel, select a local network from the Choose local network from list drop-down menu.
|
|
•
|
If traffic can originate from any local network, select Any Address. Use this option if a peer has Use this VPN tunnel as default route for all Internet traffic selected. Auto-added rules will be created between Trusted Zones and the VPN Zone.
|
|
11
|
Under Destination Networks, select one of these:
|
|
•
|
If traffic from any local user cannot leave the firewall unless it is encrypted, select Use this VPN Tunnel as default route for all Internet traffic.
|
|
•
|
Alternatively, select Choose Destination network from list, and select the address object or group.
|
|
12
|
Click the Proposals tab.
|
|
13
|
In the IKE (Phase 1) Proposal section, select the following settings:
|
|
•
|
|
•
|
Select the desired DH Group from the DH Group menu:
|
|
•
|
|
•
|
256-Bit Random ECP Group, 384-Bit Random ECP Group, 521-Bit Random ECP Group, 192-Bit Random ECP Group, or 224-Bit Random ECP Group
|
|
•
|
|
•
|
Select the desired authentication method from the Authentication menu.
|
|
•
|
Enter a value in the Life Time (seconds) field. The default setting of 28800 forces the tunnel to renegotiate and exchange keys every 8 hours.
|
|
14
|
|
•
|
Select the desired protocol from the Protocol menu.
|
|
•
|
|
•
|
Select the desired authentication method from the Authentication menu.
|
|
•
|
Select Enable Perfect Forward Secrecy if you want an additional Diffie-Hellman key exchange as an added layer of security. Select Group 2 from the DH Group menu.
|
|
•
|
Enter a value in the Life Time (seconds) field. The default setting of 28800 forces the tunnel to renegotiate and exchange keys every 8 hours.
|
|
15
|
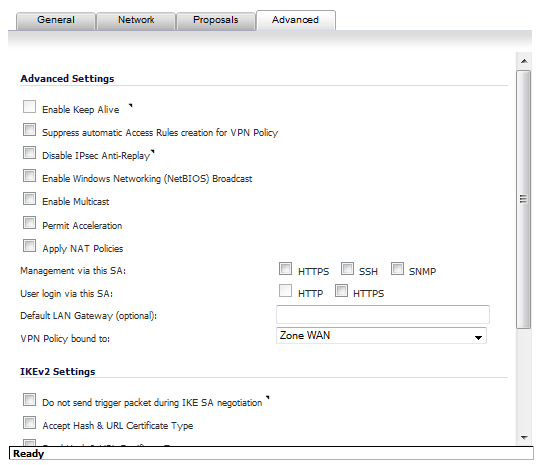
Click the Advanced tab. Select any optional configuration options you want to apply to your VPN policy:
|
|
•
|
Select Enable Keep Alive to use heartbeat messages between peers on this VPN tunnel. If one end of the tunnel fails, using Keepalives will allow for the automatic renegotiation of the tunnel once both sides become available again without having to wait for the proposed Life Time to expire.
|
|
•
|
The Suppress automatic Access Rules creation for VPN Policy setting is not enabled by default to allow the VPN traffic to traverse the appropriate zones.
|
|
•
|
Select Disable IPsec Anti-Replay to disable anti-replay, which is a form of partial sequence integrity that detects the arrival of duplicate IP datagrams (within a constrained window).
|
|
•
|
To require XAUTH authentication by users prior to allowing traffic to traverse this tunnel, select Require authentication of VPN client by XAUTH, and select a User group to specify allowed users from the User group for XAUTH.
|
|
•
|
Select Enable Windows Networking (NetBIOS) Broadcast to allow access to remote network resources by browsing the Windows® Network Neighborhood.
|
|
•
|
Select Enable Multicast to allow multicast traffic through the VPN tunnel.
|
|
•
|
Select Permit Acceleration to enable redirection of traffic matching this policy to the WAN Acceleration (WXA) appliance
|
|
•
|
Select Apply NAT Policies if you want the firewall to translate the Local, Remote or both networks communicating via this VPN tunnel. Two drop-down menus display:
|
|
•
|
To perform Network Address Translation on the Local Network, select or create an Address Object in the Translated Local Network menu.
|
|
•
|
To translate the Remote Network, select or create an Address Object in the Translated Remote Network drop-down menu.
|
|
NOTE: Generally, if NAT is required on a tunnel, either Local or Remote should be translated, but not both. Apply NAT Policies is particularly useful in cases where both sides of a tunnel use either the same or overlapping subnets.
|
|
•
|
Select Enable OCSP Checking to check VPN certificate status and specify the URL where to check certificate status. See Using OCSP with Dell SonicWALL Network Security Appliances .
|
|
•
|
To manage the remote SonicWALL through the VPN tunnel, select HTTP, HTTPS, or both from Management via this SA. Select HTTP, SSH, HTTPS, or any combination of the three in the User login via this SA to allow users to login using the SA.
|
|
•
|
If you wish to use a router on the LAN for traffic entering this tunnel destined for an unknown subnet, for example, if you configured the other side to Use this VPN Tunnel as default route for all Internet traffic, you should enter the IP address of your router into the Default LAN Gateway (optional) field.
|
|
•
|
Select an interface or zone from the VPN Policy bound to menu. A zone is the preferred selection if you are using WAN Load Balancing and you wish to allow the VPN to use either WAN interface.
|
|
•
|
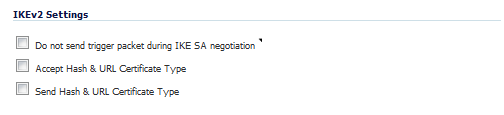
Under IKEv2 Settings (visible only if you selected IKEv2 for Exchange on the Proposals tab), The Do not send trigger packet during IKE SA negotiation checkbox is cleared by default and should only be selected when required for interoperability.
|
The term Trigger Packet refers to the use of initial Traffic Selector payloads populated with the IP addresses from the packet that caused SA negotiation to begin. It is recommended practice to include Trigger Packets to assist the IKEv2 Responder in selecting the correct protected IP address ranges from its Security Policy Database. Not all implementations support this feature, so it may be appropriate to disable the inclusion of Trigger Packets to some IKE peers.
When the Accept Hash & URL Certificate Type option is selected, the firewall sends an HTTP_CERT_LOOKUP_SUPPORTED message to the peer device. If the peer device replies by sending a “Hash and URL of X.509c” certificate, the firewall can authenticate and establish a tunnel between the two devices.
When the Send Hash & URL Certificate Type option is selected, the firewall, on receiving an HTTP_CERT_LOOKUP_SUPPORTED message, sends a "Hash and URL of X.509c” certificate to the requestor.
|
16
|
Click OK.
|
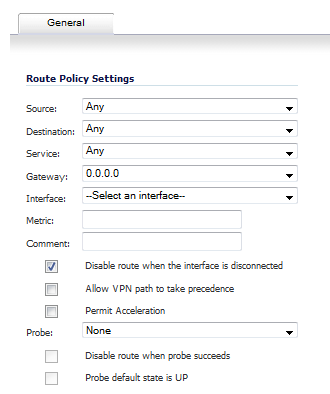
Optionally, you can configure a static route to be used as a secondary route in case the VPN tunnel goes down. The Allow VPN path to take precedence option allows you to create a secondary route for a VPN tunnel. By default, static routes have a metric of one and take precedence over VPN traffic. The Allow VPN path to take precedence option gives precedence over the route to VPN traffic to the same destination address object. This results in the following behavior:
|
•
|
When a VPN tunnel is active: static routes matching the destination address object of the VPN tunnel are automatically disabled if the Allow VPN path to take precedence option is enabled. All traffic is routed over the VPN tunnel to the destination address object.
|
|
1
|
Navigate to the Network > Routing page.
|
|
2
|
Scroll to the bottom of the page and click on the Add button. The Add Route Policy window is displayed.
|
|
3
|
|
4
|
|
5
|
Enable the Allow VPN path to take precedence checkbox.
|
|
6
|
Click OK.
|