Configuring the Dell SonicWALL Network Security Appliance

You can configure the Dell SonicWALL network security appliance using one of three methods:
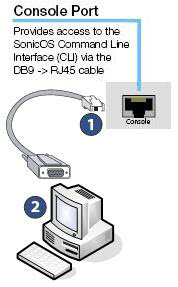
 

Configuring Features using the CLI on a Serial Connection via the Console Port

You do not need to assign an IP address to the firewall to use the CLI on a serial connection to the Console port.

To configure features using the CLI on a serial connection via the console port:
1
Attach an RJ-45 to DB-9 serial cable to the appliance port marked CONSOLE. Attach the other end of the cable to a serial port on the configuring computer.

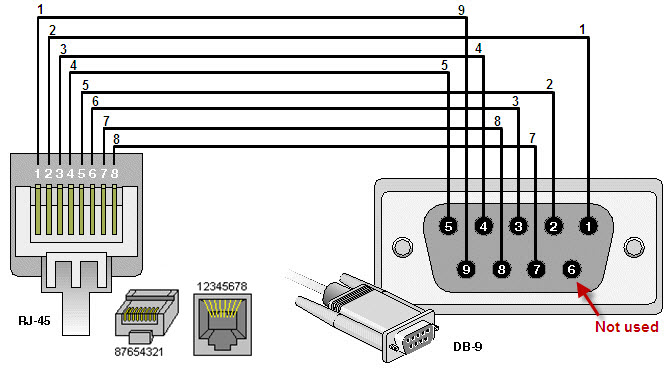
The RJ-45 to DB-9 serial cable pin assignments are as follows:


Table 169. RJ-45 to DB-9 serial cable pin assignments

RJ-45 connector

DB9 connector

Pin 1

Pin 9

Pin 2

Pin 1

Pin 3

Pin 4

Pin 4

Pin 5

Pin 5

Pin 2

Pin 6

Pin 3

Pin 7

Pin 8

Pin 8

Pin 7


Pin 6 – not used

The RJ-45 to DB-9 serial cable pin diagram is shown below:

Figure 69. RJ-45 to DB-9 cable pin diagram

2
3
Press Enter/Return. Initial information is displayed followed by a DEVICE NAME> prompt.

Configuring Features using the CLI in an SSH Management Session via Ethernet

You can use an SSH client to access the CLI by connecting to the appliance with an Ethernet cable. This option is useful for customers that do not have access to an RJ-45 to DB-9 serial cable for the Console port on the firewall.

To use SSH management, you must assign an IP address to X0 (LAN) or X1 (WAN), or use the default LAN IP address of 192.168.168.168.

To configure features using the CLI in an SSH management session via Ethernet:
1
Attach an Ethernet cable to the interface port marked X0. Attach the other end of the Ethernet cable to an Ethernet port on the configuring computer.
2
3
In the emulation application, enter the IP destination address for the X0 interface and enter 22 as the port number.
4
Select SSH as the connection type and open a connection.

Configuring Features using the Management Interface (Web UI)

You can manage the appliance securely from your Web browser using HTTPS by connecting to either the LAN or WAN IP address of the appliance, directly or over the network.

There are a number of features in SonicOS that cannot be configured using the CLI. The following features can only be configured in the SonicOS management interface (Web UI):


Table 170. SonicOS features that must be configured in the management interface (web UI)

Category

Features

Dashboard

All features

System

License, Certificates, Settings (import, upload/download)

SonicPoint

All features

Firewall

App Rules

Firewall Settings

BWM

DPI-SSL

All features

Anti-Spam

All features

Users

Guest Services, Guest Accounts, Guest Status Security

Security Services

Summary, Content Filter, Client AV Enforcement, Anti-Spyware,
Geo-IP filter, Botnet Filter

WAN Acceleration

All features

AppFlow

All features

Log

All features

SafeMode

SafeMode is a limited Web management interface that provides a way to upload firmware from your computer and reboot the appliance.

The SafeMode feature allows you to recover quickly from uncertain configuration states with a simplified management interface that includes the same settings available on the System > Settings page.

For instructions on how to restart your firewall in SafeMode, refer to Using SafeMode to Upgrade Firmware or see the Getting Started Guide for your appliance.