How Does Packet Monitor Work?

As an administrator, you can configure the general settings, monitor filter, display filter, advanced filter settings, and FTP settings of the Packet Monitor tool. As network packets enter the Packet Monitor subsystem, the monitor filter settings are applied and the resulting packets are written to the capture buffer. The display filter settings are applied as you view the buffer contents in the management interface. You can log the capture buffer to view in the management interface, or you can configure automatic transfer to the FTP server when the buffer is full.

Default settings are provided so that you can start using Packet Monitor without configuring it first. The basic functionality is provided by buttons on the page:


Dashboard > Packet Monitor Toolbar Options

Button

Functionality

Configure

Configures Packet Capture settings, including filtering and logging.

Monitor All

Resets all current monitor filter settings and advanced page settings so that traffic on all local interfaces is monitored.

NOTE: Clicking Monitor All will overwrite your current monitor filter settings and advanced page settings. A warning message is displayed that requires confirmation to continue.

Monitor Default

Resets current monitor filter settings and advanced page settings to factory default settings.

NOTE: Clicking Monitor Default will overwrite your current monitor filter settings and advanced page settings with factory default settings. A warning message is displayed that requires confirmation to continue.

Clear

Clears the Packet Monitor queue and refreshes the displayed packet statistics for capture buffer, mirroring, and FTP logging to show new buffer data. A confirmation dialog box displays when you click this button.

Refresh

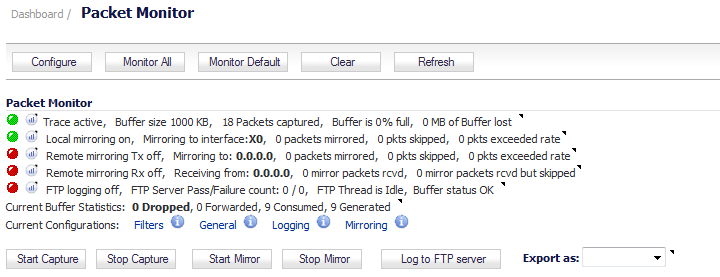
Displays new buffer data in the Captured Packets table. You can then click any packet in the list to display its header information and data in the Packet Detail and Hex Dump sections.

Start Capture

Begins capturing all packets except those used for communication between the SonicWall appliance and the management interface on your console system.

Stop Capture

Stops the packet capture.

Start Mirror

Begins mirroring packets.

Stop Mirror

Stop mirroring packets

Log to FTP server

Transfers the capture file to the FTP server when the buffer is full.

NOTE: A valid FTP server IP address must have been entered on the Logging tab of the Packet Monitor Configuration window. See Configuring Logging Settings.

Export As:

Displays or saves a snapshot of the current buffer in the file format that you select from the drop-down list. Saved files are placed on your local management system (where the management interface is running). Choose from the following formats:

Libpcap - View the data with the Wireshark (formerly Ethereal) network protocol analyzer. This is also known as libcap or pcap format. A dialog box allows you to open the buffer file with Wireshark, or save it to your local hard drive with the extension .pcap.
Html - View the data with a browser. You can use File > Save As to save a copy of the buffer to your hard drive.
Text - View the data in a text editor. A dialog box allows you to open the buffer file with the registered text editor, or save it to your local hard drive with the extension .wri.
App Data - View only application data contained in the packet. Packets containing no application data are skipped during the capture. Application data equals captured packet minus L2, L3, and L4 headers.

Refer to the figure below to see a high-level view of the Packet Monitor subsystem. This shows the different filters and how they are applied.

Packet Monitor subsystem: High-level view