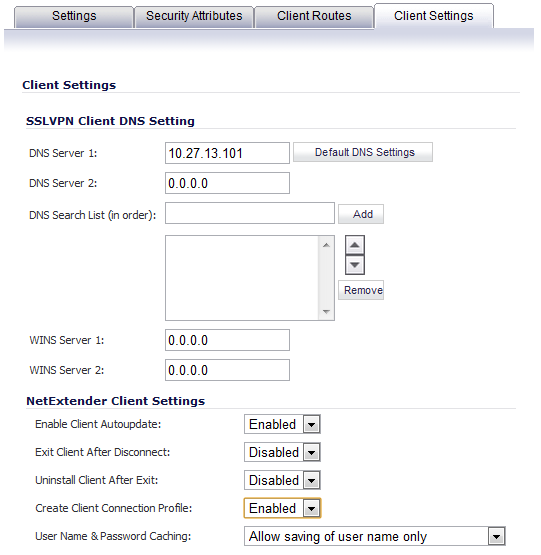
The Client Settings tab configures the DNS settings for SSL VPN clients as well as several options for the NetExtender client.
|
1
|
Click the Default DNS Settings to use the default DNS settings of the SonicWall security appliance. The DNS and WINS configuration is auto-propagated.
|
|
2
|
To manually configure the DNS information, In the DNS Server 1 field:
|
|
•
|
Click the Default DNS Settings to use the default settings.
|
|
3
|
(Optional) In the DNS Server 2 field, enter the IP address of the backup DNS server.
|
|
4
|
In the DNS Search List (in order) field, enter the IP addresses to be searched.
|
|
5
|
Click Add. The IP address appears in the list below the field.
|
Use the up and down arrow  icons to order the addresses.
To remove an address, select it and then click Remove.
|
6
|
(Optional) In the WINS Server 1 field, enter the IP address of the primary WINS server.
|
|
NOTE: Only IPv4 is supported.
|
|
7
|
(Optional) In the WINS Server 2 field, enter the IP address of the backup WINS server.
|
|
•
|
Enable Client Autoupdate - The NetExtender client checks for updates every time it is launched.
|
|
•
|
Exit Client After Disconnect - The NetExtender client exits when it becomes disconnected from the SSL VPN server. To reconnect, users have to either return to the SSL VPN portal or launch NetExtender from their Programs menu.
|
|
•
|
Uninstall Client After Disconnect - The NetExtender client automatically uninstalls when it becomes disconnected from the SSL VPN server. To reconnect, users have to return to the SSL VPN portal.
|
|
•
|
Create Client Connection Profile - The NetExtender client creates a connection profile recording the SSL VPN Server name, the Domain name, and optionally the username and password.
|
|
•
|
User Name & Password Caching - To balance security needs against ease of use for users and provide flexibility in allowing users to cache their usernames and passwords in the NetExtender client, select one of these options:
|
|
9
|
Click OK to complete the Device Profile configuration process.
|