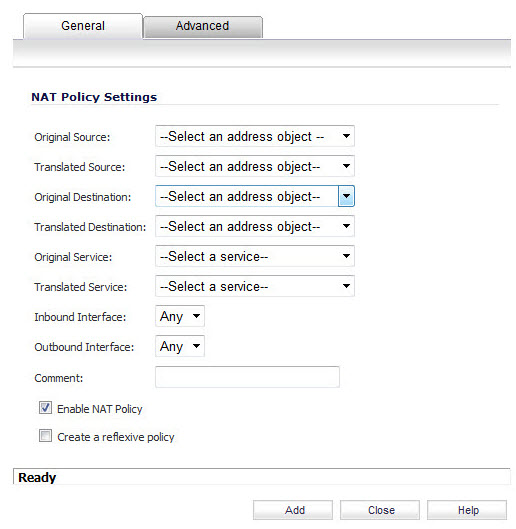
The following explains the settings used to create a NAT policy entry in the Add NAT Policy or Edit NAT Policy windows.
Click the Add button in the Network > NAT Policies page to display the Add NAT Policy window to create a new NAT policy or click the Edit icon in the Configure column for the NAT policy you want to edit to display the Edit NAT Policy window.
|
•
|
Original Source—This drop-down menu setting is used to identify the Source IP address(es) in the packet crossing the SonicWall security appliance, whether it is across interfaces, or into/out-of VPN tunnels. You can use the default Address Objects in SonicOS Enhanced, or you can create your own Address Objects. These entries can be single host entries, address ranges, or IP subnets.
|
|
•
|
Translated Source—This drop-down menu setting is what the SonicWall security appliance translates the specified Original Source to as it exits the SonicWall security appliance, whether it is to another interface, or into/out-of VPN tunnels. You can use the default Address Objects in SonicOS Enhanced, or you can create your own Address Objects entries. These entries can be single host entries, address ranges, or IP subnets.
|
|
•
|
Original Destination—This drop-down menu setting is used to identify the Destination IP address(es) in the packet crossing the SonicWall security appliance, whether it be across interfaces, or into/out-of VPN tunnels. When creating outbound NAT polices, this entry is usually set to Any since the destination of the packet is not being changed, but the source is being changed. However, these Address Object entries can be single host entries, address ranges, or IP subnets.
|
|
•
|
Translated Destination—This drop-down menu setting is what the SonicWall translates the specified Original Destination to as it exits the SonicWall security appliance, whether it is to another interface, or into/out-of VPN tunnels. When creating outbound NAT polices, this entry is usually set to Original, since the destination of the packet is not being changed, but the source is being changed. However, these Address Objects entries can be single host entries, address ranges, or IP subnets.
|
|
•
|
Original Service—This drop-down menu setting is used to identify the IP service in the packet crossing the SonicWall security appliance, whether it is across interfaces, or into/out-of VPN tunnels. You can use the default services on the SonicWall, or you can create your own entries. For many NAT policies, this field is set to Any, as the policy is only altering source or destination IP addresses.
|
|
•
|
Translated Service—This drop-down menu setting is what the SonicWall security appliance translates the Original Service to as it exits the SonicWall security appliance, whether it be to another interface, or into/out-of VPN tunnels. You can use the default services in the SonicWall security appliance, or you can create your own entries. For many NAT Policies, this field is set to Original, as the policy is only altering source or destination IP addresses.
|
|
•
|
Inbound Interface—This drop-down menu setting is used to specify the entry interface of the packet. When dealing with VPNs, this is usually set to Any, since VPN tunnels aren’t really interfaces.
|
|
•
|
Outbound Interface—This drop-down is used to specify the exit interface of the packet once the NAT policy has been applied. This field is mainly used for specifying which WAN interface to apply the translation to. Of all fields in NAT policy, this one has the most potential for confusion. When dealing with VPNs, this is usually set to Any, since VPN tunnels aren’t really interfaces. Also, as noted in the Quick Q&A’ section of this chapter, when creating inbound 1-2-1 NAT Policies where the destination is being remapped from a public IP address to a private IP address, this field must be set to Any.
|
|
•
|
Comment—This field can be used to describe your NAT policy entry. The field has a 32-character limit, and once saved, can be viewed in the main Network > NAT Policies page by running the mouse over the text balloon next to the NAT policy entry. Your comment appears in a pop-up window as long as the mouse is over the text balloon.
|
|
•
|
Enable NAT Policy—By default, this box is checked, meaning the new NAT policy is activated the moment it is saved. To create a NAT policy entry but not activate it immediately, uncheck this box.
|
|
•
|
Create a reflective policy—When you check this box, a mirror outbound or inbound NAT policy for the NAT policy you defined in the Add NAT Policy window is automatically created.
|