Application layer bandwidth management (BWM) allows you to create policies that regulate bandwidth consumption by specific file types within a protocol, while allowing other file types to use unlimited bandwidth. This enables you to distinguish between desirable and undesirable traffic within the same protocol. Application layer bandwidth management is supported for all Application matches, as well as custom App Rules policies using HTTP client, HTTP Server, Custom, and FTP file transfer types. For details about policy types, see App Rules Policy Creation .
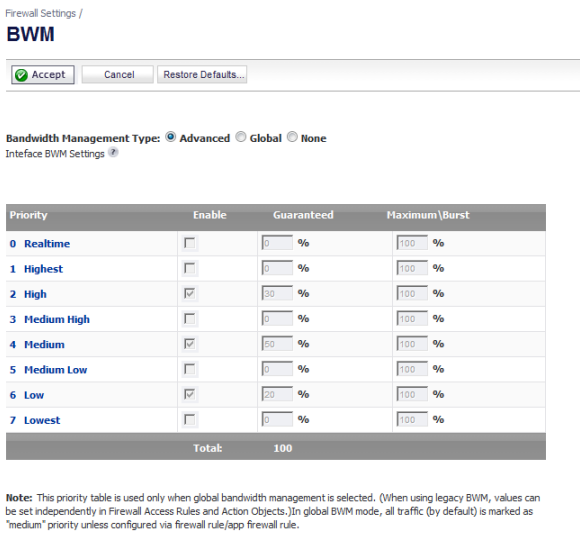
If the Bandwidth Management Type on the Firewall Settings > BWM page is set to Global, application layer bandwidth management functionality is supported with eight predefined, default BWM priority levels, available when adding a policy from the Firewall > App Rules page. There is also a customizable Bandwidth Management type action, available when adding a new action from the Firewall > Action Objects page.
Bandwidth management can also be configured from the App Flow Monitor page by selecting a service type application or a signature type application and then clicking the Create Rule button. The Bandwidth Management options available there depend on the enabled priority levels in the Global Priority Queue table on the Firewall Settings > BWM page. The priority levels enabled by default are High, Medium, and Low.
All application bandwidth management is tied in with global bandwidth management, which is configured on the Firewall Settings > BWM page.
|
•
|
|
•
|
When the type is set to Global, the configured bandwidth management can be applied globally to all interfaces in all zones.
|
As a best practice, configuring the Global Bandwidth Management settings on the Firewall Settings > BWM page should always be done before configuring any BWM policies.
Changing the Bandwidth Management Type on the Firewall Settings > BWM page from Advanced to Global disables BWM in all Access Rules. However, the default BWM action objects in App Control policies are converted to the global bandwidth management settings.
When you change the Bandwidth Management Type from Global to Advanced, the default BWM actions that are in use in any App Rules policies are automatically converted to Advanced BWM Medium, no matter what level they were set to before the change.
When you toggle between Advanced and Global, the default BWM actions are converted to BWM Global-Medium. The firewall does not store your previous priority levels when you switch the type back and forth. You can view the conversions on the Firewall > App Rules page.
Custom BWM actions behave differently than the default BWM actions. Custom BWM actions are configured by creating action objects on the Firewall > Action Objects page. Custom Bandwidth Management actions, and the policies that use those actions, retain their priority settings whenever the Bandwidth Management Type is toggled between Global and Advanced.
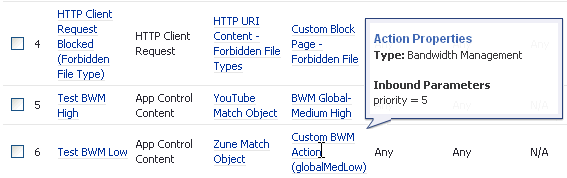
The following figure shows the same policy after the global Bandwidth Management Type is set to Global. Only the Priority appears in the tooltip, because no values are set in the Global Priority Queue for guaranteed or maximum bandwidth for level 5.
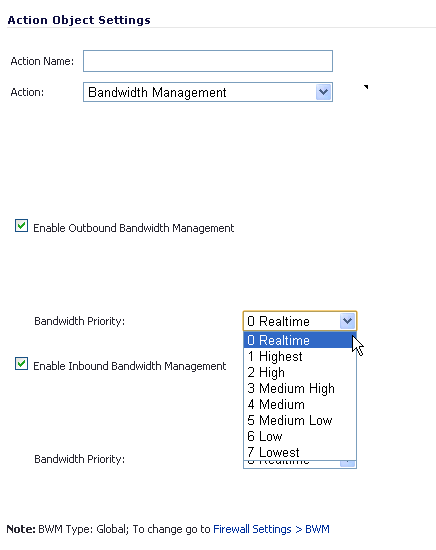
When the Bandwidth Management Type is set to Global, the Add/Edit Action Object screen provides the Bandwidth Priority option, but uses the values that are specified in the Priority table on the Firewall Settings > BWM page for Guaranteed Bandwidth and Maximum Bandwidth.
Figure 14 shows the Bandwidth Priority selections in the Add/Edit Action Objects screen when the global Bandwidth Management Type is set to Global on the Firewall Settings > BWM page.
|
NOTE: All priorities are displayed (Realtime - Lowest) regardless of whether or not the have been configured. Refer to the Firewall Settings > BWM page to determine which priorities are enabled. If the Bandwidth Management Type is set to Global and you select a Bandwidth Priority that is not enabled, the traffic is automatically mapped to the level 4 priority (Medium).
|
A number of BWM action options are also available in the predefined, default action list. The BWM action options change depending on the Bandwidth Management Type setting on the Firewall Settings > BWM page. If the Bandwidth Management Type is set to Global, all eight priorities are selectable. If the Bandwidth Management Type is set to Advanced, no priorities are selectable, but the predefined priorities are available when adding a policy.
When the predefined Packet Monitor action is selected for a policy, SonicOS will capture or mirror the traffic according to the settings you have configured on the Dashboard > Packet Monitor or System > Packet Monitor page. The default is to create a capture file, which you can view with Wireshark. Once you have configured a policy with the Packet Monitor action, you still need to click Start Capture on the Packet Monitor page to actually capture any packets. After you have captured the desired packets, click Stop Capture.
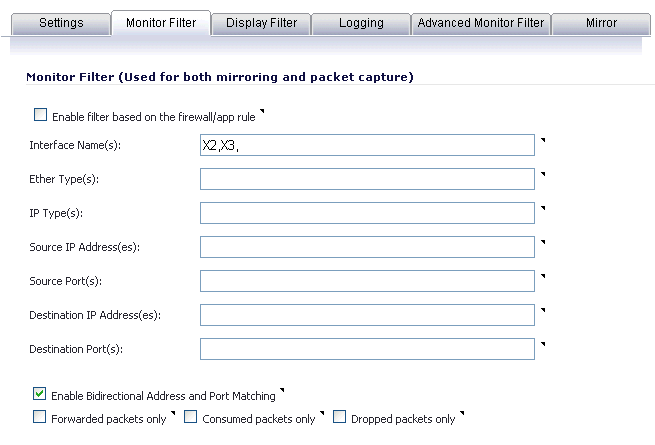
To control the Packet Monitor action to capture only the packets related to your policy, click Configure on the Packet Monitor page and select Enable Filter based on the firewall/app rule on the Monitor Filter tab (see Figure 15). In this mode, after you click Start Capture on the Packet Monitor page, packets are not captured until some traffic triggers the App Control policy (or Firewall Access Rule). You can see the Alert message in the Log > View page when the policy is triggered. This works when Packet Monitor is selected in App Control policies created with the Create Rule button or with the App Rules method using an action object, or in Firewall Access Rules, and allows you to specify configuration or filtering for what to capture or mirror. You can download the capture in different formats and look at it in a Web page, for example.
Figure 15. Packet Monitor - Monitor Filter tab
To set up mirroring, go to the Mirror tab and pick an interface to which to send the mirrored traffic in the Mirror filtered packets to Interface field under Local Mirroring Settings. You can also configure one of the Remote settings. This allows you to mirror the application packets to another computer and store everything on the hard disk. For example, you could capture everyone’s MSN Instant Messenger traffic and read the conversations.
The Dashboard > AppFlow Monitor page provides a Create Rule button. If, while viewing the AppFlow Monitor, you see an application that seems suspicious or is using excessive amounts of bandwidth, you can simply select the application in the list, then click Create Rule and configure an App Control policy for it immediately. You can also select multiple applications and then use Create Rule to configure a policy that applies to all of them.
Figure 16 shows the Create Rule window displayed over the Dashboard > AppFlow Monitor page.
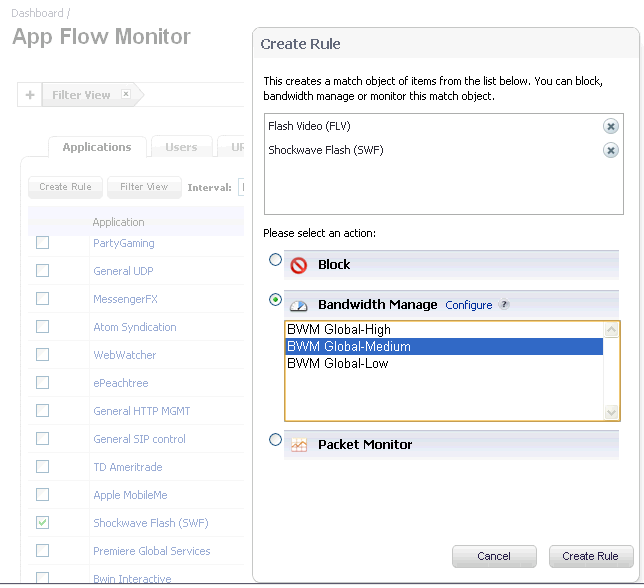
The Create Rule window contains a Configure button next to the Bandwidth Manage section that takes you to the Firewall Settings > BWM page where you can configure the Global Priority Queue. For more information about global bandwidth management and the Firewall Settings > BWM page, see Actions Using Bandwidth Management . The Bandwidth Manage options you see in the Create Rule window reflect the options that are enabled in the Global Priority Queue. The default values are:
The configuration method on the Firewall > App Control Advanced page allows granular control of specific categories, applications, or signatures. This includes granular logging control, granular inclusion and exclusion of users, groups, or IP address ranges, and schedule configuration. The settings here are global policies and independent from any custom App Rules policy. The Firewall > App Control Advanced page is shown below.
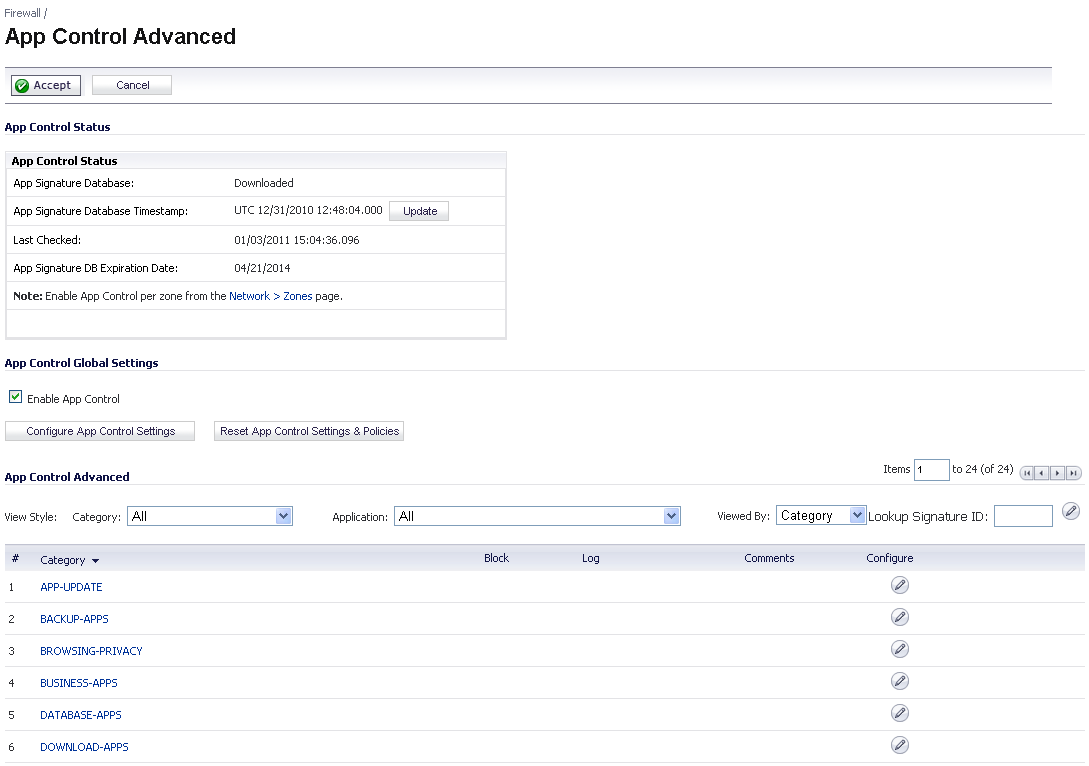
While these application control settings are independent from App Rules policies, you can also create application match objects for any of the categories, applications, or signatures available here or on the Firewall > Match Objects page, and use those match objects in an App Rules policy. This allows you to use the wide array of actions and other configuration settings available with Application Control. See Application List Objects for more information about this policy-based user interface for application control.
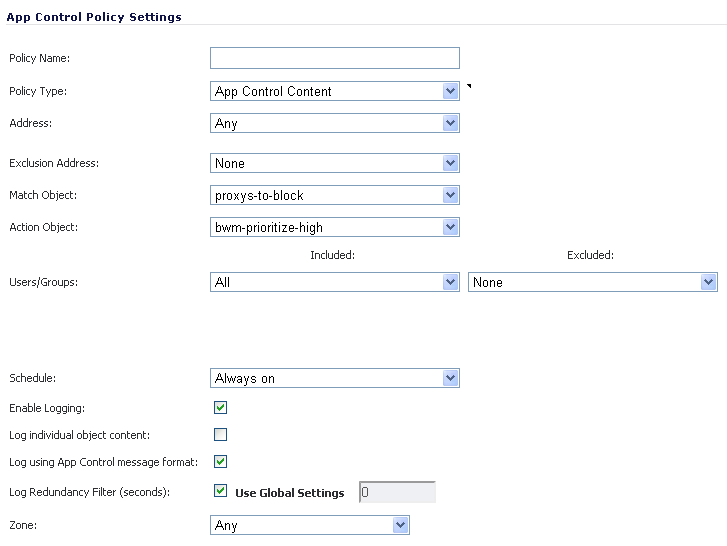
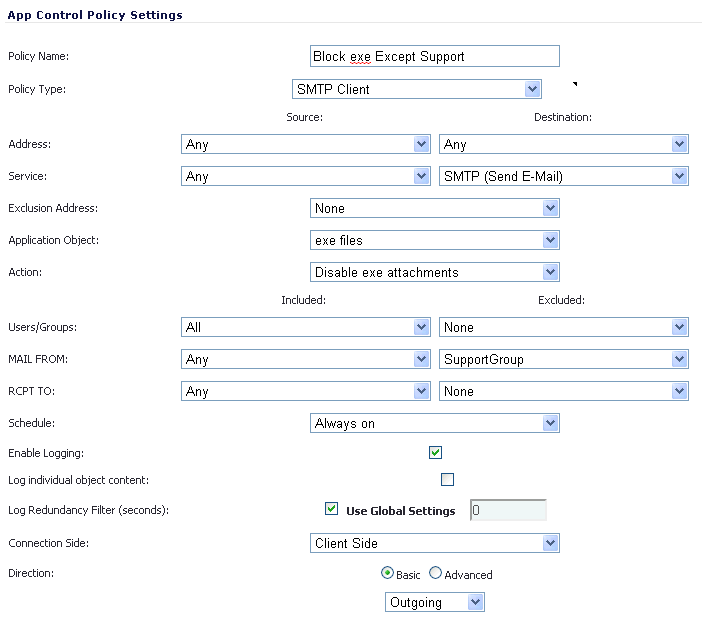
In the Firewall > App Rules page, you can access the Policy Settings screen, shown below for a Policy Type of SMTP Client. The screen changes depending on the Policy Type you select.
|
•
|
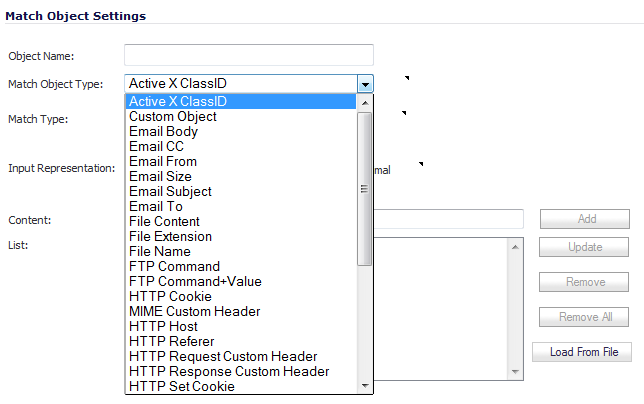
You can see the available types of match objects in a drop-down menu in the Add/Edit Match Object window.
In the Add/Edit Match Object window, you can add multiple entries to create a list of content elements to match. All content that you provide in a match object is case-insensitive for matching purposes. A hexadecimal representation is used to match binary content. You can use a hex editor or a network protocol analyzer like Wireshark to obtain hex format for binary files. For more information about these tools, see the following sections:
You can use the Load From File button to import content from predefined text files that contain multiple entries for a match object to match. Each entry in the file must be on its own line. The Load From File feature allows you to easily move Application Control settings from one firewall to another.
|
•
|
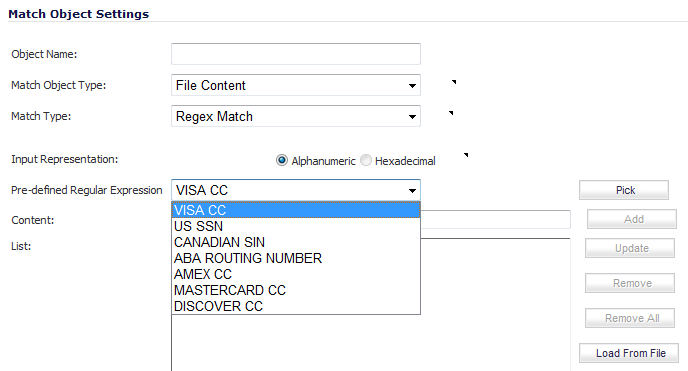
Popular regular expression primitives such as ‘.’, (the any character wildcard), ‘*’, ‘?’, ‘+’, repetition count, alternation, and negation are supported. Though the syntax and semantics are similar to popular regular expression implementations such as Perl, vim, and others, there are some minor differences. For example, beginning (^) and end of line ($) operators are not supported. Also, ‘\z’ refers to the set of non-zero digits, [1-9], not to the end of the string as in PERL. For syntax information, see the Regular Expression Syntax .
Regular expressions are matched efficiently by building a data structure called Deterministic Finite Automaton (DFA). The DFA’s size is dictated by the regular expression provided by the user and is constrained by the memory capacities of the device. A lengthy compilation process for a complex regular expression can consume extensive amounts of memory on the appliance. It may also take up to two minutes to build the DFA, depending on the expressions involved.
Also at risk of rejection are expressions containing a large number of characters rather than a character range or class. That is, the expression ‘(a|b|c|d|. . .|z)’ to specify the set of all lower-case letters is more likely to be rejected than the equivalent character class ‘\l’. When a range such as ‘[a-z]’ is used, it is converted internally to ‘\l’. However, a range such as
‘[d-y]’ or ‘[0-Z]’ cannot be converted to any character class, is long, and may cause the rejection of the expression containing this fragment.
‘[d-y]’ or ‘[0-Z]’ cannot be converted to any character class, is long, and may cause the rejection of the expression containing this fragment.
Whenever an expression is rejected, the user may rewrite it in a more efficient manner to avoid rejection using some of the above tips. For syntax information, see the Regular Expression Syntax . For an example discussing how to write a custom regular expression, see Creating a Regular Expression in a Match Object .
|
Any character except ‘\n’. Use /s (stream mode, also known as single-line mode) modifier to match ‘\n’ too.
|
|
|
Hex input. “dd” is the hexadecimal value for the character. Two digits are mandatory. For example, \r is \x0d and not \xd.
|
|
|
x followed by y
|
|
|
x or y
|
|
|
Equivalent to x. Can be used to override precedences.
|
|
Minimum of n and a maximum of m sequential x’s. All numbered repetitions are expanded. So, making m unreasonably large is ill-advised.
|
|
|
Exactly n x’s
|
|
|
Minimum of n x’s
|
|
|
Maximum of n x’s
|
|
‘C’ programming language escape sequences (\0 is the NULL character (ASCII character zero))
|
|
|
Non-zero digits ([1-9]), All other characters.
|
|
|
Word characters, Non-word characters Equivalent to [0-9A-Za-z_].
|
|
Control character. [\x00 - \x1F\x7F]
|
||
|
Any hexadecimal digit. [a-fA-F0-9]. Note this is different from the Perl \h, which means a horizontal space.
|
||
|
. (Concatenation)
|
|
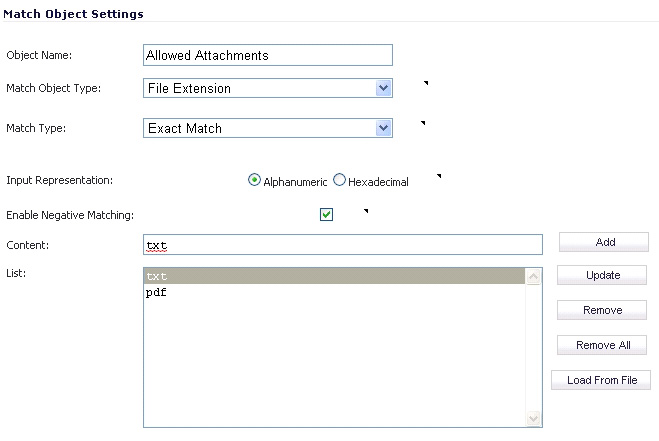
Although all App Rules policies are DENY policies, you can simulate an ALLOW policy by using negative matching. For instance, you can allow email .txt attachments and block attachments of all other file types. Or you can allow a few types, and block all others.
Not all match object types can utilize negative matching. For those that can, you will see the Enable Negative Matching checkbox on the Match Object Settings screen.
The Firewall > Match Objects page also contains the Add Application List Object button, which opens the Create Match Object window. This window provides two tabs:
|
•
|
Application – You can create an application filter object on this tab. This screen allows selection of the application category, threat level, type of technology, and attributes. After selections are made, the list of applications matching those criteria is displayed. The Application tab provides another way to create a match object of the Application List type.
|
|
•
|
Category – You can create a category filter object on this tab. A list of application categories and their descriptions are provided. The Category page offers another way to create a match object of the Application Category List type.
|
The Application tab provides a list of applications for selection. You can control which applications are displayed by selecting one or more application categories, threat levels, and technologies. You can also search for a keyword in all application names by typing it into the Search field near the top right of the display. For example, type in “bittorrent” into the Search field and click the Search icon to find multiple applications with “bittorrent” (not case-sensitive) in the name.
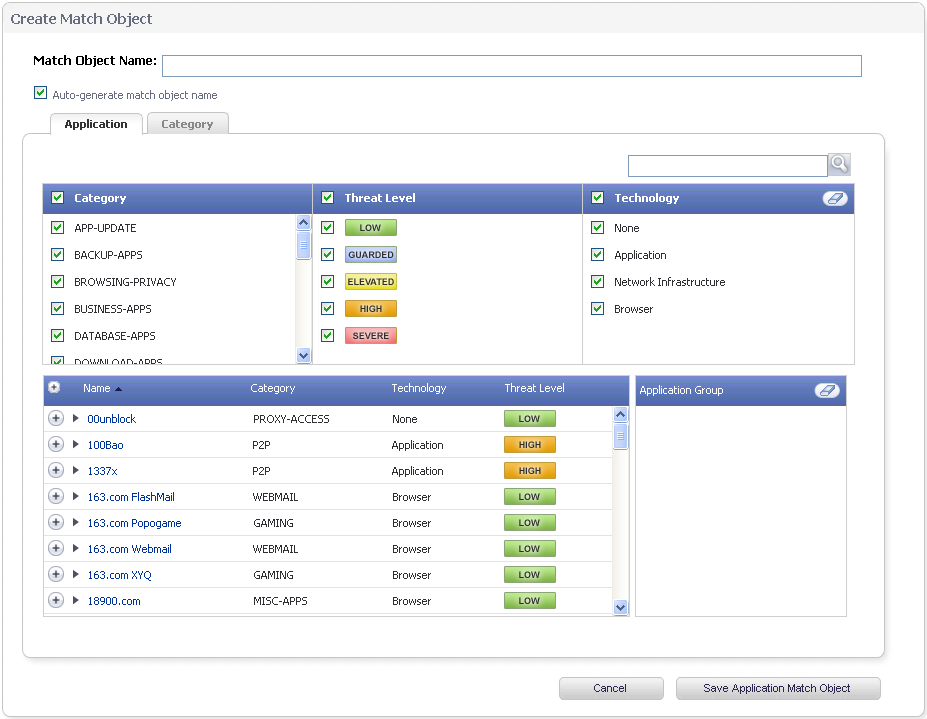
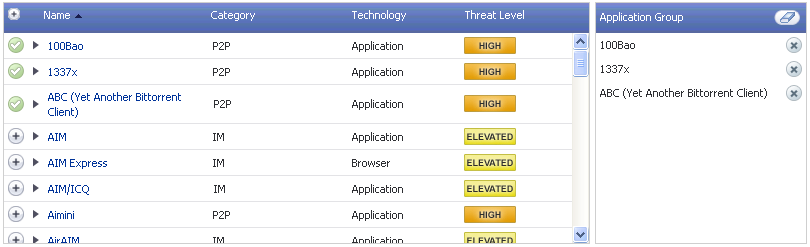
As you select the applications for your filter, they appear in the Application Group field on the right. You can edit the list in this field by deleting individual items or by clicking the eraser to delete all items. The image below shows several applications in the Application Group field. The selected applications are also marked with a green checkmark icon in the application list on the left side.
When finished selecting the applications to include, you can type in a name for the object in the Match Object Name field (first, clear the Auto-generate match object name checkbox) and click the Save Application Match Object button. You will see the object name listed on the Firewall > Match Objects page with an object type of Application List. This object can then be selected when creating an App Rules policy.
Match Objects created using the Auto-generate match object name option display a tilde (~) as the first character of the object name.
The Category tab provides a list of application categories for selection. You can select any combination of categories and then save your selections as a category filter object with a custom name. The image below shows the screen with the description of the IM category displayed.
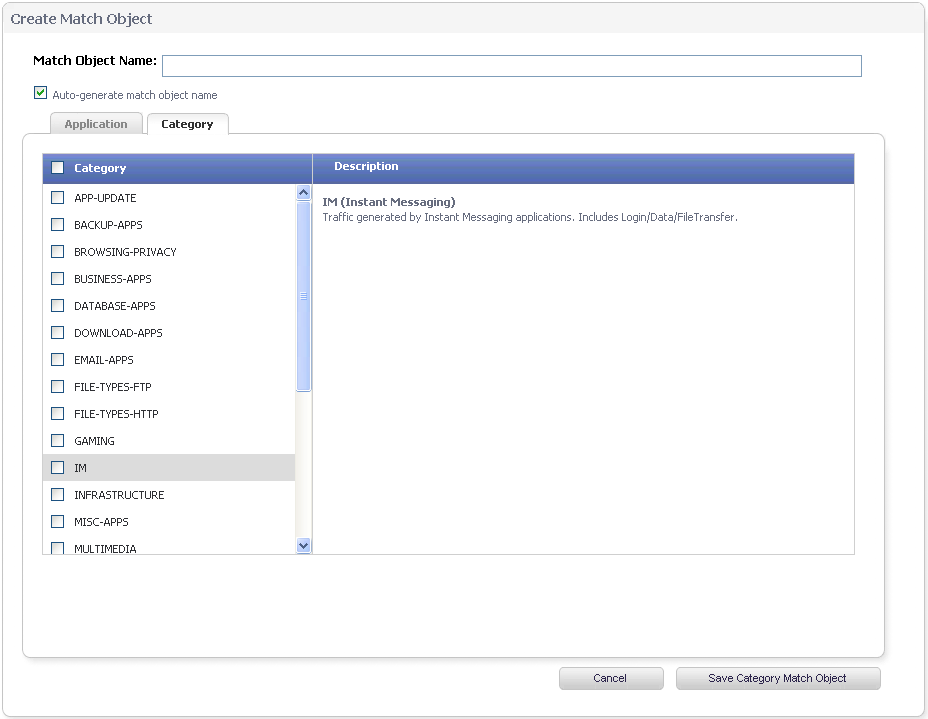
You can hover your mouse pointer over each category in the list to see a description of it. To create a custom category filter object, simply type in a name for the object in the Match Object Name field (first, clear the Auto-generate match object name checkbox), select one or more categories, and click the Save Category Match Object button. You will see the object name listed on the Firewall > Match Objects page with an object type of Application Category List. This object can then be selected when creating an App Rules policy.
Match Objects created using the Auto-generate match object name option display a tilde (~) as the first character of the object name.
A number of BWM action options are also available in the predefined, default action list. The BWM action options change depending on the Bandwidth Management Type setting on the Firewall Settings > BWM page. If the Bandwidth Management Type is set to Global, all eight priorities are selectable. If the Bandwidth Management Type is set to Advanced, no priorities are selectable, but the predefined priorities are available when adding a policy.
The following customizable actions are displayed in the Add/Edit Action Object window when you click Add New Action Object on the Firewall > Action Objects page:
|
NOTE: Only the customizable actions are available for editing in the Action Object Settings window. The predefined actions cannot be edited or deleted. When you create a policy, the Policy Settings window provides a way for you to select from the predefined actions along with any customized actions that you have defined.
|
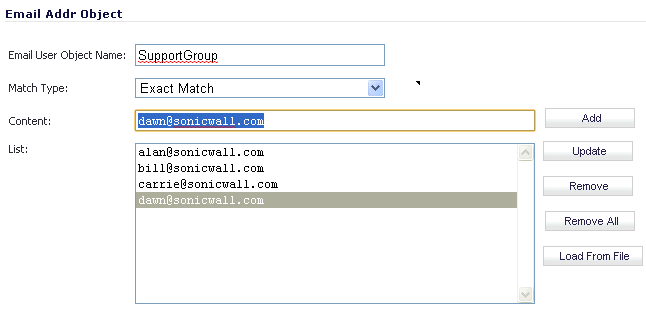
Although Application Control cannot extract group members directly from Outlook Exchange or similar applications, you can use the member lists in Outlook to create a text file that lists the group members. Then when you create an email address object for this group, you can use the Load From File button to import the list from your text file. Be sure that each email address is on a line by itself in the text file.