SonicPoint : SonicPoint Management over SSL VPN

SonicPoint Management over SSL VPN
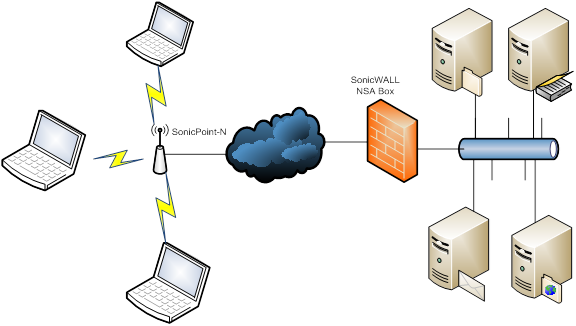
As a part of SonicWALL Advanced Management Protocol (SAMP) suite, SonicWALL SSL VPN Based Management Protocol (SSMP) uses the SonicWALL SSL VPN solution to provide remote SonicPoint N management. SonicPoint N has integrated NetExtender client and supports SSL VPN remote access as Figure 4 shows.
Figure 4. SonicPoint N with integrated NetExtender
SonicPoint is used as a managed bridge to work with the firewall as a secure wireless solution. The SonicPoint is configured and managed centrally by the SonicWALL Gateway. The SonicPoint retrieves the latest firmware and configuration information from the firewall and automatically configures itself.
SAMP manages SonicPoints at Layer 3, and SSMP provides the functionality for running the SonicPoint management protocol over SSL VPN.
Configuring SonicPoint Management over SSL VPN
Topics:
Creating a WLAN Tunnel Interface
To create a WLAN Tunnel Interface:
1
Go to the Network > Interfaces page,
2
Below the Interface Settings table, click the Add WLAN Tunnel Interface button. The Add WLAN Tunnel Interface window appears.
 
3
In the Interface Settings fields, configure the WLAN Tunnel Interface values that you want.
1
Set the Zone field to WLAN. More options appear.
 
2
Set the Tunnel Source Interface field to the interface that is used for the SSL VPN tunnel (such as X2).
3
4
Click OK.
Configuring the SSL VPN Settings
To configure the SSL VPN Settings:
1
Go to the SSL VPN > Client Settings page.
 
2
Click Configure for the Default Device Profile for SonicPointN in the Default Device Profile section. The Edit Device Profile window displays.
 
3
Under Basic Settings, enter the Name and Description that you want for the SonicPoint N device.
4
In the Zone IP V4 drop-down menu, select SSLVPN.
5
In the Network Address IP V4 drop-down menu, either:
Select Create new network to create a new network object, then select it.
6
Click the Client Routes tab.
 
7
In the Networks list, select the subnet interface (that the WLAN Tunnel Interface has been bound to)
8
Click the Arrow button to add the subnet interface to the Client Routes list.
9
Select the SP L3 Settings tab.
 
10
11
Click OK.
Creating a User for the SSL VPN Client
To create a user for an SSL VPN Client:
1
Go to the Users > Local Users page.
 
2
Click Add User or Edit for the user you want to edit. The Add/Edit User dialog appears.
 
3
Click the Groups tab.
4
From the User Groups list, add SSL VPN Services to the Member Of list.
5
Click the VPN Access tab.
 
6
From the Networks list, add the Subnet of the Interface that WLAN Tunnel interface has been bound to into the Access List. In this case, it is X2 Subnet.
7
Click OK.
SonicPoint Traffic Routing
In addition to the route to the subnet of the WLAN Tunnel Interface (X2 Subnet), you can also add other routes under the Client Route tab of the SSL VPN Edit Device window.
Adding other routes enables remote wireless clients to access internal networks through the SSL VPN tunnel of the SonicPoint and the SonicOS. The traffic to other destinations are routed locally on the SonicPoint without tunneling to the SonicOS side.
Provisioning SSL VPN Server Information to SonicPoint N
To provision SSL VPN Server information to a SonicPoint N device:
1
Go to the SonicPoint > SonicPoints page.
2
The Add SonicPointn Profile window displays.
 
3
Under L3 SSLVPN Tunnel Settings, enter the SSL VPN Server, User Name, Password, and Domain.
4
Select the Auto Reconnect option.
5
6
Establishing an SSL VPN Tunnel to a Remote Network
If the remote network site supports DHCP, set the SonicPoint to the factory default settings and connect it to the network. The SonicPoint automatically gets the IP address and the Gateway from DHCP. The SSL VPN server information is saved when the factory default settings are in place. After the SonicPoint gets its DHCP lease, it connects to the remote SonicWALL Gateway.
If the remote network site does not support DHCP, set the SonicPoint to the factory default settings and set the network parameters. Then the SonicPoint automatically connects to the remote SonicWALL Gateway.