|
•
|
|
1
|
|
2
|
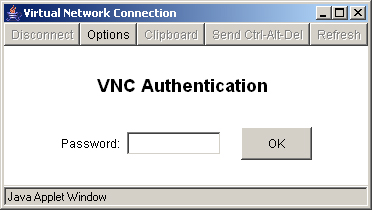
When the VNC client has loaded, you will be prompted to enter your password in the VNC Authentication window.
|
|
3
|
|
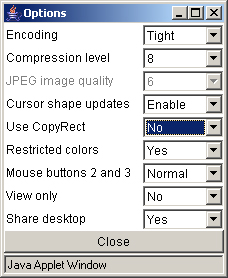
Hextile is a good choice for fast networks, while Tight is better suited for low-bandwidth connections. From the other side, the Tight decoder in TightVNC Java viewer is more efficient than Hextile decoder so this default setting can also be acceptable for fast networks.
|
||
|
Use specified compression level for Tight and Zlib encodings. Level 1 uses minimum of CPU time on the server but achieves weak compression ratios. Level 9 offers best compression but may be slow in terms of CPU time consumption on the server side. Use high levels with very slow network connections, and low levels when working over higher-speed networks. The Default value means that the server's default compression level should be used.
|
||
|
Set this parameter to Disable if you always want to see real cursor position on the remote side. Setting this option to Ignore is similar to Enable but the remote cursor will not be visible at all. This can be a reasonable setting if you don't care about cursor shape and don't want to see two mouse cursors, one above another.
|
||
|
If set to No, then 24-bit color format is used to represent pixel data. If set to Yes, then only 8 bits are used to represent each pixel. 8-bit color format can save bandwidth, but colors may look very inaccurate.
|
||
|
If set to Reversed, the right mouse button (button 2) will act as if it was the middle mouse button (button 3), and vice versa.
|
||
|
If set to Yes, then all keyboard and mouse events in the desktop window will be silently ignored and will not be passed to the remote side.
|
||
|
If set to Yes, then the desktop can be shared between clients. If this option is set to No then an existing user session will end when a new user accesses the desktop.
|
|
2
|
Click OK to any warning messages that are displayed. A Java-based Telnet window launches.
|
|
1
|
Click on the SSHv2 bookmark. A Java-based SSH window displays. Type your user name in the Username field and click Login.
|
|
2
|
A hostkey popup displays. Click Yes to accept and proceed with the login process.
|
SonicOS supports NetExtender connections for users with IPv6 addresses. On the SSL VPN > Client Settings page, first configure the traditional IPv6 IP address pool, and then configure an IPv6 IP Pool. Clients will be assigned two internal addresses: one IPv4 and one IPv6.
On the SSL VPN > Client Routes page, user can select a client routes from the drop-down list of all address objects including all the pre-defined IPv6 address objects.
|
NOTE: IPv6 FQDN is supported.
|


 For complete information on the SonicOS implementation of IPv6, see