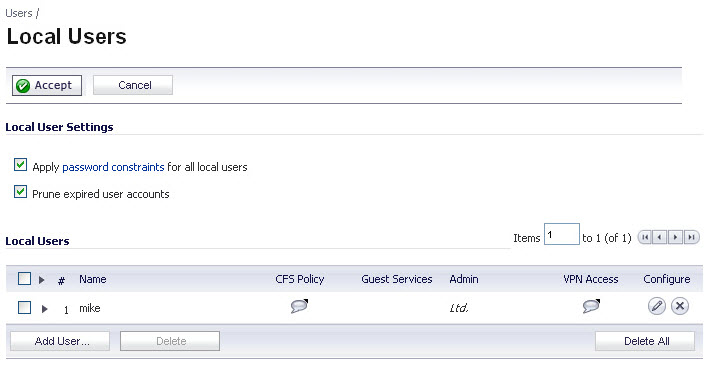
The following global settings can be configured for all local users on the Users > Local Users page:
|
•
|
Apply password constraints for all local users - Applies the password constraints that are specified on the System > Administration page to all local users. For more information on password constraints, see Login Security .
|
|
•
|
Prune account upon expiration - For a user account that is configured with a limited lifetime, selecting this checkbox causes the user account to be deleted after the lifetime expires. Disable this checkbox to have the account simply be disabled after the lifetime expires. The administrator can then re-enable the account by resetting the account lifetime.
|
You can view all the groups to which a user belongs on the Users > Local Users page. Click on the Expand icon  next to a user to view the group memberships for that user.
|
•
|
Hover the mouse pointer over the Comment icon in the VPN Access column to view the network resources to which the user has VPN access.
|
|
•
|
|
•
|
|
•
|
|
1
|
|
2
|
|
3
|
In the Password field, type a password for the user. Passwords are case-sensitive and should consist of a combination of letters and numbers rather than names of family, friends, or pets.
|
|
4
|
Confirm the password by retyping it in the Confirm Password field.
|
|
5
|
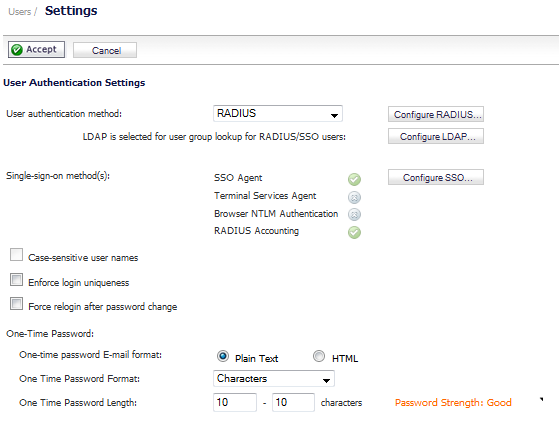
Optionally, select the User must change password checkbox to force users to change their passwords the first time they login. Select the Require one-time passwords checkbox to enable this functionality requiring SSL VPN users to submit a system-generated password for two-factor authentication.
|
|
7
|
In the Account Lifetime drop-down menu, select Never expires to make the account permanently. Or select Minutes, Hours, or Days to specify a lifetime after which the user account will either be deleted or disabled.
|
|
•
|
If you select a limited lifetime, select the Prune account upon expiration checkbox to have the user account deleted after the lifetime expires. Disable this checkbox to have the account simply be disabled after the lifetime expires. The administrator can then re-enable the account by resetting the account lifetime.
|
|
8
|
Optionally enter a comment in the Comment field.
|
|
9
|
On the Groups tab, under User Groups, select one or more groups to which the user will belong, and click the arrow button -> to move the group name(s) into the Member of list. The user will be a member of the selected groups. To remove the user from a group, select the group from the Member of list, and click the left arrow button <-.
|
|
10
|
The VPN Access tab configures which network resources VPN users (either GVC, NetExtender, or Virtual Office bookmarks) can access. On the VPN Access tab, select one or more networks from the Networks list and click the right arrow button (->) to move them to the Access List column. To remove the user’s access to a network, select the network from the Access List, and click the left arrow button (<-).
|
|
NOTE: The VPN access tab affects the ability of remote clients using GVC, NetExtender, and Virtual Office bookmarks to access network resources. To allow GVC, NetExtender, or Virtual Office users to access a network resource, the network address objects or groups must be added to the “allow” list on the VPN Access tab.
|
|
11
|
On the Bookmark tab, administrators can add, edit, or delete Virtual Office bookmarks for each user who is a member of a related group. For information on configuring SSL VPN bookmarks, see Configuring SSL VPN Bookmarks .
|
|
12
|
Click OK to complete the user configuration.
|
You can edit local users from the Users > Local Users page.
|
1
|
In the list of users, click the Edit icon under Configure in same line as the user you want to edit.
|
|
2
|
Configure the Settings, Groups, VPN Access, and Bookmark tabs exactly as when adding a new user. See Adding Local Users .
|
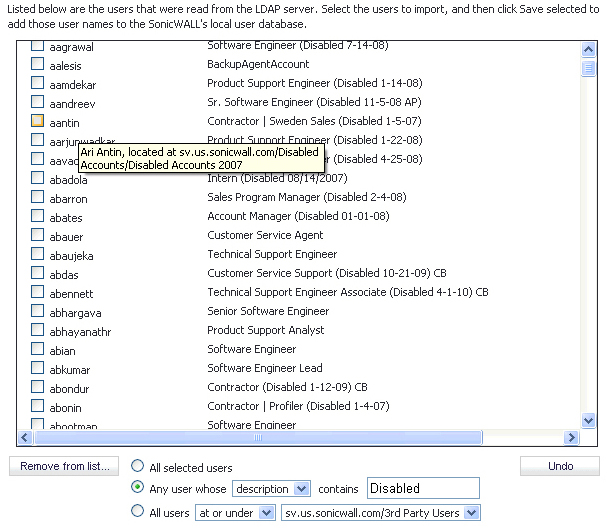
The list of users read from the LDAP server can be quite long, and you will probably only want to import a small number of them. A Remove from list button is provided, along with several methods of selecting unwanted users.You can use these options to reduce the list to a manageable size and then select the users to import.
|
1
|
Navigate to the Users > Settings page.
|
|
2
|
Set the User authentication method to LDAP or LDAP + Local Users. The Configure LDAP button moves up.
|
|
3
|
|
4
|
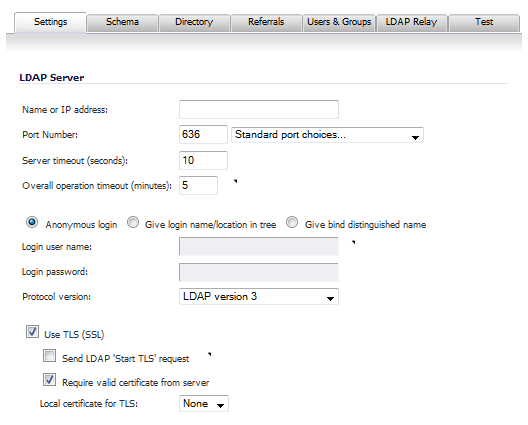
In the Settings tab, configure these server options:
|
|
a
|
Enter the name or IP address of the LDAP server in the Name or IP address field.
|
|
•
|
|
•
|
Choose a port from the Standard port choices… drop-down menu:
|
If you choose a port from the Standard port choices… drop-down menu, the port number changes to that of the specified choice.
|
c
|
Enter a server timeout in the Server timeout (seconds) field. The server timeout is the maximum time to wait for each response from the LDAP server over the network. The default is 10 seconds.
|
|
d
|
Enter an overall operation timeout in the Overall operation timeout (minutes) field. The overall operation timeout is the maximum time to spend on any auto operation. The default is 5 minutes.
|
|
•
|
Bind distinguished name (binds the distinguished name to the LDAP server
|
|
•
|
Anonymous login, enter the user name in the Login user name field.
|
|
•
|
Give login name/location in tree, enter the name that is in the first component of the user’s distinguished name and not their login ID in the Login user name field. For example, John Doe may normally log in as jdoe, but you would enter John Doe in the field. You must also give the user tree for login to server in the Directory tab.
|
|
•
|
Bind distinguished name, enter the full distinguished name (DN) to use to bind to the LDAP server in the Bind distinguished name field.
|
|
7
|
To enable TLS mode, ensure the Use TLS (SSL) checkbox is selected. It is enabled by default.
|
|
8
|
To allow an LDAP server to operate in both TLS and non-TLS modes on the same TCP port, select the Send LDAP ‘Start TLS’ request checkbox.
|
|
9
|
To require valid certificates from the LDAP server in TLS mode, ensure the Require valid certificate from server checkbox is selected. It is enabled by default.
|
|
10
|
Optionally, select a local certificate for TLS from the Local certificate for TLS drop-down menu. The default is None.
|
|
11
|
Click the Schema tab.
|
|
12
|
|
•
|
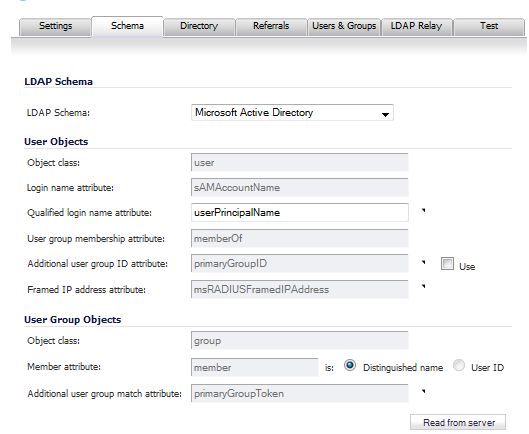
Microsoft Active Directory (default)
|
|
NOTE: What options are available and which are dimmed (unavailable) in the User Objects and User Group Objects sections change according to the schema you choose.
|
|
13
|
If you selected User defined schema, enter an object class in the Object class field. The default is user. These are the default values for the other schemas and cannot be changed:
|
|
•
|
|
•
|
RFC2798 InetOrgPerson – inetOrgPerson
|
|
•
|
RFC2307 Network Information Service – posixAccount
|
|
•
|
Samba SMB – sambaSAMAccount
|
|
•
|
NovelleDirectory – inetOrgPerson
|
|
14
|
If you selected User defined schema, enter a login name attribute in the Login name attribute field. The default is on. These are the default values for the other schemas and cannot be changed:
|
|
•
|
Microsoft Active Directory – sAMAccountName
|
|
•
|
|
•
|
Samba SMB – uid
|
|
•
|
|
15
|
Optionally, in the Qualified login name attribute, specify an attribute of a user object that sets an alternative login name of the user in name@domain format. This may be needed with multiple domains in particular, where the simple login name may not be unique across domains. These are the default values:
|
|
•
|
Microsoft Active Directory – userPrincipalName
|
|
•
|
|
•
|
|
NOTE: With Active Directory, this would normally be userPrincipalName for login using name@domain, but could be set to mail to enable login by email address.
|
|
16
|
If you selected User defined schema, enter a user group-membership attribute in the User group membership attribute field. There is no default. These are the default values for the other schemas and cannot be changed:
|
|
•
|
Microsoft Active Directory – memberOf
|
|
•
|
|
17
|
Optionally, specify an additional user ID group attribute in the Additional user group ID attribute field and select the Use checkbox to enable the attribute’s use. The Additional user group ID attribute, along with the Additional user group match attribute in the User Group Objects section, allow for a schema that may set additional memberships for a user in addition to those that are found via a member and/or memberOf attributes; for example, Active Directory’s group attribute.
|
If the Additional user group ID attribute is specified and its use is enabled, then when a user object is found with one or more instances of this attribute, a search for additional user groups matching those attributes will be made in the LDAP directory. If a group is found with the Additional user group match attribute set to that value, then the user will also be made a member of that group.
|
With Active Directory, this value, along with the Additional user group match attribute value, will give users membership in their primary user group (typically, Domain Users).
|
|
18
|
In the LDAP Import Users dialog box, you can select individual users or select all users. To select all users in the list, select the Select/deselect all checkbox at the top of the list. To clear all selections, click it again.
|
|
19
|
|
•
|
To remove the users whose checkboxes you have selected, select the All selected users radio button.
|
|
•
|
To remove certain users on the basis of name, description, or location, select the Any user whose <field1> contains <field2> radio button. Select name, description, or location from the drop-down list in the first field, and type the value to match into the second field.
|
|
•
|
In this option, name refers to the user name displayed in the left column of the list, description refers to the description displayed to its right (not present for all users), and location refers to the location of the user object in the LDAP directory. The location, along with the full user name, is displayed by a mouse-over on a user name, as shown in the image above.
|
|
•
|
For example, you might want to remove accounts that are marked as “Disabled” in their descriptions. In this case, select description in the first field and type Disabled in the second field. The second field is case-sensitive, so if you typed disabled you would prune out a different set of users.
|
|
•
|
To remove certain users from the list on the basis of their location in the LDAP directory, select the All users <field1> <field2> radio button. In the first field, select either at or at or under from the drop-down list. In the second field, select the LDAP directory location from the drop-down list.
|
|
21
|
To undo all changes made to the list of users, click Undo and then click OK in the confirmation dialog box.
|
|
22
|
When finished pruning out as many unwanted accounts as possible with the Remove from list options, use the checkboxes in the list to select the accounts to import.
|
|
23
|
Click Save selected.
|
|
1
|
Navigate to the Users > Local Users page.
|
|
2
|
|
3
|
Click the Groups tab.
|
|
4
|
|
5
|
|
6
|
Click OK.
|
|
7
|
Navigate to the Network > Interfaces page.
|
|
8
|
|
9
|
To allow the Guest Administrator account to login to the appliance from the LAN, under User Login select both HTTP and HTTPS checkboxes.
|
|
10
|
Click OK.
|
|
2
|
Click the Manage button.
|
After logging in, the Guest Administrator can manage guest accounts and sessions through the Users > Guest Status page, but cannot access any other resources or management interface pages.