
The Security Services > Anti-Spyware page displays the configuration settings for managing the service on your Dell SonicWALL security appliance.
The Security Services > Anti-Spyware page is divided into three sections:
|
•
|
Anti-Spyware Status – displays status information on the state of the signature database, your Dell SonicWALL Anti-Spyware license, and other information.
|
|
•
|
Anti-Spyware Global Settings – provides the key settings for enabling SonicWALL Anti-Spyware on your Dell SonicWALL security appliance, specifying global SonicWALL Anti-Spyware protection based on three classes of spyware, and other configuration options.
|
|
•
|
Anti-Spyware Policies – allows you to view Dell SonicWALL Anti-Spyware signatures and configure the handling of signatures by category groups or on a signature by signature basis. Categories are signatures grouped together based on the product or manufacturer.
|
The Anti-Spyware Status section shows the state of the signature database, including the database's timestamp, and the time the SonicWALL signature servers were last checked for the most current signatures. The SonicWALL security appliance automatically attempts to synchronize the database on startup, and once every hour.
|
•
|
Signature Database – indicates the signature database has been downloaded to the SonicWALL security appliance.
|
|
•
|
Signature Database Timestamp – displays the date and time the signature database was last updated. The Signature Database Timestamp is a timestamp for updates to the SonicWALL Anti- Spyware signature database, not the last update to the SonicWALL security appliance.
|
|
•
|
Last Checked – displays the last time the SonicWALL security appliance checked for signature updates.
|
|
•
|
Anti-Spyware Expiration Date – displays your SonicWALL Anti-Spyware license expiration date. If your SonicWALL Anti-Spyware subscription expires, the SonicWALL Anti-Spyware inspection is stopped and the SonicWALL Anti-Spyware configuration settings are removed from the SonicWALL security appliance. These settings are automatically restored after renewing your SonicWALL Anti- Spyware license to the previously configured state.
|
The following note contains a link to the Network > Zones page where you can configure
Anti-Spyware on individual zones:
Note: Enable the Anti-Spyware per zone from the Network > Zones page.
The Anti-Spyware Global Settings panel enables you to globally prevent and/or detect attacks based on the following attack levels:
|
•
|
High Danger Level Spyware – These spyware applications are the most dangerous to your network, such as keyloggers or porn dialers, or may contain security vulnerabilities. Removal may be extremely difficult or impossible.
|
|
•
|
Medium Danger Level Spyware – These spyware applications can cause disruption to your network, such as increased network traffic that slows down performance. Removal may be extremely difficult.
|
|
•
|
Low Danger Level Spyware – These spyware applications are characterized by less intrusive activity and are not an immediate threat. They may profile users and usually are simple to remove.
|
|
TIP: Dell SonicWALL recommends enabling Prevent All for High Danger Level Spyware and Medium Danger Level Spyware to provide network protection against the most damaging spyware.
|
Anti-Spyware protection provides two methods for managing global spyware threats: detection (Detect All) and prevention (Prevent All). You must specify a Prevent All action in the Signature Groups panel for anti-spyware to occur on a global level on the SonicWALL security appliance.
When Prevent All is enabled for a signature group in the Signature Groups panel, the SonicWALL security appliance automatically drops and resets the connection to prevent the traffic from reaching its destination.
When Detect All is enabled for a signature group in the Signature Groups panel, the SonicWALL security appliance logs and alerts any traffic that matches any signature in the group, but does not take any action against the traffic. The connection proceeds to its intended destination. You view the SonicWALL log on the Log > View page as well as configure how alerts are handled by the SonicWALL security appliance in the Log > Automation page.
When Detect All and Prevent All are both enabled for a signature group in the Signature Groups panel, the SonicOS logs and sends alerts on traffic that matches any signature in the group, and automatically drops and resets the connection to prevent the traffic from reaching its destination.
The Enable Inspection of Outbound Spyware Communication option is available for scanning outbound traffic for spyware communication.
If your firewall is running SonicOS, you can apply Dell SonicWALL Anti-Spyware to zones on the Network > Zones page to enforce Anti-Spyware not only between each network zone and the WAN, but also between internal zones. For example, enabling Anti-Spyware on the LAN zone enforces Anti-Spyware on all incoming and outgoing LAN traffic.
In the Anti-Spyware Status section of the Security Services> Anti-Spyware Service page, click the Network > Zones link to access the Network > Zones page. You apply Anti-Spyware to one of the zones listed on the Network > Zones page.
|
1
|
In the firewall management interface, select Network > Zones. (Or from the Anti-Spyware Status section, on the Security Services > Intrusion Prevention page, click the Network > Zones link.) The Network > Zones page is displayed.
|
|
2
|
In the Configure column in the Zone Settings panel, click the Edit icon for the zone you want to apply SonicWALL Anti-Spyware. The Edit Zone window is displayed.
|
|
3
|
Click the Enable Anti-Spyware checkbox. A checkmark appears. To disable SonicWALL Anti-Spyware, clear the box.
|
|
4
|
Click OK.
|
You can also enable SonicWALL Anti-Spyware protection for new zones you create on the Network > Zones page. Clicking the Add button displays the Add Zone window, which includes the same settings as the Edit Zone window.
The Anti-Spyware Policies section allows you to view and manage how SonicWALL Anti-Spyware handles signatures by category groups or on a signature by signature basis. Categories are signatures grouped together by product or manufacturer, and they are listed in the View Style menu.
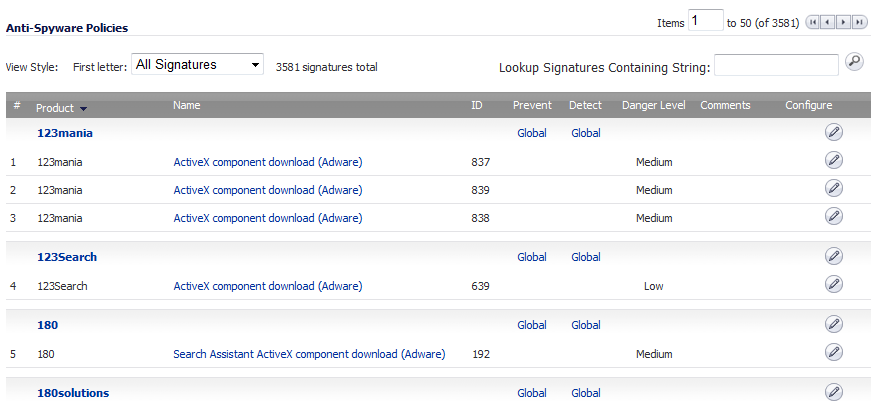
Entries listed in the Anti-Spyware Policies panel are from the Dell SonicWALL Anti-Spyware signature database downloaded to your firewall. Categories and signatures are dynamically updated by the Anti-Spyware Service. Categories and signatures dynamically change over time in response to new threats.
You can display the signatures in a variety of views using the View Style menu. This menu allows you to specify the categories or signatures to display in the Anti-Spyware Policies panel. You can select All Signatures, or you can select the first letter or number in the spyware name.

Selecting All Signatures from the menu displays all of the signatures by category. The Anti-Spyware Policies panel displays all the categories and their signatures. The category headers divide the signature entries. These headers display Global in the Prevent and Detect columns, indicating the global settings that you defined in the Anti-Spyware Global Settings section.
The Anti-Spyware Policies panel displays the following information about each signature entry:
|
•
|
Product - Displays the spyware name or manufacturer.
|
|
•
|
Name - Displays the name of the spyware as a link. Clicking the name link displays the SonicAlert information about the spyware.
|
|
•
|
ID - The SonicWALL database ID number of signature.
|
|
•
|
Prevent - A check mark in this column indicates prevention is enabled. A green check mark appears in the Detect column any time you make a change from the global or category prevention settings.
|
|
•
|
Detect - A check mark in this column indicates detection is enabled. A green check mark appears in the Detect column any time you make a change from the global or category detection settings.
|
|
•
|
Danger Level - Defines the attack signature as Low, Medium, or High as defined for the Signature Groups panel.
|
|
•
|
Comments - Displays a brief description of the policy.
|
|
•
|
Configure - Clicking the edit icon in the Configure column of the category header displays the Edit Anti-Spyware Category window. Clicking the edit icon in the Configure column for an individual signature displays the Edit Anti-Spyware Signature window. These windows allow you to define a different action from the global settings for the specific category or signature.
|
In the Anti-Spyware Policies panel, clicking on the spyware name link in Name column, displays a SonicALERT page that provides detailed information about the spyware.
The Items field displays the panel number of the first category or signature. If you are displaying the first page of a panel, the entry might be Items 1 to 50 (of 58). You can enter a number in the Items field to go directly to a specific entry or use the navigation buttons to navigate the panel.
![]()
The SonicWALL Anti-Spyware signatures are displayed fifty to a page in the Anti-Spyware Policies panel.
|
NOTE: You can change the default, 50 entries per panel, on the System > Administration page in the Web Management Settings section.
|
You can search the signature database by entering a search string in the Lookup Signatures Containing String field, then clicking icon.
Clicking on the Anti-Spyware Policies panel headings (Name, ID, Prevent, Detect, or Danger Level) sorts the panel entries according to the heading. An up arrow by the column header name indicates the entries are sorted in descending order. A down arrow by the column header name indicates the entries are sorted in ascending order.
You can choose to override the global prevention and detection settings on a category-by-category basis. The global Prevent All and Detect All settings, which include High Danger Level Spyware, Medium Danger Level Spyware, and Low Danger Level Spyware are configured in the Anti-Spyware Global Settings section. Categories can include any combination of Danger Levels as defined in the Signature Groups panel.
The available signature categories are listed in the View Style menu in the Anti-Spyware Policies section. Configuring the prevent and detect behaviors on a category basis affects all the signatures in the category, regardless of the global attack priority settings (Low, Medium, or High)
|
1
|
|
2
|
If you select All categories, click on the Edit icon in the Configure column for the category you want to change. the Edit Anti-Spyware Category window is displayed.
|
|
3
|
If you select an individual category, click on the Edit icon to the right of the Category menu. The Edit Anti-Spyware Category window is displayed.
|
|
4
|
If you want to change the Global Setting for Prevention, select Enable or Disable from the Prevention menu.
|
|
5
|
If you want to change the Global Setting for Detection, select Enable or Disable from the Detection menu.
|
|
6
|
If you want to change the Global Settings for both detection and prevention, select Enable or Disable from the Detection and Prevention menu.
|
|
7
|
If you want to change the Log Redundancy Filter setting from the default global setting, uncheck the Use Category Settings box for Log Redundancy Filter (seconds) and enter a time value in seconds.
|
|
8
|
Click OK to save your changes.
|
|
TIP: If you select All signatures from the Category menu, all the categories and their signatures are displayed in the Anti-Spyware Policies panel, allowing you to configure both the category and signatures within the category.
|
If you override any global settings for a category, a green check mark appears in the Prevent and/or Detect columns of the Anti-Spyware Policies panel.
|
1
|
|
2
|
If you select All Categories, click on the Edit icon in the Configure column for the category you want to change. the Edit Anti-Spyware Category window is displayed.
|
|
3
|
If you select an individual category, click on the Edit icon to the right of the Category menu. The Edit Anti-Spyware Category window is displayed.
|
|
4
|
If you want to change the Global Setting for Prevention, select Enable or Disable from the Prevention menu.
|
|
5
|
If you want to change the Global Setting for Detection, select Enable or Disable from the Detection menu.
|
|
6
|
If you want to change the Global Settings for both detection and prevention, select Enable or Disable from the Detection and Prevention menu.
|
|
•
|
Included Users/Groups - select the Users/Groups you want included in this SonicWALL Anti-Spyware category. The default is All.
|
|
•
|
Excluded Users/Groups - select the Users/Groups you want excluded from this SonicWALL Anti-Spyware category. The default None.
|
|
•
|
Included IP Address Range - select the IP address range you want included in this SonicWALL Anti-Spyware category. The default All.
|
|
•
|
Excluded IP Address Range - select the IP address range you want excluded from this SonicWALL Anti-Spyware category. The default None.
|
|
•
|
Schedule - select the scheduled time you want for the activation of this SonicWALL Anti-Spyware category. The default Always on.
|
|
8
|
If you want to change the Log Redundancy Filter setting from the default global setting, uncheck the Use Category Settings box for Log Redundancy Filter (seconds) and enter a time value in seconds.
|
|
9
|
Click OK to save your changes.
|
|
TIP: If you select All signatures from the Category menu, all the categories and their signatures are displayed in the Anti-Spyware Policies panel, allowing you to configure both the category and signatures within the category.
|
You can remove all custom category and signature settings you created as well as reset global Prevent All and Detect All settings and Log Redundancy Filter (seconds) settings by clicking the Reset Anti-Spyware Settings & Policies button in the Anti-Spyware Global Settings section.
Selecting All signatures from the Category menu displays all of the signatures organized within categories. The All signatures option displays every signature in the Anti-Spyware database.
If global Prevent All and Detect All settings are in effect for the category, Global is displayed in the Prevent and Detect columns for the category and all of its signatures.
Selecting a specific signature category, displays the signatures in that category.
|
1
|
In the Anti-Spyware Policies panel, display the signature you want to change. Click the edit icon in the Configure column for the entry to display the Edit Anti-Spyware Signature window.
|
|
2
|
If you want to change the Category Setting for Prevention, select Enable or Disable from the Prevention menu.
|
|
3
|
If you want to change the Category Setting for Detection, select Enable or Disable from the Detection menu.
|
|
4
|
If you want to change the Category Setting for both detection and prevention, select Enable or Disable from the Detection and Prevention menu.
|
|
5
|
If you want to change the Log Redundancy Filter setting from the Category setting, uncheck the Use Category Settings box for Log Redundancy Filter (seconds) and enter a time value in seconds.
|
|
6
|
Click OK to save your changes.
|
|
1
|
In the Anti-Spyware Policies panel, display the signature you want to change. Click the edit icon in the Configure column for the entry to display the Edit Anti-Spyware window.
|
|
2
|
If you want to change the Category Setting for Prevention, select Enable or Disable from the Prevention menu.
|
|
3
|
If you want to change the Category Setting for Detection, select Enable or Disable from the Detection menu.
|
|
4
|
If you want to change the Category Setting for both detection and prevention, select Enable or Disable from the Detection and Prevention menu.
|
|
•
|
Included Users/Groups - select the Users/Groups you want included in this SonicWALL Anti-Spyware signature. The default is All.
|
|
•
|
Excluded Users/Groups - select the Users/Groups you want excluded from this SonicWALL Anti-Spyware signature. The default None.
|
|
•
|
Included IP Address Range - select the IP address range you want included in this SonicWALL Anti-Spyware signature. The default All.
|
|
•
|
Excluded IP Address Range - select the IP address range you want excluded from this SonicWALL Anti-Spyware signature. The default None.
|
|
•
|
Schedule - select the scheduled time you want for the activation of this SonicWALL Anti-Spyware signature. The default Always on.
|
|
6
|
If you want to change the Log Redundancy Filter setting from the Category setting, uncheck the Use Category Settings box for Log Redundancy Filter (seconds) and enter a time value in seconds.
|
|
7
|
Click OK to save your changes.
|
You can remove all custom category and signature settings you created as well as reset global Prevent All and Detect All settings and Log Redundancy Filter (seconds) settings by clicking the Reset Anti-Spyware Settings & Policies button in the Anti-Spyware Global Settings section.