|
1
|
|
2
|
|
3
|
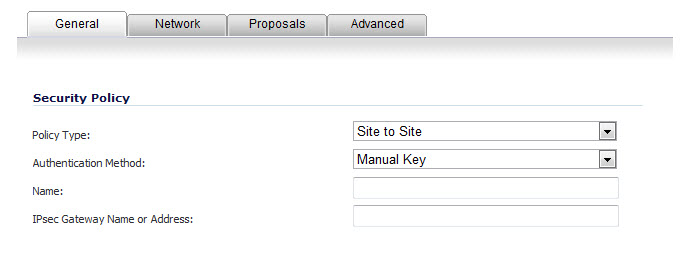
Select Manual Key from the IPsec Keying Mode menu. The VPN Policy dialog displays the manual key options.
|
|
4
|
Enter a name for the policy in the Name field.
|
|
5
|
Enter the host name or IP address of the remote connection in the IPsec Gateway Name or Address field.
|
|
6
|
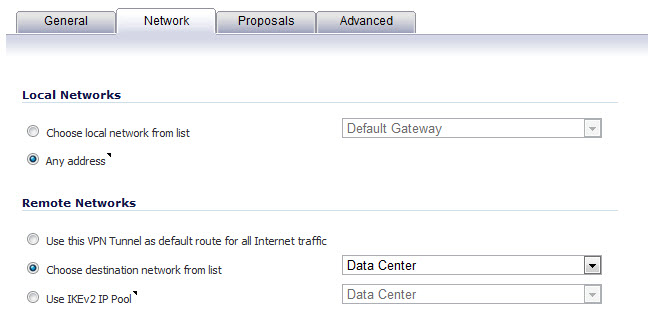
Click the Network tab.
|
|
7
|
Select a local network from Choose local network from list if a specific local network can access the VPN tunnel. If traffic can originate from any local network, select Any Address. Use this option is a peer has Use this VPN Tunnel as default route for all Internet traffic selected. You can only configure one SA to use this setting.
|
Alternatively, select Choose Destination network from list, and select the address object or group.
|
8
|
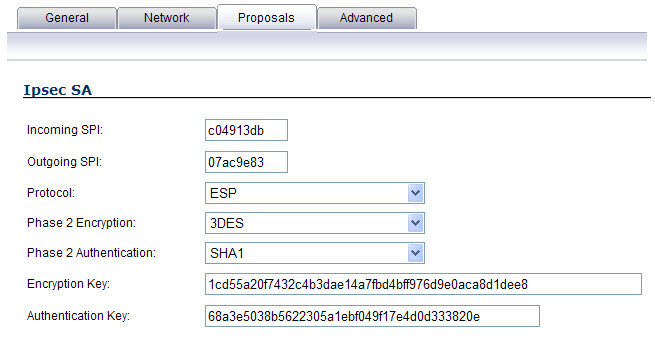
Click on the Proposals tab.
|
|
9
|
Define an Incoming SPI and an Outgoing SPI. The SPIs are hexadecimal (0123456789abcedf) and can range from 3 to 8 characters in length.
|
|
10
|
The default values for Protocol, Phase 2 Encryption, and Phase 2 Authentication are acceptable for most VPN SA configurations.
|
|
NOTE: The values for Protocol, Phase 2 Encryption, and Phase 2 Authentication must match the values on the remote SonicWall.
|
|
11
|
Enter a 16-character hexadecimal encryption key in the Encryption Key field or use the default value. This encryption key is used to configure the remote SonicWall encryption key, therefore, write it down to use when configuring the SonicWall.
|
|
12
|
Enter a 32-character hexadecimal authentication key in the Authentication Key field or use the default value. Write down the key to use while configuring the SonicWall settings.
|
|
13
|
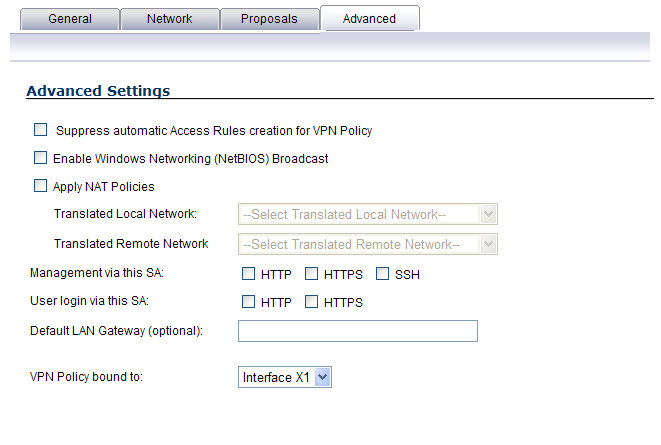
Click the Advanced tab and select any of the following optional settings you want to apply to your VPN policy.
|
|
•
|
The Suppress automatic Access Rules creation for VPN Policy setting is not enabled by default to allow the VPN traffic to traverse the appropriate zones.
|
|
•
|
Select Enable Windows Networking (NetBIOS) broadcast to allow access to remote network resources by browsing the Windows® Network Neighborhood.
|
|
•
|
Select Apply NAT Policies if your want the SonicWall to translate the Local, Remote or both networks communicating via this VPN tunnel. To perform Network Address Translation on the Local Network, select or create an Address Object in the Translated Local Network drop-down box. To translate the Remote Network, select or create an Address Object in the Translated Remote Network drop-down box. Generally, if NAT is required on a tunnel, either Local or Remote should be translated, but not both. Apply NAT Policies is particularly useful in cases where both sides of a tunnel use either the same or overlapping subnets.
|
|
•
|
To manage the local SonicWall through the VPN tunnel, select HTTP, HTTPS, or both from Management via this SA.
|
|
•
|
|
•
|
If you have an IP address for a gateway, enter it into the Default LAN Gateway (optional) field.
|
|
•
|
Select an interface from the VPN Policy bound to drop-down menu.
|
|
14
|
Click OK.
|
|
15
|
|
1
|
|
2
|
|
3
|
Enter a name for the SA in the Name field.
|
|
4
|
Enter the host name or IP address of the local connection in the IPsec Gateway Name or Address field.
|
|
5
|
Click the Network tab.
|
|
6
|
Select a local network from Choose local network from list if a specific local network can access the VPN tunnel. If traffic can originate from any local network, select Any Address. Select Use this VPN Tunnel as default route for all Internet traffic if traffic from any local user cannot leave the SonicWall security appliance unless it is encrypted. You can only configure one SA to use this setting.
|
Alternatively, select Choose Destination network from list, and select the address object or group.
|
7
|
Click the Proposals tab.
|
|
8
|
Define an Incoming SPI and an Outgoing SPI. The SPIs are hexadecimal (0123456789abcedf) and can range from 3 to 8 characters in length.
|
|
9
|
The default values for Protocol, Phase 2 Encryption, and Phase 2 Authentication are acceptable for most VPN SA configurations.
|
|
NOTE: The values for Protocol, Phase 2 Encryption, and Phase 2 Authentication must match the values on the remote SonicWall.
|
|
10
|
Enter a 16 character hexadecimal encryption key in the Encryption Key field or use the default value. This encryption key is used to configure the remote SonicWall encryption key, therefore, write it down to use when configuring the remote SonicWall.
|
|
11
|
Enter a 32 character hexadecimal authentication key in the Authentication Key field or use the default value. Write down the key to use while configuring the remote SonicWall settings.
|
|
12
|
Click the Advanced tab and select any of the following optional settings you want to apply to your VPN policy:
|
|
•
|
The Suppress automatic Access Rules creation for VPN Policy setting is not enabled by default to allow the VPN traffic to traverse the appropriate zones.
|
|
•
|
Select Enable Windows Networking (NetBIOS) broadcast to allow access to remote network resources by browsing the Windows® Network Neighborhood.
|
|
•
|
Select Apply NAT Policies if you want the SonicWall to translate the Local, Remote or both networks communicating via this VPN tunnel. To perform Network Address Translation on the Local Network, select or create an Address Object in the Translated Local Network drop-down box. To translate the Remote Network, select or create an Address Object in the Translated Remote Network drop-down box. Generally, if NAT is required on a tunnel, either Local or Remote should be translated, but not both. Apply NAT Policies is particularly useful in cases where both sides of a tunnel use either the same or overlapping subnets.
|
|
•
|
To manage the remote SonicWall through the VPN tunnel, select HTTP, HTTPS, or both from Management via this SA.
|
|
•
|
|
•
|
If you have an IP address for a gateway, enter it into the Default LAN Gateway (optional) field.
|
|
•
|
Select an interface from the VPN Policy bound to menu.
|
|
13
|
Click OK.
|
|
14
|