Downloading System/Log Files

NOTE: Some log file names, such as those found in the commonlogs directory, contain a two-digit number such as 12.log. The 12 indicates that the log is for the 12th day of the most recent month. Some log file names end with a digit, such as MlfThumbUpdate_2.log. The _2 indicates that this is an older log. The current log is MlfThumbUpdate.log. The next most recent log is MlfThumbUpdate_0.log, followed by MlfThumbUpdate_1.log, and so forth.
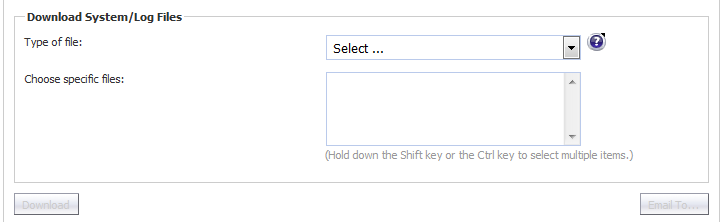
Most log data is in Greenwich Mean Time (GMT), not in the local time of the server the logs come from. This applies to the names of the log files as well.

To download log or system configuration files from your SonicWall Email Security server:
1
Navigate to the Download System/Log Files section of Anti-Spam > Advanced.

2
Select the type of file to download from the Type of file drop-down menu. The Choose specific files list becomes populated with that type of file.

3
From the Choose specific files list, select one or more specific items. To select multiple files, hold down the Shift key or Ctrl key while selecting the files. The Download and Email To… buttons become active.
4
Download button to download the file(s) to your local hard drive.
Email To... button to email the file(s). the Send To dialog displays.

a)
Enter the sender’s email address in the Send files from this email address field. The default is postmaster.
b)
Enter the recipient’s email address in the Recipient email address field.
c)
Click the Send button.

Selecting the Amount and Level of Log Information

You can select the level and amount of system report information to be stored in your logs in the Other Settings section.

To configure the level and amount of log information:
1
Navigate to the Other Settings section of Anti-Spam > Advanced.

2
Click the Manage button. The Set Log Level dialog displays.

3
Select the default log level from the Default Log Level drop-down menu; levels are listed from lowest to highest:
NOTE: The higher the default log level, the more events are recorded. For example, the info level also records trace and debug levels.
trace – lowest level
info – default
fatal – highest level

All logs adhere to the default level set here unless specifically overridden.

4
To make changes to the logs in the Overrides section, deselect the Adhere to default level check box. All drop-down menus for all service categories become active.
5
To change the log level for specific services and subservices. from the Select Log Level drop-down menu for the service/subservice to be changed, select the desired log level. The levels are the same as for those in Step 3, plus the adhere option.
NOTE: The default log level for all service and subservice categories is adhere, that is, the log level set by the Default Log Level drop-down menu is used.
6
 

When a fourth log file is generated, the oldest log file is discarded, the second oldest becomes the oldest, and the third oldest becomes the second oldest.

a
 
3
6
8
5
7
9


A lower number of logs saves disk space, but older data may not be available. A larger number of logs retains more data, but takes more disk space.

7
Optionally, select a size for the service logs (see Step 6) from the Size drop-down menus. The default size of each log is 10 Mb.

You can increase the size of he logs, in 10 MB increments, from 10 Mb (default) to 100 Mb. A smaller log size saves disk space, but larger logs contain more data.

8
Click the Apply Changes button to save any changes made.
To return the logging level to default value:
1
Click the Reset to Defaults button.