CDP_Agent_User_Guide
This User’s Guide provides installation procedures and configuration guidelines for deploying the SonicWALL Continuous Data Protection (CDP) Agent. The SonicWALL CDP Agent provides a software interface for backing up files, folders, and application data to a SonicWALL CDP appliance.
The SonicWALL CDP appliance backs up data from the agent computer, saving it first locally and then, if configured, to a secure offsite location*. By combining the advantages of local disk-based backup (fast recovery) with offsite backup, the SonicWALL CDP appliance helps protect your network from threats of data loss.
*Offsite backup is offered as a subscription-based service.
This guide contains the following sections:
Overview of the SonicWALL CDP Agent
The SonicWALL CDP 6.1 Agent provides a user interface that is closely aligned with the Web-based management interface for the SonicWALL CDP appliance. The Agent User Interface looks and operates the same on supported Windows, Mac, and Linux clients.
The Agent service is also faster, smarter, and more efficient than in versions previous to 6.0. Initial backup of one million files (of size 1 KB each) takes just a little over 6 hours, and subsequent revisions copy only the modified data blocks, keeping track of all changes internally. This method uses less bandwidth, takes less time, and uses less disk space than earlier versions of SonicWALL CDP.
See the following sections for an overview of various functionality in SonicWALL CDP:
About Data De-Duplication
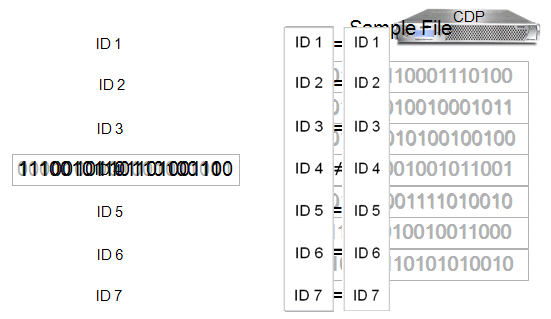
Data de-duplication technology is used on the agent during backups of revisions for both applications and files/folders. This allows all new data to be backed up, while existing data is not rewritten to the appliance. Metadata keeps track of where the changes occur, and is always included with revisions.
Figure 1 shows a graphical representation of the data de-duplication process.
|
|
Data De-Duplication |
About FileSets
When backing up data, SonicWALL CDP is aware of interdependencies among multiple, related files, called FileSets. Both application backup and backup of files and folders use the concept of FileSets to include all relevant data in backups, so that recovery can provide everything needed for full and seamless operation.
On Windows agents, Microsoft Volume Shadow Copy Service (VSS) is used during backups to take a snapshot of all relevant data, providing a cohesive set of files at a certain point in time. Using the VSS method also eliminates the need to stop services in order to keep files in sync while performing a backup.
About Backup Policies
Data backup in SonicWALL CDP is accomplished via policies. Policies control the backup activities performed by SonicWALL CDP.
Figure 2 illustrates a policy for a files and folders backup.
|
|
Policy Contents |
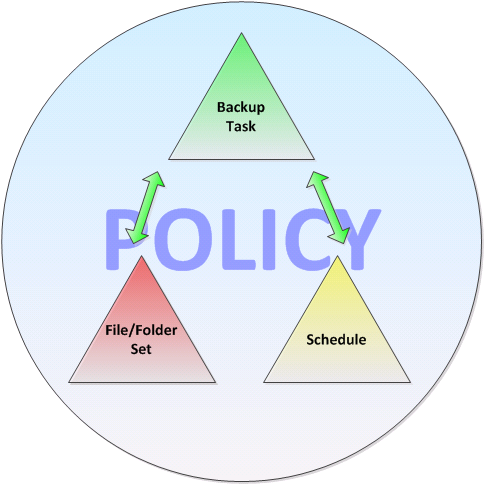
Each backup policy contains one or more backup tasks.
Each backup task consists of two components:
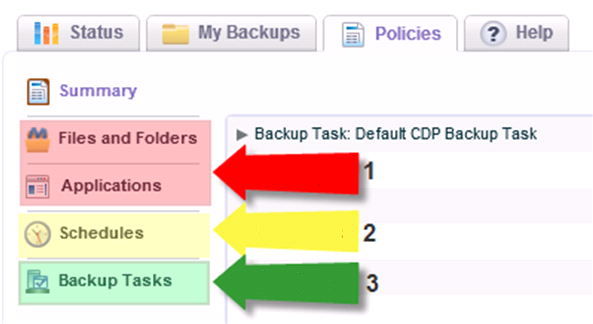
Figure 3 illustrates the steps for creating a policy.
|
|
Creating a Policy |
Backup policies are defined both at the administrative level in the Web Management Interface and at the local agent level using the Agent User Interface. Policies can be very granular, even allowing you to create multiple backup tasks in one Files and Folders object, if desired. Such an object can contain more than one folder. You can also define the number of revisions to keep when configuring the backup policy, on both local and offsite CDP appliances.
A legacy style CDP policy is defined by default at the administrative level and is inherited by agents connected to the SonicWALL CDP appliance. At the agent level, you can edit this default policy to add files and folders for backup to the CDP object, but you cannot create a new CDP object. A CDP object differs from a Files and Folders or Application object in that the defined files and folders are backed up as separate entities, not as FileSets. CDP policies use Interval scheduling, which back up changed data continuously or at a set interval, rather than Event scheduling in which you can set dates for backups to occur. The default CDP policy accommodates policies from previous (5.x) versions of SonicWALL CDP after upgrading.
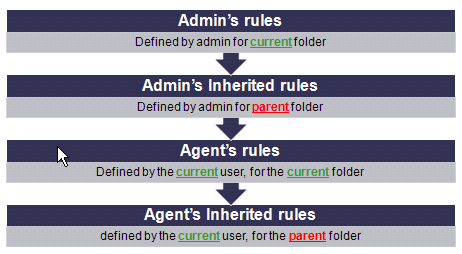
About Rules
The rules within Files and Folders objects are flexible, providing the ability to include or exclude files or folders at any level. Rules are defined at both the administrative level and the agent level, with administrative rules taking precedence over local rules. CDP type objects also provide similar rule functionality. Application objects do not use rules in the same format, but allow you to select the application components to back up, such as individual user mailboxes or system state files.
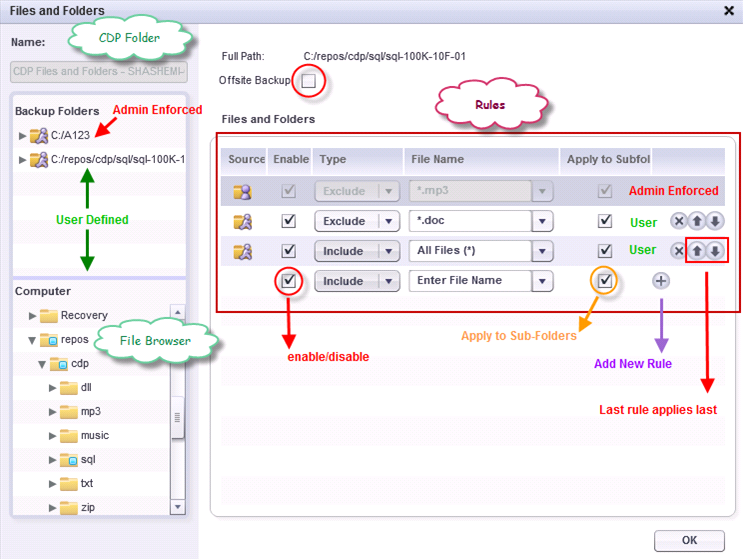
Figure 4 illustrates the order in which rules are applied when determining what to back up.
|
|
Admin vs Agent Rule Precedence |
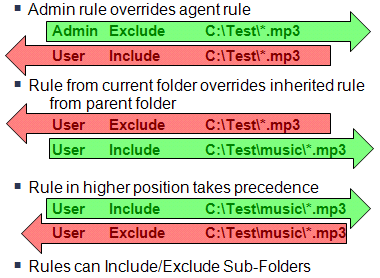
Within the constraints of administrative rule precedence, rules operate as follows:
Figure 5 illustrates rule operation and precedence.
|
|
Rule Operational Precedence |
About Offsite Backup
The SonicWALL CDP Offsite Data Backup Service is an optional offsite backup and recovery solution that stores data in a secure data center, and can be purchased for an additional fee. When configuring a backup task on the Policies tab, you can specify the number of revisions that should be kept on the offsite portal or appliance.
The Offsite subscription-based service is configured by the administrator on the System > Settings page of the Web Management Interface. Offsite backup can be selected during policy configuration. This allows you to copy your backups to either the SonicWALL Offsite Portal, or to another, offsite, SonicWALL CDP appliance for safekeeping in the event that your local appliance becomes unusable. The SonicWALL Offsite Portal provides load balancing, redundancy, and an efficient file system structure for optimal access to and protection of your data.
The SonicWALL CDP Offsite Data Backup provides different services, ranging from 5 to 100 GB of quota. You need to make sure that the total size of all of your backups does not exceed the quota limit. If the offsite quota is exceeded, the consequent backup will fail and the administrator will receive an email alert. If the agent exceeds its quota, the Quota Exceeded Error message will be displayed, and the status for the last backup will change to Quota Exceeded . You will receive an email notification informing you of the failed backup attempt. You can free up your storage space by removing some of the old backups or you can purchase additional quota.
For more information, see the SonicWALL CDP Offsite Data Backup Service data sheet at: <http://www.sonicwall.com/downloads/DS_CDP_Offsite_US_060507.pdf >
About Scheduling
Backups are scheduled using a very flexible interface for schedule configuration. You can schedule backups to occur at any interval down to the minute or up to months apart. Custom, specific dates can be configured.
There are two types of scheduling:
|
|
|
Event – Uses fixed time points, such as Mondays at 5 PM or midnight every evening. Used for Fileset or Application backup tasks. |
|
|
|
Interval – Uses Always On or always on during a specific start and end time, such as Sundays from 4 PM to 8 PM. Used for CDP type backup tasks. |
Interval scheduling is used for the default CDP type policy on an agent. Because the Agent User Interface does not provide a way to create a new CDP type backup task, you would not have another opportunity to use interval scheduling.
When creating a backup task in the Web Management Interface, the type of Schedule object available for selection depends on whether you have selected CDP , Fileset , or Client Application in the Select Data Type field of the Add Backup Task configuration window.
The scheduling interface provides four tabs for different scheduling options:
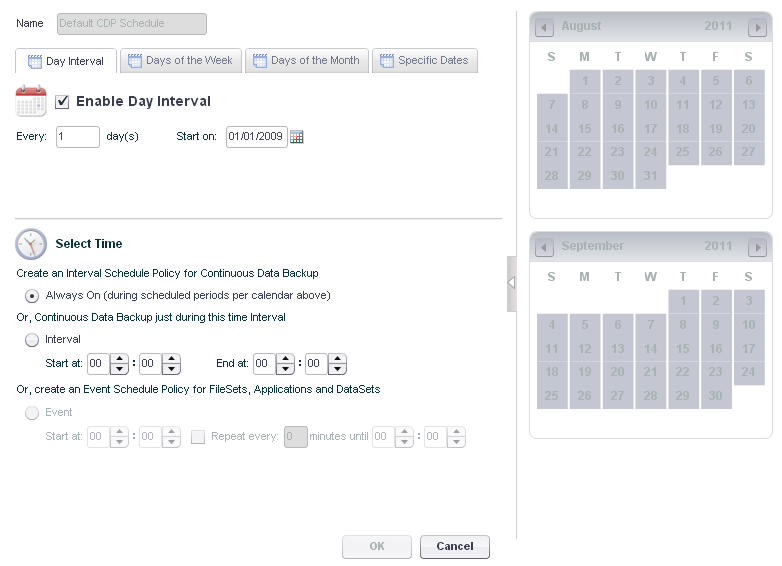
Each tab provides configuration fields and a calendar that displays the selected dates with a darker background, so that you can easily verify your configuration.
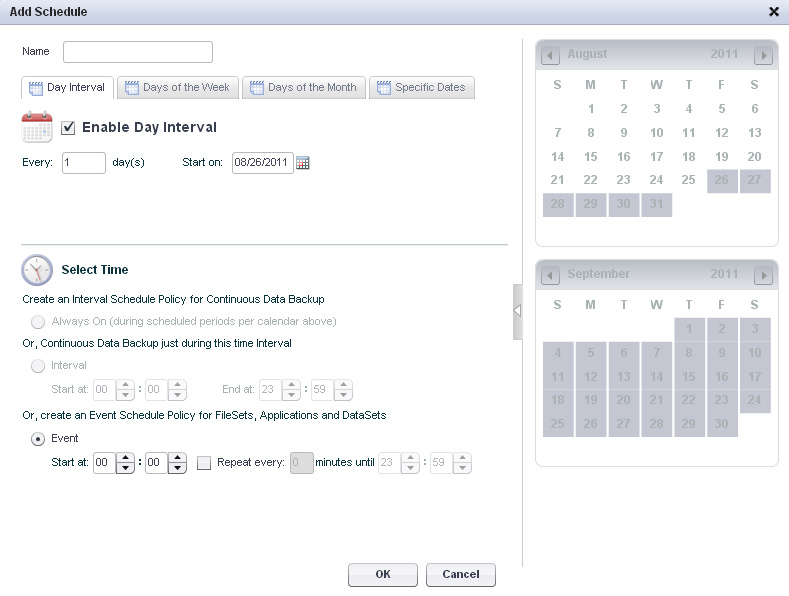
Figure 6 illustrates the Day Interval tab.
|
|
Day Interval Scheduling |
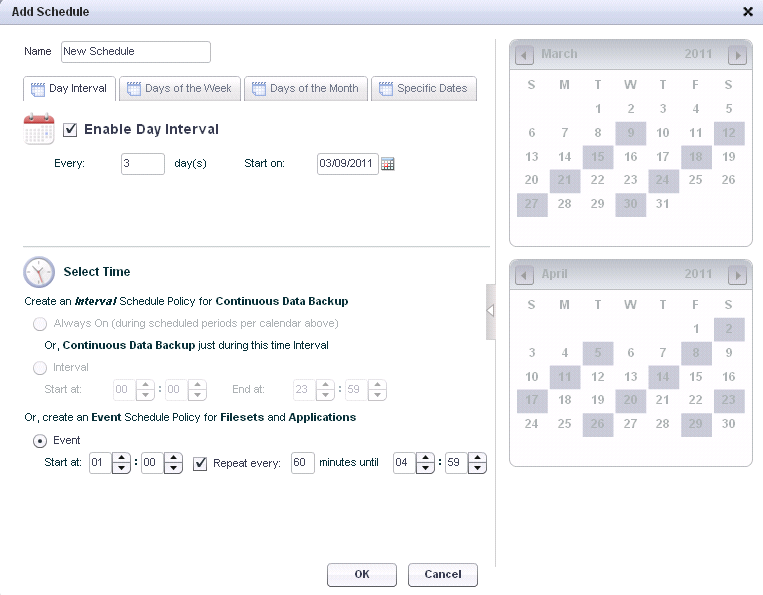
Figure 7 illustrates the Days of the Week tab.
|
|
Days of the Week Scheduling |
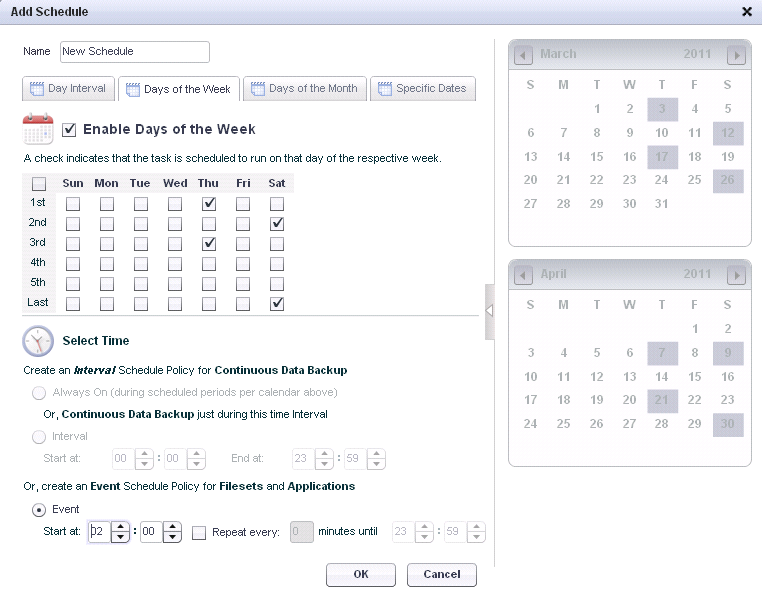
Figure 8 illustrates the Days of the Month tab.
|
|
Days of the Month Scheduling |
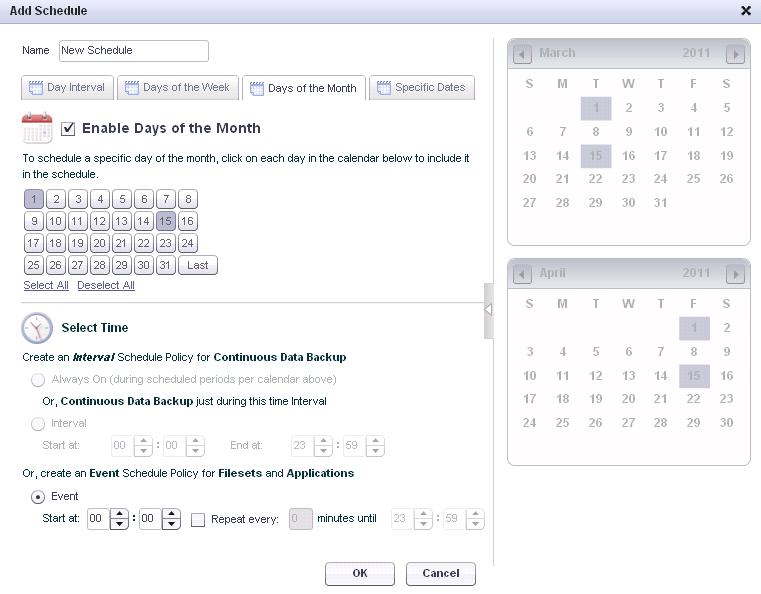
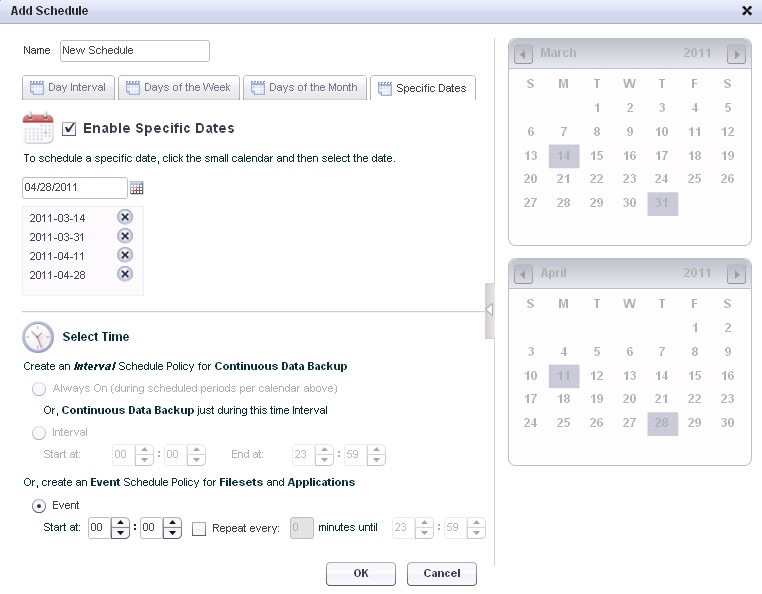
Figure 9 illustrates the Specific Dates tab.
|
|
Specific Dates Scheduling |
The same data can be scheduled for backup with multiple policies using different schedules, allowing you to maintain near-continuous revisions along with daily, weekly, monthly, or custom scheduled versions. The number of revisions to keep is controlled by the settings in each policy.
About Application Backup and Restore
Client applications such as Outlook and Outlook Express are supported for backup and restore, as well as a number of server applications. Supported server applications include Microsoft Exchange, SQL Server, Sharepoint, and Active Directory. Active Directory is backed up and restored as an element of System State, to ensure that all relevant system files are included for a consistent environment.
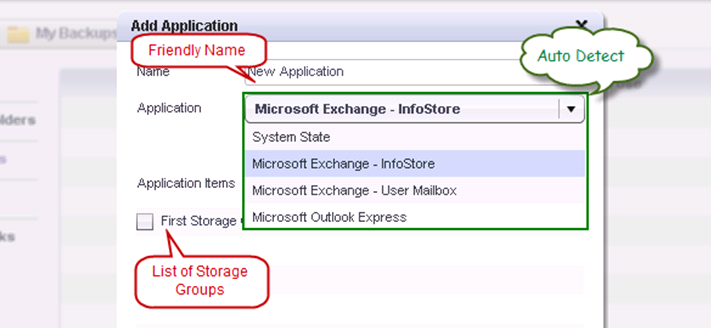
When configuring an Application object as part of a backup policy, available applications on the agent are automatically discovered by SonicWALL CDP, and their friendly names are presented for selection in a drop-down list. Figure 10 illustrates these application features.
|
|
Adding an Application |
When restoring an application, SonicWALL CDP automatically uses the proper restore method for the application type. For example, restore on reboot for Active Directory, or stop/restore/start for SQL Server. Restoring is interactive and walks you through the process.
Example: Creating a Backup Policy
Let’s say that the Finance Department at SonicWALL needs to backup its data on three different schedules.
|
|
|
Administrator requires all users to back up data in the C:\A123 folder |
First, edit the inherited administrator policy to add files for backup. The Files and Folders object includes the folder required by the administrator, and users can add more files and folders for backup and create rules to include or exclude certain files or file types.
Figure 11 illustrates the modifications to the Files and Folders object.
|
|
Selecting Folders for Backup |
Next, the schedule is defined on multiple tabs to accommodate the scheduling requirements.
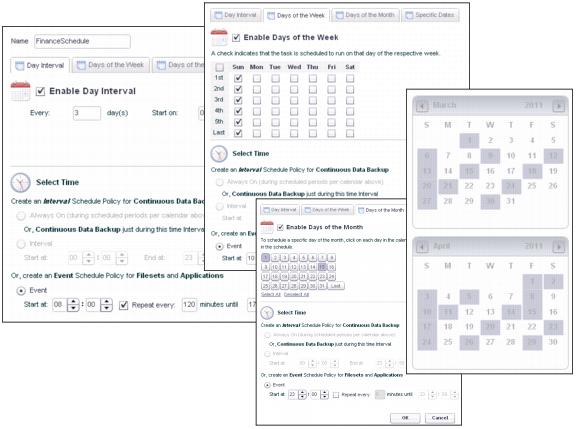
Figure 12 illustrates the schedule configuration.
|
|
Configuring the Schedule |
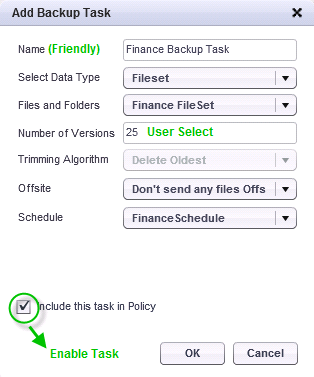
Next, create a backup task which includes the Files and Folders object and the Schedule object.
Figure 13 illustrates the backup task.
|
|
Creating the Backup Task |
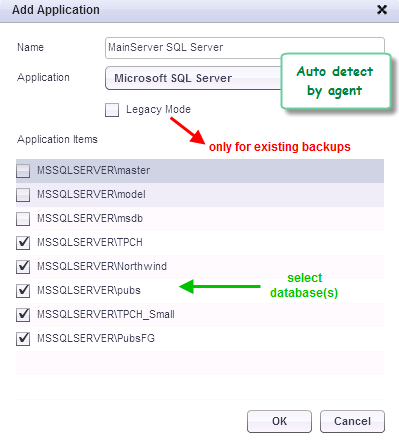
For the SQL backups, create an Application object to select the SQL databases to back up.
Figure 14 illustrates the SQL Server Application object creation.
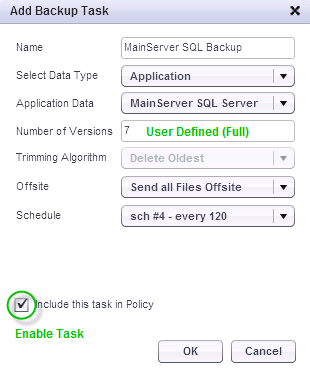
Finally, create a backup task for the SQL Server backup, using the SQL Server Application object and an appropriate Schedule object.
Figure 15 illustrates the creation of the SQL Server backup task.
|
|
Creating an SQL Server Backup Task |
This completes the configuration needed to accomplish the required backups for the Finance Department.
Installing the SonicWALL CDP Agent Software
This section describes installation of the SonicWALL CDP Agent Software for Windows, Mac OS, and Linux systems. See the following subsections:
Configuration Information
Have your network administrator supply you with the following information needed for SonicWALL CDP Agent setup:
|
The password for your SonicWALL
CDP
appliance (if applicable).
|
|
|
The static IP address for your
SonicWALL CDP appliance. |
Downloading the Latest SonicWALL CDP Agent Software
Perform the following steps to download the SonicWALL CDP Agent software on your computer:
|
|
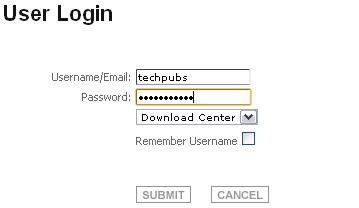
Open a Web browser on the computer you are using as the agent and navigate to http://www.mysonicwall.com . |

|
|
Enter the Username/Email and Password in the appropriate fields. Select Download Center in the drop-down menu located below the password field. |
|
|
Click the Submit button. |
|
|
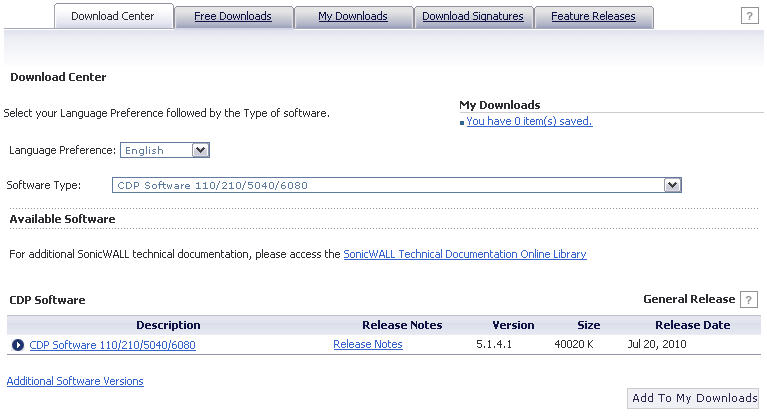
In the Software Type drop-down menu, located in the Download Center , select the CDP Software that corresponds to your SonicWALL CDP appliance. A list of available software appears. |
For Windows , download one of the following installers (where the x’s represent version numbers):
|
|
|
CDPSetup.x64-6.1.x.xx.exe – For 64 bit Windows operating systems |
|
|
|
CDPSetup.x86-6.1.x.xx.exe – For 32 bit Windows operating systems |
For Mac OS , download the following installer (where the x’s represent version numbers):
For Linux , download the following installer (where the x’s represent version numbers):
SonicWALL CDP Agent Installation on Windows
This section describes the requirements and installation steps for Windows computers.
Installation Prerequisites for Windows
In order to install the SonicWALL CDP Agent, you must have:
Installing the SonicWALL CDP Windows Agent
Perform the following steps to install the SonicWALL CDP Agent on your Windows computer:
|
|
Navigate to the folder where your software was downloaded and double-click the setup file to begin the installation process. |
|
|
|
If you are running Windows XP SP2 or use a third-party firewall, you may receive a warning during installation of the SonicWALL CDP software. Select the option to install SonicWALL CDP. |
|
|
Select your preferred language and click Next . |
|
|
|
If you wish to change your language in the future, you will need to uninstall and re-install the software. |
|
|
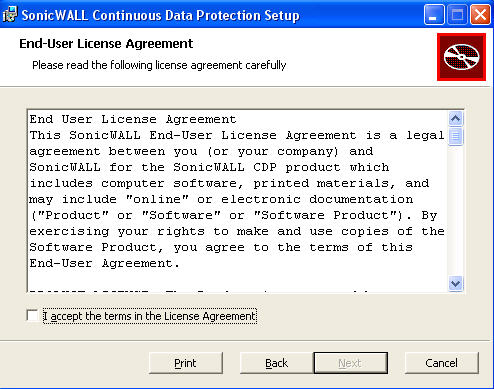
Select the I accept the terms of the license agreement option and click the Next button. |
|
|
|
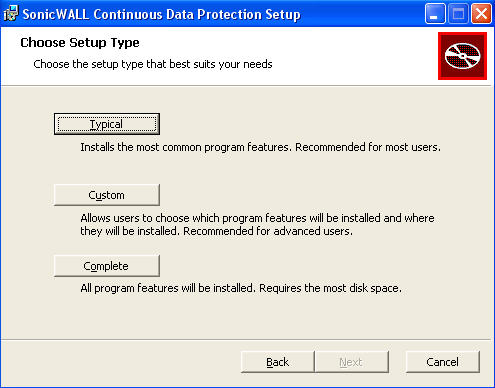
Typical : Installs the most common program features. Recommended for most users. |
|
|
|
Custom : Allows users to select which program features are installed and where they are installed. Typically recommended for advanced users. |
|
|
|
Complete : All program features are installed. This setup choice requires more disk space. |
|
|
Click Next to proceed. |
|
|
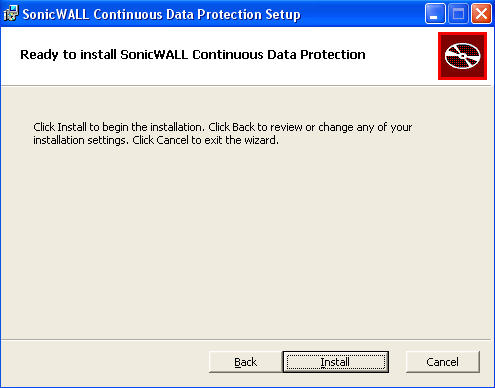
Click Install to install the software. |
|
|
Once the software installation is complete, click the Finish button. |

You have successfully installed the SonicWALL CDP Agent.
Uninstalling the SonicWALL CDP Windows Agent
To uninstall the SonicWALL CDP Agent from your Windows computer, perform the following steps:
|
|
Open the Control Panel and double-click Add or Remove Programs . |
|
|
Select SonicWALL Continuous Data Protection . |
This will remove both SonicWALL Continuous Data Protection and SonicWALL CDPAgentTool .
SonicWALL CDP Agent Installation on Mac OS
This section describes the requirements and installation steps for Mac OS computers.
Supported Platforms
The CDP Mac OS X Agent User Interface is supported on the following operating systems:
System Requirements
The Mac running the CDP Mac OS X Agent User Interface has the following minimum system requirements:
Installing the SonicWALL CDP Mac OS Agent
Perform the following steps to install the SonicWALL CDP Agent on your Mac OS computer:
|
|
Copy the SonicWALL CDPAgentTool_6.1.0.xx.dmg installer to a location on the Mac OS computer. |
|
|
Invoke CDPAgentTool_6.1.0.xx.dmg from “Finder” to create CDPMac/Agent_x.x.x.x.pkg , where x.x.x.x represents the installer version. |
|
|
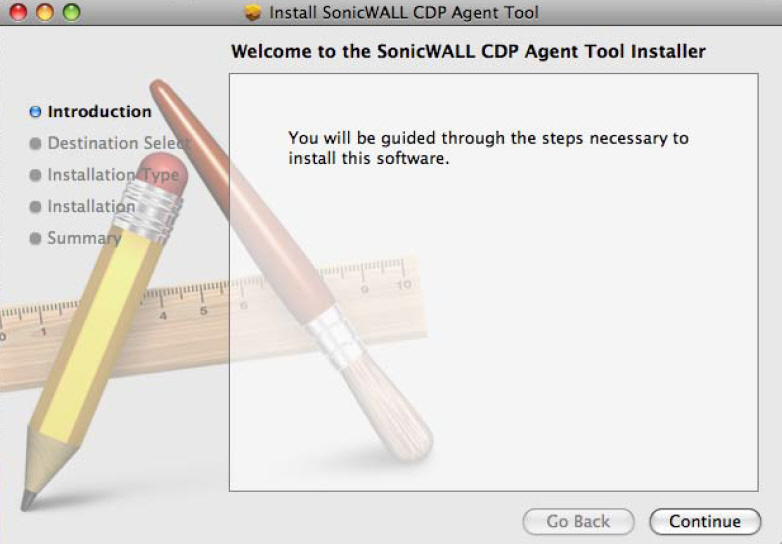
Double click the CDPMac/Agent_x.x.x.x.pkg icon to start the SonicWALL CDP Agent User Interface Installer. |
|
|
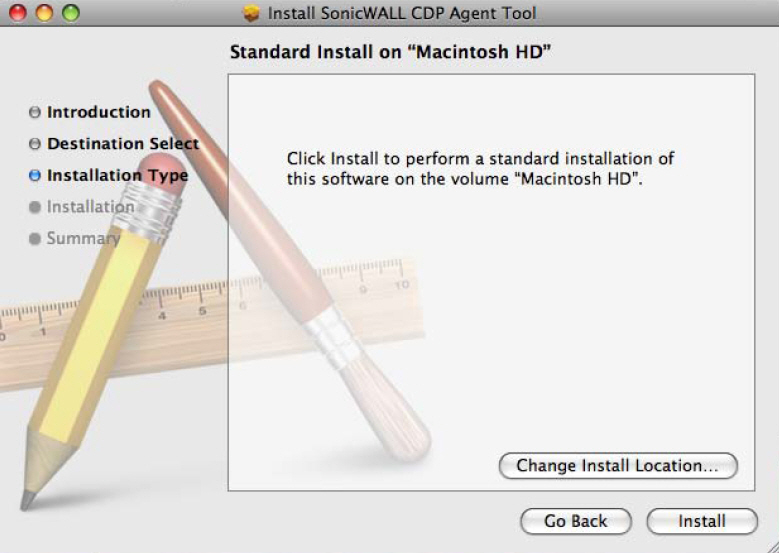
Click the Install button to begin installation of the SonicWALL CDP Agent User Interface. |
|
|
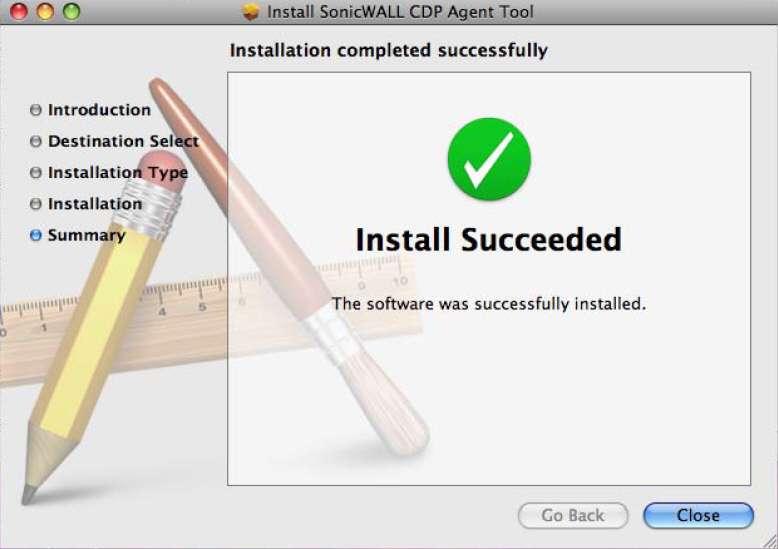
When prompted, enter the Admin password to continue the installation. The Agent User Interface will notify you when the software has successfully been installed. |
Adjusting the Hostname Setting
On some Mac systems, the SonicWALL CDP displays the hostname as “localhost”. This typically does not match the hostname returned if you type hostname on the computer itself. On some Mac OS X versions, such as earlier Snow Leopard, you need to force a change to the hostname by editing the /etc/hostconfig file and changing the HOSTNAME variable definition to reflect the correct value.
HOSTNAME= –AUTOMATIC–
Change the “ –AUTOMATIC–” to the correct hostname.
You may need to reboot the computer.
SonicWALL CDP Agent Installation on Linux
This section describes the requirements and installation steps for Linux computers.
Supported Linux Distributions
The SonicWALL CDP Linux Agent is supported on the following 32-bit Linux distributions:
Installing the SonicWALL CDP Linux Agent
The Linux Agent can be installed or uninstalled only by the root user. The compressed tar file, CDPAgentTool_6.1.0.xx.tar.gz , is used for installation.
Perform the following steps to install the Linux Agent on your Linux computer:
|
|
Login as root , or log in using your own credentials and then use sudo in front of commands requiring root privileges. |
tar – zxvf CDPAgentTool_6.1.0.xx.tar.gz
This command creates the CDPAgentTool folder containing the files: cdpinstall.sh and cdpagent.tar.gz .
|
|
Change directory to the CDPAgentTool folder. |
./cdpinstall.sh – i – access=all
This command installs both the Linux Agent service and Linux Agent User Interface.
The installation process creates a Desktop shortcut that can be double-clicked to launch the Agent. You can also start the Agent by typing cdpagentool on the Linux command line.
The following messages are displayed:
Installing CDP Agent BackupService...
Starting CDP Agent Daemon process.
CDP Agent BackupService is installed.
Installing CDP Agent Console...
CDP Agent Console is installed.
ps auxwww | grep cdpagentservice
The output should be similar to the following:
root 7044 0.1 0.4 17404 1744 ? Ssl 11:05 0:00 /usr/bin/cdp/cdpagentservice –d
/usr/bin/cdp/watchdog/cdpagentservice.pid -r /etc/cdp/cdpagent.conf
root 7195 0.0 0.1 3884 668 pts/1 R+ 11:05 0:00 grep cdpagentservice
Initializing the SonicWALL CDP Agent
The following section provides instructions for launching the SonicWALL CDP Agent and connecting to a SonicWALL CDP appliance. This section contains the following subsections:
Launching the SonicWALL CDP Agent
Perform the following steps to login to your SonicWALL CDP Agent for the first time.
|
|
Launch the SonicWALL CDP Agent Software by double-clicking the shortcut placed on your computer desktop during the installation process. Windows, Mac, and Linux systems all have a shortcut for launching the Agent. |

On Windows, you can also launch the Agent from the Windows Start Menu: Programs > SonicWALL > SonicWALL Continuous Data Protection > SonicWALL Agent User Interface .
On Linux, you can also start the Agent by typing cdpagentool on the Linux command line.
|
|
|
If you are running Windows XP SP2 or use a third-party firewall, you may receive a warning during initial launch of the SonicWALL CDP software. For more information on configuring your firewall to work with SonicWALL CDP, contact your network administrator. |
|
|
Double-click the desired SonicWALL CDP Appliance in the Available Appliances list. If you are unsure which CDP appliance to connect to, contact your network administrator before continuing. |
Troubleshooting the SonicWALL CDP Agent Operation
If your SonicWALL CDP Agent User Interface does not start, verify the following:
|
|
On a Windows Server agent, use the Task Manager to verify that another administrator has not already launched the Agent software. |
|
|
Right click My Computer and select Properties , then select the Advanced tab, |
|
|
Under Performance , click Settings . |
|
|
Select the DEP tab. |
|
|
Click Apply . |
Agent User Interface Overview
The Agent User Interface provides users with selection tabs and a view panel.
Tab Selection
The Tab Selection allows users to navigate the Agent User Interface. Four selectable tabs are available:
![]()
|
Displays the connected SonicWALL CDP appliance IP address, the agent name and state, quota information including file count, size, size on disk, quota remaining, and the name of the current backup policy that is defined for agents on the connected SonicWALL CDP appliance. Recent tasks are displayed in right pane with task name, start time, duration, and status. |
|
|
My Backups |
Displays all backed up data, including backups created using the CDP, FileSets, and Applications backup methods. It also provides the ability to enable or disable backups, refresh the display, search by all or part of the file name, restore data, remove items, and remove old file versions. |
|
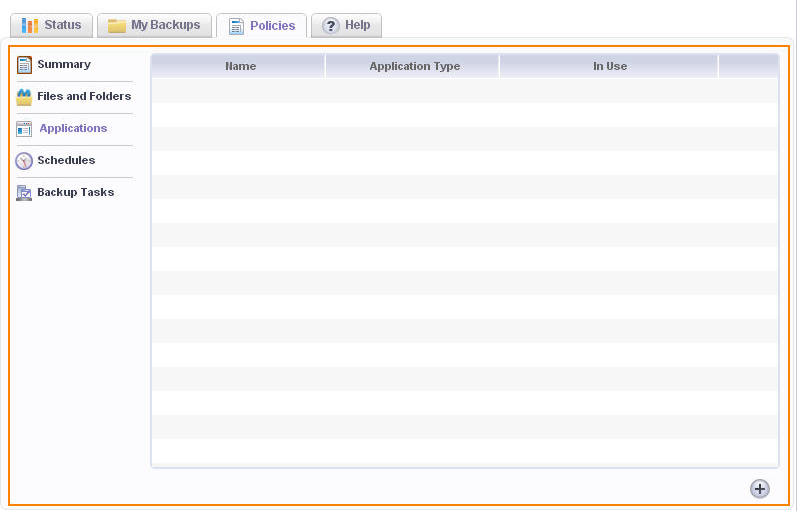
Allows the user to configure Files and Folder objects, Application objects, Schedule objects, and Backup Task objects. Also allows the user to view a summary of backup tasks. |
|
|
Provides links to online help, the SonicWALL knowledge base, the Agent log file, and Agent version information. |
View Panel
The View Panel is located directly below the Tab Selection. The panel refreshes when a tab is selected.
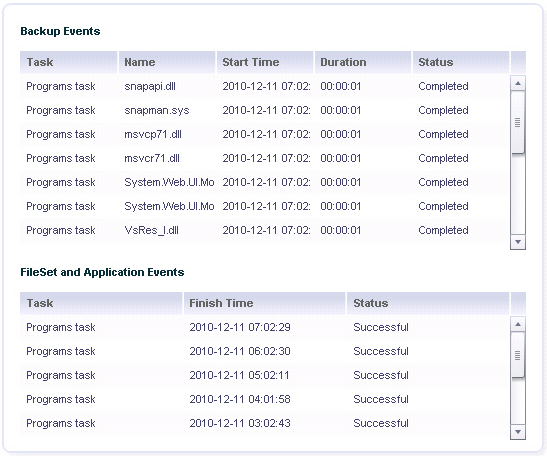
Using the Status Interface
The Status tab allows you to view current agent information, change appliances, log into the Administrator File Browser, and view details about recent backups.
This section contains the following subsections:
To view the Status window, click the Status tab at the top of the Agent User Interface.
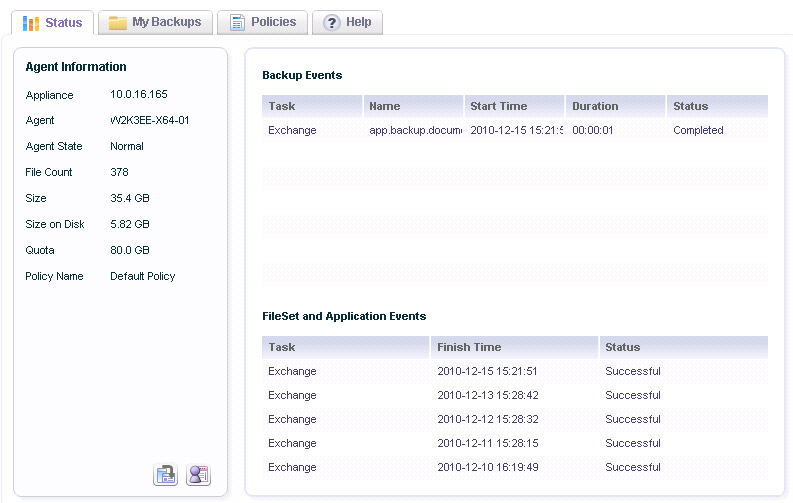
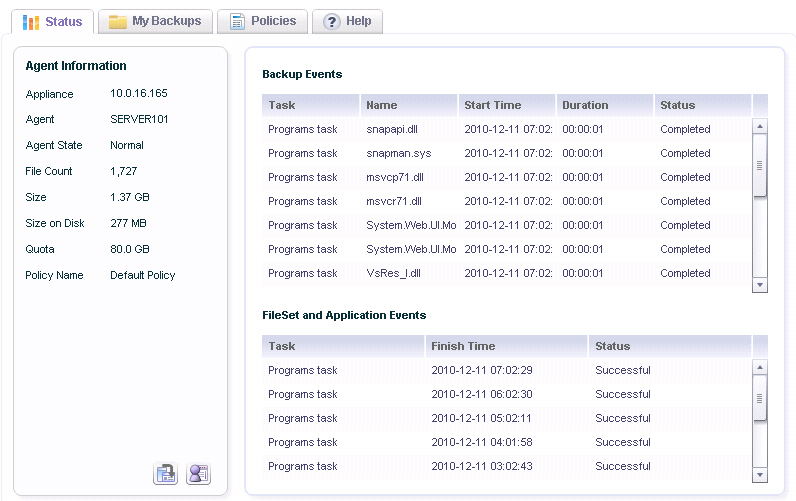
Figure 16 provides an image of the Status window, which displays recent Backup Events and FileSet and Application Events.
|
|
Status View |
Current Agent Information
The Agent Information panel displays details about the current agent and about its backups. It also displays the name of the SonicWALL CDP appliance to which the agent is currently connected.
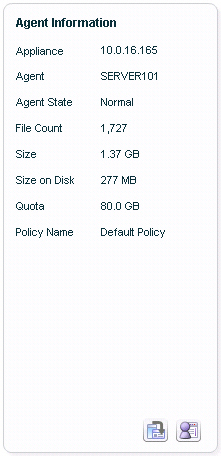
Descriptions of the items in the Agent Information panel are provided below:
|
Displays the IP address of the SonicWALL CDP appliance that the agent is currently accessing. |
|
|
Agent State |
|
|
File Count |
|
|
Size on Disk |
Displays the total file size on disk that is dedicated to the agent’s files. |
|
Displays the allotted quota that the agent can use for backups. |
|
|
Policy Name |
Displays the name of the administrative policy the agent is using. A single administrative policy can apply to an agent at a time. This policy is defined by the administrator while logged into the SonicWALL CDP appliance, using the Web Management Interface. |
Two buttons are located at the bottom of the Agent Information panel:
|
|
|
|
|
|
|
|
Changing Appliances
You can connect to different SonicWALL CDP appliances while using the Agent User Interface.
To connect the SonicWALL CDP Agent User Interface to a different CDP appliance:
![]()
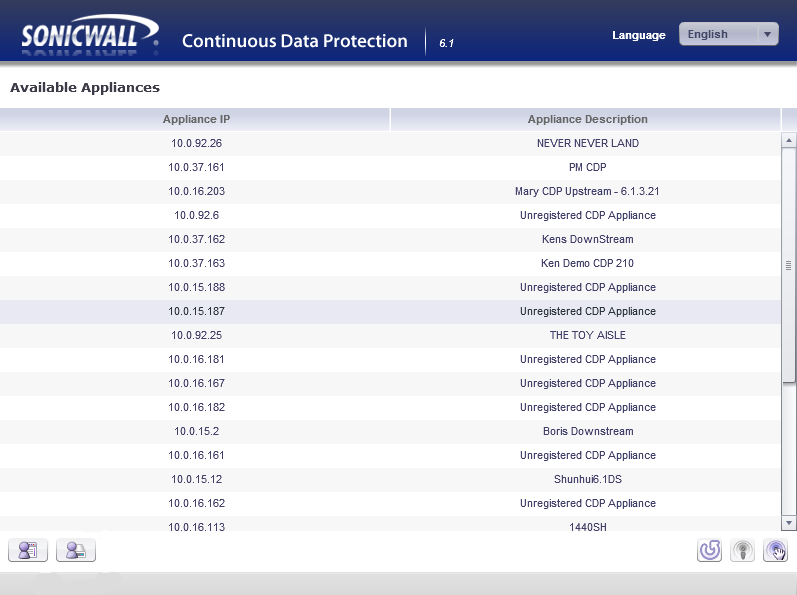
The Available Appliances window opens, displaying the IP addresses and descriptions of available appliances on the network.
![]()
|
|
To manually enter the IP address of an appliance that is not displayed, click the Manual Connect button and then type in the IP address or name of the desired appliance and click OK in the dialog box. |

|
|
To connect to a displayed appliance, either double-click the appliance IP address or select it and click the Connect button. |
![]()
The Agent Information panel displays the new appliance information.
Using the Administrator File Browser
The Agent software allows Administrators to log into the Agent User Interface to manage and configure agent backups. You can access any appliance, and then view, manage, or restore any files backed up by any agent that is associated with that appliance, when logged in as an administrator in the Agent User Interface.
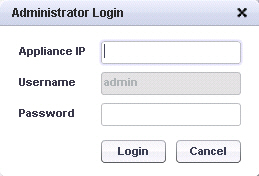
To use the Administrator File Browser in the Agent User Interface:
|
|
Click on the Login to Administrator File Browser button located at the bottom of the agent informaton panel. |
![]()
|
|
In the login dialog box, type the IP address of the desired appliance into the Appliance IP field. |
|
|
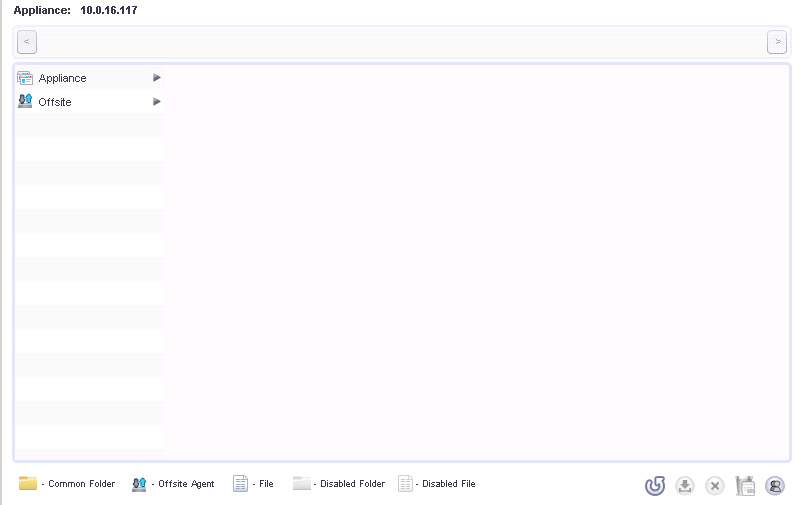
Type in the password for the admin account, and click Login . The Agent User Interface displays the starting screen for the appliance. |
|
|
Click the arrow for either Appliance or Offsite to expand the display to include all associated agents, then click any agent to expand the display further. You can view details about agents that are associated with the appliance. |
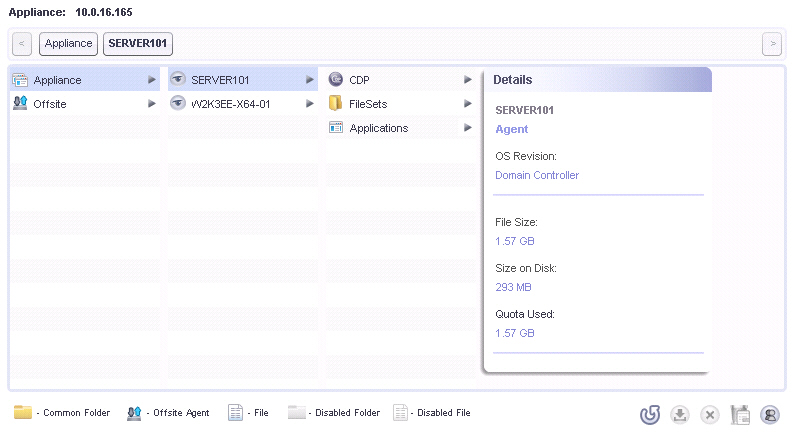
You can also view specific backups.
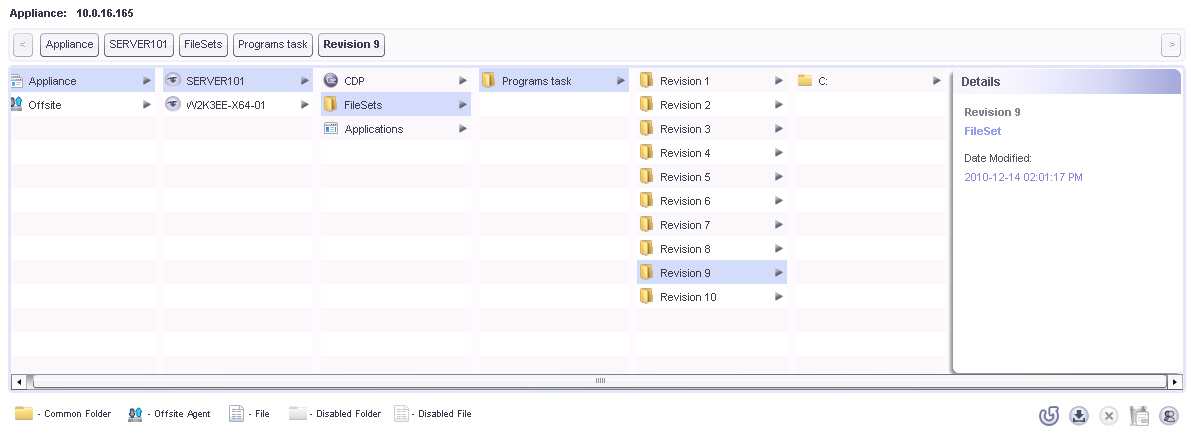
The bottom of the window provides controls for your use.
![]()
|
|
On the left, the meanings of the icons are defined. At the right, the following controls are available, from left to right: |
![]()
|
|
|
Refresh – refreshes the window contents |
|
|
|
Restore – restores the selected item |
|
|
|
Remove Items – removes the selected items |
|
|
|
Remove Deleted Items – removes items that are no longer on the agent machine |
|
|
|
Logoff from Administrator File Browser – logs off |
Viewing the Status Events Panel
The main Status panel displays information about the recent backup tasks for the agent. There are two sections: Backup Events and FileSet and Application Events .
Descriptions of the fields on the Status page are provided below:
|
Displays the names of files that are backed up as part of the task. |
|
|
In the FileSet and Application Events section, displays the time that each backup task finished, for each revision that was executed. |
|
|
In the Backup Events section, displays the status of each file backup. In the FileSet and Application Events section, displays the status of each backup task, for each revision. |
Managing Backups
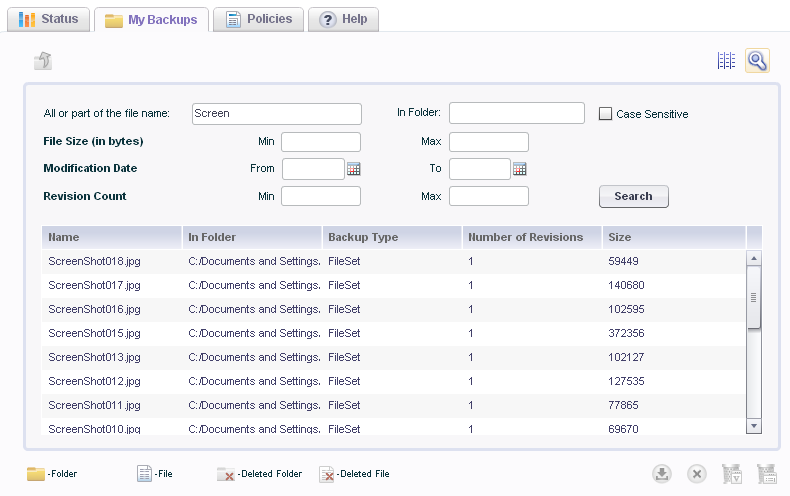
The My Backups tab displays information about recent backups that have been executed by the SonicWALL CDP Agent. You can view the backups at various levels of detail, search for files, remove backed up files, and restore files from this page. Figure 17 shows the initial view of the My Backups tab.
|
|
My Backups View |
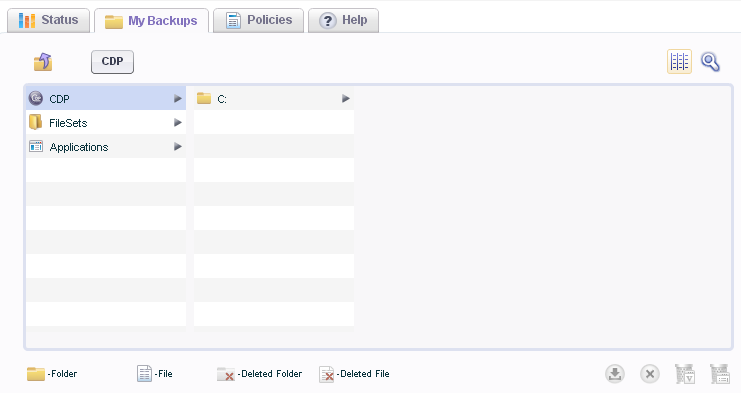
This section contains the following subsections:
For information about restoring client data, see the “Restoring Backed Up Client Data” section .
For information about restoring server applications, see the “Restoring Server Applications” section .
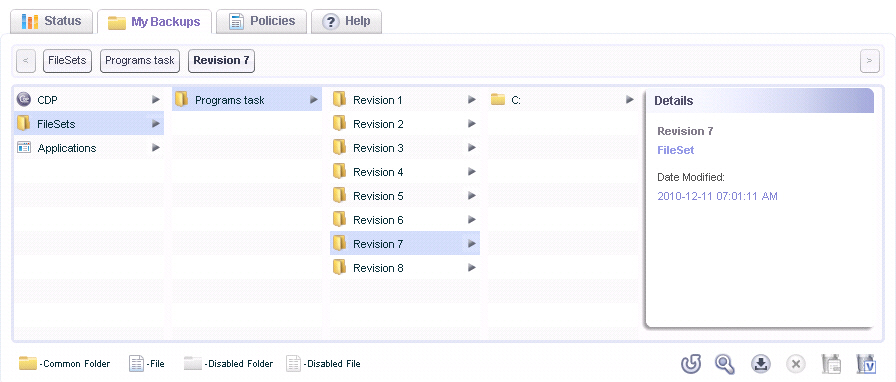
Viewing Backup Details
You can click the arrow next to any of the three backup types to expand the level of detail shown on the My Backups page. For example, Figure 18 shows the page after expanding the CDP selection several times until the actual file names are displayed.
|
|
My Backups Expanded |
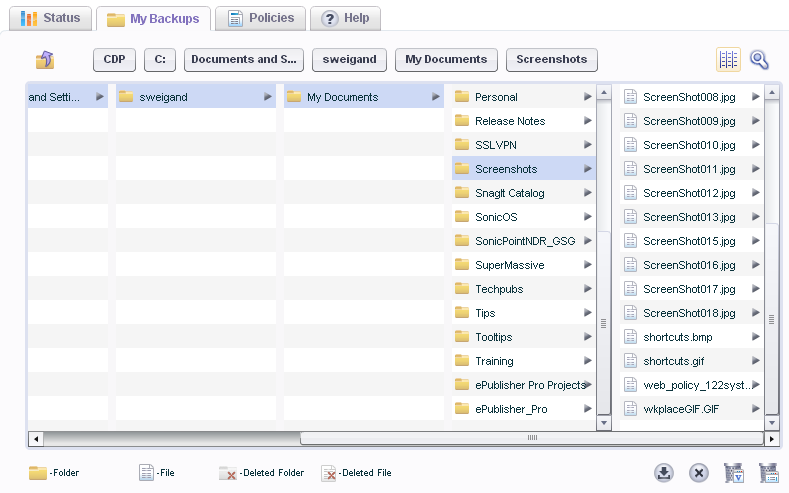
A key or legend for the icons next to each file or folder is provided in the lower left area of the window. There are Common Folder, File, Deleted Folder, and Deleted File icons.
To return to a view with fewer details, click the tab for the level you want to display or click the Back arrow to the left of the tabs.
![]()
Searching for Files
You can use the Search function on the My Backups page to search for backed up files stored on the SonicWALL CDP appliance.
The enhanced search feature provides the ability to restore, delete, or trim directly from the search interface.
Searching in User Mode
To use the Search function while in normal user mode in the Agent user interface:
|
|
On the My Backups page, click the Search button in the upper right corner. |
![]()
|
|
A Search dialog is displayed at the top of the window. In the All or part of the file name field, type in the file name or partial file name for which to search. |
|
|
To specify a folder to search in, enter the folder name in the In Folder field. |
|
|
Select the Case Sensitive checkbox if the search should be case sensitive. |
|
|
To search by file size range, type numbers for the minimum size and maximum size in bytes in the File Size (in bytes) fields. |
|
|
To search within a range of modification dates, specify the earliest and the latest dates in the Modification Date fields. |
|
|
To search within a range of revisions, specify the number of the minimum revision and the maximum revision in the Revision Count fields. |
|
|
Click the Search button to start the search. Only your agent machine is searched when in normal user mode. The results are displayed below the search options. |
|
|
Optionally use the buttons at the bottom of the window to to restore, delete, or trim the files or folders you have located. |
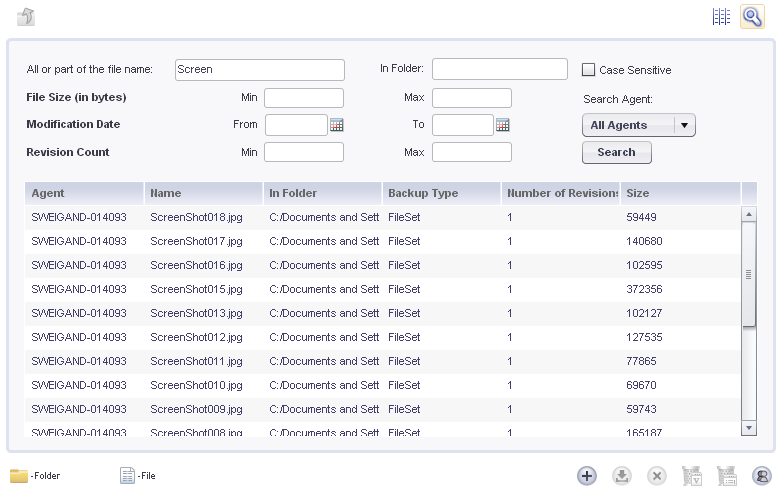
Searching in the Administrative File Browser
To use the Search function from the Agent user interface while in the Administrative File Browser:
|
|
Enter the text to search for in the file or folder names, or enter the minimum and maximum file size, date range, or minimum and maximum revision count. You can fill in a value for one or more of these fields. |
|
|
To search for files from a specific Agent, select the Agent in the Search Agent drop-down list. To search for files from any Agent, select All Agents . |
|
|
Click Search . The results are displayed below the search options. |
|
|
Optionally use the buttons at the bottom of the window to to restore, delete, or trim the files or folders you have located. |
Removing Backed Up Files
The My Backups page provides three ways to remove files stored on the SonicWALL CDP appliance:
|
|
|
|
|
|
|
|
|
|
|
|
To remove files or data from the appliance:
|
|
On the My Backups page, to remove a specific file, expand the backup to view the file that you want to remove. |
|
|
Select the file to be removed and click the Remove icon. |
|
|
To remove files from the appliance which no longer exist on the agent, select the backup or the revision that contains such files. The Remove Deleted Items icon becomes active when files exist on the appliance which no longer exist on the agent. Click the icon to remove the deleted items from the appliance. |
|
|
To remove older revisions of a file or a set of files, expand the view to display the files, select the file, and then click the Remove Old Versions icon to remove all revisions of the file except the most current one. The icon is greyed out if there is only one revision of the file currently backed up. |
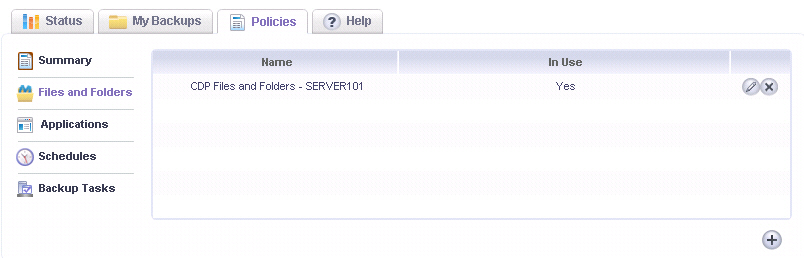
Configuring Client Backup Policies
For file and folder backups, client backup policies include a Files and Folders object, schedule, and task. For client applications such as Outlook or Outlook Express, client backup policies include an Application object, schedule, and task. You can configure objects, schedules, and tasks on the Policies tab in the Agent User Interface.
Objects can be defined using one of the following methods:
|
|
|
FileSet – The FileSet method backs up related files as a set. Dependencies between files is considered. This method uses Event scheduling. |
|
|
|
Application – The Application method is used for both client and server applications, and also considers dependencies and backs up files as a set. This method also uses Event scheduling. |
When using the FileSet or Application methods, Microsoft Volume Shadow Copy Service is used to create a cohesive snapshot for backup on Windows agents. Data de-duplication prevents multiple copies of unchanged data from being backed up.
The Policies window might also display a policy for a CDP method backup. The CDP method is folder-based and uses Interval scheduling.
To back up files or application data, you must configure a backup object, a schedule, and a backup task that includes both the backup object and the schedule.
This section contains the following subsections:
For information about restoring client data, see the “Restoring Backed Up Client Data” section .
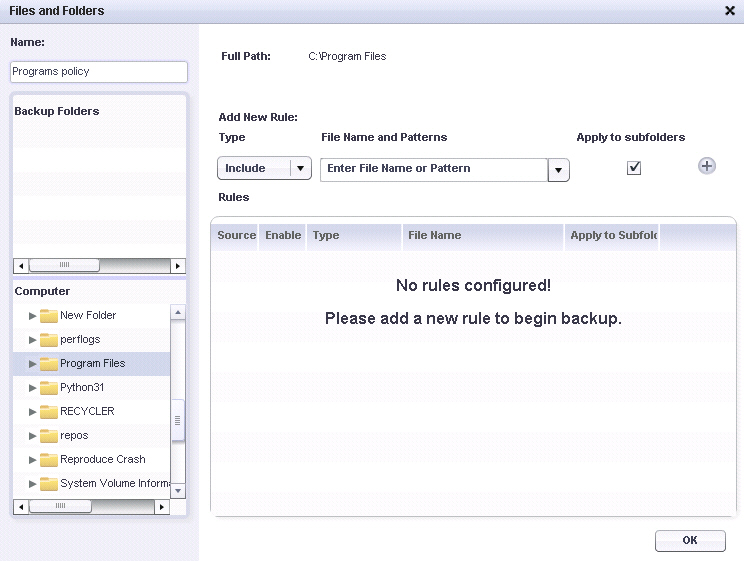
Adding a Files and Folders Object
To create a Files and Folders object, perform the following steps:
|
|
Navigate to the Policies tab located in the Agent User Interface and click on the Files and Folders link located in the left-side menu. |
|
|
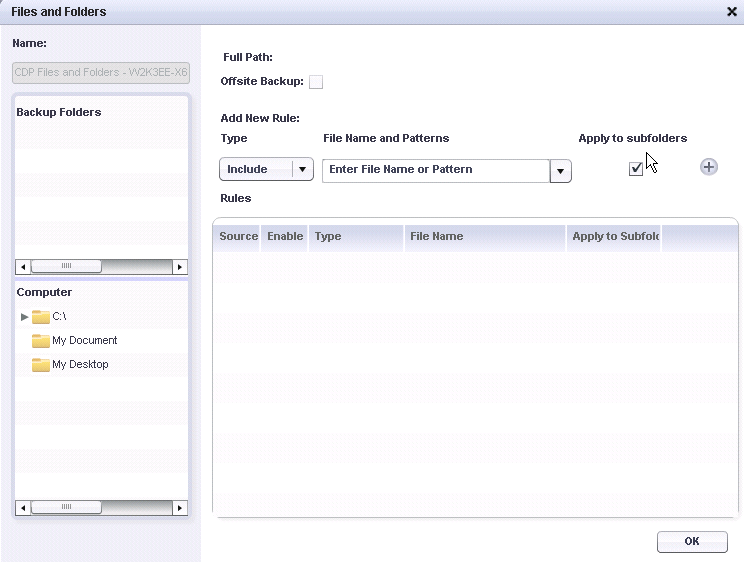
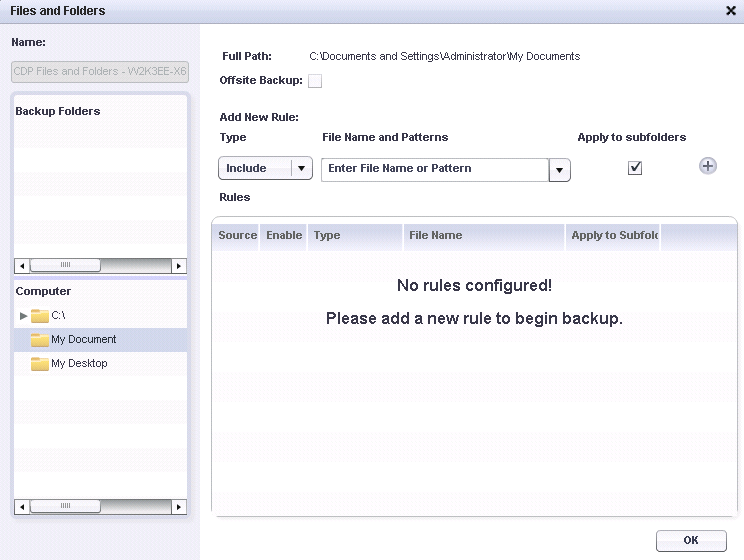
Click the + button located in the bottom-right below the Files and Folders table. The Files and Folders window appears. |

|
|
Specify a friendly name for your Files and Folders object in the Name field located in the upper-left corner. |
|
|
Select the desired folder you wish to back up in the Computer field. |
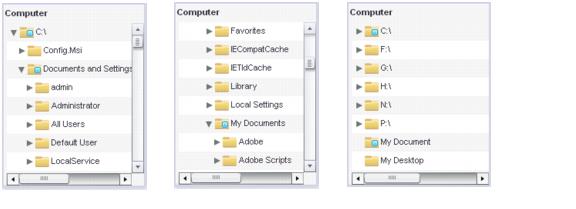
SonicWALL CDP supports backing up and restoring on non-directly attached drives, including USB drives and mounted network drives. You must have the appropriate read/write permissions for the drives.
The image below shows the CDP Agent user interface window next to a view of the Windows computer, while two USB drives are mounted as drives G and H. You can select the G or H drives, as well as any of the network-mounted drives on the system, to drill down to files or folders that you want to back up.

To drill down and select a particular folder, click the arrow at the left of the folder icon to expand the list of subfolders, then repeat to expand the next folder in the path until you see the folder you want, then click that folder icon. Not every folder has an arrow, such as the “shortcut” My Document folder.
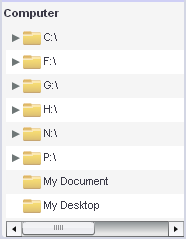
As an example, to select a folder under My Documents, click the arrow next to the C:\ folder to expand it and then continue to expand the desired folders (including My Documents when you reach it) until you see the folder you want. After you select the folder for backup, each parent folder is marked by a blue dot. In this example, both the My Documents folder within the expanded list and the “shortcut” My Document folder display the blue dot.
The file path of the backup folders is displayed in the Full Path field located at the top of the Files and Folders window.
|
|
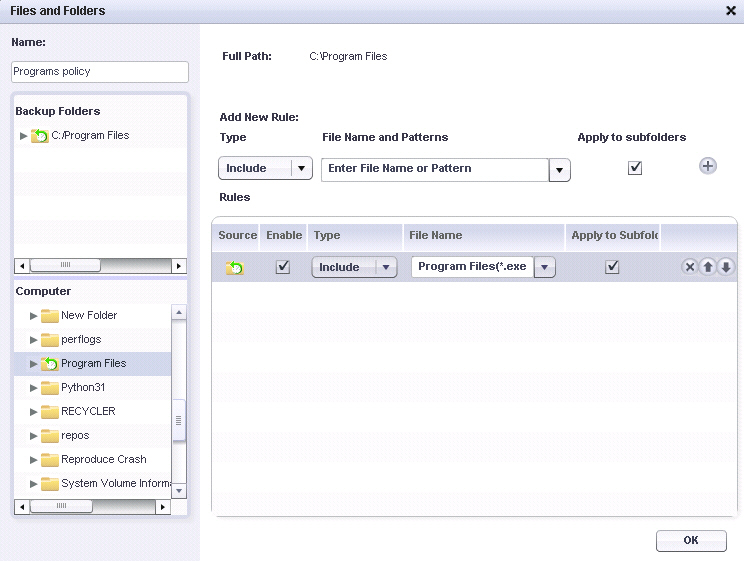
Define the rules for your Files and Folders object by first determining how to apply the rule by choosing Include or Exclude under the Type drop-down menu. |
|
|
|
Include : Includes the specified files or extensions. |
|
|
|
Exclude : Excludes the specified files or extensions. |
|
|
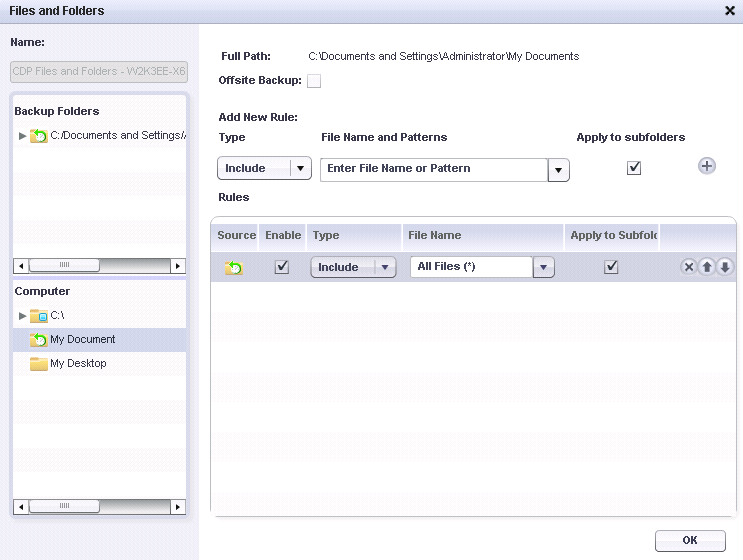
Define the File Name by entering a file name, extension, or select from a predefined list under File Name and Patterns . |
|
|
If desired, check the Apply to Subfolders check box to apply the rules to subfolders. |
|
|
Click the + button, located next to the check box, to add the rule to the Files and Folders object. |
After clicking the + button, the rule is added to the Rules table and the selected folder appears in the Backup Folders list.
|
|
If desired, repeat Step 5 through Step 8 to create more rules. |
|
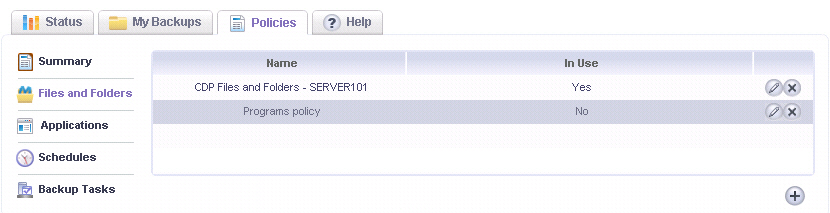
|
Click OK after Files and Folders object creation is complete. The new Files and Folders object is visible in the table on the Policies tab. |
Adding a Client Application Object
To backup a client application such as Outlook or Outlook Express, you must configure an application object, a schedule, and a backup task that includes both the application object and the schedule. This section describes how to create the application object.
To create a client application object, perform the following steps:
|
|
In the SonicWALL CDP Agent User Interface, click the Policies tab. |
|
|
In the left pane, click Applications . |
|
|
In the right pane, click the Plus button |
|
|
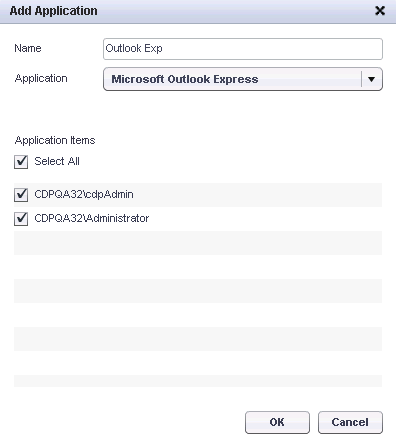
Type a descriptive name for the application object into the Name field. |
|
|
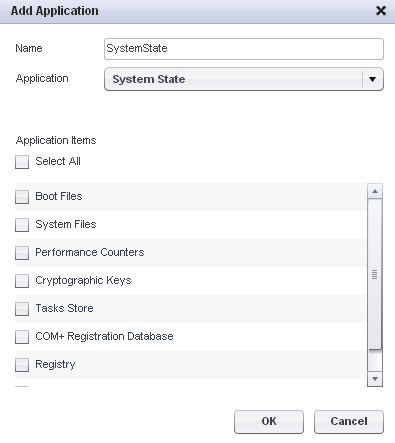
Select the desired application from the Application drop-down list. The list of available applications is automatically populated through a discovery process. On most Windows computers, for example, the list will include Outlook, Outlook Express, and System State. |
|
|
|
Only applications that are installed on your local computer will display in the Add Application window. |
|
|
Under Application items , select the checkboxes for one or more items to back up. |
|
|
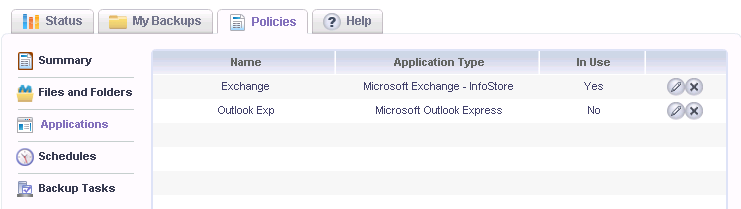
Click OK to add the application object. |
The new application object appears in the Policies screen of the Agent User Interface. The In Use column indicates No to show that this application object is not part of an enabled Backup Task.
|
|
|
Before the backup will occur, you must configure a schedule for this application object (unless one already exists) and a backup task that includes both the application object and the schedule. |
Editing the Default CDP Files and Folders Object
A legacy style CDP policy, including a default CDP Files and Folders object, a default CDP schedule (set to Always On), and a default CDP backup task, is defined by default at the administrative level and is inherited by agents connected to the SonicWALL CDP appliance. At the agent level, you can edit the default CDP Files and Folders object to add files and folders for backup to the CDP object, but you cannot create a new CDP object.
A CDP object differs from a Files and Folders or Application object in that the defined files and folders are backed up as separate entities, not as FileSets. CDP schedules use Interval scheduling, which back up changed data continuously when set to Always On, rather than Event scheduling in which you can set dates for backups to occur.
To edit the default CDP Files and Folders object, perform the following steps:
|
|
Navigate to the Policies tab located in the Agent User Interface and click on the Files and Folders link located in the left-side menu. |
|
|
Click the
Edit
button |
|
|
Select the desired folder you wish to back up in the Computer field. |
To drill down and select a particular folder, click the arrow at the left of the folder icon to expand the list of subfolders, then repeat to expand the next folder in the path until you see the folder you want, then click that folder icon. Not every folder has an arrow, such as the “shortcut” My Document folder.
To select a folder under My Documents, click the arrow next to the C:\ folder to expand it and then continue to expand the desired folders (including My Documents when you reach it) until you see the folder you want.
The file path of the backup folders is displayed in the Full Path field located at the top of the Files and Folders window.
|
|
Define the rules for your Files and Folders object by first determining how to apply the rule by choosing Include or Exclude under the Type drop-down menu. |
|
|
|
Include : Includes the specified files or extensions. |
|
|
|
Exclude : Excludes the specified files or extensions. |
|
|
Define the File Name by entering a file name, extension, or select from a predefined list under File Name and Patterns . |
|
|
If desired, check the Apply to Subfolders check box to apply the rules to subfolders. |
|
|
Click the + button, located next to the check box, to add the rule to the Files and Folders object. |
After clicking the + button, the rule is added to the Rules table and the selected folder appears in the Backup Folders list.
|
|
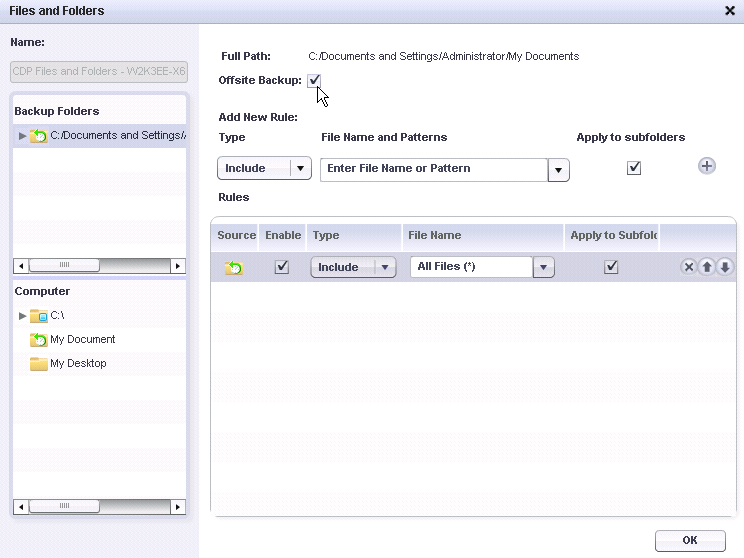
To send the backed up files to the configured SonicWALL Offsite Portal or offsite CDP appliance, first click on the selected folder in the Backup Folders list, and then select the Offsite Backup checkbox. |
|
|
If desired, repeat Step 5 through Step 8 to create more rules. |
|
|
Click OK when finished editing the CDP Files and Folders object. |
Configuring Schedule Objects
To backup client data, you must configure a Files and Folders or Application object, a schedule object, and a backup task that includes both the backup object and the schedule. This section describes how to create the schedule object.
You can create or edit schedule objects for FileSet or Application backup tasks, but not for CDP method tasks. If you see a CDP schedule object, it is inherited from the connected appliance. You can view the settings on the CDP schedule object; see the “Viewing a CDP Schedule Object” section .
To create a schedule object, perform the following steps:
|
|
In the SonicWALL CDP Agent User Interface, click the Policies tab. |
|
|
In the left pane, click Schedules . |
|
|
In the right pane, click the Plus button |
|
|
Type a descriptive name for the schedule into the Name field. |
|
|
Specify the type of schedule and time desired. Four options are available and can be combined to form a schedule policy: |
|
|
|
Day Interval – The backup occurs every so many days calculated from a particular date. |
|
|
|
Select the Enable Day Interval checkbox. |
|
|
|
Under Select Time , to back up the files beginning at a specific time, select the Event radio button, then fill in the Start at fields by selecting an hour and a minute for the start time. To repeat the backup, type a value into the Repeat every ... minutes field, and select an hour and minute for the end time after until . |
|
|
|
Days of the Week – The backup runs on certain days of the week. |
|
|
|
Select the Enable Days of the Week checkbox. |
|
|
|
Under Select Time , to back up the files beginning at a specific time, select the Event radio button, then fill in the Start at fields by selecting an hour and a minute for the start time. To repeat the backup, type a value into the Repeat every ... minutes field, and select an hour and minute for the end time after until . |
|
|
|
Days of the Month – The backup occurs on certain days of the month. |
|
|
|
Select the Enable Days of the Month checkbox. |
|
|
|
Select the days of the month on which to run the backup. Select Last for the last day of the month. |
|
|
|
Under Select Time , to back up the files beginning at a specific time, select the Event radio button, then fill in the Start at fields by selecting an hour and a minute for the start time. To repeat the backup, type a value into the Repeat every ... minutes field, and select an hour and minute for the end time after until . |
|
|
|
Specific Dates – The backup occurs on the selected dates. |
|
|
|
Select the Enable Specific Dates checkbox. |
|
|
|
Under Select Time , to back up the files beginning at a specific time, select the Event radio button, then fill in the Start at fields by selecting an hour and a minute for the start time. To repeat the backup, type a value into the Repeat every ... minutes field, and select an hour and minute for the end time after until . |
|
|
Click OK after defining the desired schedule. New schedules are visible in the table on the main Schedules page. |
Viewing a CDP Schedule Object
A default CDP schedule object is inherited from the SonicWALL CDP appliance. It uses Interval scheduling rather than Event scheduling. Only the Day Interval tab of the Edit Schedule Object interface is used. You can view the default CDP schedule object, but cannot change it.
To view the default CDP schedule object:
|
|
In the SonicWALL CDP Agent User Interface, click the Policies tab. |
|
|
In the left pane, click Schedules . |
|
|
In the right pane, double-click the Edit button |
|
|
On the Day Interval tab under Enable Day Interval, the number of days for the interval between backups is defined. For example, if you see 1 , the backups will occur daily; if you see 2 , the backups will occur every other day. |
|
|
In the Start on field, the start date is defined. By default, the interval is calculated from the current date. |
|
|
Under Select Time , to back up the files at any time that a change occurs, the Always On radio button is selected. To back up changed files only during a specific time range, the Interval radio button is selected and the Start at and End at fields are set. |
|
|
Click Cancel . The OK button is disabled. |
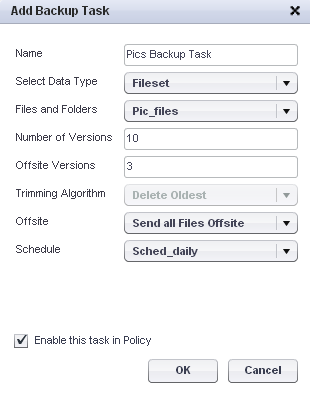
Configuring a Backup Task for Client Data
A backup task includes either a Files and Folders or Application object and a schedule for the backup. Without a backup task, no backups will occur.
For offsite backup, you can choose the Send All Files Offsite option when adding or editing a backup task. In the Offsite Versions field, you can specify the number of revisions that should be kept on the Offsite device.
|
|
|
Before creating a backup task, create the backup object and schedule to be included in the task. |
To create a backup task for client data backup, perform the following steps:
|
|
In the SonicWALL CDP Agent User Interface, click the Policies tab. |
|
|
In the left pane, select Backup Tasks . |
|
|
In the right pane, click the Plus button |
|
|
Type a descriptive name for the backup task into the Name field. |
|
|
Select one of the following in the Select File Type drop-down list: |
|
|
|
For a client application backup task, select Application . |
|
|
|
For a FileSet or CDP backup task, select FileSet . |
|
|
For a client application backup task, select the desired application object from the Application Data drop-down list. |
|
|
For a FileSet or CDP backup task, select the desired Files and Folders object from the Files and Folders drop-down list. |
|
|
Type the desired number of backup revisions to keep into the Number of Versions field. For client applications, the default is 2. For files and folders, the default is 10. |
|
|
Type the desired number of backup revisions to keep on the Offsite CDP or Portal into the Offsite Versions field. The default is 1. |
|
|
The Trimming Algorithm field is not configurable. The field displays the type of trimming algorithm in use. |
|
|
In the Offsite drop-down list, select one of the following options: |
|
|
|
Send all Files Offsite – Files will be backed up on the configured Offsite appliance. |
|
|
|
Do Not Send Files Offsite – Files will be backed up on the SonicWALL CDP appliance that is connected to the agent. |
|
|
Select the desired schedule from the Schedule drop-down list. |
|
|
To activate this backup task, select the Enable this task in Policy checkbox. To disable this backup task without deleting it, you can clear this checkbox. |
|
|
Click OK when finished configuring the backup task. |
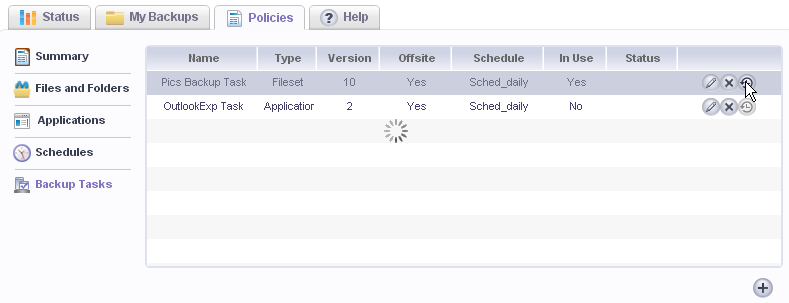
Using Backup Now
For any existing backup task that is currently enabled in a policy, the administrator can click the Backup Now button on the Policies tab to execute an immediate backup. This is useful for immediate backup of files, in general, and especially in the following cases:
To perform an immediate backup using Backup Now:
|
|
Click the Policies tab. |
|
|
Select Backup Tasks in the left pane. |
|
|
Click the
Backup Now
button |
Removing Backup Tasks
You can temporarily disable a backup task, or completely remove it along with the associated backup rules or application object. See the following sections:
Disabling a Backup Task
You can temporarily disable any backup task with removing its configuration by performing the following steps:
|
|
In the SonicWALL CDP Agent User Interface, click the Policies tab. |
|
|
In the left pane, click Backup Tasks . |
|
|
Click the Edit
button |
|
|
In the Edit Backup Task window, clear the Enable this task in Policy checkbox. |
|
|
Click OK . |
Removing a Backup Task
To completely remove a backup task and the associated Files and Folders or Application object rules, perform the following steps:
|
|
In the SonicWALL CDP Agent User Interface, click the Policies tab. |
|
|
In the left pane, click Backup Tasks . |
|
|
Click the X button located to the right of the backup task you want to remove. |
|
|
Click Yes in the confirmation dialog. |
|
|
In the left pane, click either Files and Folders or Applications . |
|
|
Click the X button located to the right of the object name. |
|
|
Click Yes in the confirmation dialog. |
Restoring Backed Up Client Data
Using the SonicWALL CDP Agent on a machine for which you have administrative rights, you can restore data from connected CDP appliances to the agent machine, even if it is a different machine than the one from which the data was backed up.
See the following sections for instructions about restoring backed up files, folders, and client applications:
Restoring Files and Folders
SonicWALL CDP allows you to recover lost data directly from the appliance. Recovery can be performed to replace a file set that has been deleted, or to restore a previous version of a file or folder that has been changed or otherwise damaged. Recovery can be performed on any agent and recovered files are restored directly from the appliance.
If necessary, before restoring a file set, first follow the prescribed restore procedures of the system which may include the re-installation of the operating system, applications or replacement of hardware.
To recover files and folders from the SonicWALL CDP appliance, perform the following steps:
|
|
Launch the SonicWALL CDP Agent software on the agent machine on which you want to recover the file set. This does not have to be the same machine from which the backup was made. |
|
|
If necessary, click the Change Appliance icon |
|
|
Click the My Backups tab. |
|
|
In the left pane, click FileSets . The display expands to show available backup tasks. |
|
|
Click the desired revision. The root folder and details about the revision are displayed, including the date and time. |
|
|
At the bottom right corner, click the Restore
icon |
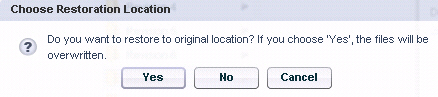
Click Yes to restore the files on top of the original files. Click No to save the files to another location. Click Cancel to exit the restoration process without restoring the files at all.
|
|
If you clicked No in order to save the files to another location, a Browse For Folder window is displayed. |
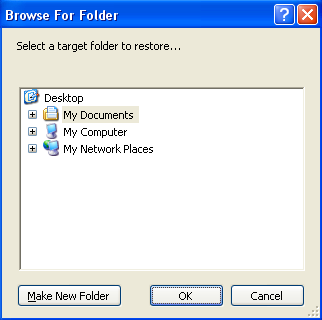
You can restore to a location on your local computer, to a network-mounted folder, or to a mounted USB drive. For example, you could expand the My Computer entry to expose network folders and drill down within one of those to select a folder.
To create a new folder for the restored files, select the parent folder in which the new folder should be created and then click the Make New Folder button. The Browse For Folder window displays the folder as New Folder . Select the New Folder entry and then click OK to begin the restore to that folder.
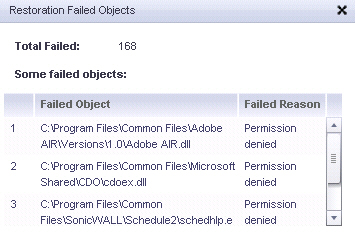
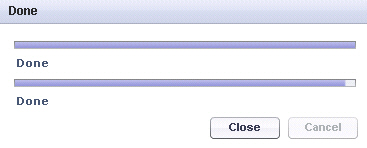
If any files cannot be restored, the Restoration Failed Objects window displays a list of files and the reasons for their failure to restore. Click the X to close the window.
|
|
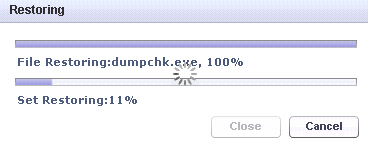
When the restore process is finished, the Restoring window changes to Done. Click the Close button to close the window. |
Restoring a Client Application
You can restore any revision of a client application that is available on the SonicWALL CDP appliance to an agent machine. The restore can be made directly to the application installation on the agent, or to another location on the hard drive. If restored to another location on disk, the files can be copied to the application later by stopping the application, doing the copy, and restarting the application.
To restore a backed up client application from a revision on the SonicWALL CDP appliance, perform the following steps.
|
|
In the SonicWALL CDP Agent User Interface, click the My Backups tab. |
|
|
In the left pane, click Applications . The display expands to show available backup tasks. |
|
|
Click the desired revision. The root folder and details about the revision are displayed, including the date and time. |
|
|
At the bottom right corner, click the Restore
icon |
|
|
In the Restore dialog box, select the backup that you want to restore. The Application Restoration window opens. |
|
|
In the Options drop-down list, select one of the following: |
|
|
|
Restore to original location – This option restores the files to the client application location. |
|
|
|
Restore to alternate location – This option restores the files to the disk of the agent machine. |
|
|
Under Components , select the checkboxes for the items you want to restore. |
|
|
Click OK . The Application Restoration Details window appears. |
|
|
The restoration steps are listed, along with a Start Time column, a Duration column, and an in-progress indicator. The steps are: |
To start the restore process, click Start . To exit without restoring any files, click Cancel .
The in-progress indicators become active for each step as it is executed, and the Start Time and Duration values are updated.
|
|
When the restore is finished, click Close . |
Backing Up Server Applications
Server applications, including Microsoft Exchange, Active Directory, and SQL Server can be configured for backup or recovery using the SonicWALL CDP User Interface.
Refer to the following sections for information about backing up server applications:
Creating Schedules for Application Backups
To backup an application, you must configure an application object, a schedule, and a backup task that includes both the application object and the schedule. This section describes how to create the schedule object.
To configure a schedule for application backups, perform the following steps:
|
|
In the SonicWALL CDP Agent User Interface, click the Policies tab. |
|
|
In the left pane, select Schedules . |
|
|
In the right pane, click the Plus button |
|
|
Type a descriptive name for the schedule into the Name field. |
|
|
Select one or more of the following tabs to configure a schedule that meets your requirements: |
|
|
|
Day Interval – The backup occurs every so many days calculated from a particular date. |
|
|
|
Select the Enable Day Interval checkbox. |
|
|
|
Select the Event radio button. |
|
|
|
Fill in the Start at fields by selecting an hour and a minute for the start time on the selected days. |
|
|
|
To repeat the backup at intervals during the selected days, select the Repeat checkbox and type a value into the Repeat every ... minutes field, then select an hour and minute for the end time after until . |
|
|
|
Days of the Week – The backup runs on certain days of the week. |
|
|
|
Select the Enable Days of the Week checkbox. |
|
|
|
Select the Event radio button. |
|
|
|
Fill in the Start at fields by selecting an hour and a minute for the start time on the selected days. |
|
|
|
To repeat the backup at intervals during the selected days, select the Repeat checkbox and type a value into the Repeat every ... minutes field, then select an hour and minute for the end time after until . |
|
|
|
Days of the Month – The backup occurs on certain days of the month. |
|
|
|
Select the Enable Days of the Month checkbox. |
|
|
|
Select the days of the month on which to run the backup. Select Last for the last day of the month. |
|
|
|
Select the Event radio button. |
|
|
|
Fill in the Start at fields by selecting an hour and a minute for the start time on the selected days. |
|
|
|
To repeat the backup at intervals during the selected days, select the Repeat checkbox and type a value into the Repeat every ... minutes field, then select an hour and minute for the end time after until . |
|
|
|
Specific Dates – The backup occurs on the selected dates. |
|
|
|
Select the Enable Specific Dates checkbox. |
|
|
|
Select the Event radio button. |
|
|
|
Fill in the Start at fields by selecting an hour and a minute for the start time on the selected days. |
|
|
|
To repeat the backup at intervals during the selected days, select the Repeat checkbox and type a value into the Repeat every ... minutes field, then select an hour and minute for the end time after until . |
|
|
Click OK . |
Microsoft Exchange Prerequisites
This section lists the necessary prerequisites for successful operation of the SonicWALL CDP Agent User Interface with the User Mailbox and InfoStore Microsoft Exchange features.
Microsoft Exchange Versions Supported
The following versions of Microsoft Exchange are supported:
Windows Server Versions Supported
Microsoft Exchange runs on the following versions of Windows Server:
|
|
|
Refer to the latest SonicWALL CDP Release Notes , available on www.sonicwall.com , for the location of the full support matrix and compatibility information. |
Proper Configuration of Exchange 2007/2003 Admin User on Agent
Follow the instructions below to allow mailbox access for proper user mailbox backup/restore in Microsoft Exchange 2003(32bit) and Microsoft Exchange 2007(64bit). On your Agent system, create an Exchange user account for cdpAdmin , make cdpAdmin a member of the “Administrators” group, and login to the Exchange system as cdpAdmin .
See the following subsections for specific instructions:
See the following Microsoft Knowledge Base articles for more information:
http://support.microsoft.com/kb/556045
http://support.microsoft.com/kb/821897
Configuration on a 32-bit Machine
To configure the Exchange admin user on a 32-bit machine (MS Windows SBS 2003 and MS Exchange 2003), perform the following steps:
|
|
Create a user in ‘Active Directory User and Computer’ in the Domain Controller (DC) computer (such as cdpAdmin ). |
|
|
Expand Servers , right-click on the server name and then click Properties . |
|
|
On the Security tab, add the cdpAdmin user to the Group or user names list. |
|
|
Make sure this user has Full control permissions. |
|
|
Logout of the MS Exchange server machine and then log back in as the cdpAdmin user. |
|
|
Open SonicWALL CDP Agent User Interface, select the Application tab, and add MS Exchange – User Mailbox . |
|
|
Click the Configure Authentication button.Enter the user credentials in the authentication dialog box: |
User: Domain\user (yourDomain\cdpAdmin)
Password: password for user cdpAdmin
Configuration on a 64-bit Machine
To configure the Exchange admin user on a 64-bit machine: (MS Windows 2003/2008 and MS Exchange 2007), perform the following steps:
|
|
Create a user in ‘Active Directory User and Computer’ in the Domain Controller (DC) computer (such as cdpAdmin ). |
|
|
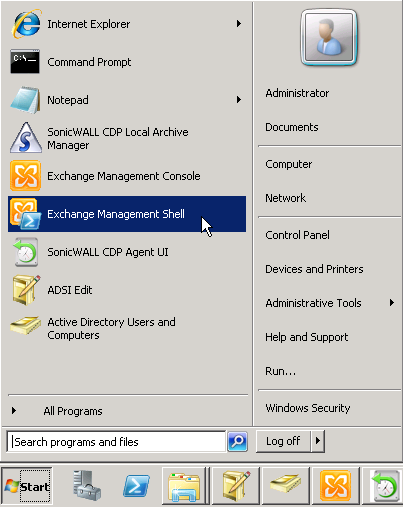
On the MS Exchange machine, access the Microsoft Exchange Shell by going to Start > Programs > Microsoft Exchange Server 2007 > Exchange Management Shell . |
|
|
To set the Exchange View Only Administrator role, type the command in the following format: |
An example of this command is:
|
|
To set the Send As, Receive As, and Administer Information Store permissions, type the following command: |
|
|
|
<server_name> is the Microsoft Exchange 2007 server name |
|
|
|
<service_account_name> is the user account created in step 1 (cdpAdmin) |
An example of this command is:
|
|
This step only applies if your MS Exchange server is installed on a non-Domain Controller server. On the MS Exchange server machine, to give login access to the cdpAdmin user, add the cdpAdmin user to the local Backup Operators group by performing the following steps: |
|
|
Navigate to Administrative Tools > Computer Management > Local Users and Groups , and right-click on the Backup Operators group. |
|
|
Select Add to Group and click on the domain user cdpAdmin . |
|
|
Log out of the MS Exchange server machine and then log back in as the cdpAdmin user. |
|
|
Open the SonicWALL CDP Agent User Interface and configure authentication for MS Exchange – User Mailbox with the following credentials: |
User: Domain\user (yourDomain\cdpAdmin)
Password: password for user cdpAdmin
ExOLEDB / ADO / CDO Requirements for Exchange 2007/2003
SonicWALL CDP uses ExOLEDB to access Microsoft Exchange 2007 and 2003. The Exchange OLE DB Provider should be installed along with Microsoft Exchange, and must be accessible by the SonicWALL CDP Web Management Interface and Agent User Interface.
The ADO (ActiveX Data Objects) and CDO (Collaboration Data Objects) APIs are also required by this feature. These are application programming interfaces provided by Microsoft that allow applications to access data stores in a uniform manner. These APIs are included with the Microsoft Exchange installation.
Backing Up Exchange 2010 User Mailboxes
You can backup individual user mailboxes by using the Microsoft Exchange User Mailbox Backup and Restore server application in the SonicWALL CDP Agent User Interface. The user mailbox is backed up onto your SonicWALL CDP appliance.
For Microsoft Exchange 2010 on Windows Server 2008, SonicWALL CDP supports backup and restore on a multi-application, single server deployment, in which the same server has several applications installed, such as Exchange, SQL, and Active Directory.
In the Agent User Interface, you can create a Microsoft Exchange - User Mailbox application object for one or more user mailboxes, input the login credentials for the Exchange server, configure a backup schedule, create a backup task, optionally select offsite backup, and restore individual user mailboxes to the Exchange server. For information about restoring a user mailbox, see the “Restoring Exchange 2010 User Mailboxes” section .
The User Mailbox Backup and Restore feature includes the following capabilities:
User Mailbox Backup and Restore backs up and restores messages in the user’s Outlook Mailbox, including the Inbox, Drafts, Deleted Items, and Sent Items, as well as messages within all other folders with custom names.
It does not back up the Outlook Calendar, Notes, Contacts, Tasks, Meeting Requests, and Public Folders. It also does not back up locally archived folders.
How Does User Mailbox Backup and Restore Work?
The SonicWALL CDP Microsoft Exchange User Mailbox Backup and Restore feature is implemented as a server application that is automatically discovered by the SonicWALL CDP Agent User Interface. To get started using the feature, select the Policies tab and then select Applications in the left pane of the Agent User Interface. To backup user mailboxes, you must configure an application object, a schedule, and a backup task that includes both the application object and the schedule.
The User Mailbox application allows you to add or delete individual user mailboxes for backup, set backup schedules, restore specific backups of individual mailboxes, enter credentials for accessing the Exchange server, and configure offsite backup. You can view log entries in the SonicWALL CDP Agent User Interface on the Status tab to verify that backups are successful.
|
|
|
The SonicWALL CDP appliance must be licensed for server applications. On models that do not support server application licenses, such as the generation 3 SonicWALL CDP 110 and 210, you can still use the User Mailbox Backup and Restore feature. |
Adding User Mailboxes to an Application Object
To backup user mailboxes, you must configure an application object, a schedule, and a backup task that includes both the application object and the schedule. This section describes how to create the application object.
You can test the connection to the Exchange Server by clicking the Authentication button while adding or editing an application object. It is not necessary to enter any authentication credentials to test the connection.
To create an application object with individual user mailboxes for backup, perform the following steps:
|
|
In the SonicWALL CDP Agent User Interface, click the Policies tab. |
|
|
In the left pane, click Applications . |
|
|
In the right pane, click the Plus button |
|
|
Type a descriptive name for the application object into the Name field. |
|
|
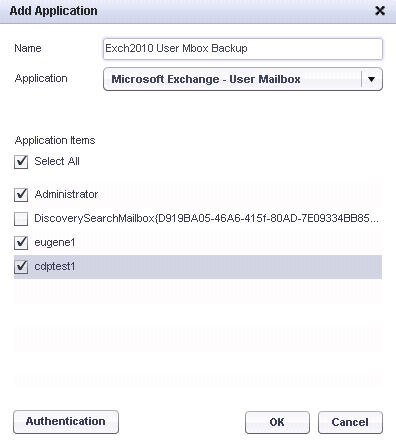
Select Microsoft Exchange - User Mailbox in the Application drop-down list. The list of available applications is automatically populated through a discovery process. For proper discovery, the Microsoft Volume Shadow Copy service must not be disabled. |
|
|
Under Application items , select the checkboxes for one or more user mailboxes to back up. |
|
|
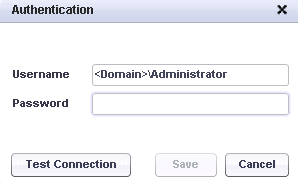
If authentication credentials are required to access the Exchange server, or to test the connections to the Exchange server, click the Authentication button. The Authentication dialog box opens. |
|
|
In the Authentication dialog box, type the domain\username into the Username field and type the password into the Password field. |
|
|
|
For Exchange 2010, configure Authentication with <your_domain>\Administrator . When ready to restore a backed up user mailbox, login to the server agent as Administrator . For more information, see “Configuring Authentication on the Exchange Server” . |
|
|
To test the connection between the User Mailbox application and the Exchange server, either with or without credentials, click the Test Connection button. If successful, the dialog box displays the message “Connection succeeded.” |
|
|
When finished entering the authentication credentials, click Save . Click Cancel to close the dialog box without saving anything. |
|
|
In the Add Application window, click OK to add the application object. |
The new application object appears in the Policies screen of the Agent User Interface.
|
|
|
Before the backup will occur, you must also configure a schedule for this application object, and a backup task that includes both the application object and the schedule. |
Scheduling Backups for User Mailboxes
A schedule is required when creating an Application backup task to backup user mailboxes. You can use the same schedule object in more than one backup task.
For instructions on creating a schedule object, see the “Creating Schedules for Application Backups” section .
Configuring a Backup Task for User Mailbox Backups
A backup task includes both an application object and a schedule for the backup. Without a backup task, no backups will occur.
For offsite backup, you can choose the Send All Files Offsite option when adding or editing a backup task.
|
|
|
Before creating a backup task, create the application object and schedule to be included in the task. |
To create a backup task for a user mailbox backup, perform the following steps:
|
|
In the SonicWALL CDP Agent User Interface, click the Policies tab. |
|
|
In the left pane, select Backup Tasks . |
|
|
In the right pane, click the Plus button |
|
|
Type a descriptive name for the backup task into the Name field. |
|
|
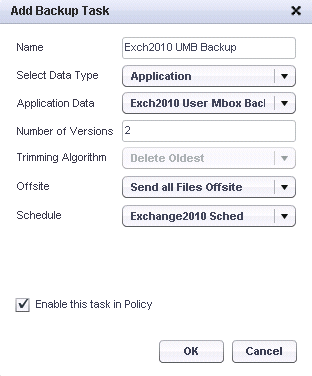
Select Application from the Select File Type drop-down list. |
|
|
Select the desired application object from the Application Data drop-down list. |
|
|
Type the desired number of backup revisions to keep into the Number of Versions field. The default is 2. |
|
|
The Trimming Algorithm field is not configurable for Application policies. The field displays the type of trimming algorithm in use. |
|
|
In the Offsite drop-down list, select one of the following options: |
|
|
Select the desired schedule from the Schedule drop-down list. |
|
|
To activate this backup task, select the Enable this task in Policy checkbox. To disable this backup task without deleting it, you can clear this checkbox. |
|
|
Click OK . |
Configuring Authentication on the Exchange Server
Access between the SonicWALL CDP appliance and the Exchange server where the user mailboxes reside can be configured to require authentication credentials or not. When you add an application object for a user mailbox backup, you can choose to add authentication credentials if required by the Exchange server. In either case, you can use the Authentication dialog box to test the connection between the SonicWALL CDP appliance and the Exchange server.
|
|
|
If no authentication credentials are entered, the actual backup process uses the local SYSTEM account to access the Microsoft Exchange database. |
Before configuring a User Mailbox application object to use credentials when accessing the Exchange server, you must first configure the credentials on the Exchange server. The user name must have appropriate privileges to access user mailbox data on the Exchange server.
|
|
|
For Exchange 2010, configure authentication with <your_domain>\Administrator . When ready to restore a backed up user mailbox, login to the server agent as Administrator . |
The procedure below provides basic instructions for configuring authentication with the Administrator user. For more information about configuring users and access privileges on Microsoft Exchange, see the following Microsoft knowledge base articles:
http:/support.microsoft.com/kb/821897
http://support.microsoft.com/kb/556045
To configure the Administrator account for authentication, perform the following steps:
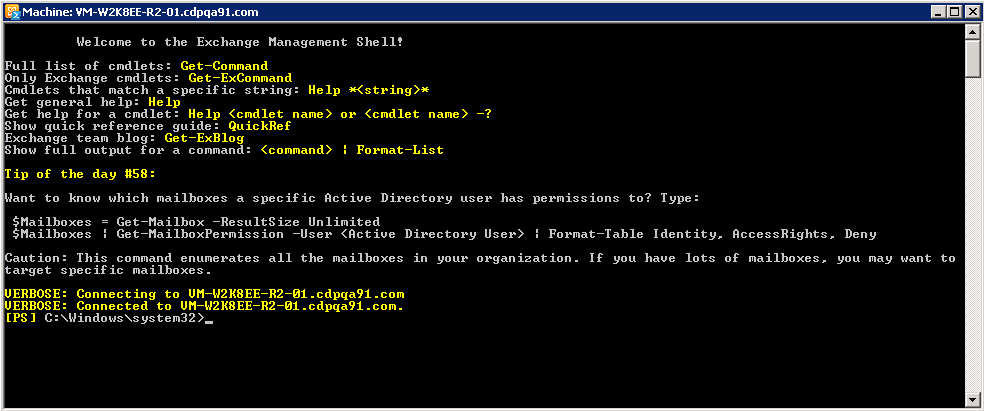
The welcome screen displays, followed by a command prompt.
New – ManagementRoleAssignment – Role “Mailbox Import Export” – User “Administrator”

Additional Steps for Exchange 2010
For Exchange 2010 there are additional steps required to allow User Mailbox discovery:
|
|
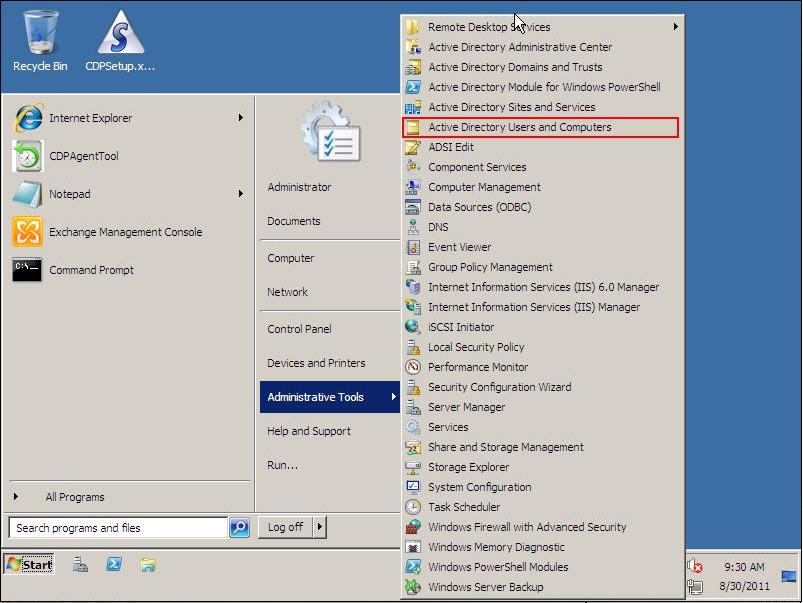
Open Active Directory Users and Computers . |
|
|
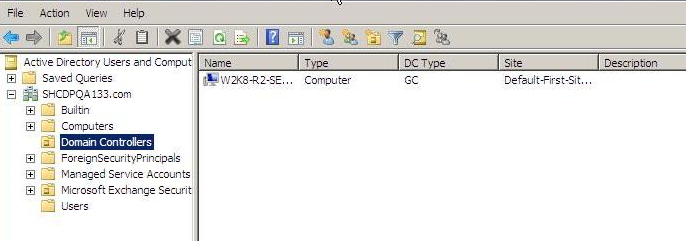
Navigate to Domain Controllers . |
|
|
Locate the domain controller, and add it to the Organization Management group. |
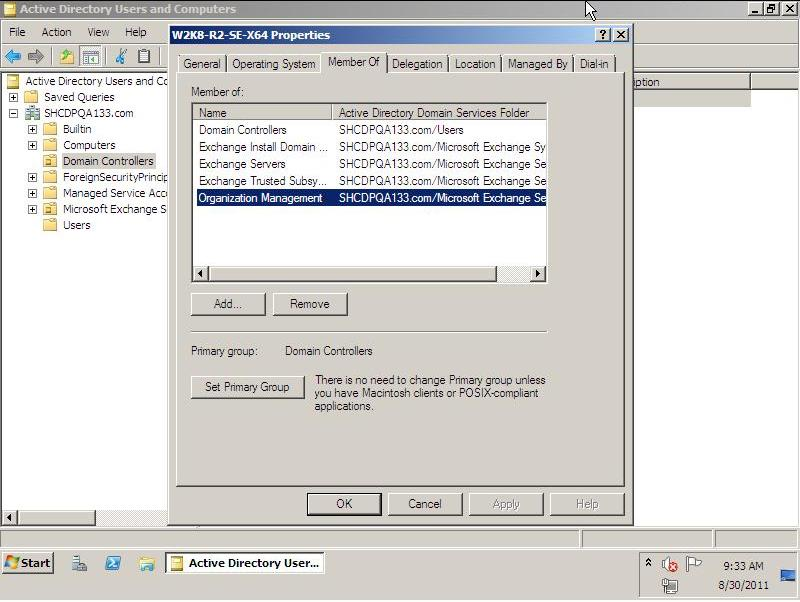
|
|
Click OK . |
Removing User Mailboxes from the Backup Task
This section describes how to remove a user mailbox from the list of mailboxes scheduled for backup.
To remove a user mailbox from the backup task, perform the following steps:
|
|
In the SonicWALL CDP Agent User Interface, click the Policies tab. |
|
|
In the left pane, select Applications . |
|
|
In the right pane, click the Edit button |
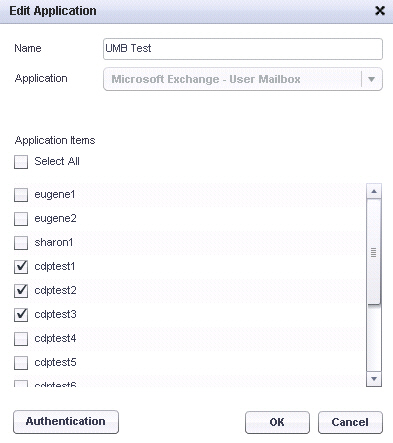
|
|
Click OK . |
Verifying User Mailbox Backup Activity
This section describes how to tell if your user mailbox backups are working correctly. You can view log entries showing the backups in the Status page of the SonicWALL CDP Agent User Interface.
You should see log entries showing backups right after the first scheduled backup after creating a backup task for one or more user mailboxes, and then after each scheduled backup.
If you are watching the Status page during the backup, you will first see the backup task appear multiple times (for each mailbox) in the Backup Events table. When all individual backup events are finished, the backup task appears in the FileSet and Application Events table as completed.
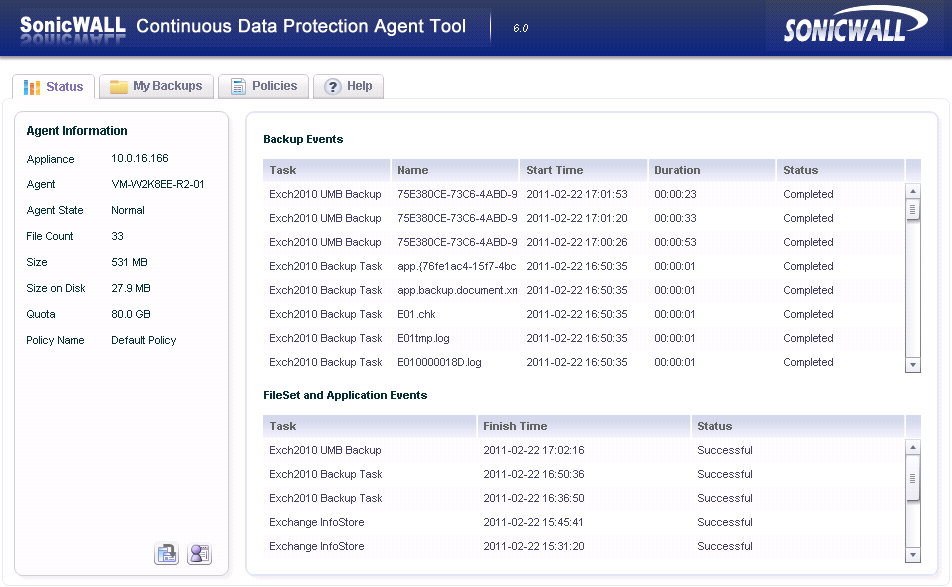
To verify user mailbox backups:
|
|
In the SonicWALL CDP Agent User Interface, click the Status tab. |
|
|
Optionally, to view backup status on a different appliance, click the change appliance
button |
Backing Up Exchange 2010 InfoStore
You can backup and restore Microsoft Exchange InfoStore databases by using the SonicWALL CDP Microsoft Exchange InfoStore Backup and Restore server application in the SonicWALL CDP Agent User Interface. The InfoStore databases are backed up onto your SonicWALL CDP appliance.
For Microsoft Exchange 2010 on Windows Server 2008, SonicWALL CDP supports backup and restore on a multi-application, single server deployment, in which the same server has several applications installed, such as Exchange, SQL, and Active Directory.
In the Agent User Interface, you can create a Microsoft Exchange - InfoStore application object for for one or more databases, input the login credentials for the Exchange server, configure a backup schedule, create a backup task, optionally select offsite backup, and restore databases back to the Exchange server. For information about restoring InfoStore databases, see the “Restoring Exchange 2010 InfoStore” section .
|
|
|
The SonicWALL CDP appliance must be licensed for server applications. On the SonicWALL CDP 110, 210, and 220 platforms, this feature requires the purchase of the SonicWALL CDP 5 Server Applications License upgrade. This license allows you to back up five applications that are installed on your server, such as Exchange, SQL, Active Directory, and others. |
The SonicWALL CDP Microsoft Exchange InfoStore Backup and Restore feature includes the following capabilities:
How Does InfoStore Backup and Restore Work?
The SonicWALL CDP Microsoft Exchange InfoStore Backup and Restore feature is implemented as a server application that is automatically discovered by the SonicWALL CDP Agent User Interface. To get started using the feature, select the Policies tab and then select Applications in the left pane of the Agent User Interface. To backup Microsoft Exchange databases, you must configure an application object, a schedule, and a backup task that includes both the application object and the schedule.
|
|
|
Exchange 2010 InfoStore does not use storage groups, as are used with Exchange 2007/2003 InfoStore, but provides direct access to the databases for backup and restore. |
The InfoStore application allows you to add or remove individual Microsoft Exchange databases for backup, set backup schedules, restore specific backups of the Exchange server, and configure offsite backup. You can view log entries in the SonicWALL CDP Agent User Interface on the Status tab to verify that backups are successful.
Adding an InfoStore Application Object
To backup InfoStore databases, you must configure an application object, a schedule, and a backup task that includes both the application object and the schedule. This section describes how to create the application object.
To create an application object for Microsoft Exchange InfoStore backup, perform the following steps:
|
|
In the SonicWALL CDP Agent User Interface, click the Policies tab. |
|
|
In the left pane, click Applications . |
|
|
In the right pane, click the Plus button |
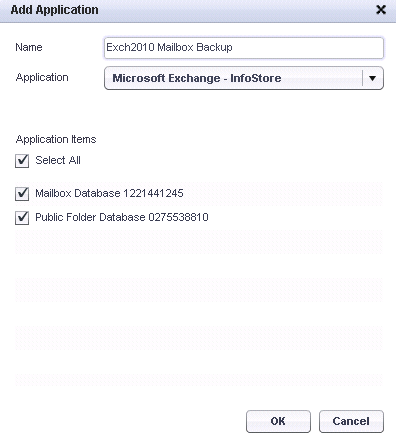
|
|
Type a descriptive name for the application object into the Name field. |
|
|
Select Microsoft Exchange - InfoStore in the Application drop-down list. The list of available applications is automatically populated through a discovery process. For proper discovery, the Microsoft Volume Shadow Copy and VSS Writer services must not be disabled. |
|
|
Under Application items , select the checkboxes for one or more databases to back up. It is not required to back up all databases with the same backup task. For large databases, you might want to schedule separate backups at different times. |
|
|
In the Add Application window, click OK to add the application object. |
The new application object appears in the Policies screen of the Agent User Interface.
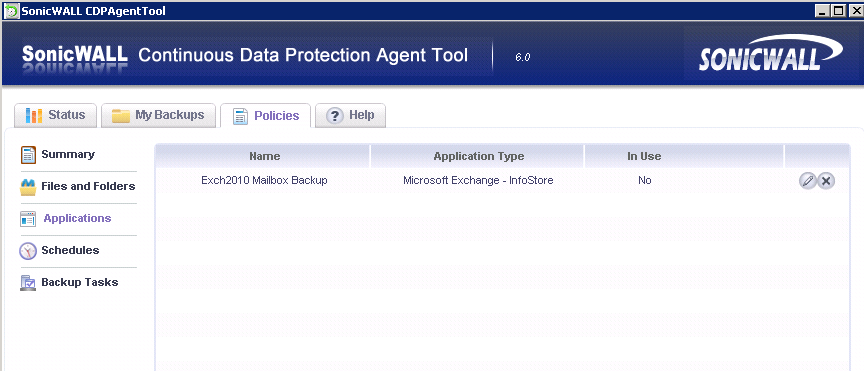
|
|
|
Before the backup will occur, you must also configure a schedule for this application object, and a backup task that includes both the application object and the schedule. |
Scheduling Backups for InfoStore
A schedule is required when creating an Application backup task to backup Exchange InfoStore databases. You can use the same schedule object in more than one backup task.
For instructions on creating a schedule object, see the “Creating Schedules for Application Backups” section .
Configuring a Backup Task for InfoStore Backups
A backup task includes both an application object and a schedule for the backup. Without a backup task, no backups will occur.
For offsite backup, you can choose the Send All Files Offsite option when adding or editing a backup task.
|
|
|
Before creating a backup task, create the application object and schedule to be included in the task. |
To create a backup task for an InfoStore backup, perform the following steps:
|
|
In the SonicWALL CDP Agent User Interface, click the Policies tab. |
|
|
In the left pane, select Backup Tasks . |
|
|
In the right pane, click the Plus button |
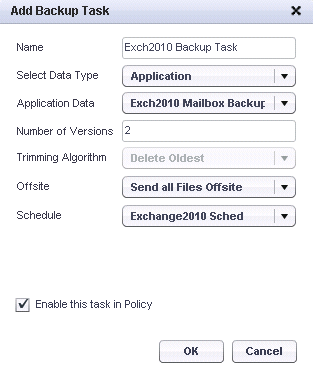
|
|
Type a descriptive name for the backup task into the Name field. |
|
|
Select Application from the Select File Type drop-down list. |
|
|
Select the desired application object from the Application Data drop-down list. |
|
|
Type the desired number of backup revisions to keep into the Number of Versions field. The default is 2. |
|
|
The Trimming Algorithm field is not configurable for Application policies. The field displays the type of trimming algorithm in use. |
|
|
In the Offsite drop-down list, select one of the following options: |
|
|
|
Send all Files Offsite – Offsite backup settings must already be configured in the SonicWALL CDP Web Management Interface, and the offsite appliance must be available. |
|
|
|
Do Not Send Files Offsite – No files will be sent offsite. |
|
|
Select the desired schedule from the Schedule drop-down list. |
|
|
To activate this backup task, select the Enable this task in Policy checkbox. To disable this backup task without deleting it, you can clear this checkbox. |
|
|
Click OK . |
Removing a Database from the Backup Task
To remove a storage group from the list of groups scheduled for backup, perform the following steps:
|
|
In the SonicWALL CDP Agent User Interface, click the Policies tab. |
|
|
In the left pane, select Applications . |
|
|
In the right pane, click the Edit button |
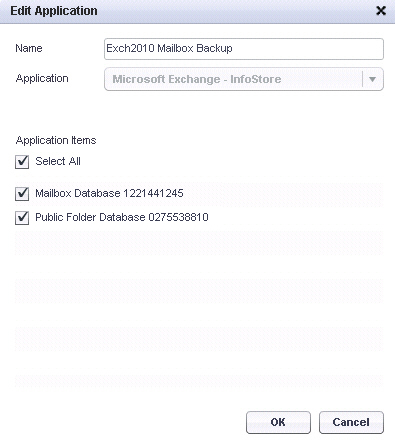
|
|
Click OK . |
Verifying InfoStore Backup Activity
This section describes how to tell if your Microsoft Exchange backups are working correctly. You can view log entries showing the backups in the Status page of the SonicWALL CDP Agent User Interface.
You should see log entries showing backups after each scheduled backup after creating a backup task for one or more InfoStore databases. If you are watching the Status page during the backup, you will first see the backup task appear multiple times in the Backup Events table. When all individual backup events are finished, the backup task appears in the FileSet and Application Events table as completed.
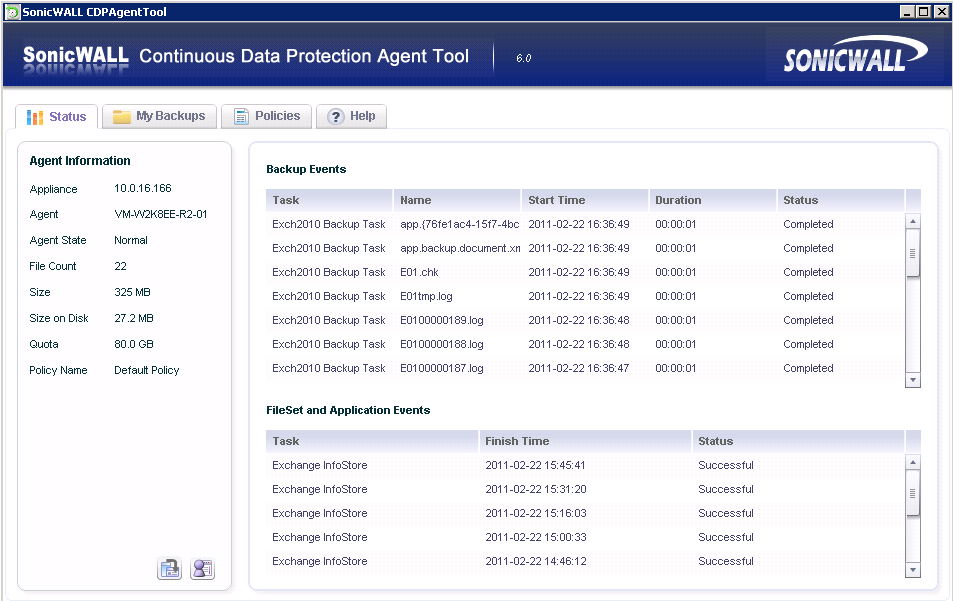
To verify an InfoStore backup:
|
|
In the SonicWALL CDP Agent User Interface, click the Status tab. |
|
|
Optionally, to view backup status on a different appliance, click the change appliance
button |
View the backup status in the right pane. Backing Up Exchange 2007/2003 User Mailboxes
You can backup individual user mailboxes by using the Microsoft Exchange User Mailbox Backup and Restore server application in the SonicWALL CDP Agent User Interface. The user mailbox is backed up onto your SonicWALL CDP appliance.
For Microsoft Exchange 2010 on Windows Server 2008, SonicWALL CDP supports backup and restore on a multi-application, single server deployment, in which the same server has several applications installed, such as Exchange, SQL Server, and Active Directory.
In the Agent User Interface, you can create a Microsoft Exchange - User Mailbox application object for for one or more user mailboxes, input the login credentials for the Exchange server, configure a backup schedule, create a backup task, optionally select offsite backup, and restore individual user mailboxes to the Exchange server. For information about restoring a user mailbox, see the “Restoring an Exchange 2007/2003 User Mailbox” section .
The User Mailbox Backup and Restore feature includes the following capabilities:
User Mailbox Backup and Restore backs up and restores messages in the user’s Outlook Mailbox, including the Inbox, Drafts, Deleted Items, and Sent Items, as well as messages within all other folders with custom names.
It does not back up the Outlook Calendar, Notes, Contacts, Tasks, Meeting Requests, and Public Folders. It also does not back up locally archived folders.
How Does User Mailbox Backup and Restore Work?
The SonicWALL CDP Microsoft Exchange User Mailbox Backup and Restore feature is implemented as a server application that is automatically discovered by the SonicWALL CDP Agent User Interface. To get started using the feature, select the Policies tab and then select Applications in the left pane of the Agent User Interface. To backup user mailboxes, you must configure an application object, a schedule, and a backup task that includes both the application object and the schedule.
The User Mailbox application allows you to add or delete individual user mailboxes for backup, set backup schedules, restore specific backups of individual mailboxes, enter credentials for accessing the Exchange server, and select offsite backup. You can view log entries in the SonicWALL CDP Agent User Interface on the Status tab to verify that backups are successful.
Adding User Mailboxes to an Application Object
To backup user mailboxes, you must configure an application object, a schedule, and a backup task that includes both the application object and the schedule. This section describes how to create the application object.
You can test the connection to the Exchange Server by clicking the Authentication button while adding or editing an application object. It is not necessary to enter any authentication credentials to test the connection.
To create an application object with individual user mailboxes for backup, perform the following steps:
|
|
In the SonicWALL CDP Agent User Interface, click the Policies tab. |
|
|
In the left pane, click Applications . |
|
|
In the right pane, click the Plus button |
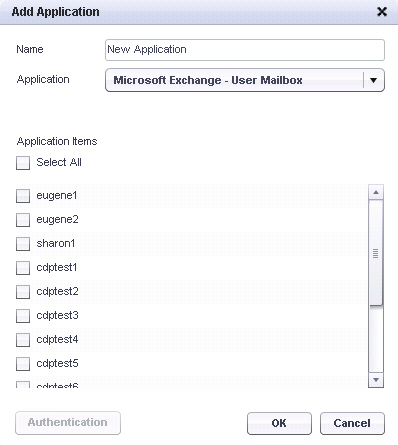
|
|
Type a descriptive name for the application object into the Name field. |
|
|
Select Microsoft Exchange - User Mailbox in the Application drop-down list. The list of available applications is automatically populated through a discovery process. For proper discovery, the Microsoft Volume Shadow Copy service must not be disabled. See the 'Backup and Recovery Troubleshooting' section in the SonicWALL CDP Administrator’s Guide for more information. |
|
|
Under Application items , select the checkboxes for one or more user mailboxes to back up. |
|
|
If authentication credentials are required to access the Exchange server, or to test the connections to the Exchange server, click the Authentication button. The Authentication dialog box opens. |
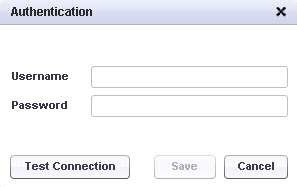
|
|
In the Authentication dialog box, type the domain\username into the Username field and type the password into the Password field. |
|
|
To test the connection between the User Mailbox application and the Exchange server, either with or without credentials, click the Test Connection button. |
|
|
When finished entering the authentication credentials, click Save . Click Cancel to close the dialog box without saving anything. |
|
|
In the Add Application window, click OK to add the application object. |
The new application object appears in the Policies screen of the Agent User Interface.
|
|
|
Before the backup will occur, you must also configure a schedule for this application object, and a backup task that includes both the application object and the schedule. |
Scheduling Backups for User Mailboxes
A schedule is required when creating an Application backup task to backup user mailboxes. You can use the same schedule object in more than one backup task.
For instructions on creating a schedule object, see the “Creating Schedules for Application Backups” section .
Configuring a Backup Task for User Mailbox Backups
A backup task includes both an application object and a schedule for the backup. Without a backup task, no backups will occur.
For offsite backup, you can choose the Send All Files Offsite option when adding or editing a backup task.
|
|
|
Before creating a backup task, create the application object and schedule to be included in the task. |
To create a backup task for a user mailbox backup, perform the following steps:
|
|
In the SonicWALL CDP Agent User Interface, click the Policies tab. |
|
|
In the left pane, select Backup Tasks . |
|
|
In the right pane, click the Plus button |
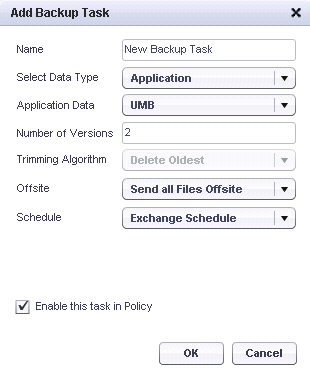
|
|
Type a descriptive name for the backup task into the Name field. |
|
|
Select Application from the Select File Type drop-down list. |
|
|
Select the desired application object from the Application Data drop-down list. |
|
|
Type the desired number of backup revisions to keep into the Number of Versions field. The default is 2. |
|
|
The Trimming Algorithm field is not configurable for Application policies. The field displays the type of trimming algorithm in use. |
|
|
In the Offsite drop-down list, select one of the following options: |
|
|
|
Send all Files Offsite – Offsite backup settings must already be configured in the SonicWALL CDP Web Management Interface, and the offsite appliance must be available. |
|
|
|
Do Not Send Files Offsite – No files will be sent offsite. |
|
|
Select the desired schedule from the Schedule drop-down list. |
|
|
To activate this backup task, select the Enable this task in Policy checkbox. To disable this backup task without deleting it, you can clear this checkbox. |
|
|
Click OK . |
Configuring and Testing Access to the Exchange Server
Access between the SonicWALL CDP appliance and the Exchange server where the user mailboxes reside can be configured to require authentication credentials or not. When you add an application object for a user mailbox backup, you can choose to add authentication credentials if required by the Exchange server. In either case, you can use the Authentication dialog box to test the connection between the SonicWALL CDP appliance and the Exchange server.
|
|
|
If no authentication credentials are entered, the actual backup process uses the local SYSTEM account to access the Microsoft Exchange database. |
Before configuring a User Mailbox application object to use credentials when accessing the Exchange server, you must first configure the credentials on the Exchange server. The user name must have appropriate privileges to access user mailbox data on the Exchange server. For more information about configuring users and access privileges on Microsoft Exchange, see the following Microsoft knowledge base articles:
http:/support.microsoft.com/kb/821897
http://support.microsoft.com/kb/556045
Removing User Mailboxes from the Backup Task
This section describes how to remove a user mailbox from the list of mailboxes scheduled for backup.
To remove a user mailbox from the backup task, perform the following steps:
|
|
In the SonicWALL CDP Agent User Interface, click the Policies tab. |
|
|
In the left pane, select Applications . |
|
|
In the right pane, click the Edit button |
|
|
Click OK . |
Verifying User Mailbox Backup Activity
This section describes how to tell if your user mailbox backups are working correctly by viewing log entries showing the backups in the Status page of the SonicWALL CDP Agent User Interface.
You should see log entries showing backups right after the first scheduled backup after creating a backup task for one or more user mailboxes, and then after each scheduled backup.
|
|
In the SonicWALL CDP Agent User Interface, click the Status tab. |
|
|
Optionally, to view backup status on a different appliance, click the change appliance
button |
Backing Up Exchange 2007/2003 Storage Groups
You can backup and restore a Microsoft Exchange Storage Group by using the SonicWALL CDP Microsoft Exchange InfoStore Backup and Restore server application in the SonicWALL CDP Agent User Interface. The Storage Group, or InfoStore, is backed up onto your SonicWALL CDP appliance.
For Microsoft Exchange 2010 on Windows Server 2008, SonicWALL CDP supports backup and restore on a multi-application, single server deployment, in which the same server has several applications installed, such as Exchange, SQL Server, and Active Directory.
In the Agent User Interface, you can create a Microsoft Exchange - InfoStore application object for for one or more storage groups, input the login credentials for the Exchange server, configure a backup schedule, create a backup task, optionally select offsite backup, and restore storage groups back to the Exchange server. For information about restoring a Storage Group, see the “Restoring an Exchange 2007/2003 Storage Group” section .
|
|
|
The SonicWALL CDP appliance must be licensed for server applications. On the SonicWALL CDP 110 and 210 platforms, this feature requires the purchase of the SonicWALL CDP 110/210 5 Server Applications License upgrade. This license allows you to back up five applications that are installed on your server, such as Exchange, SQL Server, Active Directory, and others. |
The SonicWALL CDP Microsoft Exchange InfoStore Backup and Restore feature includes the following capabilities:
How Does InfoStore Backup and Restore Work?
The SonicWALL CDP Microsoft Exchange InfoStore Backup and Restore feature is implemented as a server application that is automatically discovered by the SonicWALL CDP Agent User Interface. To get started using the feature, select the Policies tab and then select Applications in the left pane of the Agent User Interface. To backup a storage group, you must configure an application object, a schedule, and a backup task that includes both the application object and the schedule.
The InfoStore application allows you to add or remove individual Microsoft Exchange Storage Groups for backup, set backup schedules, restore specific backups of the Exchange server, and configure offsite backup. You can view log entries in the SonicWALL CDP Agent User Interface on the Status tab to verify that backups are successful.
Adding a Storage Group Application Object
To backup a storage group, you must configure an application object, a schedule, and a backup task that includes both the application object and the schedule. This section describes how to create the application object.
To create an application object for Microsoft Exchange Storage Group backup, perform the following steps:
|
|
In the SonicWALL CDP Agent User Interface, click the Policies tab. |
|
|
In the left pane, click Applications . |
|
|
In the right pane, click the Plus button |
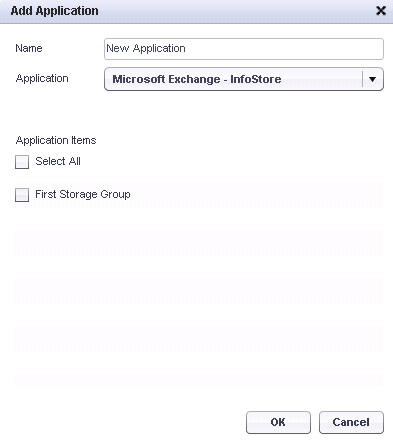
|
|
Type a descriptive name for the application object into the Name field. |
|
|
Select Microsoft Exchange - InfoStore in the Application drop-down list. The list of available applications is automatically populated through a discovery process. For proper discovery, the Microsoft Volume Shadow Copy and VSS Writer services must not be disabled. See the 'Backup and Recovery Troubleshooting' section in the SonicWALL CDP Administrator’s Guide for more information. |
|
|
Under Application items , select the checkboxes for one or more storage groups to back up. |
|
|
In the Add Application window, click OK to add the application object. |
The new application object appears in the Policies screen of the Agent User Interface.
|
|
|
Before the backup will occur, you must also configure a schedule for this application object, and a backup task that includes both the application object and the schedule. |
Scheduling Backups for Storage Groups
A schedule is required when creating an Application backup task to backup Exchange storage groups. You can use the same schedule object in more than one backup task.
For instructions on creating a schedule object, see the “Creating Schedules for Application Backups” section .
Configuring a Backup Task for Storage Group Backups
A backup task includes both an application object and a schedule for the backup. Without a backup task, no backups will occur.
For offsite backup, you can choose the Send All Files Offsite option when adding or editing a backup task.
|
|
|
Before creating a backup task, create the application object and schedule to be included in the task. |
To create a backup task for a storage group backup, perform the following steps:
|
|
In the SonicWALL CDP Agent User Interface, click the Policies tab. |
|
|
In the left pane, select Backup Tasks . |
|
|
In the right pane, click the Plus button |
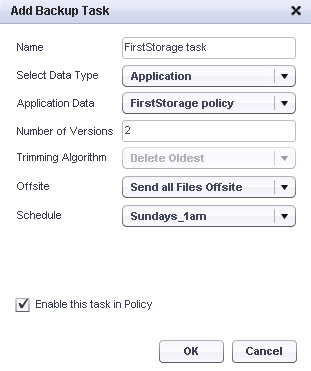
|
|
Type a descriptive name for the backup task into the Name field. |
|
|
Select Application from the Select File Type drop-down list. |
|
|
Select the desired application object from the Application Data drop-down list. |
|
|
Type the desired number of backup revisions to keep into the Number of Versions field. The default is 2. |
|
|
The Trimming Algorithm field is not configurable for Application policies. The field displays the type of trimming algorithm in use. |
|
|
In the Offsite drop-down list, select one of the following options: |
|
|
|
Send all Files Offsite – Offsite backup settings must already be configured in the SonicWALL CDP Web Management Interface, and the offsite appliance must be available. |
|
|
|
Do Not Send Files Offsite – No files will be sent offsite. |
|
|
Select the desired schedule from the Schedule drop-down list. |
|
|
To activate this backup task, select the Enable this task in Policy checkbox. To disable this backup task without deleting it, you can clear this checkbox. |
|
|
Click OK . |
Removing a Storage Group from the Backup Task
To remove a storage group from the list of groups scheduled for backup, perform the following steps:
|
|
In the SonicWALL CDP Agent User Interface, click the Policies tab. |
|
|
In the left pane, select Applications . |
|
|
In the right pane, click the Edit button |
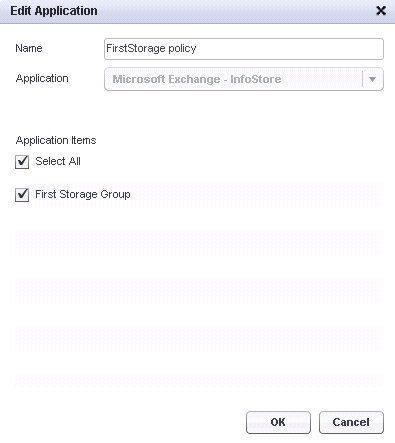
|
|
Click OK . |
Verifying InfoStore Backup Activity
This section describes how to tell if your Microsoft Exchange backups are working correctly. You can view log entries showing the backups in the Status page of the SonicWALL CDP Agent User Interface.
You should see log entries showing backups after each scheduled backup after creating a backup task for one or more storage groups.
|
|
In the SonicWALL CDP Agent User Interface, click the Status tab. |
|
|
Optionally, to view backup status on a different appliance, click the change appliance
button |
Backing Up SharePoint
Backing up Microsoft SharePoint using SonicWALL CDP allows users to store and retrieve SharePoint database revisions from an agent machine. SharePoint databases are configured for backup using the SonicWALL CDP Agent User Interface.
The application used for SharePoint backup is Microsoft SQL Server/SharePoint , as SharePoint uses Microsoft SQL databases. The default SQL master, model, and msdb databases are required for SharePoint, and SharePoint creates other SQL databases as well. Microsoft SQL can be installed on the same or on another Windows Server machine.
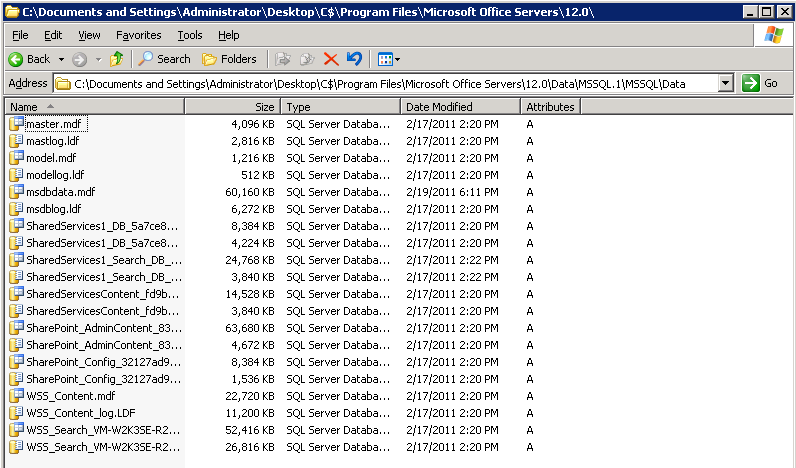
SonicWALL recommends backing up all SharePoint databases together, rather than backing up individual databases separately.
For information about restoring SharePoint databases, see the “Restoring SharePoint” section .
See the following sections for SharePoint backup procedures:
Creating an Application Object for SharePoint
To backup Microsoft SharePoint, you must configure an application object, a schedule, and a backup task that includes both the application object and the schedule. This section describes how to create the application object.
To backup SharePoint using the Agent User Interface, perform the following steps:
|
|
Open the SonicWALL Agent User Interface on the SharePoint server. |
|
|
In the SonicWALL CDP Agent User Interface, click the Policies tab. |
|
|
In the left pane, click Applications . |
|
|
In the right pane, click the Plus button |
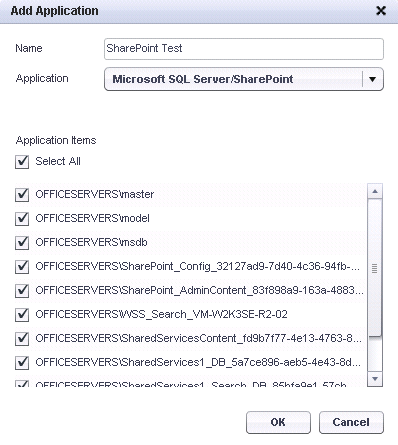
|
|
Type a descriptive name for the application object into the Name field. |
|
|
Select Microsoft SQL Server/SharePoint in the Application drop-down list. The list of available applications is automatically populated through a discovery process. For proper discovery, the Microsoft Volume Shadow Copy service must not be disabled. |
|
|
Under Application items , select the checkboxes for one or more SharePoint databases to back up. SonicWALL recommends selecting the Select All checkbox to ensure that all associated files are backed up for SharePoint. |
|
|
In the Add Application window, click OK to add the application object. |
The new application object appears in the Policies screen of the Agent User Interface.
|
|
|
Before the backup will occur, you must also configure a schedule for this application object, and a backup task that includes both the application object and the schedule. |
Scheduling Backups for SharePoint
A schedule is required when creating an Application backup task to backup Microsoft SharePoint. You can use the same schedule object in more than one backup task.
For instructions on creating a schedule object, see the “Creating Schedules for Application Backups” section .
Configuring a Backup Task for SharePoint
A backup task includes both an application object and a schedule for the backup. Without a backup task, no backups will occur.
For offsite backup, you can choose the Send All Files Offsite option when adding or editing a backup task.
|
|
|
Before creating a backup task, create the application object and schedule to be included in the task. |
To create a backup task for a SharePoint backup, perform the following steps:
|
|
In the SonicWALL CDP Agent User Interface, click the Policies tab. |
|
|
In the left pane, select Backup Tasks . |
|
|
In the right pane, click the Plus button |
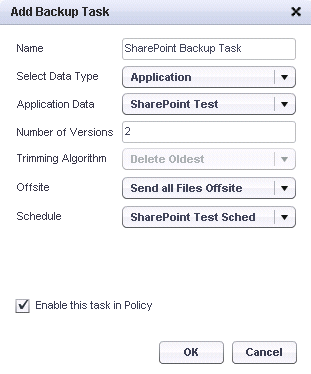
|
|
Type a descriptive name for the backup task into the Name field. |
|
|
Select Application from the Select File Type drop-down list. |
|
|
Select the desired application object from the Application Data drop-down list. |
|
|
Type the desired number of backup revisions to keep into the Number of Versions field. The default is 2. |
|
|
The Trimming Algorithm field is not configurable for Application policies. The field displays the type of trimming algorithm in use. |
|
|
In the Offsite drop-down list, select one of the following options: |
|
|
|
Send all Files Offsite – Offsite backup settings must already be configured in the SonicWALL CDP Web Management Interface, and the offsite appliance must be available. |
|
|
|
Do Not Send Files Offsite – No files will be sent offsite. |
|
|
Select the desired schedule from the Schedule drop-down list. |
|
|
To activate this backup task, select the Enable this task in Policy checkbox. To disable this backup task without deleting it, you can clear this checkbox. |
|
|
Click OK . |
Verifying SharePoint Backup Activity
This section describes how to tell if your Microsoft SharePoint backups are working correctly. You can view log entries showing the backups in the Status page of the SonicWALL CDP Agent User Interface.
You should see log entries showing backups after each scheduled backup after creating a backup task for SharePoint.
|
|
In the SonicWALL CDP Agent User Interface, click the Status tab. |
|
|
Optionally, to view backup status on a different appliance, click the change appliance
button |
View the backup status in the right pane.
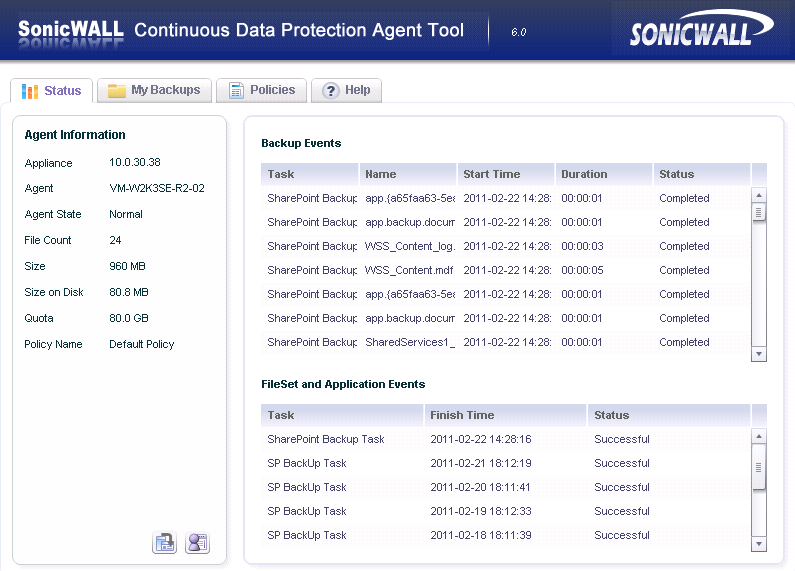
|
|
Click the My Backups tab and view the list of backup revisions. |
Backing up System State and Active Directory
Active Directory is included within the System State application object in SonicWALL CDP 6.0 and higher. When creating a System State application object, you can select components, including Active Directory, to back up. This allows you to backup and recover Active Directory revisions from agent machines together with interdependent system files to provide a consistent environment.
Creating an Application Object for System State and Active Directory
To backup System State and Active Directory, you must configure an application object, a schedule, and a backup task that includes both the application object and the schedule. This section describes how to create the application object.
To backup System State and Active Directory using the Agent User Interface, perform the following steps:
|
|
Open the SonicWALL Agent User Interface on the Domain Controller. |
|
|
In the SonicWALL CDP Agent User Interface, click the Policies tab. |
|
|
In the left pane, click Applications . |
|
|
In the right pane, click the Plus button |
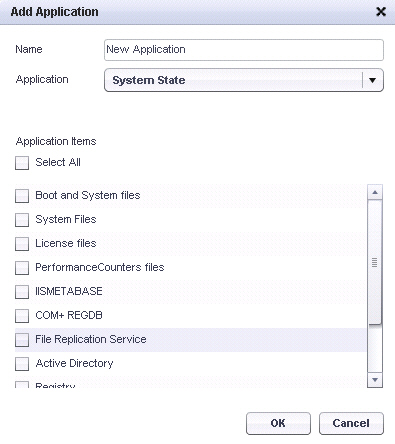
|
|
Type a descriptive name for the application object into the Name field. |
|
|
Select System State in the Application drop-down list. The list of available applications is automatically populated through a discovery process. For proper discovery, the Microsoft Volume Shadow Copy service must not be disabled. See the 'Backup and Recovery Troubleshooting' section in the SonicWALL CDP Administrator’s Guide for more information. |
|
|
Under Application items , select the checkboxes for one or more System State components to back up. You can select Active Directory in this screen. SonicWALL recommends selecting the Select All checkbox to ensure that all associated System State files are backed up along with Active Directory. |
The exact list of system components that make up your computer's System State data depend on the computer's operating system and configuration. For example, on a Windows Server you might see the following:
|
|
|
Registry |
|
|
In the Add Application window, click OK to add the application object. |
The new application object appears in the Policies screen of the Agent User Interface.
|
|
|
Before the backup will occur, you must also configure a schedule for this application object, and a backup task that includes both the application object and the schedule. |
Scheduling Backups for System State and Active Directory
A schedule is required when creating an Application backup task to backup System State and Active Directory. You can use the same schedule object in more than one backup task.
For instructions on creating a schedule object, see the “Creating Schedules for Application Backups” section .
Configuring a Backup Task for System State and Active Directory
A backup task includes both an application object and a schedule for the backup. Without a backup task, no backups will occur.
For offsite backup, you can choose the Send All Files Offsite option when adding or editing a backup task.
|
|
|
Before creating a backup task, create the application object and schedule to be included in the task. |
To create a backup task for a System State and Active Directory backup, perform the following steps:
|
|
In the SonicWALL CDP Agent User Interface, click the Policies tab. |
|
|
In the left pane, select Backup Tasks . |
|
|
In the right pane, click the Plus button |
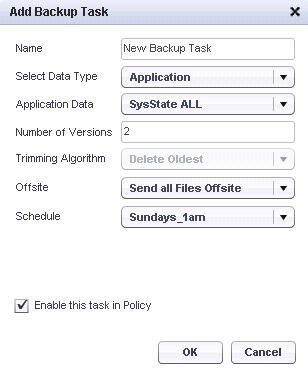
|
|
Type a descriptive name for the backup task into the Name field. |
|
|
Select Application from the Select File Type drop-down list. |
|
|
Select the desired application object from the Application Data drop-down list. |
|
|
Type the desired number of backup revisions to keep into the Number of Versions field. The default is 2. |
|
|
The Trimming Algorithm field is not configurable for Application policies. The field displays the type of trimming algorithm in use. |
|
|
In the Offsite drop-down list, select one of the following options: |
|
|
|
Send all Files Offsite – Offsite backup settings must already be configured in the SonicWALL CDP Web Management Interface, and the offsite appliance must be available. |
|
|
|
Do Not Send Files Offsite – No files will be sent offsite. |
|
|
Select the desired schedule from the Schedule drop-down list. |
|
|
To activate this backup task, select the Enable this task in Policy checkbox. To disable this backup task without deleting it, you can clear this checkbox. |
|
|
Click OK . |
Verifying System State and Active Directory Backup Activity
This section describes how to tell if your System State backups are working correctly. You can view log entries showing the backups in the Status page of the SonicWALL CDP Agent User Interface.
You should see log entries showing backups after each scheduled backup after creating a backup task for System State and Active Directory.
|
|
In the SonicWALL CDP Agent User Interface, click the Status tab. |
|
|
Optionally, to view backup status on a different appliance, click the change appliance
button |
View the backup status in the right pane.
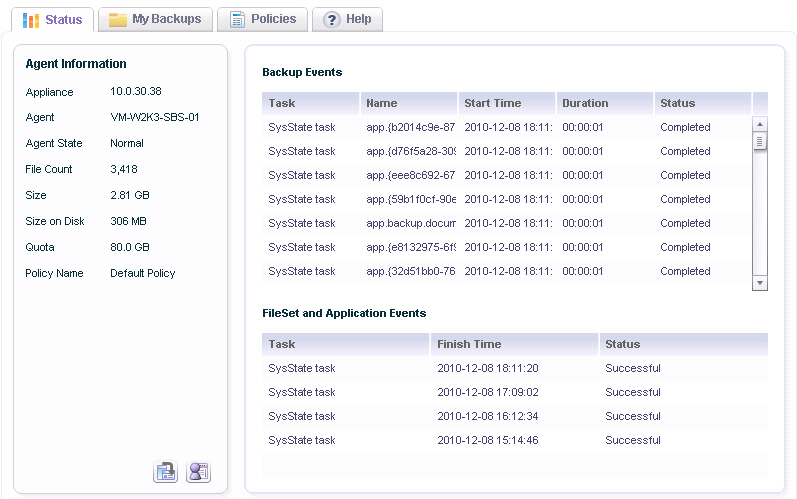
|
|
Click the My Backups tab and view the list of backup revisions. |
Backing up Microsoft SQL Server
Backing up Microsoft SQL Server using SonicWALL CDP allows users to store and retrieve Microsoft SQL Server revisions from an agent machine. Microsoft SQL Server databases are configured for backup using the SonicWALL CDP Agent User Interface.
During SQL Server backup and restore using CDP, the Agent Service directly interfaces with the server through the Open Database Connectivity (ODBC) API, using an SQL-ODBC driver that is installed with SQL Server. By ODBC, the Agent service communicates to the SQL server through transactional SQL commands.

When the SonicWALL CDP Agent Service backs up an SQL database, it instructs SQL to place the data in a certain location in memory. The Agent Service will then process the data one block at a time, compressing it and sending to the appliance.
The Agent Service first needs to connect to the database and authenticate, typically by using Windows user account credentials.
For more information about SQL backup and restore, see the SonicWALL CDP Administrator’s Guide .
This section contains the following subsections:
Adding a SQL Server Backup Application Object
To backup Microsoft SQL Server databases, you must configure an application object, a schedule, and a backup task that includes both the application object and the schedule. This section describes how to create the application object.
To create an application object for Microsoft SQL Server database backup, perform the following steps:
|
|
Open the SonicWALL Agent User Interface on the SQL server. |
|
|
In the SonicWALL CDP Agent User Interface, click the Policies tab. |
|
|
In the left pane, click Applications . |
|
|
In the right pane, click the Plus button |
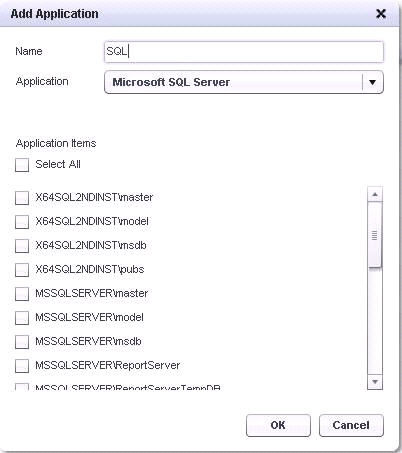
|
|
Type a descriptive name for the application object into the Name field. |
|
|
Select either Microsoft SQL Server or Microsoft SQL Server Desktop Engine (MSDE) in the Application drop-down list. The list of available applications is automatically populated through a discovery process. For proper discovery, the Microsoft Volume Shadow Copy and VSS Writer services must not be disabled. See the 'Backup and Recovery Troubleshooting' section in the SonicWALL CDP Administrator’s Guide for more information. |
|
|
Under Application items , select the checkboxes for one or more databases to back up. |
|
|
In the Add Application window, click OK to add the application object. |
The new application object appears in the Policies screen of the Agent User Interface.
|
|
|
Before the backup will occur, you must also configure a schedule for this application object, and a backup task that includes both the application object and the schedule. |
Scheduling Backups for Microsoft SQL Server
A schedule is required when creating an Application backup task to backup Microsoft SQL Server databases. You can use the same schedule object in more than one backup task.
For instructions on creating a schedule object, see the “Creating Schedules for Application Backups” section .
Configuring a Backup Task for Microsoft SQL Server Database Backups
A backup task includes both an application object and a schedule for the backup. Without a backup task, no backups will occur.
For offsite backup, you can choose the Send All Files Offsite option when adding or editing a backup task.
|
|
|
Before creating a backup task, create the application object and schedule to be included in the task. |
To create a backup task for Microsoft SQL Server database backup, perform the following steps:
|
|
In the SonicWALL CDP Agent User Interface, click the Policies tab. |
|
|
In the left pane, select Backup Tasks . |
|
|
In the right pane, click the Plus button |
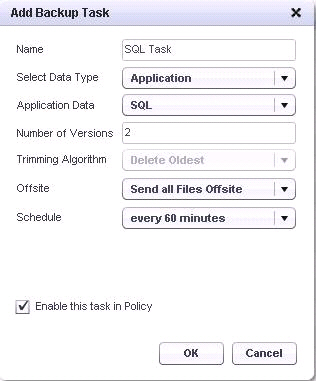
|
|
Type a descriptive name for the backup task into the Name field. |
|
|
Select Application from the Select File Type drop-down list. |
|
|
Select the desired application object from the Application Data drop-down list. |
|
|
Type the desired number of backup revisions to keep into the Number of Versions field. The default is 2. |
|
|
The Trimming Algorithm field is not configurable for Application policies. The field displays the type of trimming algorithm in use. |
|
|
In the Offsite drop-down list, select one of the following options: |
|
|
|
Send all Files Offsite – Offsite backup settings must already be configured in the SonicWALL CDP Web Management Interface, and the offsite appliance must be available. |
|
|
|
Do Not Send Files Offsite – No files will be sent offsite. |
|
|
Select the desired schedule from the Schedule drop-down list. |
|
|
To activate this backup task, select the Enable this task in Policy checkbox. To disable this backup task without deleting it, you can clear this checkbox. |
|
|
Click OK . |
Removing a SQL Database from the Backup Task
To remove a database from the list of SQL databases scheduled for backup, perform the following steps:
|
|
In the SonicWALL CDP Agent User Interface, click the Policies tab. |
|
|
In the left pane, select Applications . |
|
|
In the right pane, click the Edit button |

|
|
Click OK . |
Verifying Microsoft SQL Server Backup Activity
This section describes how to tell if your Microsoft SQL Server backups are working correctly. You can view log entries showing the backups on the Status page of the SonicWALL CDP Agent User Interface.
You should see log entries showing backups after each scheduled backup after creating a backup task for SQL Server.
To view the status of SQL Server backups:
|
|
In the SonicWALL CDP Agent User Interface, click the Status tab. |
|
|
Optionally, to view backup status on a different appliance, click the change appliance
button |
View the backup status in the right pane.
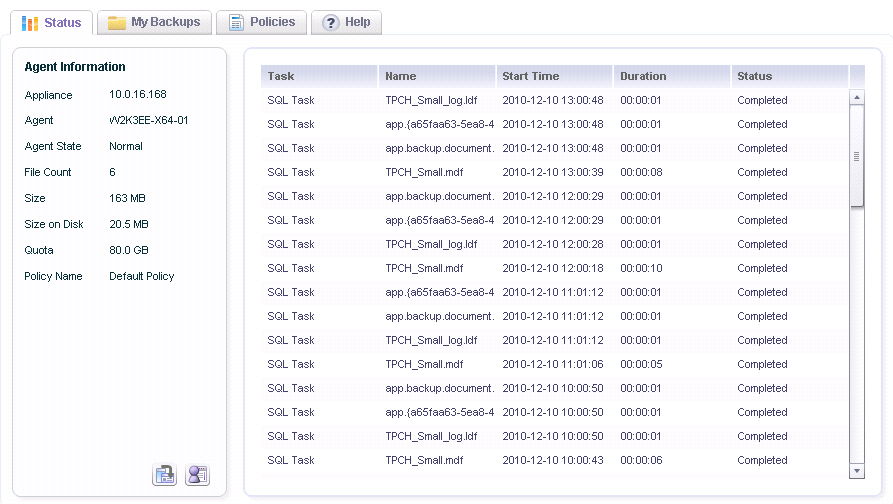
|
|
Click the My Backups tab and view the list of backup revisions. |
Offsite Backup of SQL Server
Offsite Service backup of CDP can be selected at the agent level when configuring the backup task. This implies that all SQL Server instances and databases selected on the agent will be backed up to the Offsite Service.
You can view files backed up offsite by expanding the Offsite option while logged into the Agent as Administrator. For information about this, see the “Using the Administrator File Browser” section .
Restoring Server Applications
while logged into the Agent as Administrator. For information about this, see the “Using the Administrator File Browser” section .Using the SonicWALL CDP Agent on a server for which you have administrative rights, you can restore data from connected CDP appliances to the server, even if it is a different machine than the one from which the data was backed up.
Restoring Data from Exchange 2010
Recovery of data from Microsoft Exchange 2010 using SonicWALL CDP allows users to retrieve Microsoft Exchange revisions from an agent machine previously configured to backup that data.
Restoring Exchange 2010 User Mailboxes
This section describes how to restore an individual user mailbox backup to the Exchange 2010 server, by using the Microsoft Exchange User Mailbox Backup and Restore server application in the SonicWALL CDP Agent User Interface.
|
|
|
You must log into the agent machine as Administrator before restoring a User Mailbox. For information about configuring the Administrator account for Exchange authentication, see “Configuring Authentication on the Exchange Server” . |
A mailbox must exist in Exchange in order for the restore to work properly. To restore an individual user mailbox to the Exchange server, perform the following steps:
|
|
In the SonicWALL CDP Agent User Interface, click the My Backups tab. |
|
|
In the left pane, click Applications . The display expands to show available backup tasks. |
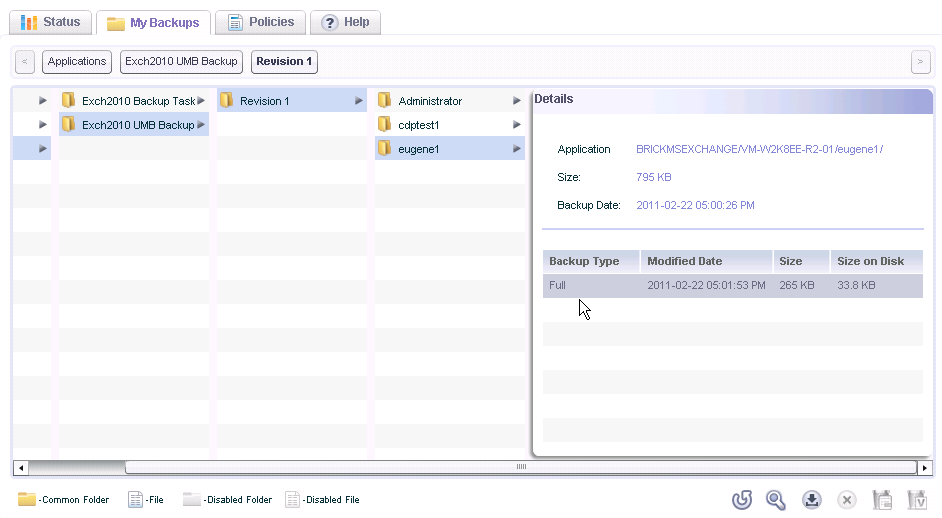
|
|
Click the desired revision. The root folder and details about the revision are displayed, including the date and time. |
|
|
|
To restore all user mailboxes contained in the revision, click the Restore
icon |
|
|
To restore a single user mailbox, click the desired user mailbox to restore. The Details are displayed. |
|
|
In the Details section, click to select the desired backup in the table in the lower area of the Details section, such as the Full backup of the mailbox. |
|
|
At the bottom right corner, click the Restore
icon |
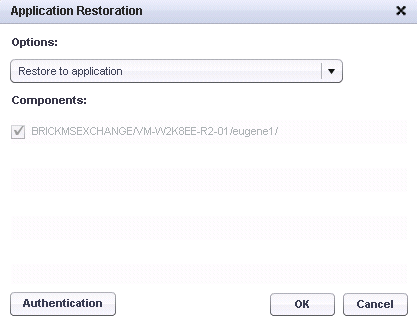
|
|
For a single user mailbox restoration , select Restore to application from the Options drop-down list. No other option is available in this case. |
When restoring all mailboxes in a Revision , select one of the following from the Options drop-down list:
|
|
|
Restore to original location – This option restores the files to the Microsoft Exchange application location. |
|
|
|
Restore to alternate location – This option restores the files to the disk of the agent machine. |
|
|
Under Components , select the checkboxes for the user mailbox databases you want to restore. Select all databases to maintain consistency. |
|
|
Click OK . The Application Restoration Details window appears. |
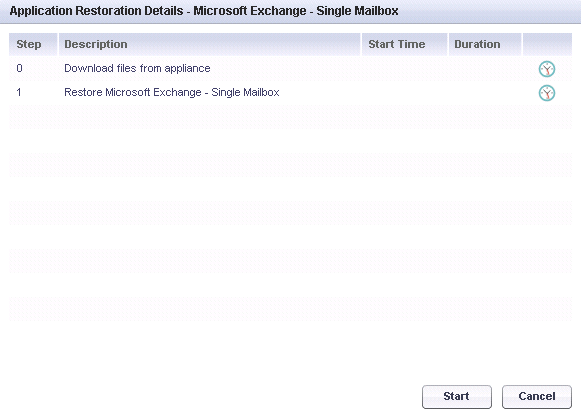
|
|
The restoration steps are listed, along with a Start Time column, a Duration column, and an in-progress indicator. The steps are: |
To start the restore process, click Start . To exit without restoring any files, click Cancel .
The in-progress indicators become active for each step as it is executed, and the Start Time and Duration values are updated.

|
|
When the restore is finished, click Close . |
|
|
|
After the data is restored to the Exchange server, you may need to synchronize your local mail client (Outlook) in order to see restored emails. |
Restoring Exchange 2010 InfoStore
You can restore Exchange 2010 InfoStore databases by using the SonicWALL CDP Microsoft Exchange InfoStore Backup and Restore server application in the SonicWALL CDP Agent User Interface.
This section describes how to restore an individual Storage Group. You can restore the Storage Group in two ways:
|
|
|
Restore to Disk - Copies the data to a folder on the local disk, then you can copy it to the Exchange database |
A storage group must exist in Exchange in order for the restore to work properly.
|
|
|
The current account must have privileges to access the Exchange server. If authentication is configured for the Administrator account, login as Administrator to do the restore. For information about configuring the Administrator account for Exchange authentication, see “Configuring Authentication on the Exchange Server” . |
To restore InfoStore data using the SonicWALL CDP Agent User Interface, perform the following steps:
|
|
In the SonicWALL CDP Agent User Interface, click the My Backups tab. |
|
|
In the left pane, click Applications . The display expands to show available backup tasks. |
|
|
Click the desired revision. The root folder and details about the revision are displayed, including the date and time. |
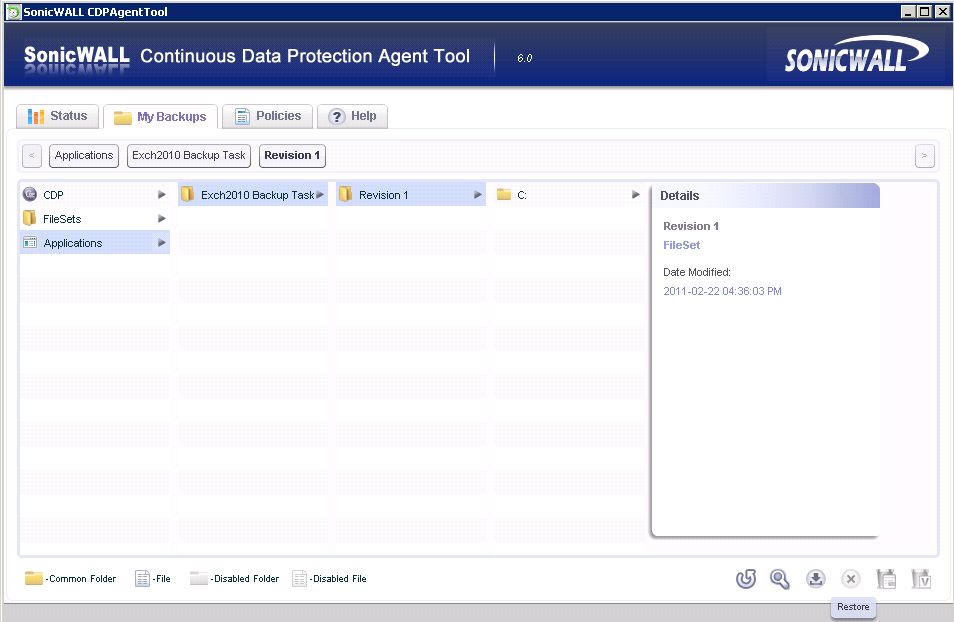
|
|
At the bottom right corner, click the Restore
icon |
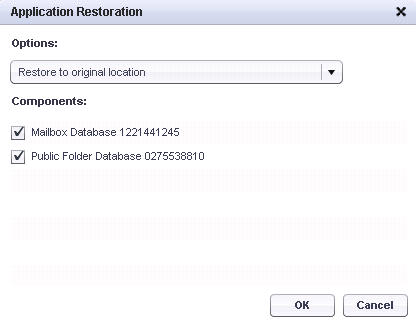
|
|
In the Options drop-down list, select one of the following: |
|
|
|
Restore to original location – This option restores the files to the application in their original location in Microsoft Exchange. |
|
|
|
Restore to alternate location – This option restores the files to the disk of the agent machine. |
|
|
Under Components , select the checkboxes for the databases you want to restore. |
|
|
Click OK . The Application Restoration Details window appears. |
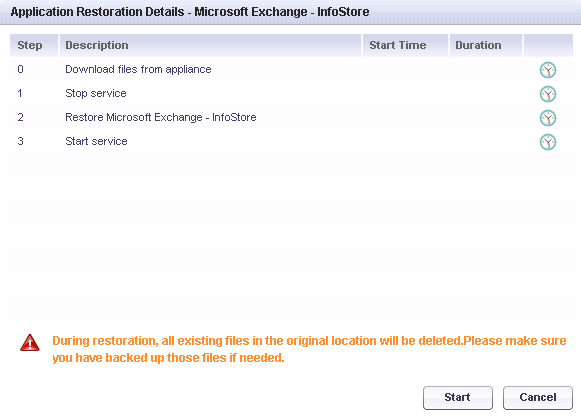
|
|
The restoration steps are listed, along with a Start Time column, a Duration column, and an in-progress indicator. The steps are: |
During restoration, all existing files in the original location will be deleted. Please make sure you have backed up those files if needed.
To start the restore process, click Start . To exit without restoring any files, click Cancel .
The in-progress indicators become active for each step as it is executed, and the Start Time and Duration values are updated.
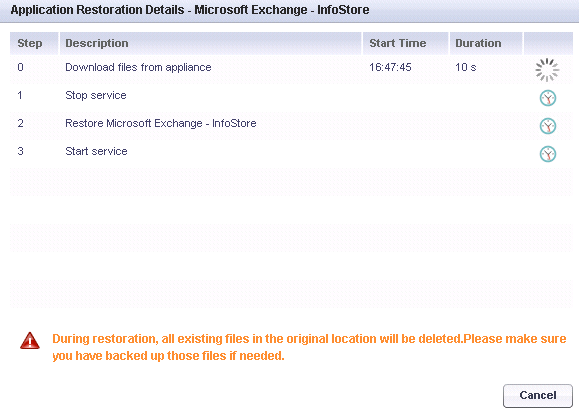
|
|
When the restore is finished, click Close . |
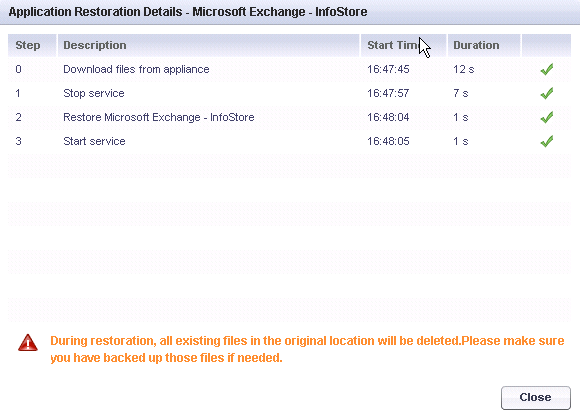
|
|
|
After the data is restored to the Exchange server, you may need to synchronize your local mail client (Outlook) in order to see restored emails. |
Restoring Data from Exchange 2007/2003
Recovery of data from Microsoft Exchange 2007 or 2003 using SonicWALL CDP allows users to retrieve Microsoft Exchange revisions from an agent machine previously configured to backup that data.
Restoring an Exchange 2007/2003 User Mailbox
This section describes how to restore an individual user mailbox backup to the Exchange server, by using the Microsoft Exchange User Mailbox Backup and Restore server application in the SonicWALL CDP Agent User Interface.
|
|
|
You must log into the agent machine as cdpadmin before restoring a User Mailbox. For more information about account privileges to access the Exchange server, see KB821897 . |
A mailbox must exist in Exchange in order for the restore to work properly. For cases in which the mailbox has been deleted from Exchange, special procedures are necessary.
Restoring the Contents of an Existing Mailbox
To restore an individual user mailbox to the Exchange server, perform the following steps:
|
|
In the SonicWALL CDP Agent User Interface, click the My Backups tab. |
|
|
In the left pane, click Applications . The display expands to show available backup tasks. |
|
|
Click the desired revision. The root folder and details about the revision are displayed, including the date and time. |
|
|
At the bottom right corner, click the Restore
icon |
|
|
In the Restore Mailbox dialog box, select the backup that you want to restore. The Application Restoration window opens. |
|
|
In the Options drop-down list, select one of the following: |
|
|
|
Restore to original location – This option restores the files to the Microsoft Exchange application location. |
|
|
|
Restore to alternate location – This option restores the files to the disk of the agent machine. |
|
|
Under Components , select the checkboxes for the user mailboxes you want to restore. |
|
|
Click OK . The Application Restoration Details window appears. |
|
|
The restoration steps are listed, along with a Start Time column, a Duration column, and an in-progress indicator. The steps are: |
During restoration, all existing files in the original location will be deleted. Please make sure you have backed up those files if needed.
To start the restore process, click Start . To exit without restoring any files, click Cancel .
The in-progress indicators become active for each step as it is executed, and the Start Time and Duration values are updated.
|
|
When the restore is finished, click Close . |
|
|
|
After the data is restored to the Exchange server, you may need to synchronize your local mail client (Outlook) in order to see restored emails. |
Restoring Deleted Mailboxes in Exchange 2003
Once a mailbox is deleted from Exchange, there is no container to hold the emails, even though SonicWALL CDP has a copy of the mailbox backup. This container (in our case an empty mailbox) must be created prior to restoring the mailbox.
In Exchange 2003, you can either “purge” or “delete” a user mailbox. Mailbox deletion leaves the user account in Exchange, but purging a mailbox removes the user account from Exchange. In either case, the user account in Active Directory still exists (unless removed separately). See the following procedures for each case:
Restoring a Deleted Mailbox in Exchange 2003
|
|
In Exchange, right-click the user mailbox and select Reconnect . This reconnects the mailbox to the Active Directory account. |
|
|
Follow the instructions in the procedure “Restoring the Contents of an Existing Mailbox” to restore the mailbox. |
Restoring a Purged Mailbox in Exchange 2003
|
|
Follow the instructions in the procedure “Restoring the Contents of an Existing Mailbox” to restore the mailbox. |
Restoring Deleted Mailboxes in Exchange 2007
Once a mailbox is deleted from Exchange, there is no container to hold the emails, even though SonicWALL CDP has a copy of the mailbox backup. This container (in our case an empty mailbox) must be created prior to restoring the mailbox.
In Exchange 2007, deleting a user mailbox removes the user account from both Exchange and Active Directory. In this case, there are two methods that can be used to restore a user mailbox. See the following procedures for each case:
Restoring a Deleted Mailbox by First Restoring Active Directory
|
|
Follow the instructions in the procedure “Restoring the Contents of an Existing Mailbox” to restore the mailbox. |
Restoring a Deleted Mailbox by Creating a New Active Directory Account
|
|
Create a new user mailbox in Exchange using the same account name and connect to the Active Directory account. |
|
|
Follow the instructions in the procedure “Restoring the Contents of an Existing Mailbox” to restore the mailbox. |
|
|
|
This process might take a long time to complete due to the recovery procedure between Active Directory and Exchange. |
Restoring an Exchange 2007/2003 Storage Group
You can restore an Exchange Storage Group by using the SonicWALL CDP Microsoft Exchange InfoStore Backup and Restore server application in the SonicWALL CDP Agent User Interface.
This section describes how to restore an individual Storage Group. You can restore the Storage Group in two ways:
|
|
|
Restore to Disk - Copies the data to a folder on the local disk, then you can copy it to the Exchange database |
A storage group must exist in Exchange in order for the restore to work properly. For cases in which the storage group has been deleted from Exchange, special procedures are necessary.
|
|
|
The current account must have privileges to access the Exchange server. See KB867704 and KB824126 |
Restoring a Storage Group
To restore a Storage Group using the SonicWALL CDP Agent User Interface, perform the following steps:
|
|
In the SonicWALL CDP Agent User Interface, click the My Backups tab. |
|
|
In the left pane, click Applications . The display expands to show available backup tasks. |
|
|
Click the desired revision. The root folder and details about the revision are displayed, including the date and time. |
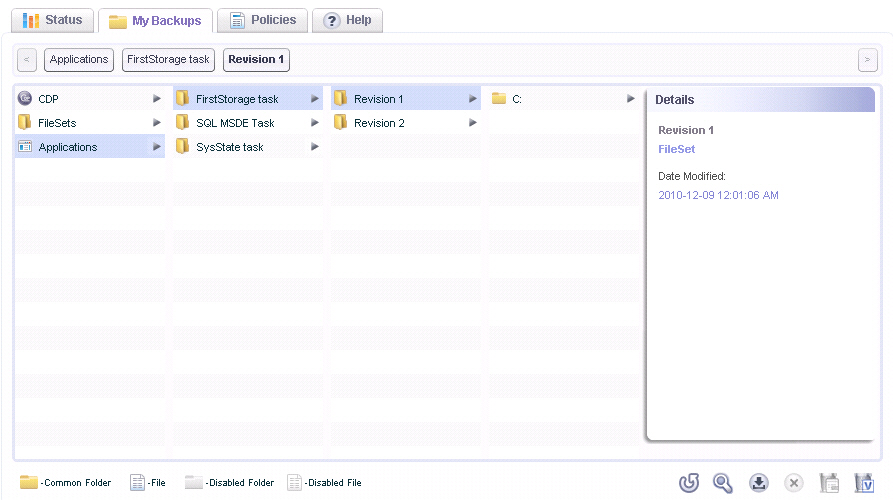
|
|
At the bottom right corner, click the Restore
icon |
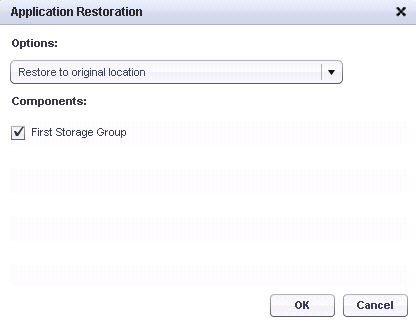
|
|
In the Options drop-down list, select one of the following: |
|
|
|
Restore to original location – This option restores the files to the application in their original location in Microsoft Exchange. |
|
|
|
Restore to alternate location – This option restores the files to the disk of the agent machine. |
|
|
Under Components , select the checkboxes for the storage groups you want to restore. |
|
|
Click OK . The Application Restoration Details window appears. |
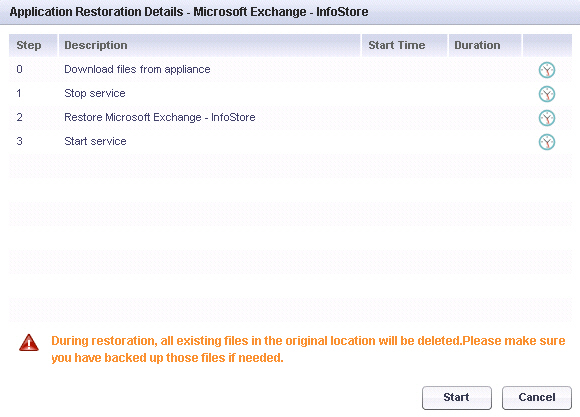
|
|
The restoration steps are listed, along with a Start Time column, a Duration column, and an in-progress indicator. The steps are: |
During restoration, all existing files in the original location will be deleted. Please make sure you have backed up those files if needed.
To start the restore process, click Start . To exit without restoring any files, click Cancel .
The in-progress indicators become active for each step as it is executed, and the Start Time and Duration values are updated.
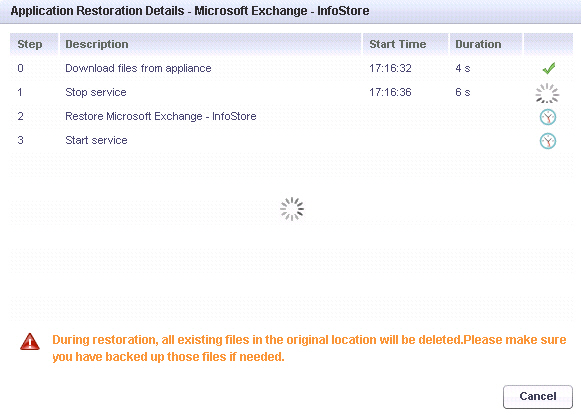
|
|
When the restore is finished, click Close . |
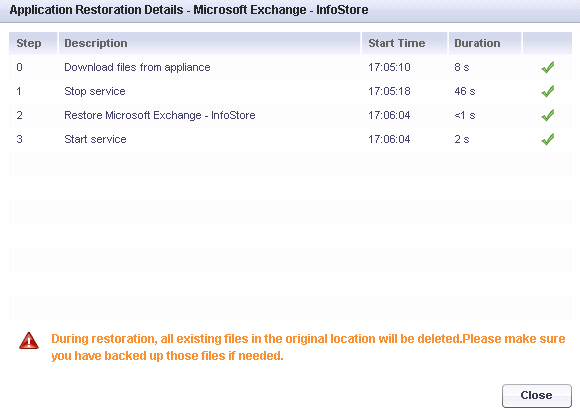
|
|
|
After the data is restored to the Exchange server, you may need to synchronize your local mail client (Outlook) in order to see restored emails. |
Restoring Deleted Storage Groups
Once a storage group is deleted from Exchange, there is no container to hold the contents, even though SonicWALL CDP has a copy of the storage group backup. This container (an empty storage group) must be created prior to restoring the storage group.
For both Exchange 2003 and 2007, the recommended way to recover deleted storage groups is to restore Active Directory first and then restore the InfoStore storage group and the user mailboxes. This is because Exchange relies on the Active Directory directory service for its directory operations. Active Directory provides all mailbox information, address list services, and other recipient-related information. Active Directory also stores most Exchange configuration information.
Restoring a Deleted Storage Group, Recommended Method
The recommended method to recover deleted storage groups is to restore Active Directory first and then restore the storage group. This is recommended for both Exchange 2003 and 2007.
See the “Restoring System State and Active Directory” section .
|
|
Follow the normal steps to restore the storage group with SonicWALL CDP, by using Restore to original location to restore files to the application. See “Restoring a Storage Group” . |
Restoring a Deleted Storage Group in Exchange 2003, Alternate Method
This method does not involve restoring Active Directory first, and is available as an alternate method for Exchange 2003, but not for Exchange 2007. In Exchange 2007, when you delete a user mailbox from the Exchange Management Console, the user is also deleted from Active Directory.
If you restore a deleted storage group with this method, there will be two instances of SMTP and SystemMailbox under <Storage Group>/<Mailbox Store>/Mailboxes after the restore.
One instance of SMTP and SystemMailbox is created when you re-create the Mailbox store. This pair has a new ID number. The other instance is from the SonicWALL CDP restore of the storage group. This pair has the original ID number.
Despite the duplicate mailbox pair, there are no problems when sending or receiving emails or when backing up or restoring the original (restored) storage group.
|
|
Select one backup revision of your deleted storage group, then choose Restore to alternate location to restore the files to disk. |
|
|
Browse to the restored folder Backup0001 , find the *.edb files. |
|
|
Create a new mailbox database for each .edb file. |
For example, if there are two .edb files:
Then create two new mailbox databases using these same names ("Mailbox Database1.edb" and "Mailbox Database2.edb") under the newly created storage group.
|
|
Follow the normal steps to restore an InfoStore storage group by using Restore to original location to restore the files to the application. See “Restoring a Storage Group” . |
|
|
After the storage group is restored, open the Exchange system manager and Reconnect the user mailboxes. |
Restoring SharePoint
Recovery of data from Microsoft SharePoint using SonicWALL CDP allows users to retrieve SharePoint SQL database revisions from agent machines previously configured to backup those databases. When restoring SharePoint databases from a SonicWALL CDP backup, you need to restore all databases in the backup revision to provide a consistent environment. SharePoint data cannot be restored from the Web Management Interface.
To recover SharePoint data from the SonicWALL CDP appliance, perform the following steps:
|
|
Launch the SonicWALL CDP Agent software on the agent machine on which you want to recover the SharePoint data. |
|
|
If necessary, click the Change Appliance icon |
|
|
Click the My Backups tab. |
|
|
In the left pane, click Applications . The display expands to show available backup tasks. |
|
|
Click the desired revision. The root folder and details about the revision are displayed, including the date and time. |
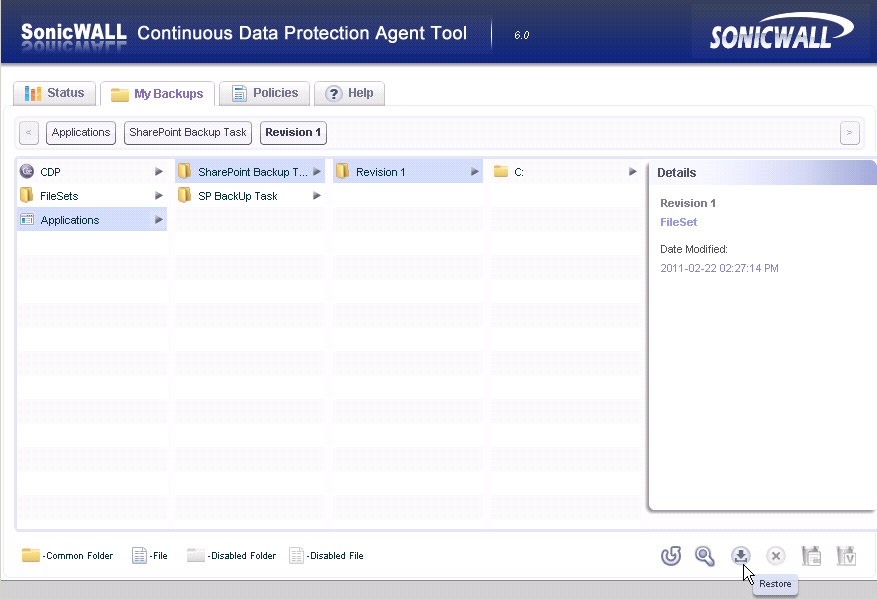
|
|
At the bottom right corner, click the Restore
icon |

|
|
In the Options drop-down list, select one of the following: |
|
|
|
Restore to original location – restore the database files on top of the original files |
|
|
|
Restore to alternate location – restore the database files to another location on disk |
Use this option if you want to verify the files, then copy them to the original location either manually or by using a separate tool or application. You can browse to the folder where you want the data restored, or create a new folder.
|
|
Click OK to begin the restoration. Click Cancel to exit without restoring the files. |
The Restoring window displays the progress of the restore.
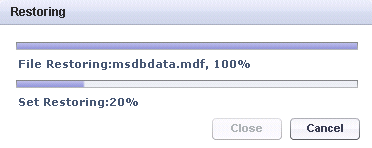
|
|
When the restore process is finished, the Restoring window changes to Done. Click the Close button to close the window. |

Restoring System State and Active Directory
Recovery of data from System State and Active Directory using SonicWALL CDP allows users to retrieve Active Directory revisions from agent machines previously configured to backup that data. When restoring Active Directory from a SonicWALL CDP backup, you need to restore all associated, interdependent System State files to provide a consistent environment. Active Directory data cannot be restored from the Web Management Interface.
This section contains the following subsections:
Restarting the Domain Controller in Safe Mode
With the exception of Active Directory on Windows Server 2008, you cannot restore Active Directory in normal Windows mode. This is because the service is already active. Before restoring Active Directory on Windows Server 2003, you must boot your computer into safe mode. Once in safe mode, you can restore the Active Directory as an application. This is because in safe mode the Active Directory is disabled.
|
|
|
Do not boot your computer into safe mode when restoring Active Directory on Windows Server 2008 or higher. |
To boot your computer into safe mode, perform the following steps:
|
|
Boot your computer and press F5 or F8 after POST/BIOS and before the Windows splash-screen, depending on hardware specs of the server. |
|
|
Select the Directory Services Restore Mode (DSRM) . |
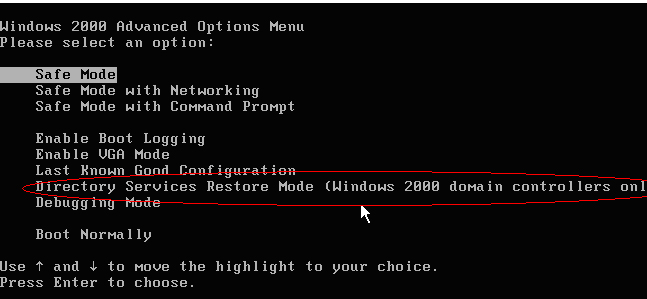
Restoring Active Directory and System State
Restoring Active Directory will cause the loss of any changes to Active Directory since the date of the backup that is being restored.
SonicWALL recommends the use of redundant Active Directory domain controllers. In the case of mirrored Active Directory domain controllers, you can optionally restore a small part of the database rather than the entire database (for example, because some people were deleted by mistake by the administrator or a script/program), keeping the remainder of the database up to date. In this case, the administrator selects the old data that needs to be pushed on top of the latest data during replication, after the server (2003 only) is rebooted out of Recovery Mode.
Restoration steps can be different depending on the computer's operating system and configuration.
To restore System State and Active Directory using the SonicWALL CDP Agent User Interface, perform the following steps:
|
|
In the SonicWALL CDP Agent User Interface, click the My Backups tab. |
|
|
In the left pane, click Applications . The display expands to show available backup tasks. |
|
|
Click the desired revision. The root folder and details about the revision are displayed, including the date and time. |
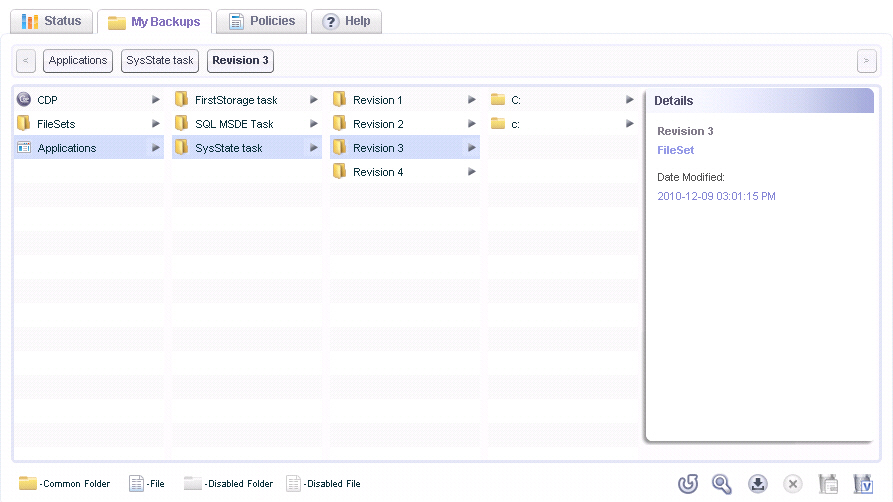
|
|
At the bottom right corner, click the Restore
icon |
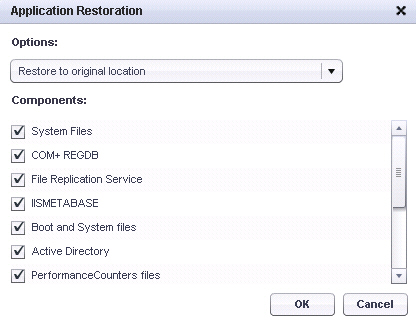
|
|
In the Options drop-down list, select one of the following: |
|
|
|
Restore to original location – This option restores the files to the application in their original location, and to original System State file locations. |
|
|
|
Restore to alternate location – This option restores the files to the disk of the agent machine. |
|
|
Under Components , select the checkboxes for the files you want to restore. To ensure a consistent environment after the restore, select all files. |
It is not recommended to restore certain System State subcomponents individually (like Certificate Services database, and COM+ Class Registration database) due to dependencies. For more information, see:
http://technet.microsoft.com/en-us/library/cc785306%28WS.10%29.aspx
|
|
Click OK . The Application Restoration Details window appears. |
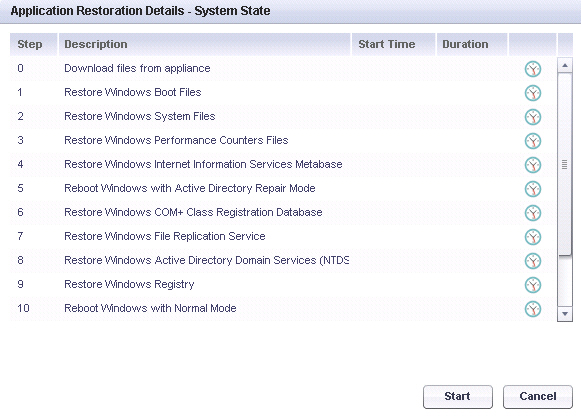
|
|
The restoration steps are listed, along with a Start Time column, a Duration column, and an in-progress indicator. The steps are: |
To start the restore process, click Start . To exit without restoring any files, click Cancel .
The in-progress indicators become active for each step as it is executed, and the Start Time and Duration values are updated.
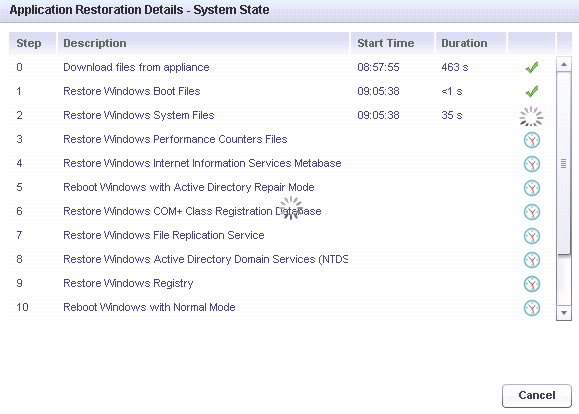
|
|
When the Reboot Windows with Active Directory Repair Mode step is reached, the restore process pauses and prompts you to select one of the following options: |
|
|
|
Run MSConfig – Click this button to continue with the reboot. The SonicWALL CDP Agent exits and must be restarted. |
MSConfig is a utility that is configured by SonicWALL CDP to perform a diagnostic startup. It can also be used to modify which programs run at startup, edit certain configuration files, and control Windows services.
|
|
|
Run Later – Click this button to stop the restore process and return to the previous screen in the SonicWALL CDP Agent User Interface. |
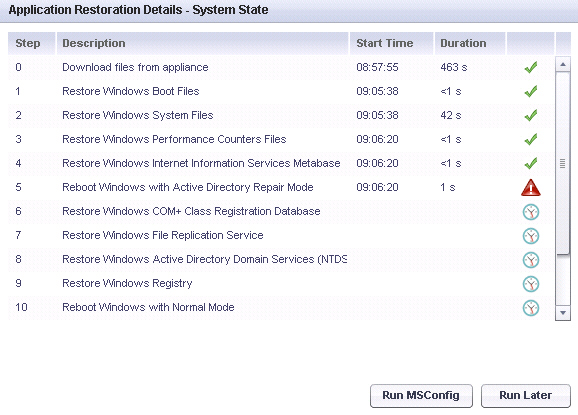
|
|
When the restore is finished, click Close . |
Using Authoritative Restore
An authoritative restore is most commonly used to restore corrupt or deleted objects. For example, a deleted user account can be recovered from an Active Directory backup that precedes the deletion of the user account. An authoritative restore should not be used to restore an entire domain controller, nor should it be used as part of a change-control infrastructure.
Proper delegation of administration and change enforcement will optimize data consistency, integrity, and security.
MSDN Engineering recommends the following as the most helpful to see what is happening:
Restoring Data from Microsoft SQL Server
Recovery of data from Microsoft SQL Server using SonicWALL CDP allows users to retrieve Microsoft SQL Server revisions from an agent machine previously configured to backup that data. Microsoft SQL Server recovery can be made directly to the SQL database.
Restoring the database can be done in two ways. The database can be either restored to disk or to application. When restoring the database to disk, the database is downloaded as a set of files from the SonicWALL CDP Appliance.
Restoring to application, on the other hand, applies the database directly to the same SQL server.
If an SQL database system fails, the first step is to recover all databases and transaction log files from the server. These databases contain the latest information, up to the point of failure. Next, the SQL system should be brought up on the same server or a different server. Having spare hardware will speed up database recovery.
Each recovered database should be run through a data consistency check (using “DBCC CHECKDB”) because it is possible that these are corrupted databases and may have been the reason for failure. If the databases are corrupted, these could either be fixed, which normally includes data loss, or the latest backed up database (from CDP) could be used instead.
Restoring SQL Server Using the Agent User Interface
To restore Microsoft SQL Server databases using the SonicWALL CDP Agent User Interface, perform the following steps:
|
|
In the SonicWALL CDP Agent User Interface, click the My Backups tab. |
|
|
In the left pane, click Applications . The display expands to show available backup tasks. |
|
|
Click the desired revision. The root folder and details about the revision are displayed, including the date and time. |
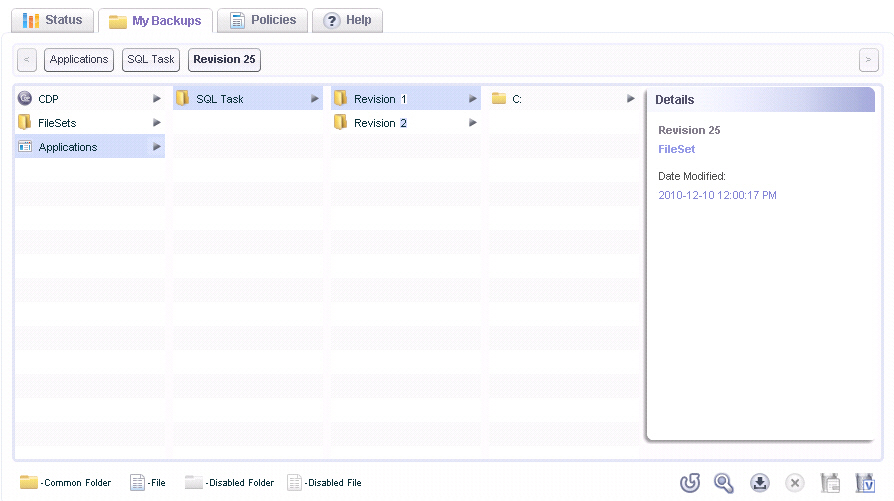
|
|
At the bottom right corner, click the Restore
icon |
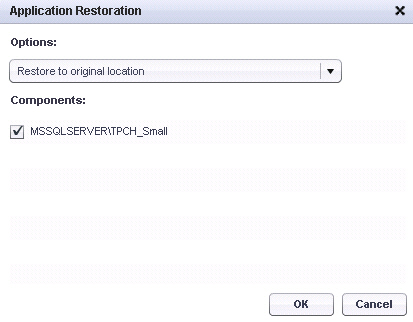
|
|
In the Options drop-down list, select one of the following: |
|
|
|
Restore to original location – This option restores the files to the application in their original location for Microsoft SQL Server. |
|
|
|
Restore to alternate location – This option restores the files to the disk of the agent machine. |
|
|
Under Components , select the checkboxes for the databases you want to restore. |
|
|
Click OK . The Application Restoration Details window appears. |
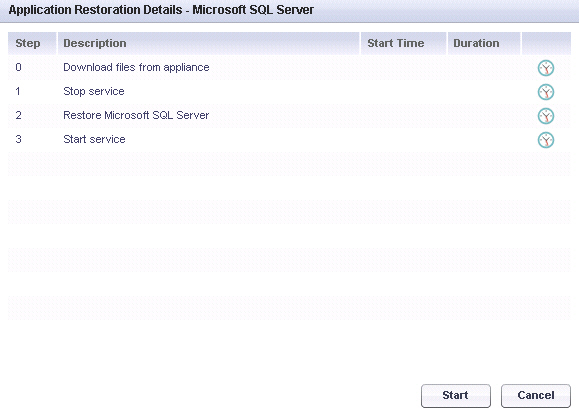
|
|
The restoration steps are listed, along with a Start Time column, a Duration column, and an in-progress indicator. The steps are: |
To start the restore process, click Start . To exit without restoring any files, click Cancel .
The in-progress indicators become active for each step as it is executed, and the Start Time and Duration values are updated.
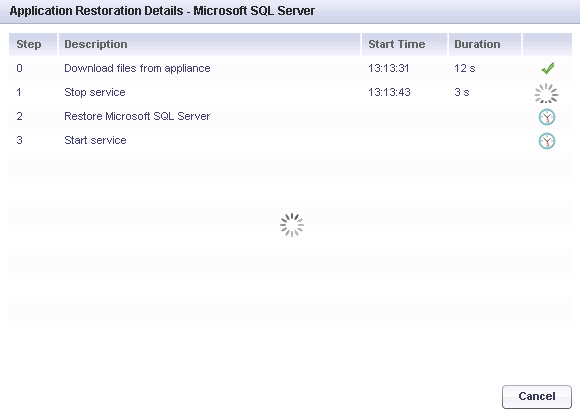
|
|
When the restore is finished, click Close . |
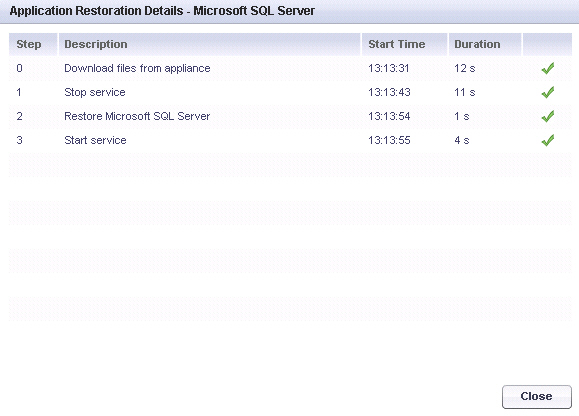
Additional Information
More information can be found here:
SQL Forum on Disaster Recovery run by Microsoft: http://forums.microsoft.com/MSDN/ShowForum.aspx?ForumID=744&SiteID=1
Handling Large Log Files: http://mkruger.cfwebtools.com/index.cfm?mode=entry&entry=CFEA536D-FC85-271F-691D1A974BA71B07
Database Locked Error
Actions that can lock the database and prevent the restore process include:
|
|
|
Querying |
Revisions may not appear immediately or even for some time due to a number of reasons including, but not limited to, large databases, single user mode databases, 24x7 databases, or other databases with high access frequency.
Restoring Local Archives
Beginning in SonicWALL CDP 6.1, the integration of local archiving to the CDP Agent user interface enables an administrator to restore data from a Local Archive USB device using the Agent Local Archive File Browser or the Administrator File Browser .
Restoring Data Using the Local Archive File Browser
To restore a local archive using the Local Archive File Browser:
|
|
On the Status tab, click the Change Appliance button. |
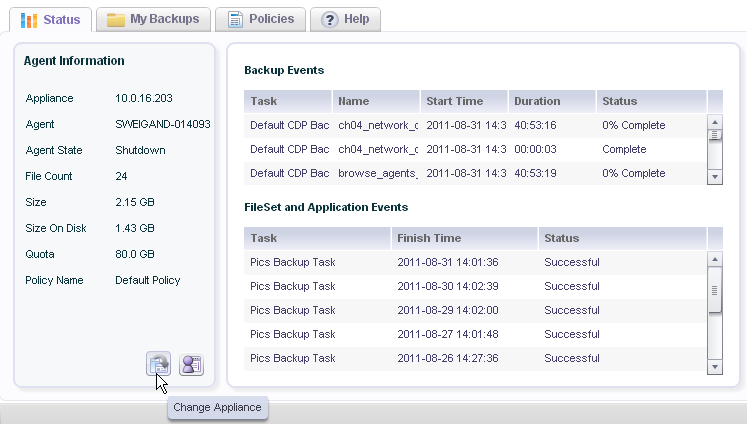
|
|
On the Available Appliances window, click the Switch to Local Archive File Browser button at the bottom of the left pane. |
![]()
|
|
At first, the Local Archive File Browser screen is empty. Insert the USB drive containing the local archive backup that you want to restore into your client system. |
![]()
|
|
Click the Add button |
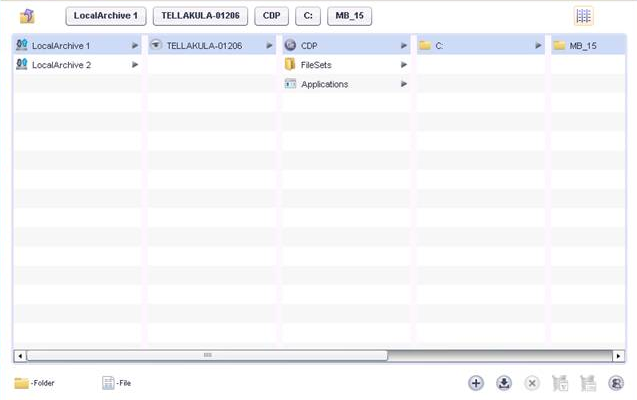
|
|
In the Local Archive File Browser interface, navigate to the local archive backup that you want to restore, and select the Revision. |
Restoring Data Using the Administrator File Browser
To restore a local archive from the Administrator File Browser:
|
|
On the Status tab, click the Switch to Administrator File Browser button at the bottom of the left pane. |
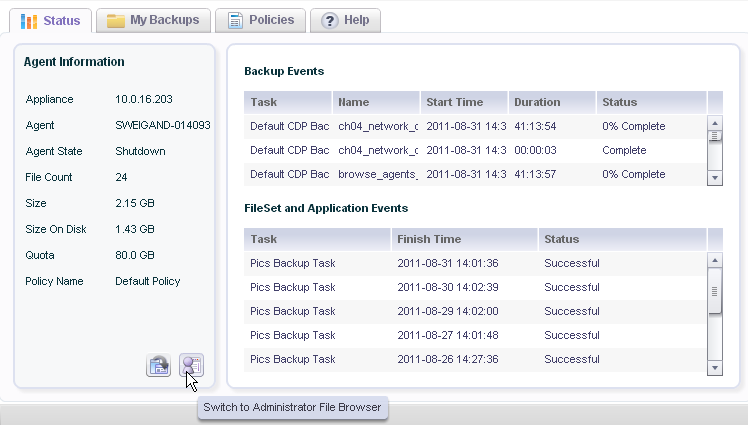
|
|
At first, the Administrator File Browser does not display your local archive. Insert the USB drive containing the local archive backup that you want to restore into your client system. |
![]()
|
|
Click the Add button |
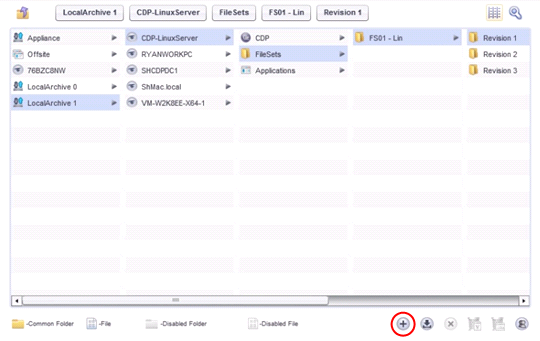
|
|
In the Administrator File Browser interface, navigate to the local archive backup that you want to restore, and select the Revision. |
Using Online Help
You can access online help by clicking the Help tab in the Agent User Interface.
The Help window provides links to online help, the SonicWALL knowledge base, the Agent log file, and Agent version information.
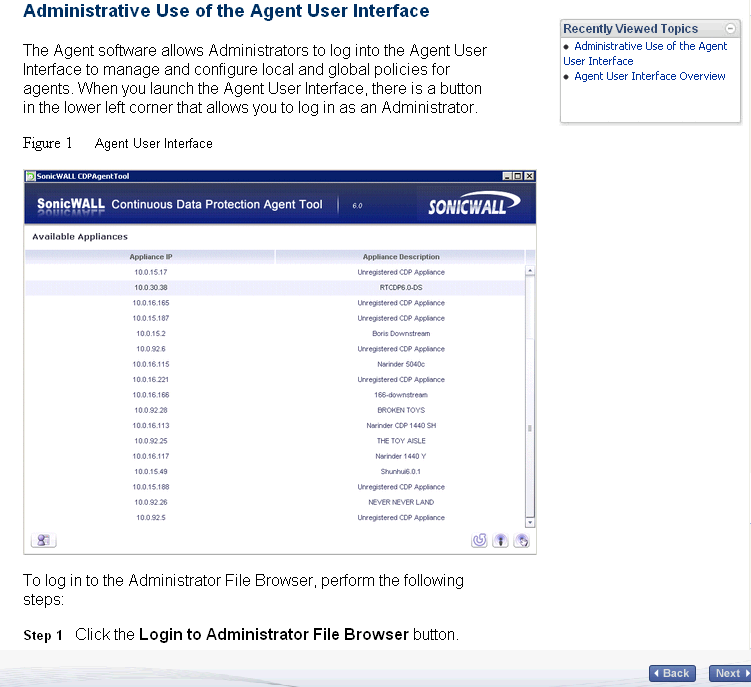
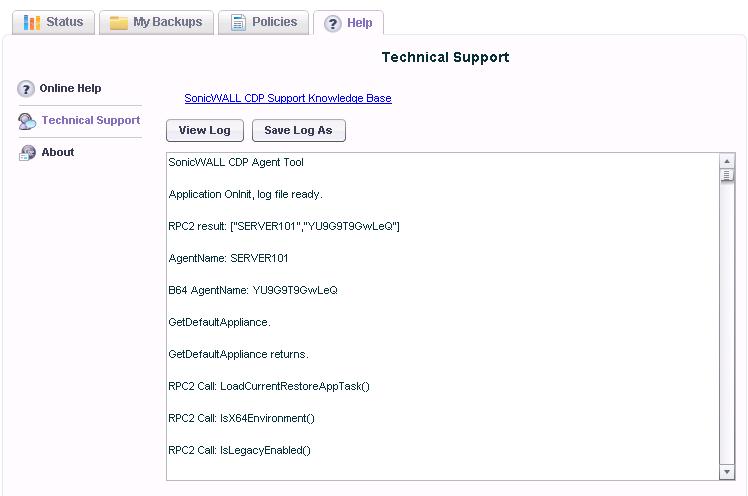
To access the SonicWALL Knowledge Base for information about SonicWALL CDP, click the SonicWALL CDP Support Knowledge Base link. The Knowledge Base page opens in your browser.
Viewing Information About the SonicWALL CDP Agent