App_Control
This chapter describes how to configure and manage the Application Control feature in SonicOS. This chapter contains the following sections:
• Application Control Overview
• Licensing Application Control
• Firewall > App Control Advanced
• Firewall > Email Address Objects
• Verifying App Control Configuration
This section provides an introduction to the SonicOS Application Control feature. This section contains the following subsections:
• Caveats
Application Control provides a solution for setting policy rules for application signatures. Application Control policies include global App Control policies, and App Rules policies that are more targeted. SonicOS allows to create certain types of App Control policies on the fly directly from the Dashboard > AppFlow Monitor page.
As a set of application-specific policies, Application Control gives you granular control over network traffic on the level of users, email addresses, schedules, and IP-subnets. The primary functionality of this application-layer access control feature is to regulate Web browsing, file transfer, email, and email attachments.
The ability to control application layer traffic in SonicOS is significantly enhanced with the ability to view real-time application traffic flows, and new ways to access the application signature database and to create application layer rules. SonicOS integrates application control with standard network control features for more powerful control over all network traffic.
SonicOS provides three ways to create App Control policies and control applications in your network:
• Create Rule from AppFlow Monitor – The Dashboard > AppFlow Monitor page provides a Create Rule button that allows the administrator to quickly configure App Control policies for application blocking, bandwidth management, or packet monitoring. This allows the administrator to quickly apply an action to an application that he or she notices while using the SonicWALL Visualization and Application Intelligence features. The policy is automatically created and displayed in the App Rules Policies table on the Firewall > App Rules page.
• App Control Advanced – The Firewall > App Control Advanced page provides a simple and direct way of configuring global App Control policies. You can quickly enable blocking or logging for a whole category of applications, and can easily locate and do the same for an individual application or individual signature. Once enabled, the category, application, or signature is blocked or logged globally without the need to create a policy on the Firewall > App Rules page. All application detection and prevention configuration is available on the Firewall > App Control Advanced page.
• App Rules – The Firewall > App Rules page provides the third way to create an App Control policy. This method is equivalent to the method used in the original App Rules feature. Policies created using App Rules are more targeted because they combine a match object, action object, and possibly email address object into a policy. For flexibility, App Rules policies can access the same application controls for any of the categories, applications, or signatures available on the App Control Advanced page. The Firewall > Match Objects page provides a way to create Application List objects, Application Category List objects, and Application Signature List objects for use as match objects in an App Rules policy. The Firewall > Action Objects pages allows you to create custom actions for use in the policy.
About Application Control Capabilities
Application Control’s data leakage prevention component provides the ability to scan files and documents for content and keywords. Using Application Control, you can restrict transfer of certain file names, file types, email attachments, attachment types, email with certain subjects, and email or attachments with certain keywords or byte patterns. You can deny internal or external network access based on various criteria. You can use Packet Monitor to take a deeper look at application traffic, and can select among various bandwidth management settings to reduce network bandwidth usage by an application.
Based on SonicWALL’s Reassembly Free Deep Packet Inspection technology, Application Control also features intelligent prevention functionality which allows you to create custom, policy-based actions. Examples of custom actions include the following:
• Blocking entire applications based on their signatures
• Blocking application features or sub-components
• Bandwidth throttling for file types when using the HTTP or FTP protocols
• Blocking an attachment
• Sending a custom block page
• Sending a custom email reply
• Redirecting an HTTP request
• Sending a custom FTP reply over an FTP control channel
While Application Control primarily provides application level access control, application layer bandwidth management and data leakage prevention, it also includes the ability to create custom application or protocol match signatures. You can create a custom App Rules policy that matches any protocol you wish, by matching a unique piece of the protocol. See Custom Signature.
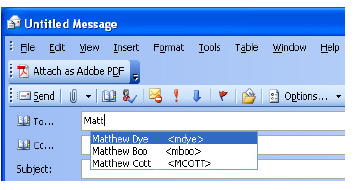
Application Control provides excellent functionality for preventing the accidental transfer of proprietary documents. For example, when using the automatic address completion feature of Outlook Exchange, it is a common occurrence for a popular name to complete to the wrong address. See the following figure for an example.
The Application Control functionality provides the following benefits:
• Application based configuration makes it easier to configure policies for application control.
• The Application Control subscription service provides updated signatures as new attacks emerge.
• The related Application Intelligence functionality, as seen in AppFlow Monitor and the Real Time Visualization Monitor, is available upon registration as a 30-day free trial App Visualization license. This allows any registered SonicWALL appliance to clearly display information about application traffic in the network. The App Visualization and App Control licenses are also included with the SonicWALL Security Services license bundle. Note that the feature must be enabled in the SonicOS management interface to become active.
• Administrators can use the Create Rule button to quickly apply bandwidth management or packet monitoring to an application that they notice while viewing the AppFlow Monitor page, or can completely block the application.
• Administrators can configure policy settings for individual signatures without influencing other signatures of the same application.
• Application Control configuration screens are moved to the Firewall menu in the SonicOS management interface, consolidating all Firewall and Application Control access rules and policies in the same area.
Application Control functionality can be compared to three main categories of products:
• Standalone proxy appliances
• Application proxies integrated into firewall VPN appliances
• Standalone IPS appliances with custom signature support
Standalone proxy appliances are typically designed to provide granular access control for a specific protocol. SonicWALL Application Control provides granular, application level access control across multiple protocols, including HTTP, FTP, SMTP, and POP3. Because Application Control runs on your SonicWALL firewall, you can use it to control both inbound and outbound traffic, unlike a dedicated proxy appliance that is typically deployed in only one direction. Application Control provides better performance and scalability than a dedicated proxy appliance because it is based on SonicWALL’s proprietary Deep Packet Inspection technology.
Today’s integrated application proxies do not provide granular, application level access control, application layer bandwidth management, and digital rights management functionality. As with dedicated proxy appliances, SonicWALL Application Control provides much higher performance and far greater scalability than integrated application proxy solutions.
While some standalone IPS appliances provide protocol decoding support, none of these products supports granular, application level access control, application layer bandwidth management, and digital rights management functionality.
In comparing Application Control to SonicWALL Email Security, there are benefits to using either. Email Security only works with SMTP, but it has a very rich policy space. Application Control works with SMTP, POP3, HTTP, FTP and other protocols, is integrated into SonicOS on the firewall, and has higher performance than Email Security. However, Application Control does not offer all the policy options for SMTP that are provided by Email Security.
Application Control utilizes SonicOS Deep Packet Inspection to scan application layer network traffic as it passes through the gateway and locate content that matches configured applications. When a match is found, these features perform the configured action. When you configure App Control policies, you create global rules that define whether to block or log the application, which users, groups, or IP address ranges to include or exclude, and a schedule for enforcement. Additionally, you can create App Rules policies that define the type of applications to scan, the direction, the content or keywords to match, optionally the user or domain to match, and the action to perform.
The following sections describe the main components of Application Control:
• Actions Using Bandwidth Management
• Actions Using Packet Monitoring
• Create Rule from AppFlow Monitor
• App Control Advanced Policy Creation
Actions Using Bandwidth Management
Tip For more information on Bandwidth Management see Firewall Settings > BWM.
Application layer bandwidth management (BWM) allows you to create policies that regulate bandwidth consumption by specific file types within a protocol, while allowing other file types to use unlimited bandwidth. This enables you to distinguish between desirable and undesirable traffic within the same protocol. Application layer bandwidth management is supported for all Application matches, as well as custom App Rules policies using HTTP client, HTTP Server, Custom, and FTP file transfer types. For details about policy types, see the “App Rules Policy Creation” section on page 355.
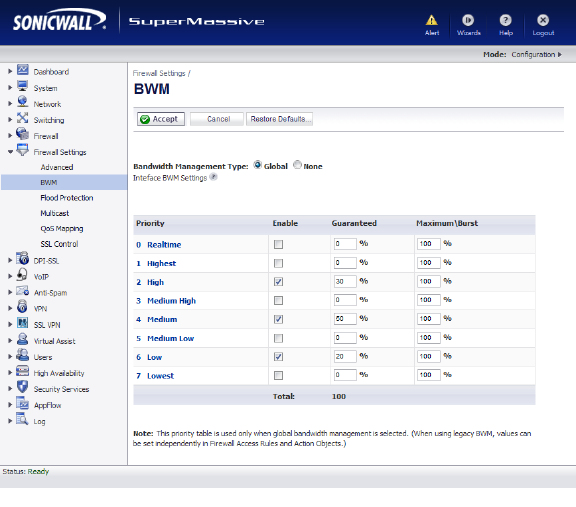
If the Bandwidth Management Type on the Firewall Settings > BWM page is set to Global, application layer bandwidth management functionality is supported with eight predefined, default BWM priority levels, available when adding a policy from the Firewall > App Rules page. There is also a customizable Bandwidth Management type action, available when adding a new action from the Firewall > Action Objects screen.
Bandwidth management can also be configured from the AppFlow Monitor page by selecting a service type application or a signature type application and then clicking the Create Rule button. The Bandwidth Management options available there depend on the enabled priority levels in the Global Priority Queue table on the Firewall Settings > BWM page. The priority levels enabled by default are High, Medium, and Low.
All application bandwidth management is tied in with global bandwidth management, which is configured on the Firewall Settings > BWM page. All App Control screens that offer an option for bandwidth management provide a link to the Firewall Settings > BWM page so that you can easily configure global bandwidth management settings for the type and the guaranteed and maximum percentages allowed for each priority level.
Figure 32:1 Firewall Settings > BWM Page
It is a best practice to configure Global Bandwidth Management settings before configuring App Control policies that use BWM. The Bandwidth Management feature is described in detail in Firewall Settings > BWM.
Custom Bandwidth Management actions behave differently than the default BWM actions. Custom BWM actions are configured by adding a new action object from the Firewall > Action Objects page and selecting the Bandwidth Management action type.
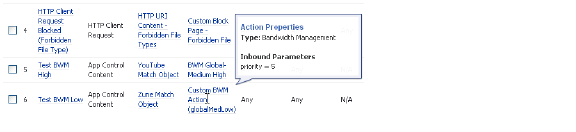
Figure 32:2 shows a policy that has a custom BWM action.
Figure 32:2 Custom BWM Action in Policy with BWM Type of Global
When the Bandwidth Management Type is set to Global as in Figure 32:3, the Add/Edit Action Object screen provides the Bandwidth Priority option, but uses the values that are specified in the Priority table on the Firewall Settings > BWM page for Guaranteed Bandwidth and Maximum Bandwidth.
Figure 32:3 Bandwidth Management Type Global on Firewall Settings > BWM
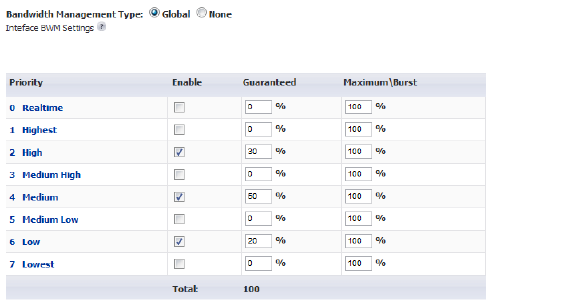
Figure 32:4 shows the Bandwidth Priority selections in the Add/Edit Action Objects screen when the global Bandwidth Management Type is set to Global on the Firewall Settings > BWM page.
Figure 32:4 Add/Edit Action Objects Page with BWM Type Global
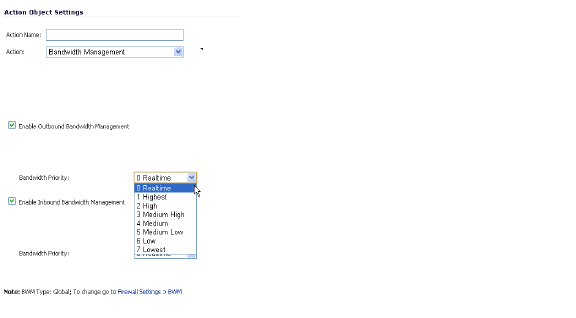
Note Only the Bandwidth Management priority categories that are configured on the Firewall Settings > BWM page are displayed in the pulldown menus.
For a bandwidth management use case, as an administrator you might want to limit mp3 and executable file downloads during work hours to no more than 1 Mbps. At the same time, you want to allow downloads of productive file types such as .doc or .pdf up to the maximum available bandwidth, or even give the highest possible priority to downloads of the productive content.
As another example, you might want to limit bandwidth for a certain type of peer-to-peer (P2P) traffic, but allow other types of P2P to use unlimited bandwidth. Application layer bandwidth management allows you to create policies to do this.
Actions Using Packet Monitoring
When the predefined Packet Monitor action is selected for a policy, SonicOS will capture or mirror the traffic according to the settings you have configured on the Dashboard > Packet Monitor or System > Packet Monitor page. The default is to create a capture file, which you can view with Wireshark. Once you have configured a policy with the Packet Monitor action, you still need to click Start Capture on the Packet Monitor page to actually capture any packets. After you have captured the desired packets, click Stop Capture.
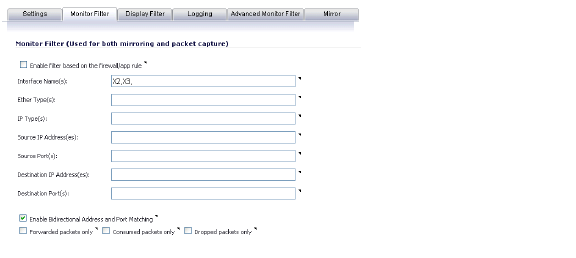
To control the Packet Monitor action to capture only the packets related to your policy, click Configure on the Packet Monitor page and select Enable Filter based on the firewall/app rule on the Monitor Filter tab (see Figure 32:5). In this mode, after you click Start Capture on the Packet Monitor page, packets are not captured until some traffic triggers the App Control policy (or Firewall Access Rule). You can see the Alert message in the Log > View page when the policy is triggered. This works when Packet Monitor is selected in App Control policies created with the Create Rule button or with the App Rules method using an action object, or in Firewall Access Rules, and allows you to specify configuration or filtering for what to capture or mirror. You can download the capture in different formats and look at it in a Web page, for example.
Figure 32:5 Packet Monitor - Monitor Filter Tab
To set up mirroring, go to the Mirror tab and pick an interface to which to send the mirrored traffic in the Mirror filtered packets to Interface field under Local Mirroring Settings. You can also configure one of the Remote settings. This allows you to mirror the application packets to another computer and store everything on the hard disk. For example, you could capture everyone’s MSN Instant Messenger traffic and read the conversations.
Create Rule from AppFlow Monitor
The Dashboard > AppFlow Monitor page provides a Create Rule button. If, while viewing the AppFlow Monitor, you see an application that seems suspicious or is using excessive amounts of bandwidth, you can simply select the application in the list, then click Create Rule and configure an App Control policy for it immediately. You can also select multiple applications and then use Create Rule to configure a policy that applies to all of them.
Note General applications cannot be selected. Service type applications and signature type applications cannot be mixed in a single rule.
Figure 32:6 shows the Create Rule window displayed over the Dashboard > AppFlow Monitor page.
Figure 32:6 Dashboard > AppFlow Monitor Page with Create Rule Window
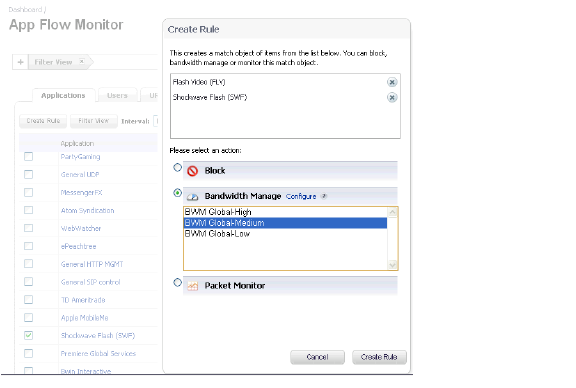
The Create Rule feature is available from AppFlow Monitor on the list view page setting. The Create Rule button is visible, but disabled, on the pie chart and graphical monitoring views.
You can configure the following types of policies in the Create Rule window:
• Block – the application will be completely blocked by the firewall
• Bandwidth Manage – choose one of the BWM levels to use Global Bandwidth Management to control the bandwidth used by the application no matter which interface it traverses
Note Bandwidth management must be enabled on each interface where you want to use it. You can configure interfaces from the Network > Interfaces page.
• Packet Monitor – capture packets from the application for examination and analysis
After you select the desired action for the rule and then click Create Rule within the Create Rule window, an App Control policy is automatically created and added to the App Rules Policies table on the Firewall > App Rules page.
The Create Rule window contains a Configure button next to the Bandwidth Manage section that takes you to the Firewall Settings > BWM page where you can configure the Global Priority Queue. For more information about global bandwidth management and the Firewall Settings > BWM page, see the “Actions Using Bandwidth Management” section on page 349. The Bandwidth Manage options you see in the Create Rule window reflect the options that are enabled in the Global Priority Queue. The default values are:
• BWM Global-High – Guaranteed 30%; Max/Burst 100%
• BWM Global-Medium – Guaranteed 50%; Max/Burst 100%
• BWM Global-Low – Guaranteed 20%; Max/Burst 100%
App Control Advanced Policy Creation
The configuration method on the Firewall > App Control Advanced page allows granular control of specific categories, applications, or signatures. This includes granular logging control, granular inclusion and exclusion of users, groups, or IP address ranges, and schedule configuration. The settings here are global policies and independent from any custom App Rules policy. The Firewall > App Control Advanced page is shown below.
You can configure the following settings on this page:
• Select a category, an application, or a signature.
• Select blocking, logging, or both as the action.
• Specify users, groups, or IP address ranges to include in or exclude from the action.
• Set a schedule for enforcing the controls.
While these application control settings are independent from App Rules policies, you can also create application match objects for any of the categories, applications, or signatures available here or on the Firewall > Match Objects page, and use those match objects in an App Rules policy. This allows you to use the wide array of actions and other configuration settings available with Application Control. See the “Application List Objects” section on page 364 for more information about this policy-based user interface for application control.
You can use Application Control to create custom App Rules policies to control specific aspects of traffic on your network. A policy is a set of match objects, properties, and specific prevention actions.When you create a policy, you first create a match object, then select and optionally customize an action, then reference these when you create the policy.
In the Firewall > App Rules page, you can access the Policy Settings screen, shown below for a Policy Type of SMTP Client. The screen changes depending on the Policy Type you select.
Some examples of policies include:
• Block applications for activities such as gambling
• Disable .exe and .vbs email attachments
• Do not allow the Mozilla browser on outgoing HTTP connections
• Do not allow outgoing email or MS Word attachments with the keywords “SonicWALL Confidential”, except from the CEO and CFO
• Do not allow outgoing email that includes a graphic or watermark found in all confidential documents
When you create a policy, you select a policy type. Each policy type specifies the values or value types that are valid for the source, destination, match object type, and action fields in the policy. You can further define the policy to include or exclude specific users or groups, select a schedule, turn on logging, and specify the connection side as well as basic or advanced direction types. A basic direction type simply indicates inbound or outbound. An advanced direction type allows zone to zone direction configuration, such as from the LAN to the WAN.
The following table describes the characteristics of the available App Rules policy types.
|
|
Match objects represent the set of conditions which must be matched in order for actions to take place. This includes the object type, the match type (exact, partial, prefix, or suffix), the input representation (text or hexadecimal), and the actual content to match. Match objects were referred to as application objects in previous releases.
Hexadecimal input representation is used to match binary content such as executable files, while text input representation is used to match things like file or email content. You can also use hexadecimal input representation for binary content found in a graphic image. Text input representation could be used to match the same graphic if it contains a certain string in one of its properties fields.
The maximum size for a match object is 8192 (8K) bytes. Because Application Control matches data at wire speeds, match objects do not provide matching for regular expressions. You can use a proxy server for this functionality.
The File Content match object type provides a way to match a pattern or keyword within a compressed (zip/gzip) file. This type of match object can only be used with FTP Data Transfer, HTTP Server, or SMTP Client policies.
The following table describes the supported match object types.
|
You can see the available types of match objects in a drop-down list in the Match Object Settings screen.
In the Match Object screen, you can add multiple entries to create a list of content elements to match. All content that you provide in a match object is case-insensitive for matching purposes. A hexadecimal representation is used to match binary content. You can use a hex editor or a network protocol analyzer like Wireshark to obtain hex format for binary files. For more information about these tools, see the following sections:
You can use the Load From File button to import content from predefined text files that contain multiple entries for a match object to match. Each entry in the file must be on its own line. The Load From File feature allows you to easily move Application Control settings from one SonicWALL SuperMassive to another.
Multiple entries, either from a text file or entered manually, are displayed in the List area. List entries are matched using the logical OR, so if any item in the list is matched, the action for the policy is executed.
A match object can include a total of no more than 8000 characters. If each element within a match object contains approximately 30 characters, then you can enter about 260 elements. The maximum element size is 8000 bytes.
Negative matching provides an alternate way to specify which content to block. You can enable negative matching in a match object when you want to block everything except a particular type of content. When you use the object in a policy, the policy will execute actions based on absence of the content specified in the match object. Multiple list entries in a negative matching object are matched using the logical AND, meaning that the policy action is executed only when all specified negative matching entries are matched.
Although all App Rules policies are DENY policies, you can simulate an ALLOW policy by using negative matching. For instance, you can allow email .txt attachments and block attachments of all other file types. Or you can allow a few types, and block all others.
Not all match object types can utilize negative matching. For those that can, you will see the Enable Negative Matching checkbox on the Match Object Settings screen.
The Firewall > Match Objects page also contains the Add Application List Object button, which opens the Create Match Object screen. This screen provides two tabs:
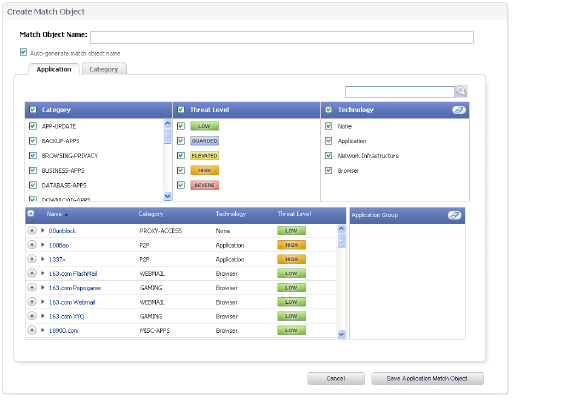
• Application – You can create an application filter object on this tab. This screen allows selection of the application category, threat level, type of technology, and attributes. After selections are made, the list of applications matching those criteria is displayed. The Application tab provides another way to create a match object of the Application List type.
• Category – You can create a category filter object on this tab. A list of application categories and their descriptions are provided. The Category page offers another way to create a match object of the Application Category List type.
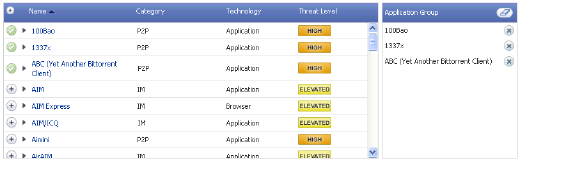
The Application tab provides a list of applications for selection. You can control which applications are displayed by selecting one or more application categories, threat levels, and technologies. You can also search for a keyword in all application names by typing it into the Search field near the top right of the display. For example, type in “bittorrent” into the Search field and click the Search icon to find multiple applications with “bittorrent” (not case-sensitive) in the name.
When the application list is reduced to a list that is focussed on your preferences, you can select the individual applications for your filter by clicking the Plus icon next to them, and then save your selections as an application filter object with a custom name or an automatically generated name. The image below shows the screen with all categories, threat levels, and technologies selected, but before any individual applications have been chosen.
As you select the applications for your filter, they appear in the Application Group field on the right. You can edit the list in this field by deleting individual items or by clicking the eraser to delete all items. The image below shows several applications in the Application Group field. The selected applications are also marked with a green checkmark icon in the application list on the left side.
When finished selecting the applications to include, you can type in a name for the object in the Match Object Name field (first, clear the Auto-generate match object name checkbox) and click the Save Application Match Object button. You will see the object name listed on the Firewall > Match Objects page with an object type of Application List. This object can then be selected when creating an App Rules policy.
Match Objects created using the Auto-generate match object name option display a tilde (~) as the first character of the object name.
The Category tab provides a list of application categories for selection. You can select any combination of categories and then save your selections as a category filter object with a custom name. The image below shows the screen with the description of the IM category displayed.
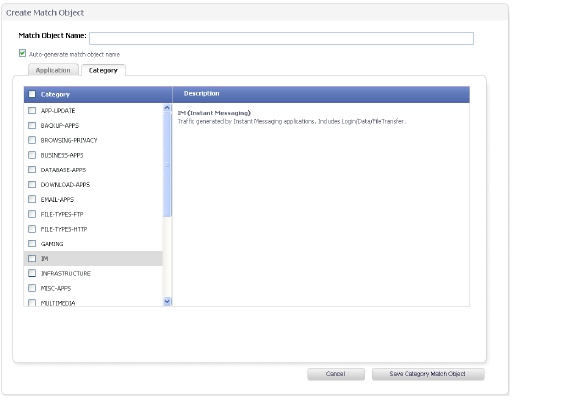
You can hover your mouse pointer over each category in the list to see a description of it. To create a custom category filter object, simply type in a name for the object in the Match Object Name field (first, clear the Auto-generate match object name checkbox), select one or more categories, and click the Save Category Match Object button. You will see the object name listed on the Firewall > Match Objects page with an object type of Application Category List. This object can then be selected when creating an App Rules policy.
Match Objects created using the Auto-generate match object name option display a tilde (~) as the first character of the object name.
Action Objects define how the App Rules policy reacts to matching events. You can choose a customizable action or select one of the predefined, default actions.
The predefined actions are displayed in the App Control Policy Settings page when you add or edit a policy from the App Rules page. The predefined actions include the eight levels of Bandwidth Management policies. For more information about BWM actions, see the “Actions Using Bandwidth Management” section on page 349.
The following are included as predefined action objects:
• BWM Global-Realtime
• BWM Global-Highest
• BWM Global-High
• BWM Global-Medium High
• BWM Global-Medium
• BWM Global-Medium Low
• BWM Global-Low
• BWM Global-Lowest
• Bypass DPI
• No Action
• Packet Monitor
• Reset / Drop
The following customizable actions are displayed in the Add/Edit Action Object window when you click Add New Action Object on the Firewall > Action Objects page:
• Block SMTP Email - Send Error Reply
• Disable Email Attachment - Add Text
• Email - Add Text
• FTP Notification Reply
• HTTP Block Page
• HTTP Redirect
• Bandwidth Management
See the table below for descriptions of these action types.
Note Only the customizable actions are available for editing in the Action Object Settings window, shown in the image below. The predefined actions cannot be edited or deleted. When you create a policy, the Policy Settings screen provides a way for you to select from the predefined actions along with any customized actions that you have defined.
The following table describes the available action types.
|
A priority setting of zero is the highest priority. Guaranteed bandwidth for all levels of BWM combined must not exceed 100%.
For a Bandwidth Management Type of WAN, total available bandwidth is defined by the values entered for Available Interface Egress/Ingress Bandwidth when configuring the WAN interface from the Network > Interfaces page. See the Configuring Application Layer Bandwidth Management for more information.
Application Control allows the creation of custom email address lists as email address objects. You can only use email address objects in an SMTP client policy configuration. Email address objects can represent either individual users or the entire domain. You can also create an email address object that represents a group by adding a list of individual addresses to the object. This provides a way to easily include or exclude a group of users when creating an SMTP client policy.
For example, you can create an email address object to represent the support group:
After you define the group in an email address object, you can create an SMTP client policy that includes or excludes the group.
In the screenshot below, the settings exclude the support group from a policy that prevents executable files from being attached to outgoing email. You can use the email address object in either the MAIL FROM or RCPT TO fields of the SMTP client policy. The MAIL FROM field refers to the sender of the email. The RCPT TO field refers to the intended recipient.
Although Application Control cannot extract group members directly from Outlook Exchange or similar applications, you can use the member lists in Outlook to create a text file that lists the group members. Then when you create an email address object for this group, you can use the Load From File button to import the list from your text file. Be sure that each email address is on a line by itself in the text file.
Application Intelligence and Control has two components:
• The Intelligence component is licensed as App Visualization, and provides identification and reporting of application traffic on the Dashboard > Real-Time Monitor and AppFlow Monitor pages in SonicOS 6.0.
• The Control component is licensed as App Control, and allows you to create and enforce custom App Control and App Rules policies for logging, blocking, and bandwidth management of application traffic handled by your network.
App Visualization and App Control are licensed together in a bundle with other security services including SonicWALL Gateway Anti-Virus (GAV), Anti-Spyware, and Intrusion Prevention Service (IPS).
Note Upon registration on MySonicWALL, or when you load SonicOS onto a registered SonicWALL device, supported SonicWALL appliances begin an automatic 30-day trial license for App Visualization and App Control, and application signatures are downloaded to the appliance.
A free 30-day trial is also available for the other security services in the bundle, but it is not automatically enabled as it is for App Visualization and App Control. You can start the additional free trials on the individual Security Services pages in SonicOS, or on MySonicWALL.
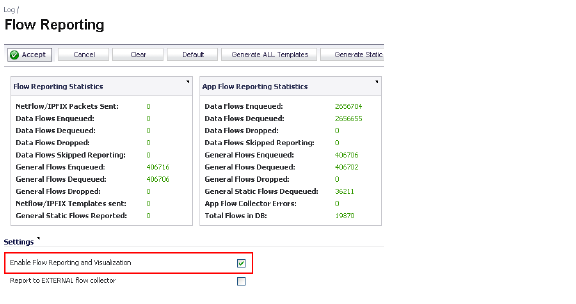
Once the App Visualization feature is manually enabled on the Log > Flow Reporting page (see the screenshot below), you can view real-time application traffic on the Dashboard > Real-Time Monitor page and application activity in other Dashboard pages for the identified/classified flows from the SonicWALL application signature database.
To begin using App Control, you must enable it on the Firewall > App Control Advanced page. See the screenshot below.

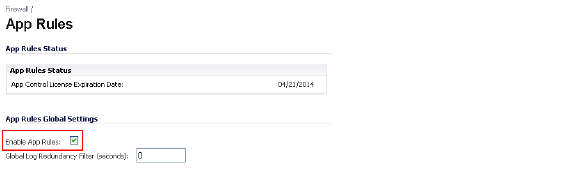
To create policies using App Rules (included with the App Control license), select Enable App Rules on the Firewall > App Rules page. See the screenshot below.
The SonicWALL Licensing server provides the App Visualization and App Control license keys to the SonicWALL device when you begin a 30-day trial (upon registration) or purchase a Security Services license bundle.
Licensing is available on www.mysonicwall.com on the Service Management - Associated Products page under GATEWAY SERVICES.
The Security Services license bundle includes licenses for the following subscription services:
• App Visualization
• App Control
• Gateway Anti-Virus
• Gateway Anti-Spyware
• Intrusion Prevention Service
Application signature updates and signature updates for other Security Services are periodically downloaded to the SonicWALL appliance as long as these services are licensed.
Note If you disable Visualization in the SonicOS management interface, application signature updates are discontinued until the feature is enabled again.
When High Availability is configured between two SonicWALL appliances, the appliances can share the Security Services license. To use this feature, you must register the SonicWALL appliances on MySonicWALL as Associated Products. Both appliances must be the same SonicWALL model.
Note For a High Availability pair, even if you first register your appliances on MySonicWALL, you must individually register both the Primary and the Secondary appliances from the SonicOS management interface while logged into the individual management IP address of each appliance. This allows the Secondary unit to synchronize with the SonicWALL license server and share licenses with the associated Primary appliance. When Internet access is restricted, you can manually apply the shared licenses to both appliances.