This chapter describes how to plan, design, implement, and maintain the RF Management
feature in SonicWALL SonicOS Enhanced. This chapter contains the following sections:
The following section provides a brief overview of the RF Management feature found on
SonicWALL security appliances running SonicOS Enhanced 5.0 or higher. This section contains the following subsections:
Radio Frequency (RF) technology used in today’s 802.11-based wireless networking devices
poses an attractive target for intruders. If left un-managed, RF devices can leave your wireless (and wired) network open to a variety of outside threats, from Denial of Service (DoS) to network security breaches.
In order to help secure your SonicPoint Wireless Access Point (AP) stations, SonicWALL takes
a closer look at these threats. By using direct RF management, SonicWALL helps detect threats without interrupting the current operation of your wireless or wired network.
SonicWALL RF Management provides real-time threat monitoring and management of
SonicPoint radio frequency traffic. In addition to its real-time threat management capabilities, SonicWALL RF Management provides network administrators a system for centralized collection of RF threats and traffic statistics; offering a way to easily manage RF capabilities directly from the SonicWALL security appliance gateway
SonicWALL RF Management is:
|
|
•
|
Real-Time
- View logged information as it happens
|
|
|
•
|
Transparent
- No need to halt legitimate network traffic when managing threats
|
In order for RF Management to be enforced, you must enable the RF Management option on
all available SonicPoint devices. The following section provides instructions to re-provision all available SonicPoints with RF Management enabled.
|
Step 1
|
Navigate to
SonicPoint > SonicPoints
in the SonicWALL security appliance management interface.
|
|
Step 2
|
Click the
Configure
button corresponding to the desired SonicPoint Provisioning Profile.
|
|
Step 3
|
In the
General
tab, click the Enable RF Management
checkbox.
|
Next, to ensure all SonicPoints are updated with the RF Management feature enabled, it is
necessary to delete all current SonicPoints from the SonicPoint table and re-synchronize these SonicPoints using the profile you just created.
|
Step 4
|
Click the
Delete All
button at the bottom right corner of the SonicPoints table.
|
|
Step 5
|
Click the
Synchronize SonicPoints
button at the top of the page.
|
Your SonicPoints will now reboot with the RF Management feature enabled. Be patient as the
reboot process may take several minutes.
The RF Management interface (
SonicPoint > RF Management
) provides a central location for selecting RF signature types, viewing discovered RF threat stations, and adding discovered threat stations to a watch list. This section provides an overview of usage and features for the following RF Management operations:
The top portion of the RF Management interface allows you to
:
The bottom (Discovered RF Threat Stations) portion of the interface allows you to
:
The RF Management interface allows you to select which types of RF threats your SonicWALL
monitors and logs.
|
Step 1
|
Navigate to
SonicPoint > RF Management
in the SonicWALL security appliance management interface. RF threat types are displayed, with a checkbox next to each.
|
The RF Management Discovered Threat Stations list allows you to view, sort and manage a list
of the most recent threats to your wireless network.
Each logged threat contains (and can be sorted by) the following information:
The RF Management Discovered Threat Stations “Watch List” feature allows you to create a
watch list of threats to your wireless network. The watch list is used to filter results in the Discovered RF Threat Stations list.
To add a station to the watch list:
|
Step 1
|
In the
SonicPoint > RF Management
page, navigate to the Discovered RF threat stations
section.
|
|
Step 2
|
Click the
 icon that corresponds to the threat station you wish to add to the watch list.
|
The following is a partial list containing descriptions for the most prominent types of RF
signatures detected by SonicWALL RF Management:
|
|
•
|
Long Duration Attacks
- Wireless devices share airwaves by dividing the RF spectrum into 14 staggered channels. Each device reserves a channel for a specified (short) duration and during the time that any one device has a channel reserved, other devices know not to broadcast on this channel. Long Duration attacks exploit this process by reserving many RF channels for very long durations, effectively stopping legitimate wireless traffic from finding an open broadcast channel.
|
|
|
•
|
Management Frame Flood
- This variation on the DoS attack attempts to flood wireless access points with management frames (such as association or authentication requests) filling the management table with bogus requests.
|
|
|
•
|
Null Probe Response
- When a wireless client sends out a probe request, the attacker sends back a response with a Null SSID. This response causes many popular wireless cards and devices to stop responding.
|
|
|
•
|
Broadcasting De-Authentication
- This DoS variation sends a flood of spoofed de-authentication frames to wireless clients, forcing them to constantly de-authenticate and subsequently re-authenticate with an access point.
|
|
|
•
|
Valid Station with Invalid (B)SSID
- In this attack, a rouge access point attempts to broadcast a trusted station ID (ESSID). Although the BSSID is often invalid, the station can still appear to clients as though it is a trusted access point. The goal of this attack is often to gain authentication information from a trusted client.
|
|
|
•
|
Wellenreiter/NetStumbler Detection
- Wellenreiter and NetStumbler are two popular software applications used by attackers to retrieve information from surrounding wireless networks.
|
|
|
•
|
Ad-Hoc Station Detection
- Ad-Hoc stations are nodes which provide access to wireless clients by acting as a bridge between the actual access point and the user. Wireless users are often tricked into connecting to an Ad-Hoc station instead of the actual access point, as they may have the same SSID. This allows the Ad-Hoc station to intercept any wireless traffic that connected clients send to or receive from the access point.
|
|
|
•
|
Unassociated Station
- Because a wireless station attempts to authenticate prior to associating with an access point, the unassociated station can create a DoS by sending a flood of authentication requests to the access point while still unassociated.
|
|
|
•
|
EAPOL Packet Flood
- Extensible Authentication Protocol over LAN (EAPOL) packets are used in WPA and WPA2 authentication mechanisms. Since these packets, like other authentication request packets, are received openly by wireless access points, a flood of these packets can result in DoS to your wireless network.
|
|
|
•
|
Weak WEP IV
- WEP security mechanism uses your WEP key along with a randomly chosen 24-bit number known as an Initialization Vector (IV) to encrypt data. Network attackers often target this type of encryption because some of the random IV numbers are weaker than others, making it easier to decrypt your WEP key.
|
This section provides an overview of practical uses for collected RF Management data in
detecting Wi-Fi threat sources. Practical RF Management Field Applications are provided as general common-sense suggestions for using RF Management data.
This section contains the following subsections:
When using RF data to locate threats, keep in mind that wireless signals are affected by many
factors. Before continuing, take note of the following:
|
|
•
|
A MAC Address is not always permanent
- While a MAC address is generally a good indicator of device type and manufacturer, this address is susceptible to change and can be spoofed. Likewise, originators of RF threats may have more than one hardware device at their disposal.
|
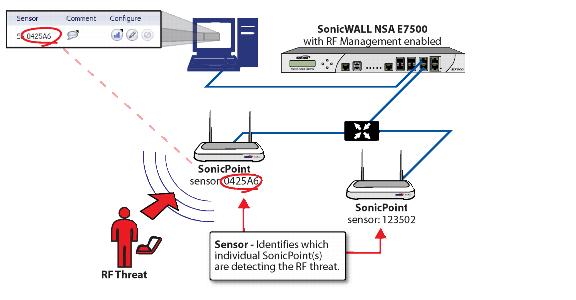
In the Discovered RF Threat Stations list, the Sensor field indicates which Sonic Point is
detecting the particular threat. Using the sensor ID and MAC address of the SonicPoint allows you to easily determine the location of the SonicPoint that is detecting the threat.
|
Step 1
|
Navigate to the
SonicPoint > RF Management
page in the SonicWALL Management Interface.
|
|
Step 2
|
In the
Discovered RF Threat Stations
table, locate the Sensor
for the SonicPoint that is detecting the targeted RF threat and record the number.
|
|
Step 4
|
In the
SonicPoints
table, locate the SonicPoint that matches the Sensor number you recorded in Step 2.
|
|
Step 5
|
Record the
MAC address
for this SonicPoint and use it to find the physical location of the SonicPoint.
|
The RF threat is likely to be in the location that is served by this SonicPoint.
This section builds on what was learned in the
“Using Sensor ID to Determine RF Threat Location” section
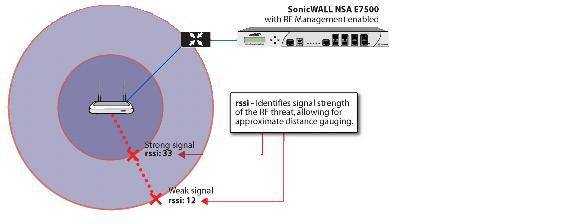
. In the Discovered RF Threat Stations list, the Rssi field indicates the signal strength at which a particular Sonic Point is detecting an RF threat.
The Rssi field allows you to easily determine the proximity of an RF threat to the SonicPoint
that is detecting that threat. A higher Rssi number generally means the threat is closer to the SonicPoint.
|
Step 1
|
Navigate to the
SonicPoint > RF Management
page in the SonicWALL Management Interface.
|
|
Step 2
|
In the
Discovered RF Threat Stations
table, locate the Sensor
and Rssi
for the SonicPoint that is detecting the targeted RF threat and record these numbers.
|
|
Step 4
|
In the
SonicPoints
table, locate the SonicPoint that matches the Sensor number you recorded in Step 2.
|
|
Step 5
|
Record the
MAC address
for this SonicPoint and use it to find the physical location of the SonicPoint.
|
A high Rssi usually indicates an RF threat that is closer to the SonicPoint. A low Rssi can
indicate obstructions or a more distant RF threat.