Network_ipHelperView
Many User Datagram Protocols (UDP) rely on broadcaset/multicast to find its respective server, usually requiring their servers to be present on the same broadcast subnet.To support cases where servers lie on different subnets than clients, a mechanism is needed to forward these UDP broadcasts/multicasts to those subnets. This mechanism is referred to as UDP broadcast forwarding. IP Helper helps broadcast/multicast packets to cross a firewall’s interface and be forwarded to other interfaces based on policy. For more information on IP Helper, refer to the IP Helper technote at:
http://www.sonicwall.com/us/support/2134_3424.html
• Enable IP Helper - Enables IP Helper features.
• Enable DHCP Support - Enables DHCP forwarding from the SonicWALL security appliance to your central DHCP server. If the DHCP server has been enabled, the message “DHCP Server has been enabled. To edit this setting, click here.” is displayed. Clicking the link displays the Network > DHCP Server page.
Caution The SonicWALL DHCP Server feature must be disabled before you can enable DHCP Support on the IP Helper. The Enable DHCP Support checkbox is greyed out until the DHCP Server setting is disabled.
• Enable NetBIOS Support - Enables NetBIOS broadcast forwarding. NetBIOS is required to allow Windows operating systems to browse for resources on a network.
IP Helper Policies allow you to forward DHCP and NetBIOS broadcasts from one interface to another interface.
Note The IP Helper is not supported for WAN interfaces or for interfaces that are configured for NAT.
Adding an IP Helper Policy for DHCP
Step 1 Click the Add button under the IP Helper Policies table. The Add IP Helper Policy window is displayed.
Step 2 The policy is enabled by default. To configure the policy without enabling it, clear the Enabled check box.
Step 3 Select DHCP from the Protocol menu.
Step 4 Select a source interface or zone from the From menu.
Step 5 Select a destination Address Group or Address Object from the To menu or select Create a new network to create a new Address Object.
Step 6 Enter an optional comment in the Comment field.
Step 7 Click OK to add the policy to the IP Helper Policies table.
Adding an IP Helper Policy for NetBIOS
Step 1 Click the Add button under the IP Helper Policies table. The Add IP Helper Policy window is displayed.
Step 2 The policy is enabled by default. To configure the policy without enabling it, clear the Enabled check box.
Step 3 Select NetBIOS from the Protocol menu.
Step 4 Select a source Address Group or Address Object from the From menu. Select Create a new network to create a new Address Object.
Step 5 Select a destination Address Group or Address Object from the To menu, or select Create a new network to create a new Address Object.
Step 6 Enter an optional comment in the Comment field.
Step 7 Click OK to add the policy to the IP Helper Policies table.
Click the Edit ![]() icon in the Configure column of the IP Helper Policies table to display the Edit IP Helper window, which includes the same settings as the Add IP Helper Policy window.
icon in the Configure column of the IP Helper Policies table to display the Edit IP Helper window, which includes the same settings as the Add IP Helper Policy window.
Click the Delete icon ![]() to delete the individual IP Helper policy entry. Click the Delete button to delete all the selected IP Helper policies in the IP Helper Policies table.
to delete the individual IP Helper policy entry. Click the Delete button to delete all the selected IP Helper policies in the IP Helper Policies table.
IP Helper extends the previous version’s Forwarding Plane to support User-defined protocols and extended policies. As a result, IP Helper’s UI has been completely redesigned. IP Helper also offers better control on existing NetBIOS/DHCP relay applications.
Some of the built-in applications that have been extended include:
• DHCP—UDP port number 67/68
• Net-Bios NS—UDP port number 137
• Net-Bios Datagram—UDP port number 138
• DNS—UDP port number 53
• Time Service—UDP port number 37
• Wake on LAN (WOL)
• mDNS—UDP port number 5353; multicast address 224.0.0.251
Each protocol has the following configurable options:
• Name—The name of the protocols. Note that these are case sensitive and must be unique.
• Port 1/2—The unique UDP port number.
• Translate IP—Translation of the source IP while forwarding a packet.
• Timeout—IP Helper cache timeout in seconds at an increment of 10.
• Raw Mode—Unidirectional forwarding that does not create an IP Helper cache. This is suitable for most of the user-defined protocols that are used for discovery, for example WOL/mDNS.
Figure 30:3 Enhanced IP Helper UI

Each protocol has the following configurable options:
• Name—The name of the protocols. Note that these are case sensitive and must be unique.
• Port 1/2—The unique UDP port number.
• Translate IP—Translation of the source IP while forwarding a packet.
• Timeout—IP Helper cache timeout in seconds at an increment of 10.
• Raw Mode—Unidirectional forwarding that does not create an IP Helper cache. This is suitable for most of the user-defined protocols that are used for discovery, for example WOL/mDNS.
Click the Add button on the lower left side of the protocol list table. The following fields must be configured in order to add a protocol.
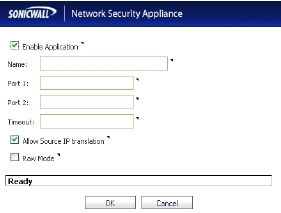
• Name—Create a unique case-sensitive name.
• Port 1/2—The unique UDP port numbers.
• Timeout—This is optional. IP Helper cache timeout in seconds at an increment of 10. If not specified, a default value of 30 seconds is selected.
• IP Translation—When selected, the firewall translates the source IP of the forwarded packet.
• Raw Mode—When selected, IP Helper does not create a cache; Unidirectional forwarding is supported.
Editing User-Defined Protocols
A user-defined protocol can be deleted by selecting the Delete button next to that protocol. The user can also select the leftmost checkbox of the desired protocol, then click the Delete button, located on the lower left side of the table.
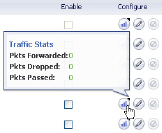
By hovering the cursor over a protocol or policy’s “Statistics” image, the counter appears, displaying the traffic status for that protocol.
Displaying IP Helper Cache from TSR
The TSR will show all the IP Helper caches, current policies, and protocols:
#IP_HELPER_START
IP Helper
-----IP Helper Global Run-time Data-------
IP Helper is OFF
IP Helper - DHCP Relay is OFF
IP Helper - Netbios Relay is OFF
Total Number Of Fwded Packets :0
Total Number Of Dropped Packets :0
Total Number Of Passed Packets :0
Total Number Of Unknown Packets :0
Total Number Of record create failure :0
Total Number Of element create failure :0User-defined
-----IP Helper Applications -------
Name: DHCP
Port: 67, 68, Max Record: 4000, Status: OFF
CanBeDel: NO, ChangeIp: 1, Raw: NO
Max Element: 8000, Timeout: 3, index: 1, proto: 1,
Record Count: 0, Element Count: 0,
Fwded: 0, Dropped: 0, Passed: 0
Name: NetBIOS
Port: 138, 137, Max Record: 4000, Status: OFF
CanBeDel: NO, ChangeIp: 1, Raw: NO
Max Element: 8000, Timeout: 4, index: 2, proto: 1,
Record Count: 0, Element Count: 0,
Fwded: 0, Dropped: 0, Passed: 0
Name: DNS
Port: 53, 0, Max Record: 8000, Status: OFF
CanBeDel: NO, ChangeIp: 1, Raw: NO
Max Element: 16000, Timeout: 3, index: 3, proto: 1,
Record Count: 0, Element Count: 0,
Fwded: 0, Dropped: 0, Passed: 0
Name: TIME
Port: 37, 0, Max Record: 8000, Status: OFF
CanBeDel: NO, ChangeIp: 1, Raw: NO
Max Element: 16000, Timeout: 3, index: 4, proto: 1,
Record Count: 0, Element Count: 0,
Fwded: 0, Dropped: 0, Passed: 0
Name: WOL
Port: 7, 9, Max Record: 8000, Status: OFF
CanBeDel: NO, ChangeIp: 1, Raw: YES
Max Element: 16000, Timeout: 3, index: 5, proto: 1,
Record Count: 0, Element Count: 0,
Fwded: 0, Dropped: 0, Passed: 0
Name: mDNS
Port: 5353, 0, Max Record: 8000, Status: OFF
CanBeDel: NO, ChangeIp: 1, Raw: YES
Max Element: 16000, Timeout: 3, index: 6, proto: 1,
Record Count: 0, Element Count: 0,
Fwded: 0, Dropped: 0, Passed: 0
----------GEN APP Relay Policy-----------
----------------------------------Record Table----------------------------
Record(hash)[ClientIP, ClientIf, ClientMac, Proto, Vpn, transId, Age(pkts)]
Elmnt(hash)[serverIp, serverIf, srcIp, dhcpMac, transId, Vpn, proto(fm,to)]
---------------------------------------------------------------------------
----------DHCP Relay Policy-----------
--------NETBIOS Relay Policy-----------#IP_HELPER_END
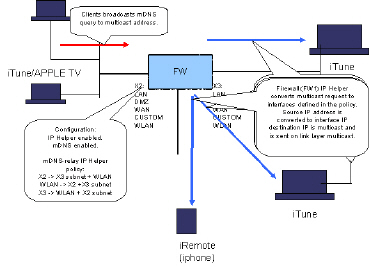
In order to enable Apple support for iRemote, iTunes, and Apple TV, the mDNS protocol must be enabled. A policy is needed to forward these packets. The following graphic illustrates the process of how Enhanced IP Helper works with mDNS Forwarding: