Security_Services_securityServicesCFView
Security Services > Content Filter
The Security Services > Content Filter page allows you to configure the Restrict Web Features and Trusted Domains settings, which are included with SonicOS Enhanced. You can activate and configure SonicWALL Content Filtering Service (SonicWALL CFS) as well as a third-party Content Filtering product from the Security Services > Content Filter page.
Note SonicWALL Content Filtering Service is a subscription service upgrade. You can try a FREE TRIAL of SonicWALL directly from your SonicWALL management interface. See Activating a SonicWALL CFS FREE TRIAL.
For complete SonicWALL Content Filtering Service documentation, see the SonicWALL Content Filtering Service Administrator’s Guide available at
http://www.sonicwall.com/us/Support.html.
This chapter contains the following sections:
• SonicWALL CFS Implementation with Application Control
• SonicWALL Legacy Content Filtering Service
• SonicWALL Legacy Content Filtering Service
• CFS 3.0 Policy Management Overview
• CFS 3.0 Configuration Examples
• Legacy Content Filtering Examples
• Configuring Legacy SonicWALL Filter Properties
• Configuring Websense Enterprise Content Filtering
SonicWALL CFS Implementation with Application Control
The latest iteration of the CFS feature allows the administrator to use the power of SonicWALL’s Application Control feature in order to increase create a more powerful and flexible solution.
Note While the new Application Control method of CFS management offers more control and flexibility, the administrator can still choose the previous user/zone management method to perform content filtering. Information on implementing the CFS feature using the previous method can be found in the SonicOS Enhanced Administrator’s Guide.
New Features for CFS 3.0 Management Using Application Control
• Application Control - is now included as part of the CFS rule creation process.to implement more granular, flexible and powerful content filter policy control, creating CFS policy allow lists utilizing Application Control framework.
• Application Objects - Users/groups, address objects and zones can be assigned for individual CFS policies.
• Bandwidth Management - CFS specifications can be included in bandwidth management policies based on CFS website categories. This also allows use of ‘Bandwidth Aggregation’ by adding a per-action bandwidth aggregation method.
New Features Applicable to All CFS 3.0 Management Methods
• SSL Certificate Common Name - HTTPS Content Filtering is significantly improved by adding the ability to use an SSL certificate common name, in addition to server IP addresses.
• New CFS Categories - Multimedia, Social Networking, Malware, and Internet Watch Foundation CAIC are now included in the CFS list.
SonicWALL Legacy Content Filtering Service
SonicWALL Content Filtering Service (CFS) enforces protection and productivity policies for businesses, schools and libraries to reduce legal and privacy risks while minimizing administration overhead. SonicWALL CFS utilizes a dynamic database of millions of URLs, IP addresses and domains to block objectionable, inappropriate or unproductive Web content. At the core of SonicWALL CFS is an innovative rating architecture that cross references all Web sites against the database at worldwide SonicWALL co-location facilities. A rating is returned to the SonicWALL security appliance and then compared to the content filtering policy established by the administrator. Almost instantaneously, the Web site request is either allowed through or a Web page is generated by the SonicWALL security appliance informing the user that the site has been blocked according to policy.
With SonicWALL CFS, network administrators have a flexible tool to provide comprehensive filtering based on keywords, time of day, trusted and forbidden domain designations, and file types such as Cookies, Java™ and ActiveX® for privacy. SonicWALL CFS automatically updates the filters, making maintenance substantially simpler and less time consuming.
SonicWALL CFS can also be customized to add or remove specific URLs from the blocked list and to block specific keywords. When a user attempts to access a site that is blocked by the SonicWALL security appliance, a customized message is displayed on the user’s screen. SonicWALL security appliance can also be configured to log attempts to access sites on the SonicWALL Content Filtering Service database, on a custom URL list, and on a keyword list to monitor Internet usage before putting new usage restrictions in place.
SonicWALL CFS Premium blocks 56 categories of objectionable, inappropriate or unproductive Web content. SonicWALL CFS Premium provides network administrators with greater control by automatically and transparently enforces acceptable use policies. It gives administrators the flexibility to enforce custom content filtering policies for groups of users on the network. For example, a school can create one policy for teachers and another for students.
Note For complete SonicWALL Content Filtering Service documentation, see the SonicWALL Content Filtering Service Administrator’s Guide available at http://www.sonicwall.com/us/Support.html
YouTube for Schools and SonicWALL Content Filtering Service
YouTube for Schools is a service that allows for customized YouTube access for students, teachers, and administrators. YouTube Education (YouTube EDU) provides schools access to hundreds of thousands of free educational videos. These videos come from a number of respected organizations.
School admins and teachers can log in and watch any video, but students cannot log in and can only watch YouTube EDU videos or videos their school has added. All comments and related videos are disabled and search is limited to YouTube EDU videos.
You can customize the content available in your school. All schools get access to all of the YouTube EDU content, but teachers and administrators can also create playlists of videos that are viewable only within their school's network.
YouTube.com/Teachers has hundreds of playlists of videos that align with common educational standards, organized by subject and grade. These playlists were created by teachers for teachers so you can spend more time teaching and less time searching.
To configure YouTube for Schools, perform the following steps:
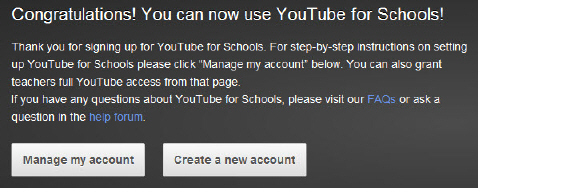
1. Before configuring your SonicWALL security appliance for YouTube for Schools, you must first sign up: www.youtube.com/schools
You will need a YouTube account to manage YouTube for your school.
2. Once you have registered, click on the Manage my account button or go to www.youtube.com/account_school
3. Scroll down to Step 1 to locate your YouTube for Schools ID. It is the string at the end of the X-YouTube-Edu-Filter: line, as shown below. Copy this School ID to you clipboard.

4. Now go to the management interface for your SonicWALL security appliance. The configuration process varies depending on whether you are using CFS 3.0 or Legacy CFS. For configuration information, see the appropriate example:
– Configuring YouTube for Schools as an App Policy
– Configuring YouTube for Schools for Legacy CFS
5. Configure access to videos and video playlists at www.youtube.com/account_school
CFS 3.0 Policy Management Overview
When a CFS policy assignment is implemented using the Application Control method, it is controlled by Application Control CFS policies in the Firewall > App Rules page instead of by Users and Zones.
While the new Application Control method of CFS management offers more control and flexibility, the administrator can still choose the previous user/zone management method to perform content filtering.
This section includes the following sub-sections:
• The CFS App Control Policy Settings Screen — page 1051
• Choosing CFS Policy Management Type — page 1052
• Enabling Application Control and CFS — page 1053
• Bandwidth Management Methods — page 1053
• Policies and Precedence: How Policies are Enforced — page 1054
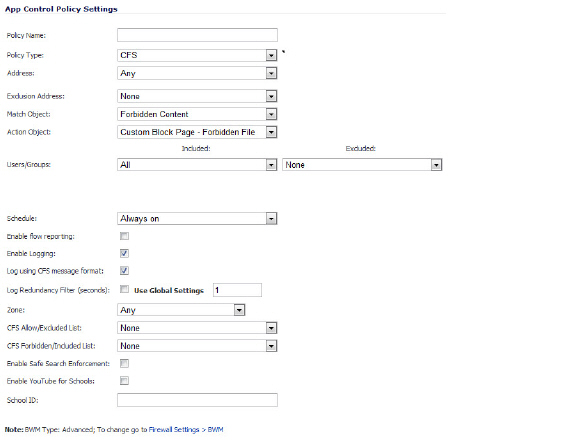
There are multiple changes/additions to the CFS policy creation window when used in conjunction with Application Control. The table and image in this section provide information on Application Control interface for CFS.
|
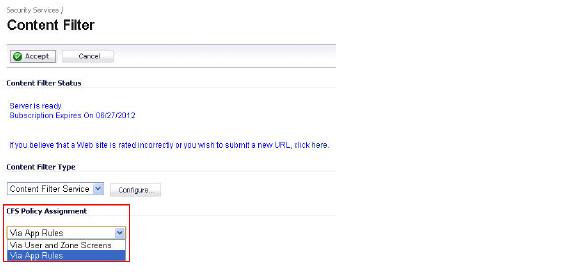
The choice of which policy management method to use – Via User and Zone Screens or Via Application Control – is made in the Security Services > Content Filter page.
Note While the new Application Control method of CFS management offers more control and flexibility, the administrator can still choose the previous user/zone management method to perform content filtering.
Before the services begin to filter content, you must enable them:
Step 1 Navigate to the Security Services > Content Filter page in the SonicOS management interface.
Step 2 Select ‘Via App Rules’ from the CFS Policy Assignment dropdown list.

Step 3 Click the Accept button to apply the change.
Step 4 Navigate to the Firewall > App Rules page.
Step 5 Check the box to Enable App Rules.

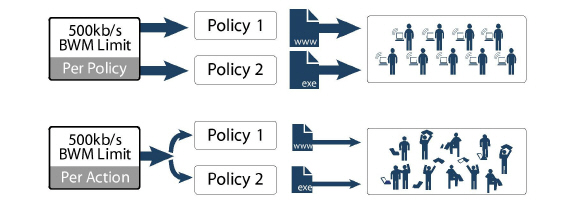
Bandwidth Management feature can be implemented in two separate ways:
• Per Policy Method
– The bandwidth limit specified in a policy is applied individually to each policy
– Example: two policies each have an independent limit of 500kb/s, the total possible bandwidth between those two rules is 1000kb/s
• Per Action Aggregate Method
– The bandwidth limit action is applied (shared) across all policies to which it is applied
– Example: two policies share a BWM limit of 500kb/s, limiting the total bandwidth between the two policies to 500kb/s
Bandwidth Aggregation Method is selected in the Action Object Settings screen when the Action type is set as Bandwidth Management. and the Bandwidth Management Type is set to WAN on the Firewall Settings > BWM page. For more information about the Bandwidth Management Type settings, see the Actions Using Bandwidth Management .
This section provides an overview of policy enforcement mechanism in CFS 3.0 to help the policy administrator create a streamlined set of rules without unnecessary redundancy or conflicting rule logic enforcement.
Policy Enforcement Across Different Groups
The basic default behavior for CFS policies assigned to different groups is to follow standard most specific / least restrictive logic, meaning:
The most specific rule is always given the highest priority
• Example
A rule applying to the “Engineering” group (a specific group) is given precedence over a rule applying to the “All” group (the least specific group.)
Policy Enforcement Within The Same Group
The basic default behavior for CFS policies within the same group is to follow an additive logic, meaning:
Rules are enforced additively
• Example
CFS policy 1 disallows porn, gambling, and social networking
CFS policy 2 applies bandwidth management to sports and adult content to 1Mbps
The end result of these policies is that sports and adult content are bandwidth managed, even though the first policy implies that they are allowed.
CFS 3.0 Configuration Examples
This section provides configuration examples using Application Control feature to create and manage CFS policies:
• Blocking Forbidden Content — page 1055
• Bandwidth Managing Content — page 1057
• Applying Policies to Multiple Groups — page 1059
• Creating a Custom CFS Category — page 1061
To create a CFS Policy for blocking forbidden content:
• Create an Application Object — page 1055
• Create an Application Control Policy to Block Forbidden Content — page 1056
Create an application object containing forbidden content:
Step 1 Navigate to the Firewall > Match Objects page in the SonicOS management interface.
Step 2 Click the Add New Match Object button, the Add/Edit Match Object window displays.
Step 3 Enter a descriptive Object Name, such as ‘Forbidden Content’.
Step 4 Select ‘CFS Category List’ from the Match Object Type dropdown list.
Step 5 Use the checkboxes to select the categories you wish to add to the forbidden content list.
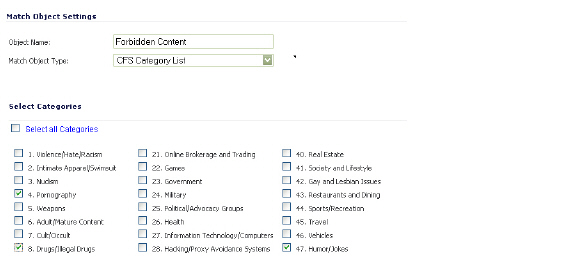
Step 6 Click the OK button to add the object to the Application Objects list.
Create an Application Control Policy to Block Forbidden Content
Create an Application Control policy to block content defined in the Application Object:
Step 1 Navigate to the Firewall > App Rules page in the SonicOS management interface.
Step 2 Click the Add Policy button, the Add/Edit Application Firewall Policy window displays.
Step 3 Enter a descriptive name for this action in the Policy Name field, such as ‘Block Forbidden Content’.
Step 4 Select ‘CFS’ from the Policy Type dropdown list.
Step 5 From the Application Object dropdown list, select the object you created in the previous section. In the case of our example, this object is named ‘Forbidden Content’.
Step 6 From the Action dropdown list, select ‘CFS block page’ to display a pre-formatted ‘blocked content’ page when users attempt to access forbidden content.
Step 7 Optionally, select the Users/Groups who this policy is to be Included or Excluded on from the dropdown list. Our example uses the defaults of including ‘all’ and excluding ‘none’.
Step 8 Optionally, select a Schedule of days and times when this rule is to be enforced from the dropdown list. Our example uses ‘Always On’ to always enforce this policy.
Step 9 Optionally, select the checkbox for Log using CFS message format if you wish for the logs to use this format instead of the standard Application Control format.
Step 10 Optionally, select the appropriate Zone where the policy is to be enforced. Our example uses ‘LAN’ to enforce the policy on all traffic traversing the local network.
Step 11 Optionally, select a CFS Allow List to enforce on this particular policy.
Step 12 Optionally, select the appropriate CFS Forbidden List to enforce on the particular policy.
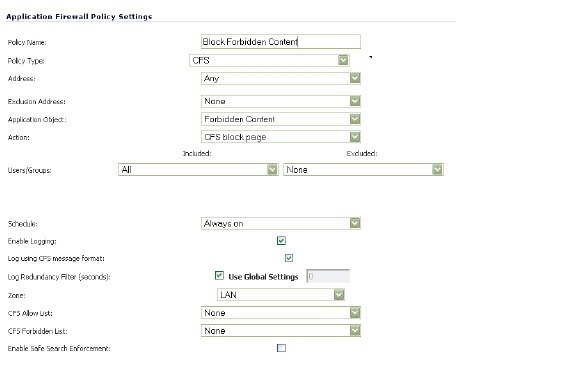
Step 13 Click the OK button to create this policy.
To create a CFS Policy for applying BWM to non-productive content:
• Create an Application Object — page 1055
• Create a Bandwidth Management Action Object — page 1057
• Create an Application Control Policy to Block Forbidden Content — page 1056
Create an Application Object for Non-Productive Content
Create an application object containing non-productive content:
Step 1 Navigate to the Firewall > Match Objects page in the SonicOS management interface.
Step 2 Click the Add New Match Object button, the Add/Edit Match Object window displays.
Step 3 Enter a descriptive Object Name, such as ‘Non-Productive Content’.
Step 4 Select ‘CFS Category List’ from the Match Object Type dropdown list.
Step 5 Use the checkboxes to select the categories you wish to add to the content list.
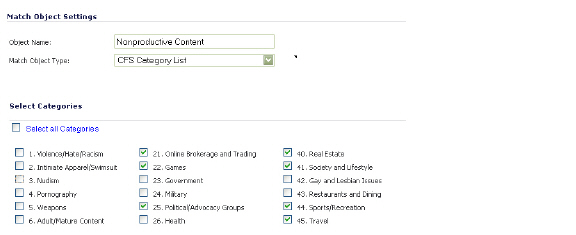
Step 6 Click the OK button to add the object to the Application Objects list.
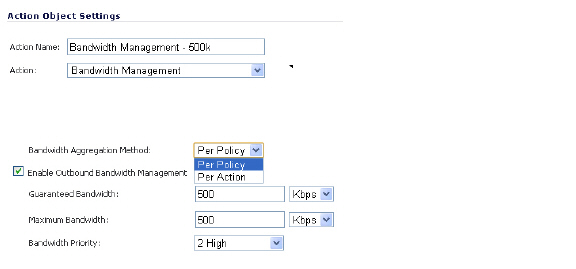
Create a Bandwidth Management Action Object
This section details creating a custom Action Object for bandwidth management.
Note Although Application Control contains pre-configured action objects for bandwidth management, a custom action object provides more control, including the ability to manage bandwidth per policy or per action.
To create a new BWM action:
Step 1 Navigate to the Firewall > Action Objects page in the SonicOS management interface.
Step 2 Click the Add New Action Object button, the Add/Edit Action Object window displays.
Step 3 Enter a descriptive Action Name for this action.
Step 4 Select ‘Bandwidth Management’ from the Action dropdown list.
Step 5 Select from the Bandwidth Aggregation Method dropdown list:
a. Per Policy - to apply this limit to each individual policy.
b. Per Action - to share this action limit across all policies to which it is applied.
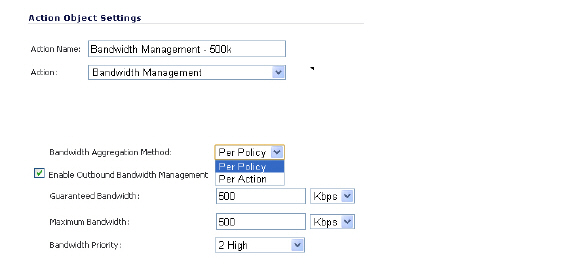
Step 6 Create the desired settings for Inbound Bandwidth Management and Outbound Bandwidth Management.
Step 7 Click the OK button to create this object.
Create an Application Control Policy to Manage Non-Productive Content
Create an Application Control policy to block content defined in the Application Object:
Step 1 Navigate to the Firewall > App Rules page in the SonicOS management interface.
Step 2 Click the Add Policy button, the Add/Edit Application Firewall Policy window displays.
Step 3 Enter a descriptive name for this action in the Policy Name field.
Step 4 Select ‘CFS’ from the Policy Type dropdown list.
Step 5 From the Application Object dropdown list, select the object you created in the previous section. In the case of our example, this object is named ‘Nonproductive Content’.
Step 6 From the Action dropdown list, select ‘Bandwidth Management - 100k’ to apply this custom BWM rule when users attempt to access non-productive content.
Note If you chose not to create a custom BWM object, you may use one of the pre-defined BWM objects (BWM high, BWM medium, or BWM low).
Step 7 Optionally, select the Users/Groups who this policy is to be Included or Excluded on from the dropdown list. Our example uses the defaults of including ‘all’ and excluding ‘none’.
Step 8 Optionally, select a Schedule of days and times when this rule is to be enforced from the dropdown list. Our example uses the pre-defined ‘Work Hours’ selection to enforce this policy only during weekday work hours.
Step 9 Optionally, select the checkbox for Log using CFS message format if you wish for the logs to use this format instead of the standard Application Control format.
Step 10 Optionally, select the appropriate Zone where the policy is to be enforced. Our example uses ‘LAN’ to enforce the policy on all traffic traversing the local network.
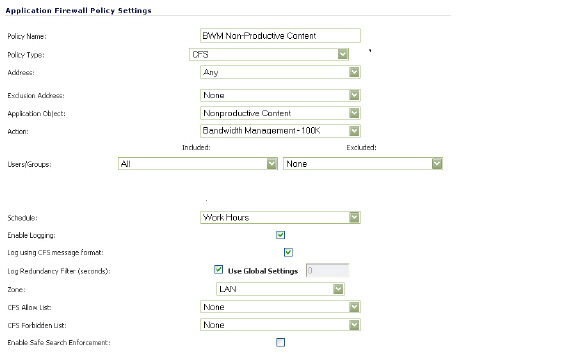
Step 11 Click the OK button to create this policy.
This section details applying a single policy to multiple user groups. CFS allows the administrator to apply one policy to different groups, allowing for variation (in time restrictions, exclusions, etc...) in the way it is applied to users.
To apply a policy to multiple groups:
• Enable CFS Custom Categories — page 1061
• Add a New CFS Custom Category Entry — page 1061
Create a Group-Specific Application Control Policy
Create an Application Control policy to block content defined in the Application Object:
Step 1 Navigate to the Firewall > App Rules page in the SonicOS management interface.
Step 2 Click the Add Policy button, the Add/Edit Application Firewall Policy window displays.
Step 3 Enter a descriptive name for this action in the Policy Name field. For easy identification, this name can include the user group to which you are applying the policy.
Step 4 Select ‘CFS’ from the Policy Type dropdown list.
Step 5 Select an Application Object from the dropdown list. Our example uses ‘Nonproductive Content’.
Step 6 Select an Action form the dropdown list.Our example uses the pre-defined ‘BWM Medium’ action to manage bandwidth of the applicable content.
Step 7 Select the Users/Groups who this policy is to be Included or Excluded on from the dropdown list. Our example uses the ‘Trusted Users’ group, although you may choose a different, or custom group depending on your needs.
Step 8 Select a Schedule appropriate for this group. Our example uses the pre-defined ‘Work Hours’ schedule.

With this the selections in this example, Nonproductive Content will be Bandwidth Managed for Trusted Users only during Work Hours.
Step 9 Click the OK button to create this policy. The new policy displays in the Application Firewall Policies list.

Step 10 Repeat steps 2-9 with variations required by your implementation in order to create a policy for each required group.