Security_Services_idpSummary2
Security Services > Intrusion Prevention Service
SonicWALL Intrusion Prevention Service (SonicWALL IPS) delivers a configurable, high performance Deep Packet Inspection engine for extended protection of key network services such as Web, e-mail, file transfer, Windows services and DNS. SonicWALL IPS is designed to protect against application vulnerabilities as well as worms, Trojans, and peer-to-peer, spyware and backdoor exploits. The extensible signature language used in SonicWALL’s Deep Packet Inspection engine also provides proactive defense against newly discovered application and protocol vulnerabilities. SonicWALL IPS offloads the costly and time-consuming burden of maintaining and updating signatures for new hacker attacks through SonicWALL’s industry-leading Distributed Enforcement Architecture (DEA). Signature granularity allows SonicWALL IPS to detect and prevent attacks based on a global, attack group, or per-signature basis to provide maximum flexibility and control false positives.
SonicWALL Deep Packet Inspection
Deep Packet Inspection looks at the data portion of the packet. The Deep Packet Inspection technology includes intrusion detection and intrusion prevention. Intrusion detection finds anomalies in the traffic and alerts the administrator. Intrusion prevention finds the anomalies in the traffic and reacts to it, preventing the traffic from passing through.
Deep Packet Inspection is a technology that allows a SonicWALL Security Appliance to classify passing traffic based on rules. These rules include information about layer 3 and layer 4 content of the packet as well as the information that describes the contents of the packet’s payload, including the application data (for example, an FTP session, an HTTP Web browser session, or even a middleware database connection). This technology allows the administrator to detect and log intrusions that pass through the SonicWALL Security Appliance, as well as prevent them (i.e. dropping the packet or resetting the TCP connection). SonicWALL’s Deep Packet Inspection technology also correctly handles TCP fragmented byte stream inspection as if no TCP fragmentation has occurred.
How SonicWALL’s Deep Packet Inspection Works
Deep Packet Inspection technology enables the firewall to investigate farther into the protocol to examine information at the application layer and defend against attacks targeting application vulnerabilities. This is the technology behind SonicWALL Intrusion Prevention Service. SonicWALL’s Deep Packet Inspection technology enables dynamic signature updates pushed from the SonicWALL Distributed Enforcement Architecture.
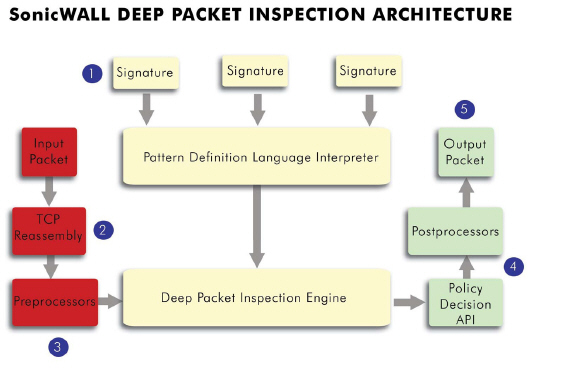
The following steps describe how the SonicWALL Deep Packet Inspection Architecture works:
Step 1 Pattern Definition Language Interpreter uses signatures that can be written to detect and prevent against known and unknown protocols, applications and exploits.
Step 2 TCP packets arriving out-of-order are reassembled by the Deep Packet Inspection framework.
Step 3 Deep Packet Inspection engine preprocessing involves normalization of the packet’s payload. For example, a HTTP request may be URL encoded and thus the request is URL decoded in order to perform correct pattern matching on the payload.
Step 4 Deep Packet Inspection engine postprocessors perform actions which may either simply pass the packet without modification, or could drop a packet or could even reset a TCP connection.
Step 5 SonicWALL’s Deep Packet Inspection framework supports complete signature matching across the TCP fragments without performing any reassembly (unless the packets are out of order). This results in more efficient use of processor and memory for greater performance.
• Stateful Packet Inspection - looking at the header of the packet to control access based on port, protocol, and IP address.
• Deep Packet Inspection - looking at the data portion of the packet. Enables the firewall to investigate farther into the protocol to examine information at the application layer and defend against attacks targeting application vulnerabilities.
• Intrusion Detection - a process of identifying and flagging malicious activity aimed at information technology.
• False Positive - a falsely identified attack traffic pattern.
• Intrusion Prevention - finding anomalies and malicious activity in traffic and reacting to it.
• Signature - code written to detect and prevent intrusions, worms, application exploits, and Peer-to-Peer and Instant Messaging traffic.
SonicWALL Gateway Anti-Virus, Anti-Spyware, and IPS Activation
If you do not have SonicWALL Gateway Anti-Virus, Anti-Spyware, and Intrusion Prevention Service installed on your SonicWALL security appliance, the Security Services > Anti-Spyware page indicates an upgrade is required and includes a link to activate it from your SonicWALL security appliance management interface.
Because SonicWALL Intrusion Prevention Service is part of the unified SonicWALL Gateway Anti-Virus, Anti-Spyware, and Intrusion Prevention Service, you will have a single License Key to activate all three services on your SonicWALL security appliance.
You must activate the SonicWALL Gateway Anti-Virus, Anti-Spyware, and Intrusion Prevention Service license from the Security Services > Intrusion Prevention page first. Once you have activated Intrusion Prevention Service, you can then activate SonicWALL Gateway Anti-Virus and SonicWALL Anti-Spyware.
To activate a SonicWALL Gateway Anti-Virus, Anit-Spyware, and Intrusion Prevention Service on your SonicWALL security appliance, you need the following:
• SonicWALL Gateway Anti-Virus, Anti-Spyware, and Intrusion Prevention Service license. You need to purchase a SonicWALL Gateway Anti-Virus, Anti-Spyware, and Intrusion Prevention Service license from a SonicWALL reseller or through your mysonicwall.com account (limited to customers in the USA and Canada).
• mysonicwall.com account. Creating a mysonicwall.com account is fast, simple, and FREE. Simply complete an online registration form from your SonicWALL security appliance management interface. Your mysonicwall.com account is also accessible at https://www.mysonicwall.com from any Internet connection with a Web browser.
• Registered SonicWALL security appliance with active Internet connection. Registering your SonicWALL security appliance is a simple procedure done directly from the management interface.
• SonicOS Enhanced 3.1 or newer. Your SonicWALL security appliance must be running SonicOS Enhanced 3.1 or newer for SonicWALL Gateway Anti-Virus, Anti-Spyware, and Intrusion Prevention Service.
Tip If your SonicWALL security appliance is connected to the Internet and registered at mysonicwall.com, you can activate a 30-day FREE TRIAL of SonicWALL Gateway Anti-Virus, SonicWALL Anti-Spyware, and SonicWALL Intrusion Prevention Service separately from the Security Services > Gateway Anti-Virus, Security Services > Anti-Spyware, and Security Services > Intrusion Prevention pages in the management interface.
Note Administrator Guides for SonicWALL Gateway Anti-Virus, SonicWALL Anti-Spyware, and SonicWALL Intrusion Prevention Service are available on the SonicWALL documentation Web site: http://www.sonicwall.com/us/Support.html
Creating a mysonicwall.com Account
Creating a mysonicwall.com account is fast, simple, and FREE. Simply complete an online registration form in the SonicWALL security appliance management interface.
Note If you already have a mysonicWALL.com account, go to Registering Your SonicWALL Security Appliance.
Step 1 Log into the SonicWALL security appliance management interface.
Step 2 If the System > Status page is not displayed in the management interface, click System in the left-navigation menu, and then click Status.
Step 3 On the System > Status page, in the Security Services section, click the Register link in Your SonicWALL is not registered. Click here to Register your SonicWALL.
Step 4 In the mysonicwall.com Login page, click the here link in If you do not have a mysonicwall account, please click here to create one.
Step 5 In the mysonicwall Account page, enter in your information in the Account Information, Personal Information and Preferences fields. All fields marked with an asterisk (*) are required fields.
Note Remember your username and password to access your mysonicwall.com account.
Step 6 Click Submit after completing the MySonicWALL Account form.
Step 7 When the mysonicwall.com server has finished processing your account, you will see a page saying that your account has been created. Click Continue. Congratulations. Your mysonicwall.com account is activated. Now you need to log into mysonicwall.com to register your SonicWALL security appliance.
Note mysonicwall.com registration information is not sold or shared with any other company.
Registering Your SonicWALL Security Appliance
To register your SonicWALL Security Appliance, perform the following steps:
Step 1 Log into the SonicWALL security appliance management interface.
Step 2 If the System > Status page is not displaying in the management interface, click System in the left-navigation menu, and then click Status.
Step 3 On the System > Status page, in the Security Services section, click the Register link. The mysonicwall.com Login page is displayed.
Step 4 Enter your mysonicwall.com account username and password in the User Name and Password fields, then click Submit.
Step 5 The next several pages inform you about the free trials available to you for SonicWALL’s Security Services:
– Gateway Anti-Virus - Delivers real-time virus protection for your entire network.
– Client Anti-Virus - Provides desktop and server anti-virus protection with software running on each computer.
– Premium Content Filtering Service - Enhances productivity by limiting access to objectionable Web content.
– Intrusion Prevention Service - Protects your network against worms, Trojans, and application layer attacks.
– Anti-Spyware - Protects your network from malicious spyware by blocking spyware installations at the gateway and disrupts.
Click Continue on each page.
Note Clicking on the Continue button does not activate the FREE TRIAL versions of these SonicWALL Security Services.
Step 6 At the top of the Product Survey page, Enter a “friendly name” for your SonicWALL security appliance in the Friendly Name field. The friendly name allows you to easily identify your SonicWALL security appliance in your mysonicwall.com account.
Step 7 Please complete the Product Survey. SonicWALL uses this information to further tailor services to fit your needs.
Step 8 Click Submit.
Step 9 When the mysonicwall.com server has finished processing your registration, a page is displayed informing you that the SonicWALL security appliance is registered. Click Continue, and the System > Licenses page is displayed showing you the available services. You can activate the service from this page or the specific service page under the Security Services left-navigation menu in the management interface.
You can try FREE TRIAL versions of SonicWALL Gateway Anti-Virus, SonicWALL Anti-Spyware, and SonicWALL Intrusion Prevention Service. You must activate each service separately from the Manage Services Online table on the System > Licenses page or by clicking the FREE TRIAL link on the respective Security Services page (i.e. Security Services > Gateway Anti-Virus).
To try a FREE TRIAL of SonicWALL Gateway Anti-Virus, SonicWALL Anti-Spyware, or SonicWALL Intrusion Prevention Service, perform these steps:
Step 1 Click the FREE TRIAL link on the Security Services > Gateway Anti-Virus,
Security Services > Anti-Spyware, or Security Services > Intrusion Prevention page. The mysonicwall.com Login page is displayed.
Step 2 Enter your mysonicwall.com account username and password in the User Name and Password fields, then click Submit. If your SonicWALL security appliance is already connected to your mysonicwall.com account, the System > Licenses page appears after you click the FREE TRIAL link.
Step 3 Click Try in the FREE TRIAL column in the Manage Services Online table. The service is enabled on your security appliance.
Activating the Gateway Anti-Virus, Anti-Spyware, and IPS License
Because SonicWALL Intrusion Prevention Service is part of SonicWALL Gateway Anti-Virus, Anti-Spyware, and Intrusion Prevention Service. The Activation Key you receive is for all three services on your SonicWALL security appliance.
If you do not have a SonicWALL Gateway Anti-Virus, Anti-Spyware, and Intrusion Prevention Service. license activated on your SonicWALL security appliance, you must purchase it from a SonicWALL reseller or through your mysonicwall.com account (limited to customers in the USA and Canada).
If you have an Activation Key for SonicWALL Gateway Anti-Virus, Anti-Spyware, and Intrusion Prevention Service, perform these steps to activate the combined services:
Step 1 On the Security Services > Intrusion Prevention page, click the SonicWALL Intrusion Prevention Service Subscription link. The mysonicwall.com Login page is displayed.
Step 2 Enter your mysonicwall.com account username and password in the User Name and Password fields, then click Submit. If your SonicWALL security appliance is already registered to your mysonicwall.com account, the System > Licenses page appears.
Step 3 Click Activate or Renew in the Manage Service column in the Manage Services Online table.
Step 4 Type in the Activation Key in the New License Key field and click Submit. SonicWALL Intrusion Prevention Service is activated. The System > Licenses page is displayed with the Anti-Spyware and Gateway Anti-Virus links displayed at the bottom of the Manage Services Online table with the child Activation Keys.
Step 5 Click on the Gateway Anti-Virus link. The child Activation Key is automatically entered in the New License Key field. The child Activation Key is a different key than the parent key for the SonicWALL Gateway Anti-Virus, Anti-Spyware, and Intrusion Prevention Service.
Step 6 Click Submit. If you have activated a FREE TRIAL version or are renewing a license, the renew screen is displayed that shows the expiration date of the current license and the expiration date of the updated license. Click Renew.
Step 7 Click on the SonicWALL Gateway Anti-Virus link. The child Activation Key is automatically entered in the New License Key field. The child Activation Key is a different key than the parent key for the SonicWALL Gateway Anti-Virus, Anti-Spyware, and Intrusion Prevention Service.
Step 8 Click Submit. If you have activated a FREE TRIAL version or are renewing a license, the renew screen is displayed that shows the expiration date of the current license and the expiration date of the updated license. Click Renew.
Congratulations! You have activated the SonicWALL Gateway Anti-Virus, Anti-Spyware, and Intrusion Prevention Service.
If you activate the SonicWALL Gateway Anti-Virus, Anti-Spyware, and Intrusion Prevention Service subscription on mysonicwall.com, the activation is automatically enabled on your SonicWALL security appliance within 24-hours or you can click the Synchronize button on the
Security Services > Summary page to immediately update your SonicWALL security appliance.
Setting Up SonicWALL Intrusion Prevention Service Protection
Activating the SonicWALL Intrusion Prevention Service license on your SonicWALL security appliance does not automatically enable the protection. To configure SonicWALL Intrusion Prevention Service to begin protecting your network, you need to perform the following steps:
Step 1 Enable SonicWALL Intrusion Prevention Service.
Step 2 Specify the Priority attack Groups.
Step 3 Apply SonicWALL Intrusion Prevention Service Protection to zones.
Note For complete instructions on setting up SonicWALL Intrusion Prevention Service, refer to the SonicWALL Intrusion Prevention Service Administrator’s Guide available on the SonicWALL documentation Web site http://www.sonicwall.com/us/Support.html.
Selecting Security Services > Intrusion Prevention displays the configuration settings for SonicWALL IPS on your SonicWALL security appliance.
The Intrusion Prevention Service page is divided into three sections:
• IPS Status - displays status information on the state of the signature database, your SonicWALL IPS license, and other information.
• IPS Global Settings - provides the key settings for enabling SonicWALL IPS on your SonicWALL security appliance, specifying global SonicWALL IPS protection based on three classes of attacks, and other configuration options.
• IPS Policies - allows you to view SonicWALL IPS signatures and configure the handling of signatures by category groups or on a signature by signature basis. Categories are signatures grouped together based on the type of attack.
After activating your Intrusion Prevention Service license, you must enable and configure SonicWALL IPS on the SonicWALL management interface to before intrusion prevention policies are applied to your network traffic.
SonicWALL IPS must be globally enabled on your SonicWALL security appliance by checking the Enable IPS check box in the IPS Global Settings section. A checkmark in the Enable IPS check box turns on the service on your SonicWALL security appliance.
Note Checking the Enable IPS check box does not automatically start SonicWALL IPS protection. You must also n the IPS Global Settings section.You must specify a Prevent All action in the Signature Groups table to activate intrusion prevention on the SonicWALL security appliance, and specify the interface or zones you want to protect.
SonicWALL IPS allows you to globally manage your network protection against attacks by simply selecting the class of attacks: High Priority Attacks, Medium Priority Attacks, and Low Priority Attacks. Selecting the Prevent All and Detect All check boxes for High Priority Attacks and Medium Priority Attacks in the Signature Groups table, and then clicking Apply protects your network against the most dangerous and disruptive attacks. For more detailed information on configuring global signature groups, refer to “Configuring Global Signature Groups” in the SonicWALL Intrusion Prevention Service Administrator’s Guide available at www.sonicwall.com/support/documentation.html
Note Leaving the High Priority Attacks, Medium Priority Attacks, and Low Priority Attacks signature groups with no Prevent All action checked means no intrusion prevention is occurring on the SonicWALL security appliance.
You apply SonicWALL IPS to zones on the Network > Zones page to enforce SonicWALL IPS not only between each network zone and the WAN, but also between internal zones. For example, enabling SonicWALL IPS on the LAN zone enforces SonicWALL IPS on all incoming and outgoing LAN traffic.
In the IPS Status section of the Security Services > Intrusion Prevention Service page, click the Network > Zones link to access the Network > Zones page. You apply SonicWALL IPS to a zone listed on the Network > Zones page.
To enable SonicWALL on a zone, perform these steps:
Step 1 In the SonicWALL security appliance management interface, select Network > Zones or from the IPS Status section, on the Security Services > Intrusion Prevention page, click the Network > Zones link. The Network > Zones page is displayed.
Step 2 In the Configure column in the Zone Settings table, click the edit icon ![]() for the zone you want to apply SonicWALL IPS. The Edit Zone window is displayed.
for the zone you want to apply SonicWALL IPS. The Edit Zone window is displayed.
Step 3 Click the Enable IPS checkbox. A checkmark appears. To disable SonicWALL IPS, uncheck the box.
Step 4 Click OK.
You also enable SonicWALL IPS protection for new zones you create on the Network > Zones page. Clicking the Add button displays the Add Zone window, which includes the same settings as the Edit Zone window.