DPI_Client_Settings
Deep Packet Inspection of Secure Socket Layer (DPI-SSL) extends SonicWALL’s Deep Packet Inspection technology to allow for the inspection of encrypted HTTPS traffic and other SSL-based traffic. The SSL traffic is decrypted transparently, scanned for threats and then re-encrypted and sent along to its destination if no threats or vulnerabilities are found. DPI-SSL provides additional security, application control, and data leakage prevention for analyzing encrypted HTTPS and other SSL-based traffic.
The following security services and features are capable of utilizing DPI-SSL:
• Gateway Anti-Virus
• Gateway Anti-Spyware
• Intrusion Prevention
• Content Filtering
• Application Firewall
• Packet Capture
• Packet Mirror
DPI-SSL has two main deployment scenarios:
• Client DPI-SSL: Used to inspect HTTPS traffic when clients on the SonicWALL security appliance’s LAN access content located on the WAN.
• Server DPI-SSL: Used to inspect HTTPS traffic when remote clients connect over the WAN to access content located on the SonicWALL security appliance’s LAN.
The DPI-SSL feature is available in SonicOS Enhanced 5.6 and higher. The following table shows which platforms support DPI-SSL and the maximum number of concurrent connections on which the appliance can perform DPI-SSL inspection.
|
TThe Client DPI-SSL deployment scenario typically is used to inspect HTTPS traffic when clients on the LAN browse content located on the WAN. In the Client DPI-SSL scenario, the SonicWALL UTM appliance typically does not own the certificates and private keys for the content it is inspecting. After the appliance performs DPI-SSL inspection, it re-writes the certificate sent by the remote server and signs this newly generated certificate with the certificate specified in the Client DPI-SSL configuration. By default, this is the SonicWALL certificate authority (CA) certificate, or a different certificate can be specified. Users should be instructed to add the certificate to their browser’s trusted list to avoid certificate trust errors.
The following sections describe how to configure Client DPI-SSL:
• Configuring General Client DPI-SSL Settings
• Configuring the Inclusion/Exclusion List
• Selecting the Re-Signing Certificate Authority
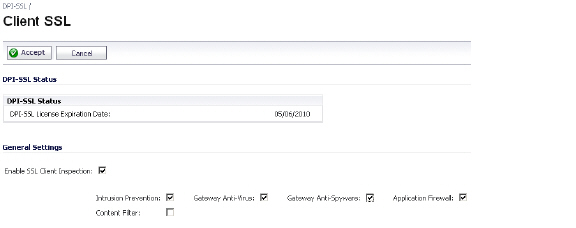
To enable Client DPI-SSL inspection, perform the following steps:
1. Navigate to the DPI-SSL > Client SSL page.
2. Select the Enable SSL Inspection checkbox.
3. Select which of the following services to perform inspection with: Intrusion Prevent, Gateway Anti-Virus, Gateway Anti-Spyware, Application Firewall, and Content Filter.
4. Click Accept.
By default, the DPI-SSL applies to all traffic on the appliance when it is enabled. You can configure an Inclusion/Exclusion list to customize which traffic DPI-SSL inspection will apply to. The Inclusion/Exclusion list provides the ability to specify certain objects, groups, or hostnames. In deployments that are processing a large amount of traffic, it can be useful to exclude trusted sources in order to reduce the CPU impact of DPI-SSL and to prevent the appliance from reaching the maximum number of concurrent DPI-SSL inspected connections.
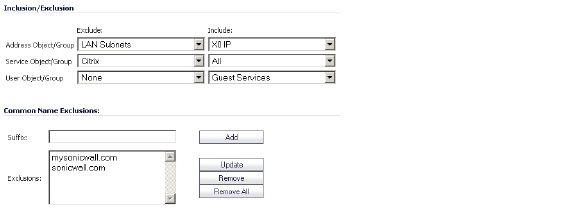
The Inclusion/Exclusion section of the Client SSL page contains four options for specifying the inclusion list:
• On the Address Object/Group line, select an address object or group from the Exclude pulldown menu to exempt it from DPI-SSL inspection.
• On the Service Object/Group line, select a service object or group from the Exclude pulldown menu to exempt it from DPI-SSL inspection.
• On the User Object/Group line, select a user object or group from the Exclude pulldown menu to exempt it from DPI-SSL inspection.
Tip The Include pulldown menu can be used to fine tune the specified exclusion list. For example, by selecting the Remote-office-California address object in the Exclude pulldown and the Remote-office-Oakland address object in the Include pulldown.
• The Common Name Exclusions section is used to add domain names to the exclusion list. To add a domain name, type it in the text box and click Add.
• Click Apply at the top of the page to confirm the configuration.
By default, DPI-SSL uses the Default SonicWALL DPI-SSL CA Certificate to re-sign traffic that has been inspected. Optionally, users can specify that another certificate will be used. To use a custom certificate, you must first import the certificate to the SonicWALL UTM appliance:
1. Navigate to the System > Certificates page.
2. Click Import Certificate.
3. Select the Import a local end-user certificate with private key from a PKCS#12 (.p12 or .pfx) encoded file option.
4. Choose password and click Import.
After the certificate has been imported, you must configure it on the Client DPI-SSL page:
1. Navigate to the DPI-SSL > Client SSL page.
2. Scroll down to the Certificate Re-Signing Authority section and select the certificate from the pulldown menu.
3. Click Apply.
For help with creating PKCS-12 formatted files, see Creating PKCS-12 Formatted Certificate File.
Adding Trust to the Browser
In the previous section we described how to configure a re-signing certificate authority. In order for re-signing certificate authority to successfully re-sign certificates browsers would have to trust this certificate authority. Such trust can be established by having re-signing certificate imported into the browser's trusted CA list.
• Internet Explorer: Go to Tools > Internet Options, click the Content tab and click Certificates. Click the Trusted Root Certification Authorities tab and click Import. The Certificate Import Wizard will guide you through importing the certificate.
• Firefox: Go to Tools > Options, click the Advanced tab and then the Encryption tab. Click View Certificates, select the Authorities tab, and click Import. Select the certificate file, make sure the Trust this CA to identify websites check box is selected, and click OK.
• Mac: Double-click the certificate file, select Keychain menu, click X509 Anchors, and then click OK. Enter the system username and password and click OK.
Creating PKCS-12 Formatted Certificate File
PKCS12 formatted certificate file can be created using Linux system with OpenSSL. In order to create a PKCS-12 formatted certificate file, one needs to have two main components of the certificate:
• Private key (typically a file with .key extension or the word key in the filename)
• Certificate with a public key (typically a file with .crt extension or the word cert as part of filename).
For example, Apache HTTP server on Linux has its private key and certificate in the following locations:
• /etc/httpd/conf/ssl.key/server.key
• /etc/httpd/conf/ssl.crt/server.crt
With these two files available, run the following command:
openssl pkcs12 -export -out out.p12 -inkey server.key -in server.crt
In this example out.p12 will become the PKCS-12 formatted certificate file and server.key and server.crt are the PEM formatted private key and the certificate file respectively.
After the above command, one would be prompted for the password to protect/encrypted the file. After the password is chosen, the creation of PKCS-12 formatted certificate file is complete and it can be imported into the UTM appliance.
The following sections
To perform SonicWALL Content Filtering on HTTPS and SSL-based traffic using DPI-SSL, perform the following steps:
1. Navigate to the DPI-SSL > Client SSL page
2. Select the Enable SSL Inspection checkbox and the Content Filter checkbox.
3. Click Apply.
4. Navigate to the Security Services > Content Filter page and click the Configure button.
5. Uncheck the Enable IP based HTTPS Content Filtering checkbox.
6. Select the appropriate categories to be blocked.
7. Click Apply.
8. Navigate to a blocked site using the HTTPS protocol to verify that it is properly blocked.
Note For content filtering over DPI-SSL, the first time HTTPS access is blocked result in a blank page being displayed. If the page is refreshed, the user will see the SonicWALL block page.
Enable Application Firewall checkbox on the Client DPI-SSL screen and enable Application Firewall on the Application Firewall >Policies screen.
1. Navigate to the DPI-SSL > Client SSL page
2. Select the Enable SSL Inspection checkbox and the Application Firewall checkbox.
3. Click Apply.
4. Navigate to the Application Firewall > Policies page.
5. Enable Application Firewall.
6. Configure an HTTP Client policy to block Microsoft Internet Explorer browser.
7. Select block page as an action for the policy. Click Apply.
8. Access any website using the HTTPS protocol with Internet Explorer and verify that it is blocked.
DPI-SSL also supports Application Level Bandwidth Management over SSL tunnels. Application Firewall HTTP bandwidth management policies also applies to content that is accessed over HTTPS when DPI-SSL is enabled for Application Firewall.