Click the Wizard button on the top right corner of the SonicOS management interface.
In the Welcome screen, select the Setup Wizard and then click Next.
On a SonicWALL TZ series (wired or wireless) appliance, select the appropriate deployment scenario for your network and then click Next:
-
Office Gateway - Provide secure access for my wired and wireless users.
-
Secure or Open Access Point - Add secure wireless access to an existing wired network. When selecting this mode, the wizard will skip over the steps for configuring the LAN interface.
To set the password, enter a new password in the New Password and Confirm New Password fields. Click Next.
Tip It is very important to choose a password which cannot be easily guessed by others.
Select the appropriate Time Zone from the Time Zone menu. The SonicWALL’s internal clock is set automatically by a Network Time Server on the Internet. Click Next.
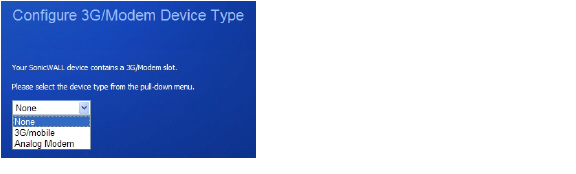
If you are setting up a SonicWALL TZ series appliance that supports 3G devices for Wireless WAN connection over cellular networks, or supports analog modem devices for dial-up WAN connection, select the type of device:
-
3G/mobile
-
Analog Modem
Configure 3G
If you are setting up a SonicWALL TZ series appliance that supports 3G devices for Wireless WAN connection over cellular networks, select how you will use the 3G device. Select one of the following choices:
-
Yes, I will use 3G as a backup for the WAN Ethernet connection.
-
Yes, 3G is my only connection to the Internet.
-
No, I will not use 3G at this time.
Click Next.
If you chose to use the 3G, enter the Country, Service Provider, and Plan Type information for the 3G device.
Click Next.
Configure Modem
If you are setting up a SonicWALL TZ series appliance that supports analog modem devices for dial-up WAN connection, select how you will use the modem. You can choose to use the modem:
-
As a backup to your WAN
-
As your primary internet connection. Note: If you choose to use the modem as your primary connection, the Setup Wizard will not ask you to configure the WAN interface.
-
Not use the modem
Click Next.
If you chose to use the modem, enter the Dial-up Connection information
Enter the dial-up Phone Number, User Name, and Password. Click Next.
Confirm that you have the proper network information necessary to configure the SonicWALL to access the Internet. Click the hyperlinks for definitions of the networking terms.
You can choose:
-
Static IP, if your ISP assigns you a specific IP address or group of addresses.
-
DHCP, if your ISP automatically assigns you a dynamic IP address.
-
PPPoE, if your ISP provided you with client software, a user name, and a password.
-
PPTP, if your ISP provided you with a server IP address, a user name, and password.
Select one of the following options and go to the corresponding section:
|
Enter the public IP address provided by your ISP in the SonicWALL WAN IP Address, then fill in the rest of the fields: WAN Subnet Mask, WAN Gateway (Router) Address, and DNS Server Addresses. Click Next.
Proceed to LAN Settings.
WAN Network Mode: NAT with DHCP Client
DHCP is a networking mode that allows you to obtain an IP address for a specific length of time from a DHCP server. The length of time is called a lease which is renewed by the DHCP server typically after a few days. When the lease is ready to expire, the client contacts the server to renew the lease. This is a common network configuration for customers with cable or DSL modems. You are not assigned a specific IP address by your ISP.
The Setup Wizard window states that the SonicWALL’s DHCP Clients will attempt dynamically obtain an IP address from the SonicWALL. To confirm this, click Next.
Proceed to LAN Settings.
WAN Network Mode: NAT with PPPoE Client
NAT with PPPoE Client is a network protocol that uses Point to Point Protocol over Ethernet to connect with a remote site using various Remote Access Service products. This protocol is typically found when using a DSL modem with an ISP requiring a user name and password to log into the remote server. The ISP may then allow you to obtain an IP address automatically or give you a specific IP address.
The SonicWALL automatically detects the presence of a PPPoE server on the WAN. If not, then select PPPoE: Your ISP provided you with desktop software, a user name and password. Click Next.
Select whether to use a dynamic or static IP address, and enter the user name and password provided by your ISP into the PPPoE User Name and PPPoE Password fields. Click Next.
Proceed to LAN Settings.
WAN Network Mode: NAT with PPTP Client
NAT with PPTP Client mode uses Point to Point Tunneling Protocol (PPTP) to connect to a remote server. It supports older Microsoft implementations requiring tunneling connectivity.
Enter the PPTP Server IP Address, PPTP User Name, and PPTP Password.
Select whether the appliance should obtain an IP address automatically or if you specify the WAN IP address, subnet mask and gateway manually.
Click Next.
Note On a SonicWALL TZ series appliance, the LAN Settings and LAN DHCP Server settings are only displayed if you selected the Office Gateway deployment scenario.
The LAN page allows the configuration of the SonicWALL LAN IP Addresses and the LAN Subnet Mask.The SonicWALL LAN IP Addresses are the private IP address assigned to the LAN port of the SonicWALL. The LAN Subnet Mask defines the range of IP addresses on the LAN. The default values provided by the SonicWALL work for most networks. If you do not use the default settings, enter your preferred private IP address and subnet mask in the fields. Click Next.
The Optional-SonicWALL DHCP Server window configures the SonicWALL DHCP Server. If enabled, the SonicWALL automatically configures the IP settings of computers on the LAN. To enable the DHCP server, select Enable DHCP Server, and specify the range of IP addresses that are assigned to computers on the LAN.
If Disable DHCP Server is selected, you must configure each computer on your network with a static IP address on your LAN. Click Next.
(SonicWALL wireless security appliances only) Select whether or not you want to configure Wi-If Protected Access (WPA) security:
-
WPA/WPA2 Mode - WPA is the security wireless protocol based on 802.11i standard. It is the recommended protocol if your wireless clients support WPA also.
-
Connectivity - Caution! This mode offers no encryption or access controls and allows unrestrained wireless access to the device.
Note If you want to configure WEP security, navigate to the Wireless > Security page.
WPA Mode Settings
(SonicWALL wireless security appliances only) Configure the WPA settings for your SonicWALL security appliance. See Wireless > Security for more information on these settings. Click Next.
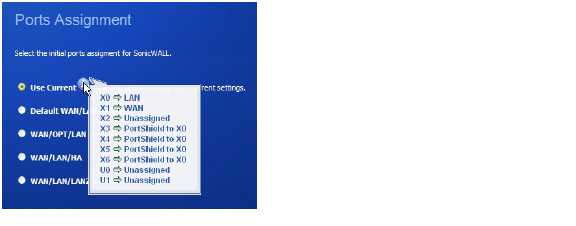
(SonicWALL TZ series and NSA 240 appliances only) Optionally, you can configure the initial PortShield group assignments for your appliance. See Configuring PortShield Interfaces with the PortShield Wizard for more information on the PortShield wizard. Click Next.
SonicWALL Configuration Summary
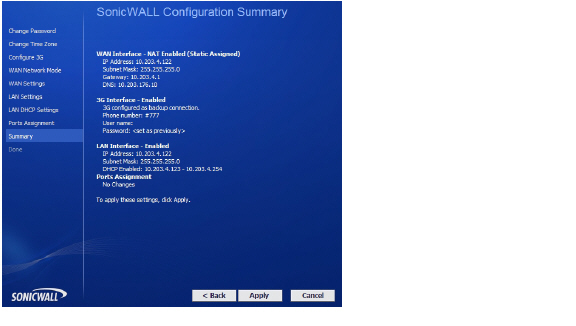
The Configuration Summary window displays the configuration defined using the Installation Wizard. To modify any of the settings, click Back to return to the Connecting to the Internet window. If the configuration is correct, click Next.
The SonicWALL stores the network settings.
Click Close to return to the SonicWALL Management Interface.