PANEL_manSnmpView
You can manage the SonicWALL security appliance using SNMP or SonicWALL Global Management System (GMS). This section describes how to configure the SonicWALL for management using SNMP.
.SNMP (Simple Network Management Protocol) is a network protocol used over User Datagram Protocol (UDP) that allows network administrators to monitor the status of the SonicWALL security appliance and receive notification of critical events as they occur on the network. The SonicWALL security appliance supports SNMP v1/v2c/v3 and all relevant Management Information Base II (MIBII) groups except egp and at.
SNMPv3 expands on earlier versions of SNMP and provides secure access to network devices by means of a combination of authenticating and encrypting packets.
Packet security is provided through:
Message Integrity: ensures a packet has not been tampered with in transit
Authentication: verifies a message comes from a valid source
Encryption: encodes packet contents to prevent its being viewed by an unauthorized source.
SNMPv3 provides for both security models and security levels. A security model is an authentication strategy set up between a user and the group in which the user resides. The security level is the permitted level of security within a given security model. The security model and associated security level determine how an SNMP packet will be handled. SNMPv3 provides extra levels of authentication and privacy, as well as additional authorization and access control.
The following table shows how security levels, authentication, and encryption are handled by the different versions of SNMP.
|
The SonicWALL security appliance replies to SNMP Get commands for MIBII, using any interface, and supports a custom SonicWALL MIB for generating trap messages. The custom SonicWALL MIB is available for download from the SonicWALL Web site and can be loaded into third-party SNMP management software such as HP Openview, Tivoli, or SNMPC.
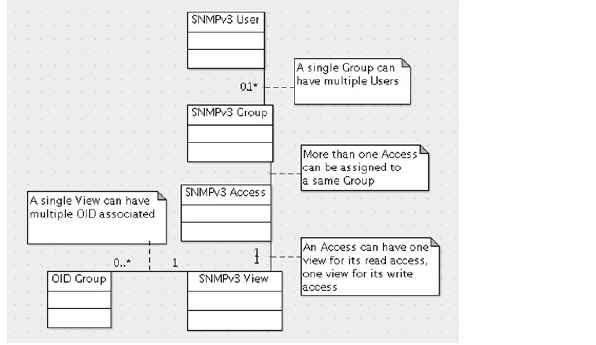
SNMP settings can be viewed and configured by the administrator. Settings cannot be viewed or modified by the user. SNMPv3 can be modified at the User or Group level. Access Views can be read, write, or both, and can be assigned to users or groups. A single View can have multiple Object IDs (OIDs) associated with it.
SNMPv3 settings for the SNMPv3 Engine ID are configurable Under the General Settings menu. The Engine ID is used to authorize a received SNMP packet. Only matching packet EngineIDs will be processed.
SNMP configuration consists of:
Enabling and Configuring SNMP Access
You can use either SNMPv1/v2 for basic functionality, or configure the appliance to use the more extensive SNMPv3 options.
To enable SNMP on the SonicWALL security appliance, log into the Management interface and click System, then SNMP.
Select the Enable SNMP checkbox, and then click Accept. The SNMP information displays in an expanded window.
To configure the SNMP interface, click on the Configure button. The Configure SNMP window is displayed.Two tabs will be available: the General tab and the SNMPv3 tab.
Type the host name of the SonicWALL security appliance in the System Name field.
Type the network administrator’s name in the System Contact field.
Type an e-mail address, telephone number, or pager number in the System Location field.
Note If the SNMPv3 configuration option is used, the General Settings menu will also display an Asset Number field on the menu.
Type a name for a group or community of administrators who can view SNMP data in the Get Community Name field.
Type a name for a group or community of administrators who can view SNMP traps in the Trap Community Name field.
Type the IP address or host name of the SNMP management system receiving SNMP traps in the Host 1 through Host 4 fields. You must configure at least one IP address or host name, but up to four addresses or host names can be used.
Click OK.
Configuring SNMPv3 Engine IDs
If SNMPv3 is used, an additional option is available: Enable SNMPv3.
SNMPv3 settings for the SNMPv3 Engine ID are configurable under the General Settings menu. The Engine ID is used to authorize a received SNMP packet. If the option is enabled, only packets whose Engine ID matches will be processed.
In the Management interface,click System, then SNMP. Select the Enable SNMP checkbox, and then click Configure.
Two tabs will be available: the General tab and the SNMPv3 tab. Configure the General Settings as described above, then click on the SNMPv3 tab to bring it up. Enter the Engine ID number and click OK. This number will be matched against received SNMP packets to authorize their processing.
The SNMPv3 security options will now be used in processing packets.
When you are through configuring the SNMP interface, click Accept.
Setting up SNMPv3 Groups and Access
SNMPv3 allows you to set up and assign groups and access with differing levels of security. Object IDs are associated with various levels of permissions, and a single view can be assigned to multiple objects. The figure below shows how access for groups and users are associated with these different permission levels.
Configuring Object IDs for SNMPv3 Views.
The SNMPv3 Views show access settings for Users or Groups. The Administrator creates settings for users and groups and these security settings are not User-modifiable. The SNMPv3 View defines the Object IDs and Object ID Groups, and is sometimes known as the SNMPv3 Access Object.
The SNMP View defines a collection of OIDs and OID groups. The initial set of default views cannot be changed or deleted. The default views reflect the most often used views, such as the root view, system view, IP, interfaces, etc. The OIDs for these views are pre-assigned.
Additionally, the administrator can create a custom view for specific users and groups.
To add a view, under View, click Add.
The Add SNMP View menu comes up. Give the View a name, and add an unassigned OID. Click Add OID.
Note If editing an existing view, the name will not be editable.
The new view will appear in the OID list. Add any more new views, with associated OIDs. Then click OK. The new views will be added to the list on the SNMP page.
Creating Users and Groups
To create a Group, click Add Group under the User/Group table.
The Add Group menu comes up. The group name can contain up to 32 alphanumeric characters. Name the Group and click OK.
To add a user, click Add User.
The Add SNMP User menu comes up. Enter the User Name and security level (None (default), Authentication, Authentication and Privacy), and whether the user is to be part of a group. (The default is No Group.)
If Authentication is selected, you will be asked for an Authentication Method and Authentication Key. Select from MD5 or SHA1 Authentication and enter the authentication key. The key can be any string of printable characters
If Authentication and Privacy is selected, you will be asked to select from AES or DES encryption, and to enter the encryption key in the Privacy Key field. The key can be any string of printable characters.
Click OK when finished. The user will be added to the list, and added to the appropriate group (if any).
Adding Access
SNMPv3 Access is an object which
Defines the read/write access rights of an SNMPv3 View
Can be assigned to an SNMPv3 Group.
Multiple groups can be assigned to the same Access object. An Access object can also have multiple views assigned to it.
To create an access object:
Under the Access table, click on the Add button.
The Add Access menu comes up.
Assign a name to the access. Existing names are non-editable.
Assign the Read view. A list of all available views is available from the drop-down selector.
Select a Master SNMPv3 group. A list of available groups is available from the drop-down selector. Access can be assigned to only one SNMPv3 groups. (However, a group can be associated with multiple Access objects.)
Assign a security level for the Access object. The available security levels are None, Authentication Only, and Authentication and Privacy.
When done, click OK. The Access object is added to the Access table.
SNMP Logs
SNMP logs can be viewed on the Log Monitor page. Expand the System category to view SNMP-specific logs.
Trap messages are generated only for the alert message categories normally sent by the SonicWALL security appliance. For example, attacks, system errors, or blocked Web sites generate trap messages. If none of the categories are selected on the Log > Log Monitor page, then no trap messages are generated.
Configuring SNMP as a Service and Adding Rules
By default, SNMP is disabled on the SonicWALL security appliance. To enable SNMP you must first enable SNMP on the System > SNMP page, and then enable it for individual interfaces. To do this, go to the Network > Interfaces page and click on the Configure button for the interface you want to enable SNMP on.
If your SNMP management system supports discovery, the SonicWALL security appliance agent automatically discover the SonicWALL security appliance on the network. Otherwise, you must add the SonicWALL security appliance to the list of SNMP-managed devices on the SNMP management system.