Enable Firmware Auto-Update - Displays an Alert icon ![]() when a new firmware release is available.
when a new firmware release is available.
Download new firmware automatically when available - Downloads new firmware releases to the SonicWALL security appliance when they become available.
System_systemSettingsView
This System > Settings page allows you to manage your SonicWALL security appliance’s SonicOS versions and preferences.
The Settings sections provides the following capabilities.
Import Settings
To import a previously saved preferences file into the SonicWALL security appliance, follow these instructions:
Click Import Settings to import a previously exported preferences file into the SonicWALL security appliance. The Import Settings window is displayed.
Click Browse to locate the file which has a *.exp file name extension.
Select the preferences file.
Click Import, and restart the firewall.
Export Settings
To export configuration settings from the SonicWALL security appliance, use the instructions below:
Click Export Settings. The Export Settings window is displayed.
Click Export.
Click Save, and then select a location to save the file. The file is named “sonicwall.exp” but can be renamed.
Click Save. This process can take up to a minute. The exported preferences file can be imported into the SonicWALL security appliance if it is necessary to reset the firmware.
Send Diagnostic Reports
Click Send Diagnostic Reports to send system diagnostics to SonicWALL Technical Support. The status bar at the bottom of the screen displays “Please wait!” while sending the report, then displays “Diagnostic reports sent successfully”.
The Firmware Management section provides settings that allow for easy firmware upgrade and preferences management. The Firmware Management section allows you to:
Upload and download firmware images and system settings.
Boot to your choice of firmware and system settings.
Manage system backups.
Easily return your SonicWALL security appliance to the previous system state.
Note SonicWALL security appliance SafeMode, which uses the same settings used Firmware Management, provides quick recovery from uncertain configuration states.
Firmware Management Table
The Firmware Management table displays the following information:
Firmware Image - in this column, the following types types of firmware images are listed:
Current Firmware - firmware currently loaded on the SonicWALL security appliance.
Current Firmware with Factory Default Settings - rebooting using this firmware image resets the SonicWALL security appliance to its default IP addresses, username, and password.
Current Firmware with Backup Settings - a firmware image created by clicking Create Backup. This option is only available on SonicWALL TZ platforms and the NSA 240 that store backup settings but not a standalone backup firmware image, as the higher platforms do.
Uploaded Firmware - the latest uploaded version from mysonicwall.com.
Uploaded Firmware with Factory Default Settings - the latest version uploaded with factory default settings.
Uploaded Firmware with Backup Settings - a firmware image created by clicking Create Backup. This option is only available on SonicWALL TZ platforms and the NSA 240 that store backup settings but not a standalone backup firmware image, as the higher platforms do.
System Backup - the backup firmware image and backup settings for the appliance. This option is only available on SonicWALL NSA 2400 and higher platforms, which store a standalone backup firmware image.
Version - the firmware version.
Date - the day, date, and time of downloading the firmware.
Size - the size of the firmware file in Megabytes (MB).
Download - clicking the icon saves the firmware file to a new location on your computer or network. Only uploaded firmware can be saved to a different location.
Boot - clicking the icon reboots the SonicWALL security appliance with the firmware version listed in the same row.
Caution Clicking Boot next to any firmware image overwrites the existing current firmware image making it the Current Firmware image.
Caution When uploading firmware to the SonicWALL security appliance, you must not interrupt the Web browser by closing the browser, clicking a link, or loading a new page. If the browser is interrupted, the firmware may become corrupted.
Updating Firmware Manually
Click Upload New Firmware to upload new firmware to the SonicWALL security appliance. The Upload Firmware window is displayed. Browse to the firmware file located on your local drive. Click Upload to upload the new firmware to the SonicWALL security appliance.
Creating a Backup Firmware Image
When you click Create Backup, the SonicWALL security appliance takes a “snapshot” of your current system state, firmware and configuration preferences, and makes it the new System Backup firmware image. Clicking Create Backup overwrites the existing System Backup firmware image as necessary.
SafeMode - Rebooting the SonicWALL Security Appliance
SafeMode allows easy firmware and preferences management as well as quick recovery from uncertain configuration states. To access the SonicWALL security appliance using SafeMode, use a narrow, straight object (such as a straightened paper clip or a toothpick) to press and hold the reset button on the back of the security appliance for more than twenty seconds. The reset button is in a small hole next to the console port or next to the power supply.
Note Holding the reset button for two seconds will take a diagnostic snapshot to the console. Holding the reset button for six to eight seconds will reboot the appliance in regular mode.
After the SonicWALL security appliance reboots, open your Web browser and enter the current IP address of the SonicWALL security appliance or the default IP address: 192.168.168.168. The SafeMode page is displayed:
SafeMode allows you to do any of the following:
Upload and download firmware images to the SonicWALL security appliance.
Upload and download system settings to the SonicWALL security appliance.
Boot to your choice of firmware options.
Create a system backup file.
Return your SonicWALL security appliance to a previous system state.
System Information
System Information for the SonicWALL security appliance is retained and displayed in this section.
Firmware Management
The Firmware Management table in SafeMode has the following columns:
Firmware Image - In this column, five types of firmware images are listed:
Current Firmware, firmware currently loaded on the SonicWALL security appliance
Current Firmware with Factory Default Settings, rebooting using this firmware image resets the SonicWALL security appliance to its default IP addresses, user name, and password
Current Firmware with Backup Settings - a firmware image created by clicking Create Backup
Uploaded Firmware, the last version uploaded from mysonicwall.com
Uploaded Firmware with Factory Default Settings, rebooting using this firmware image resets the SonicWALL security appliance to its default IP addresses, user name, and password
Uploaded Firmware with Backup Settings - a firmware image created by clicking Create Backup
Version - The firmware version is listed in this column.
Date - The day, date, and time of downloading the firmware.
Size - The size of the firmware file in Megabytes (MB).
Download - Clicking the icon saves the firmware file to a new location on your
computer or network. Only uploaded firmware can be saved to a different location.
Boot - Clicking the icon reboots the SonicWALL security appliance with the firmware version listed in the same row.
Note Clicking Boot next to any firmware image overwrites the existing current firmware image making it the Current Firmware image.
Click Boot in the firmware row of your choice to restart the SonicWALL security appliance.
Caution Only select the Boot with firmware diagnostics enabled (if available) option if instructed to by SonicWALL technical support.
Sonic OS Enhanced 5.2 release introduces the Firmware Auto-Update feature, which helps ensure that your SonicWALL security appliance has the latest firmware release. Firmware Auto-Update contains the following options:
Enable Firmware Auto-Update - Displays an Alert icon ![]() when a new firmware release is available.
when a new firmware release is available.
Download new firmware automatically when available - Downloads new firmware releases to the SonicWALL security appliance when they become available.
Caution Firmware updates are available only to registered users with a valid support contract. You must register your SonicWALL at https://www.mysonicwall.com.
One-Touch Configuration Overrides
The One-Touch Configuration Override feature can be thought of us as a quick tune-up for your SonicWALL appliance’s security settings. With a single click, One-Touch Configuration Override applies over sixty configuration settings over sixteen pages of the SonicWALL GUI to implement SonicWALL’s recommended best practices. These settings ensure that your appliance is taking advantage of SonicWALL’s security features.
There are two sets of One-Touch Configuration Override settings:
DPI and Stateful Firewall Security – For network environments with Deep Packet Inspection (DPI) security services enabled, such as Gateway Anti-Virus, Intrusion Prevention, Anti-Spyware, and App Rules.
Stateful Firewall Security – For network environments that do not have DPI security services enabled, but still want to employ SonicWALL’s stateful firewall security best practices.
Both of the One-Touch Configuration Override deployments implement the following configurations:
Configure Administrator security best practices
Enforce HTTPS login and disables ping
Configure DNS Rebinding
Configure Access Rules best practices
Configure Firewall Settings best practices
Configure Firewall Flood Protection best practices
Configure VPN Advanced settings best practices
Configure Log levels
Enable Flow Reporting and Visualization
The DPI and Stateful Firewall Security deployment also configures the following DPI-related configurations:
Enable DPI services on all applicable zones
Enable App Rules
Configure Gateway Anti-Virus best practices
Configure Intrusion Prevention best practices
Configure Anti-Spyware best practices
Caution Be aware that the One-Touch Configuration Override may change the behavior of your SonicWALL security appliance. Review the list of configurations before applying One-Touch Configuration Override.
In particular, the following configurations may affect the experience of the administrator:
- Administrator password requirements on the System > Administration page.
- Requiring HTTPS management.
- Disabling HTTP to HTTPS redirect.
- Disabling Ping management.
The following table lists the configuration settings that are applied as part of One-Touch Configuration Override for both the DPI and Stateful Firewall Security deployment and the Stateful Firewall Security Deployment.
| ||||||||||||||||||||||||||||||||||||||||||||||||||||||||||||||||||||||||||||||||||||||||||||||||||||||||||||||||||||||||||||||||||||||||||||||||||||||||||||||||||||||||||||||||||||||||||||||||||||||||||||||||||||||||||||||||||||||||||||||||||||||||||||||||||
Configuring One-Touch Configuration Override
To configure One-Touch Configuration override, perform the following steps:
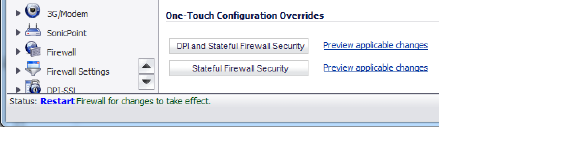
Navigate to the System > Settings page of the SonicWALL GUI.
Scroll down to the One-Touch Configuration Override section.
Click either the DPI and Stateful Firewall Security button or the Stateful Firewall Security button.
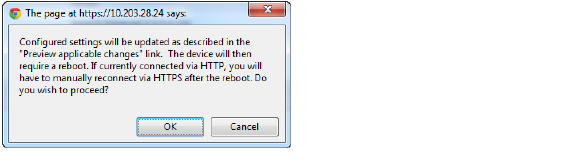
A warning pop-up window reminds you that if you are connected over HTTP, you will have to manually reconnect using HTTPS after the appliance reboots. Click OK.
When the configuration has been apply, the Status Bar displays “Restart Firewall for changes to take effect.” Click Restart.
After the appliance restarts, navigate to the management URL of the appliance, ensuring that you are using HTTPS, and login to the appliance.
When operating in FIPS (Federal Information Processing Standard) Mode, the SonicWALL security appliance supports FIPS 140-2 Compliant security. Among the FIPS-compliant features of the SonicWALL security appliance include PRNG based on SHA-1 and only FIPS-approved algorithms are supported (DES, 3DES, and AES with SHA-1).
Select Enable FIPS Mode to enable the SonicWALL security appliance to comply with FIPS. When you check this setting, a dialog box is displayed with the following message: Warning! Modifying the FIPS mode will disconnect all users and restart the device. Click OK to proceed.
Click OK to reboot the security appliance in FIPS mode. A second warning displays. Click Yes to continue rebooting. To return to normal operation, uncheck the Enable FIPS Mode check box and reboot the SonicWALL security appliance into non-FIPS mode.
Caution When using the SonicWALL security appliance for FIPS-compliant operation, the tamper-evident sticker that is affixed to the SonicWALL security appliance must remain in place and untouched.