firewall_bwm
Bandwidth management (BWM) is a means of allocating bandwidth resources to critical applications on a network.
SonicOS Enhanced offers an integrated traffic shaping mechanism through its outbound (Egress) and inbound (Ingress) BWM interfaces. Egress BWM can be applied to traffic sourced from Trusted and Public zones travelling to Untrusted and Encrypted zones. Ingress BWM can be applied to traffic sourced from Untrusted and Encrypted zones travelling to Trusted and Public zones.
This chapter contains the following sections:
Note Although BWM is a fully integrated Quality of Service (QoS) system, wherein classification and shaping is performed on the single SonicWALL appliance, effectively eliminating the dependency on external systems and thus obviating the need for marking, it is possible to concurrently configure BWM and QoS (layer 2 and/or layer 3 marking) settings on a single Access Rule. This allows those external systems to benefit from the classification performed on the SonicWALL even after it has already shaped the traffic. Refer to Firewall Settings > QoS Mapping for BWM QoS details.
Understanding Bandwidth Management
BWM is controlled by the SonicWALL Security Appliance on ingress and egress traffic. It allows network administrators to guarantee minimum bandwidth and prioritize traffic based on access rules created in the Firewall > Access Rules page on the SonicWALL management interface. By controlling the amount of bandwidth to an application or user, the network administrator can prevent a small number of applications or users to consume all available bandwidth. Balancing the bandwidth allocated to different network traffic and then assigning priorities to traffic can improve network performance. Anti-Spam for UTM provides eight priority queues (0 – 7 or Realtime – Lowest).
Three types of bandwidth management are available:
|
When global BWM is enabled on an interface, all of the traffic to and from that interface is bandwidth managed.
For example, with bandwidth management type none, if there are three traffic types (1, 2, and 3) that are using an interface with the link capability of 100 Mbps, the cumulative capacity for all three types is 100 Mbps.
Then when bandwidth management type Global is enabled on that interface and the available ingress and egress traffic are configured to 10 Mbps, the following occurs:
By default, the traffic types are sent to the Medium (4) Priority queue. This queue has, by default, a Guaranteed percentage of 50 and a Maximum percentage of 100. These values mean that the cumulative link capability is 10 Mbps with no global BWM enabled policies configured.
BWM rules each consume memory for packet queuing, so the number of allowed queued packets and rules on SonicOS Enhanced is limited by platform (values are subject to change):
|
Configuring the Firewall Settings > BWM Page
BWM works by first enabling bandwidth management in the Firewall Settings > BWM page, enabling BWM on an interface/firewall/app rule, and then allocating the available bandwidth for that interface on the ingress and egress traffic. It then assigns individual limits for each class of network traffic. By assigning priorities to network traffic, applications requiring a quick response time, such as Telnet, can take precedence over traffic requiring less response time, such as FTP.
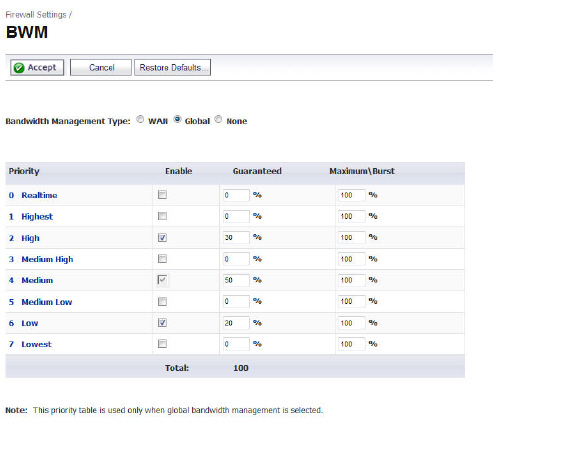
To view the BWM configuration, navigate to the Firewall Settings > BWM page.
This page consists of the following entities:
Note The defaults are set by SonicWALL to provide BWM ease-of-use. It is recommended that you review the specific bandwidth needs and enter the values on this page accordingly.
Bandwidth Management Type Option:
WAN — Only WAN zones can have assigned guaranteed and maximum bandwidth to services and have prioritized traffic.
Global — All zones can have assigned guaranteed and maximum bandwidth to services and have prioritized traffic.
None — (Default) Disables BWM.
Note When you change the Bandwidth Management Type from Global to WAN, the default BWM actions that are in use in any App Rules policies will be automatically converted to WAN BWM Medium, no matter what level they were set to before the change.
When you change the Type from WAN to Global, the default BWM actions are converted to BWM Global-Medium. The firewall does not store your previous action priority levels when you switch the Type back and forth. You can view the conversions on the Firewall > App Rules page.
Priority Column — Displays the priority number and name.
Enable Checkbox — When checked, the priority queue is enabled.
Guaranteed and Maximum\Burst Text Field — Enables the guaranteed and maximum/burst rates. The corresponding Enable checkbox must be checked in order for the rate to take effect. These rates are identified as a percentage. The configured bandwidth on an interface is used in calculating the absolute value. The sum of all guaranteed bandwidth must not exceed 100%, and the guaranteed bandwidth must not be greater than the maximum bandwidth per queue.
Note The default settings for this page consists of three priorities with preconfigured guaranteed and maximum bandwidth. The medium priority has the highest guaranteed value since this priority queue is used by default for all traffic not governed by a BWM enabled policy.
Methods of Configuring Bandwidth Management
BWM can be configured using the following methods:
Note This section uses Global BWM as the Bandwidth Management Type (Firewall Settings > BWM).
To configure BWM per interface, perform the following steps:
Navigate to the Firewall Settings > BWM page.
Select Bandwidth Management Type: Global, WAN, or none, and then click Accept.
Navigate to the Network > Interfaces page.
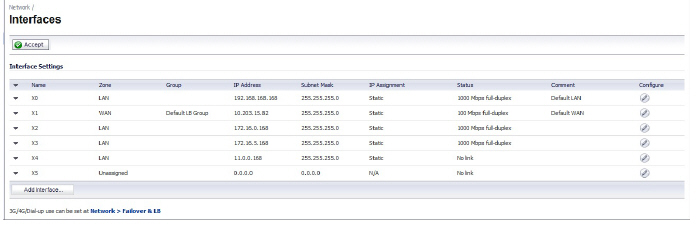
Click the Configure icon in the Configure column for the interface for which you want to set BWM.
The Edit Interface dialog is displayed.
Note If using Bandwidth Management Type WAN, you can only enable BWM on a WAN interface. If using Type: None, you cannot set the Ingress or Egress bandwidth.
Click the Advanced tab.
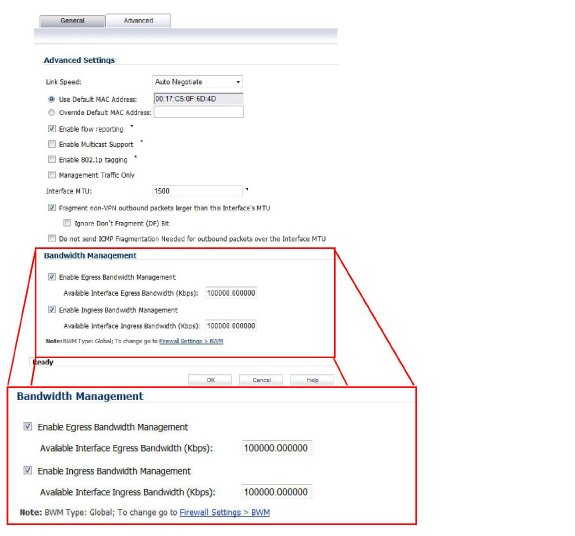
Under Bandwidth Management, check Enable Egress or Enable Ingress or both checkboxes, and then enter the available bandwidth in kilobits per second (Kbps).
Click OK.
Configuring Firewall Access Rules
You can configure BWM for each firewall rule. This method configures the direction in which to apply BWM and sets the priority queue.
To configure BWM for a firewall rule, perform the following steps:
Navigate to the Firewall > Access Rules page.
Click the Configure icon for the rule you want to edit.
The Edit Rule General tab dialog is displayed.
Select the checkboxes, select the Bandwidth Priority, and then click OK.
Note All priorities will be displayed (Realtime – Lowest) regardless if all have been configured. Refer to the Firewall Settings > BWM page to determine which priorities are enabled. If the Bandwidth Management Type is set to Global and you select a Bandwidth Priority that is not enabled, the traffic is automatically mapped to the level 4 priority (Medium). For a BWM Type of WAN, the default priority is level 7 (Low).
Verify that BWM has been set.
Application layer BWM allows you to create policies that regulate bandwidth consumption by specific file types within a protocol, while allowing other file types to use unlimited bandwidth. This enables you to distinguish between desirable and undesirable traffic within the same protocol. Application layer bandwidth management is supported for all Application matches, as well as custom App Rules policies using HTTP client, HTTP Server, Custom, and FTP file transfer types. For more information on Application Rules, see Configuring Application Rules.
Note It is a best practice to configure BWM settings before configuring App Control policies that use BWM.
After bandwidth management is enabled on the interface, you can configure BWM for a specific application rule on the Firewall > App Rules page.
To configure BWM for a specific application, perform the following steps:

Under App Rules Policies, select the Action Type: Bandwidth Management.
The page will sort by Action Type Bandwidth Management.
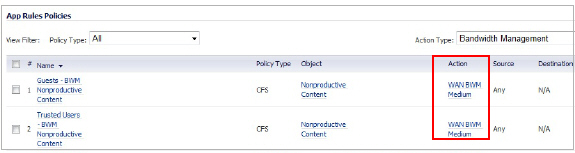
Click the Configure icon in the Configure column for the policy you want to change.
The Edit App Control Policy window is displayed.
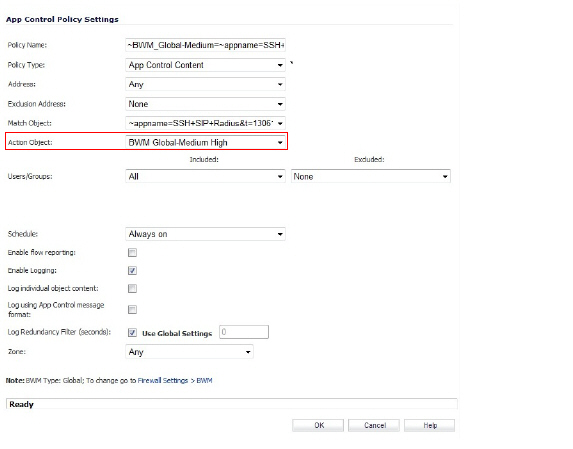
Change the Action Object to the desired BWM setting, and then click OK.
Note All priorities will be displayed (Realtime – Lowest) regardless if all have been configured. Refer to the Firewall Settings > BWM page to determine which priorities are enabled. If you select a Bandwidth Priority that is not enabled, the traffic is automatically mapped to the Medium Priority (default).
The change will take effect when you return to the App Rules page.
Understanding BWM Action Objects
Action Objects define how the App Rules policy reacts to matching events. You can customize an action or select one of the predefined default actions. The predefined actions are displayed in the App Control Policy Settings page when you add or edit a policy from the App Rules page.
Custom BWM actions behave differently than the default BWM actions. Custom BWM actions are configured by adding a new action object from the Firewall > Action Objects page and selecting the Bandwidth Management action type. Custom BWM actions and policies using them retain their priority level setting when the Bandwidth Management Type is changed from Global to WAN, and from WAN to Global.
A number of BWM action options are also available in the predefined, default action list. The BWM action options change depending on the Bandwidth Management Type setting on the Firewall Settings > BWM page. If the Bandwidth Management Type is set to Global, all eight levels of BWM are available. If the Bandwidth Management Type is set to WAN, the predefined actions list includes three levels of WAN BWM. For more information about BWM actions, see the Actions Using Bandwidth Management .
The following table lists the predefined default actions that are available when adding a policy.
|
Creating a New BWM Action or Policy
If you do not want to use the predefined BWM actions or policies, you have the option to create a new one that fits your needs.
To create a new BWM action or policy, perform the following steps:
Navigate to the Firewall > Action Objects page.
Click Add New Action Object at the bottom of the page.
The Add/Edit Action Object window is displayed.
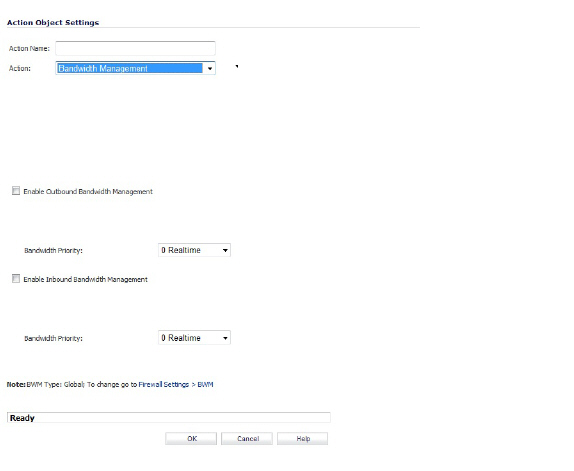
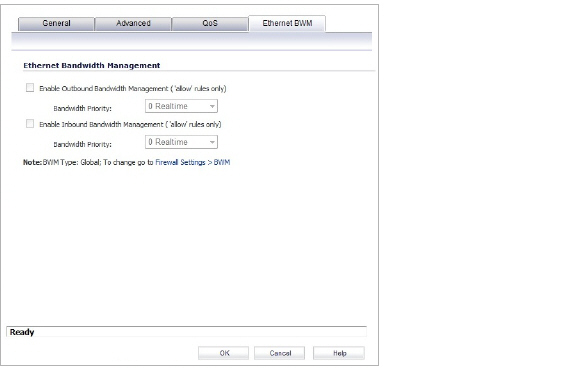
If the BWM type is Global, do the following:
Action Name field: Enter a name for the policy.
Action drop-down: Select Bandwidth Management
Check Enable Outbound Bandwidth Management checkbox and select the Bandwidth Priority.
Check Enable Inbound Bandwidth Management checkbox and select the Bandwidth Priority.
If the Bandwidth Management Type is set to WAN on the Firewall Settings > BWM page, the screen displays the following options, which are not displayed if Bandwidth Management Type is set to Global:
Bandwidth Aggregation Method
Guaranteed Bandwidth
Maximum Bandwidth
Enable Tracking Bandwidth Usage
In case of a BWM type of WAN, the configuration of these options is included in the following steps.
Note All priorities will be displayed (0 –7) regardless if all have been configured. Refer to the Firewall Settings > BWM page to determine which priorities are enabled. If you select a Bandwidth Priority that is not enabled, the traffic is automatically mapped to the Medium Priority (default).
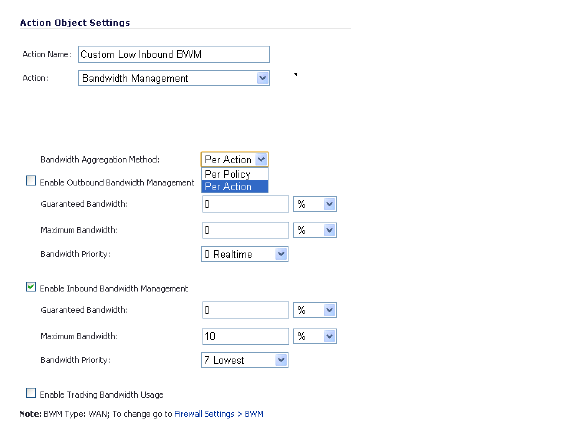
In the Bandwidth Aggregation Method drop-down list, select one of the following:
Per Policy – When multiple policies are using the same Bandwidth Management action, each policy can consume up to the configured bandwidth even when the policies are active at the same time.
Per Action – When multiple policies are using the same Bandwidth Management action, the total bandwidth is limited as configured for all policies combined if they are active at the same time.
Do one or both of the following:
To manage outbound bandwidth, select the Enable Outbound Bandwidth Management checkbox.
To manage inbound bandwidth, select the Enable Inbound Bandwidth Management checkbox.
To specify the Guaranteed Bandwidth, optionally enter a value either as a percentage or as kilobits per second. In the drop-down list, select either % or Kbps.
If you plan to use this custom action for rate limiting rather than guaranteeing bandwidth, you do not need to change the Guaranteed Bandwidth field.
To specify the Maximum Bandwidth, optionally enter a value either as a percentage or as kilobits per second. In the drop-down list, select either % or Kbps.
If you plan to use this custom action for guaranteeing bandwidth rather than rate limiting, you do not need to change the Maximum Bandwidth field.
For Bandwidth Priority, select a priority level from the drop-down list, where 0 is the highest and 7 is the lowest.
Optionally select Enable Tracking Bandwidth Usage to track the usage. When bandwidth usage tracking is enabled, you can view the usage in the Action Properties tooltip by mousing over the BWM action of a policy on the Firewall > App Rules page.
Click OK.
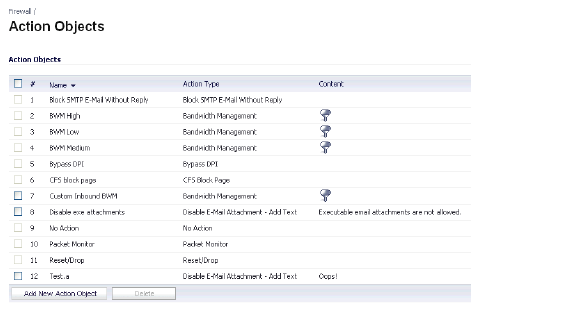
You can see the resulting action in the Action Objects screen.
BWM can also be configured from the App Flow Monitor page by selecting a service type application or a signature type application and then clicking the Create Rule button. The Bandwidth Management options available there depend on the enabled priority levels in the Global Priority Queue table on the Firewall Settings > BWM page. The priority levels enabled by default are High, Medium, and Low.
Note You must have the SonicWALL Application Visualization application enabled before proceeding.
To configure BWM using the App Flow Monitor, perform the following steps:
Navigate to the Dashboard > App Flow Monitor page.
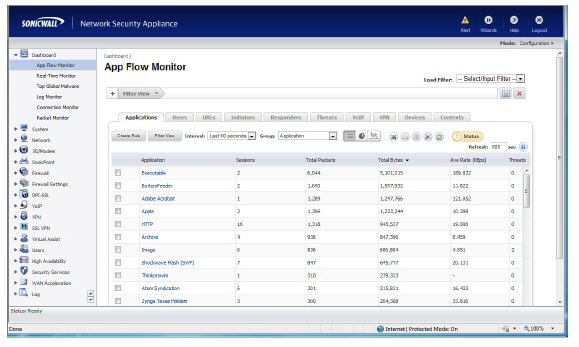
Check the service-based applications or signature-based applications to which you want to apply global BWM.
Note General applications cannot be selected. Service-based applications and signature-based applications cannot be mixed in a single rule.
Note Create rule for service-based applications will result in creating a firewall access rule and create rule for signature-based applications will create an application control policy.
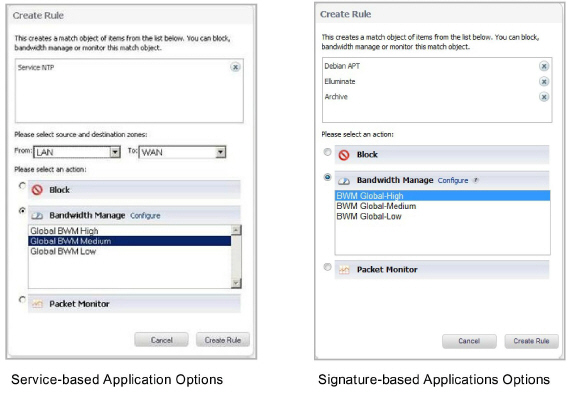
Select the Bandwidth Manage radio button, and then select a global BWM priority.
Click Create Rule.
A confirmation pop-up is displayed.
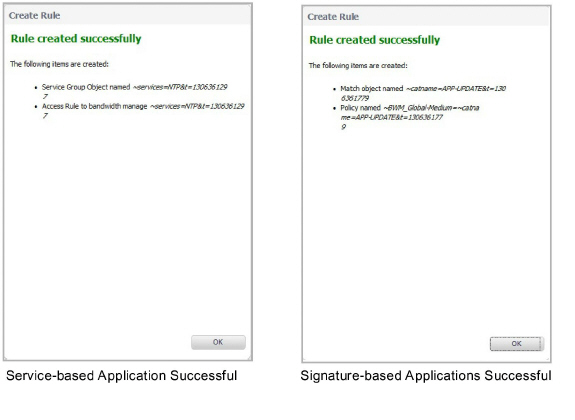
Click OK.
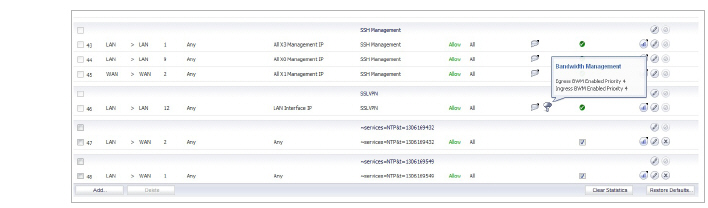
Navigate to Firewall > Access Rules page (for service-based applications) and Firewall > App Rules (for signature-based applications) to verify that the rule was created.
Note For service-based applications, the new rule is identified with a tack in the Comments column and a prefix in Service column of ~services=<service name>. For example, ~services=NTP&t=1306361297.
Note For signature-based applications, the new rule is identified with a prefix, ~BWM_Global-<priority>=~catname=<app_name> in the Name column and in the Object column prefix ~catname=<app_name>.
Bandwidth Management (BWM): Refers to any of a variety of algorithms or methods used to shape traffic or police traffic. Shaping often refers to the management of outbound traffic, while policing often refers to the management of inbound traffic (also known as admission control). There are many different methods of bandwidth management, including various queuing and discarding techniques, each with their own design strengths. SonicWALL employs a Token Based Class Based Queuing method for inbound and outbound BWM, as well as a discard mechanism for certain types of inbound traffic.
Guaranteed Bandwidth: A declared percentage of the total available bandwidth on an interface which will always be granted to a certain class of traffic. Applicable to both inbound and outbound BWM. The total Guaranteed Bandwidth across all BWM rules cannot exceed 100% of the total available bandwidth. SonicOS Enhanced 5.0 and higher enhances the Bandwidth Management feature to provide rate limiting functionality. You can now create traffic policies that specify maximum rates for Layer 2, 3, or 4 network traffic. This enables bandwidth management in cases where the primary WAN link fails over to a secondary connection that cannot handle as much traffic. The Guaranteed Bandwidth can also be set to 0%.
Inbound (Ingress) BWM: The ability to shape the rate at which traffic enters a particular interface. For TCP traffic, actual shaping can occur where the rate of the ingress flow can be adjusted by delaying egress acknowledgements (ACKs) causing the sender to slow its rate. For UDP traffic, a discard mechanism is used since UDP has no native feedback controls.
Maximum Bandwidth: A declared percentage of the total available bandwidth on an interface defining the maximum bandwidth to be allowed to a certain class of traffic. Applicable to both inbound and outbound BWM. Used as a throttling mechanism to specify a bandwidth rate limit. The Bandwidth Management feature is enhanced to provide rate limiting functionality. You can now create traffic policies that specify maximum rates for Layer 2, 3, or 4 network traffic. This enables bandwidth management in cases where the primary WAN link fails over to a secondary connection that cannot handle as much traffic.The Maximum Bandwidth can be set to 0%, which will prevent all traffic.
Outbound (Egress) BWM: Conditioning the rate at which traffic is sent out an interface. Outbound BWM uses a credit (or token) based queuing system with 8 priority rings to service different types of traffic, as classified by Access Rules.
Priority: An additional dimension used in the classification of traffic. SonicOS uses eight priority values (0 = highest, 7 = lowest) to comprise the queue structure used for BWM. Queues are serviced in the order of their priority.
Queuing: To effectively make use of the available bandwidth on a link. Queues are commonly employed to sort and separately manage traffic after it has been classified.