WANaccel_Logs
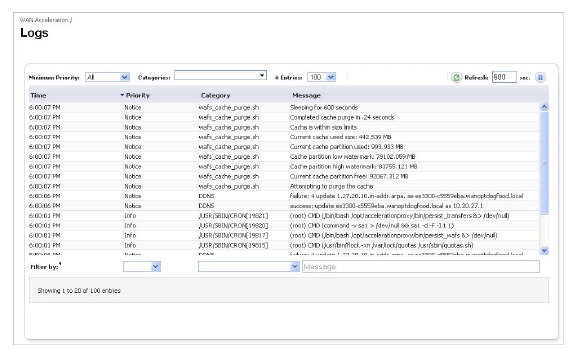
The WAN Acceleration > Logs page provides a detailed list of the log event messages. On this page, you can configure how the Logs are viewed.
Figure 85:61 WAN Acceleration Logs
|
This section includes procedures for configuring the SonicWALL WXA series appliance. All configuration procedures are performed on the SonicWALL NSA/TZ series appliance’s management interface. Refer to Configuration Task List Overview for details on the SonicWALL NSA/TZ management interface.This section includes the following subsections:
Configuring the Network Interface for the SonicWALL WXA Series Appliance
To configure your SonicWALL NSA/TZ to be used with the WXA series appliance, perform the following steps:
In your web browser, enter https://nsatzipaddress. The SonicWALL user interface is displayed.
Navigate to the Network > Interfaces page.
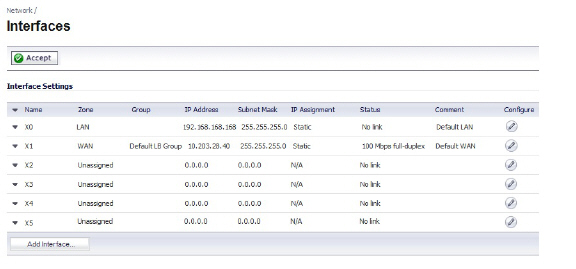
Click the Edit button in the row for the port you want the SonicWALL WXA series appliance to be connected to.
The Interface Settings General Tab is displayed.
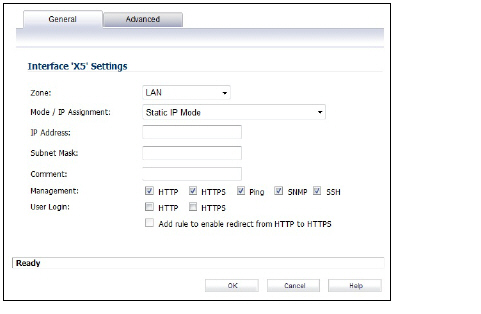
Enter the following:
Zone: Drop-down — LAN
Mode/IP Assignment: Drop-down — Static IP Mode
IP Address: Text Field — Enter the IP Address for the port. This example uses 10.203.30.162.
Subnet Mask: Text Field — Enter the subnet mask for the port.
(Optional) Comment: Text Field — Enter text that describes the device.
For example, WXA connection.
(Optional) Management: checkboxes — Select the management methods.
Click OK.
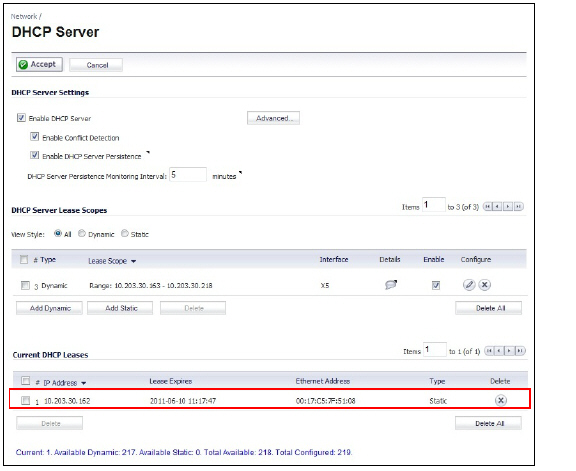
Navigate to the Network > DHCP Server page.
Navigate to the WAN Acceleration page.
Select the Enable WAN Acceleration checkbox.
Note This example assumes that the correct DNS server has already been entered in the Network > DNS page. If you have not entered the DNS server, you can overwrite the DNS specirfied in the Network > DNS Server > Click the Edit button for the lease you want to change, and then click DNS/WINS tab. Enter the DNS IP Addresses in the text fields provided.
Under the DCHP Server Lease Scopes, click Add Dynamic.
The Dynamic Range Configuration window is displayed.

Do the following
Select the Enable this DHCP Scope checkbox.
Select the Interface Pre-Populate checkbox and then select port X5 in the drop-down.
The information will be auto populated.
Click OK.
Connect an Ethernet cable from the SonicWALL WXA series appliance to the X5 port on the SonicWALL NSA/TZ security appliance.
Confirm that the SonicWALL NSA/TZ has a DCHP lease for the SonicWALL WXA.
Navigate to the Network > DHCP Server page.
Navigate to the WAN Acceleration > Status page.
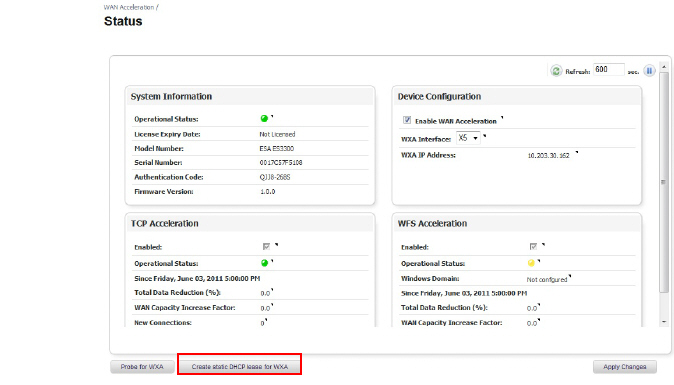
Click Create static DHCP lease for WXA.
A DHCP lease will be set for the SonicWALL WXA series appliance.
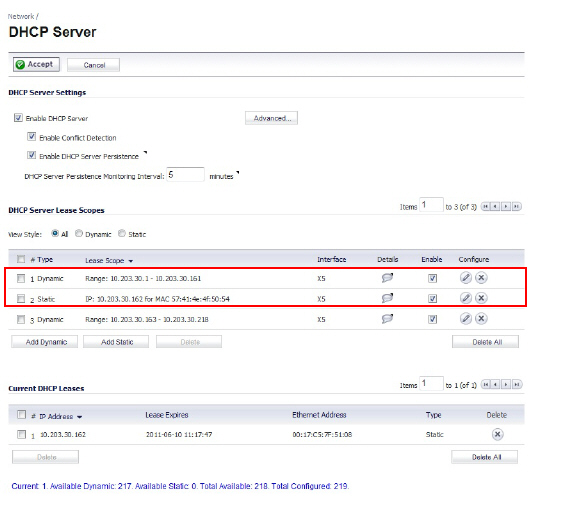
Verify that the lease was created. Navigate to the Network > DHCP Server page.
A dynamic range is set for the WXA appliance.
To configure the TCP Acceleration service, follow the steps in the sections below:
Configuring a VPN for TCP Acceleration
If a Virtual Private Network (VPN) is already configured on your network, follow the steps listed below to permit TCP Acceleration:
Note: If you have a site to site VPN, you can use a spare SonicWALL NSA/TZ series appliance in Layer 2 bridge mode with a SonicWALL WXA series appliance connected. Refer to the SonicOS Administrators Guide for Layer 2 bridge mode configuration.
Navigate to the VPN > Settings page.
Figure 85:62 VPN > Settings

Click the Configure button for the VPN policy you wish to use.
The Configure VPN Policy pop-up window displays.
Figure 85:63 VPN Policy Advanced Configuration
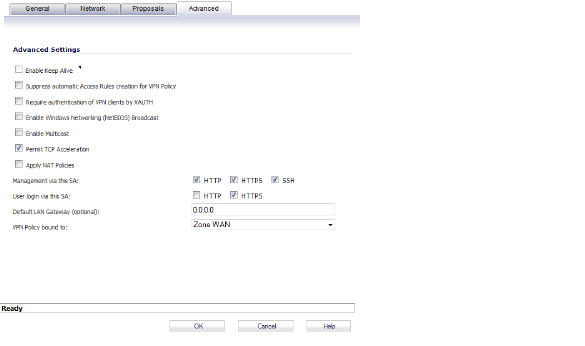
Select the Advanced tab.
Select the checkbox for Permit TCP Acceleration.
Click the OK button.
Configuring a Non-VPN for TCP Acceleration
If you do not have a VPN configured on your network and you are using a custom routing policy, you need to add two routing policies on each site: One for outgoing traffic, and one for incoming traffic. Both routing policies are configured to permit TCP Acceleration. The illustration below displays the configuration between two non-VPN sites. Refer to this Illustration as an example for the following sections:
Figure 85:64 Non-VPN Network Configuration

Configuring a Routing Policy for Outgoing Traffic
The steps in this section are configured from the Remote Site. Follow the same steps for configuring the Data Center.
Navigate to the Network > Address Objects page.
Figure 85:65 Network > Address Objects
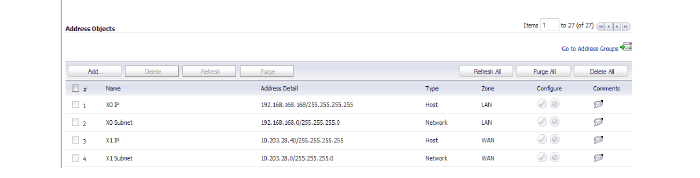
Click the Add button.
The Add Address Object Group pop-up window displays.
Figure 85:66 Add Address Object Group
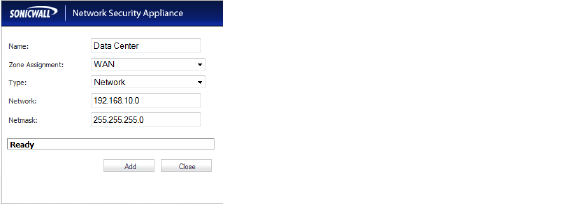
Enter a name (Data Center) for the address object in the Name text field.
Click the Zone Assignment drop-down, select WAN.
Click the Type drop-down, select Network.
Enter the LAN IP address of the Data Center (192.168.10.0) in the Network text field.
Enter the netmask IP address (255.255.255.0) in the Netmask text field.
Click the Add button.
Navigate to the Network > Routing page.
Figure 85:67 Add Routing Policies
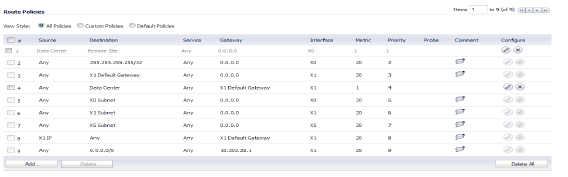
Click the Add button.
The Route Policy Settings pop-up window displays.
Figure 85:68 Route Policy Settings
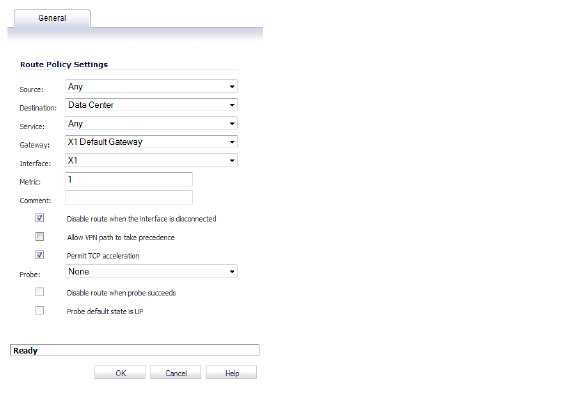
Click the Source drop-down, select Any.
Click the Destination drop-down, select the address object you created (Data Center.)
Click the Service drop-down, select Any.
Click the Gateway drop-down, select the X1 Default Gateway.
Click the Interface drop-down, select the X1 interface.
Enter 1 in the Metric text field.
This gives the route policy a high priority level. A larger metric number would have a lower priority.
Select the Permit TCP Acceleration checkbox.
Click the OK button.
Configuring a Routing Policy for Incoming Traffic
The steps in this section are configured from the Remote Site. Follow the same steps for configuring the Data Center.
Navigate to the Network > Address Objects page.
Figure 85:69 Network > Address Objects
Click the Add button.
The Add Address Object Group pop-up window displays.
Figure 85:70 Add Address Object Group
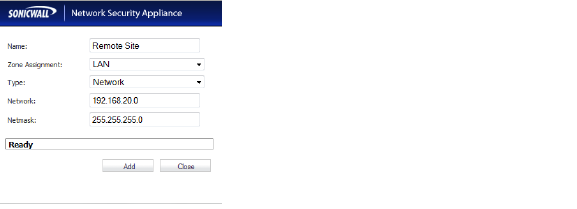
Enter a name (Remote Site) for the address object in the Name text field.
Click the Zone Assignment drop-down, select LAN.
Click the Type drop-down, select Network.
Enter the LAN IP address of the Remote Site (192.168.20.0) in the Network text field.
Enter the netmask IP address (255.255.255.0) in the Netmask text field.
Click the Add button.
Navigate to the Network > Routing page.
Figure 85:71 Add Routing Policies
Click the Add button.
The Route Policy Settings pop-up window displays.
Figure 85:72 Route Policy Settings
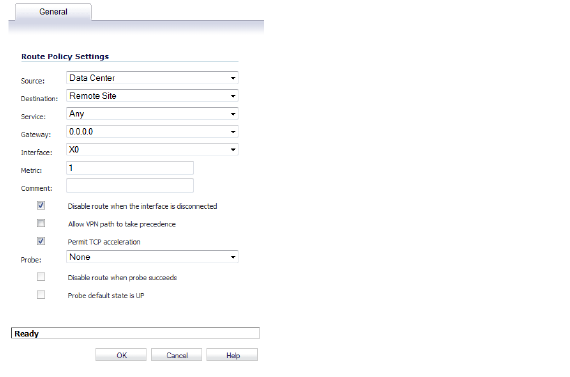
Click the Source drop-down, select Data Center.
Click the Destination drop-down, select the address object you created (Remote Site.)
Click the Service drop-down, select Any.
Click the Gateway drop-down, select (0.0.0.0).
Click the Interface drop-down, select the X0 interface.
Enter 1 in the Metric text field.
This gives the route policy a high priority level. A larger metric number would have a lower priority.
Select the Permit TCP Acceleration checkbox.
Click the OK button.
Configuring the TCP Acceleration Tab
The Configuration tab gives you the option to select the mode, service object, and address object that are included or excluded from the TCP Acceleration service. Note: To view a list, create, and edit service objects, navigate to the Network > Address Objects page. Below is examples of three different TCP Acceleration configurations:
Example 1
To configure acceleration of all the service objects, except those excluded by default. Follow the steps below:
Note: The option to choose a TCP Acceleration Service Object is read-only in this mode
Navigate to WAN Acceleration > TCP Acceleration.
Select the Configuration tab.
Figure 85:73 Configuring TCP Acceleration Example 1
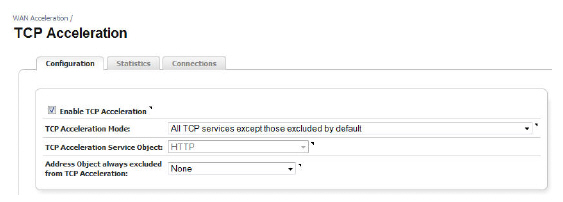
Select the Enable TCP Acceleration checkbox.
In the TCP Acceleration Mode drop-down, select All TCP services except those excluded by default.
In the Address Object always excluded from TCP Acceleration drop-down, select None.
Click the Apply Changes button.
Example 2
To configure acceleration of only the HTTP web traffic. Follow the steps below:
Navigate to WAN Acceleration > TCP Acceleration.
Select the Configuration tab.
Figure 85:74
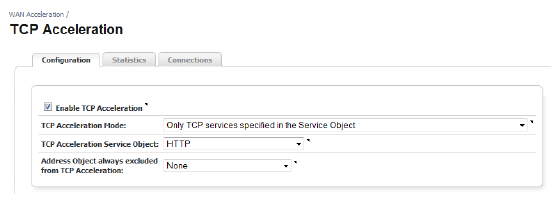
Configuring TCP Acceleration Example 2
Click the Enable TCP Acceleration checkbox.
In the TCP Acceleration Mode drop-down, select Only TCP Services Specified in TCP Acceleration Service Object.
In the TCP Acceleration Service Object drop-down, select HTTP.
In the Address Object always excluded from TCP Acceleration, select None.
Click the Apply Changes button.
Example 3
To configure acceleration of everything except Microsoft SQL database traffic or traffic to the Guest Authentication Servers. Follow the steps below:
Navigate to WAN Acceleration > TCP Acceleration.
Select the Configuration tab.
Figure 85:75 Configuring TCP Acceleration Example 3
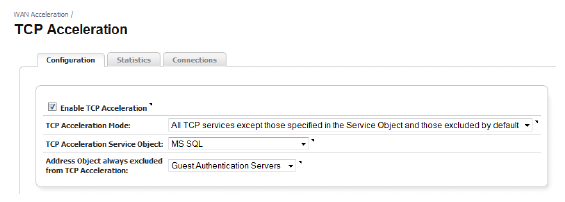
Select the Enable TCP Acceleration checkbox.
In the WFS Acceleration Mode drop-down, select All TCP services except those specified in TCP Acceleration Service Object and those excluded by default.
In the TCP Acceleration Service Object, select Microsoft Structured Query Language (MS SQL).
In the Address Object always excluded from TCP Acceleration drop-down, select Guest Authentication Servers.
Click the Apply Changes button.
This section provides details on configuring WFS Acceleration. The SonicWALL WXA series appliance must be connected to a SonicWALL NSA or TZ series appliance on a port other than X0 and X1. In this example, X5 is used as the connection to the SonicWALL WXA series appliance.
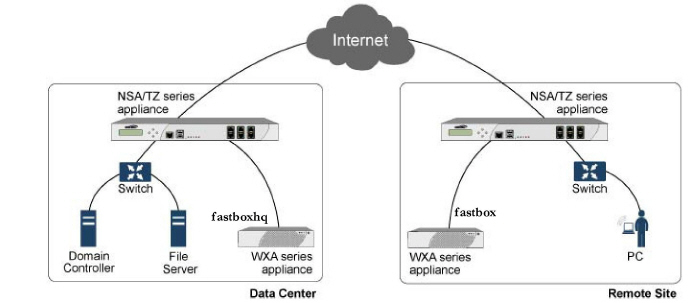
Figure 85:76 SonicWALL WXA Connection
The SonicWALL WXA series appliance allows the user to reach such speeds because WFS Acceleration is implemented between the two devices. This is how it works:
The SonicWALL WXA series appliances join the data center domain.
For example, mydomain.local.
This step allows the WXA series appliances to talk to each other.
A hostname is assigned to each SonicWALL WXA series appliance.
This example uses fastboxhq for the data center and fastbox for the remote site.
This step allows the two hostnames be accessible across the domain.
The SonicWALL WXA fastboxhq is configured to share All Shares on the File Server.
The SonicWALL WXA fastbox is configured to share All Shares on fastboxhq.
Steps 3 and 4 allow the domain users to access shares on the data center.
Enabling WFS Acceleration
Once you have configured the network interface for the port you want to connect the SonicWALL WXA series appliance to the SonicWALL NSA or TZ series appliance, you can configure WFS Acceleration.
Before you chose how you want to join the SonicWALL WXA series appliance to the domain, you must enable WFS Acceleration on your SonicWALL NSA/TZ security appliance.
To configure WFS Acceleration on the SonicWALL NSA/TZ security appliance, perform the following steps:
Open a Web browser.
Enter https://nsatzipaddress.
The SonicWALL user interface is displayed.
Navigate to the WAN Acceleration > WFS Acceleration page.
Select the Configuration tab.

Click Enable WFS Acceleration, select X5 IP in the ‘Public’ WFS Acceleration Address: drop-down, and then click Apply Changes.
Joining the Domain
After you have configured the network interface, enabled WFS Acceleration, and created a DHCP Scope, you can configure the local and remote domains.
You can join the domain for WFS Acceleration using one of the following methods:
Manually Joining the Domain with Administrator Account Credentials
Manual with Unprivileged Account Credentials
Manually Joining the Domain with Administrator Account Credentials
To join the domain manually, perform the following steps on the WXA series appliance at each site:
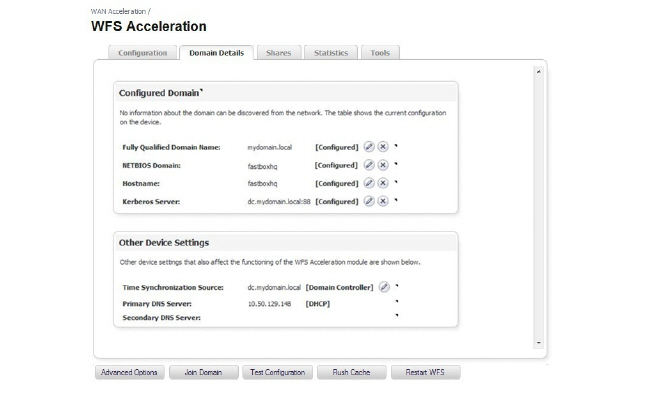
In the WAN Acceleration > WFS Acceleration page, select the Domain Details Tab.
If this is the first time setting up WFS Acceleration, enter the following in the Enter Domain Details... panel:

Enter your settings, and then click Apply Changes.
The page will be populated with the Configured Domain settings.
Click Join Domain.
The Join Domain pop-up window displays.
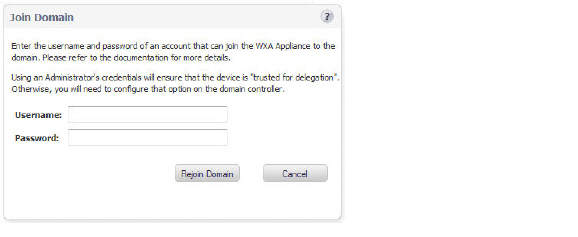
Enter the username and password for the administrator of the domain. It will be an account on the domain controller.
The WXA series appliance will create a computer account on the domain controller, using the hostname that was used in step 2.
At the SonicWALL NSA/TZ security appliance, nearest to (data center site) the domain controller, perform the following steps:
Login to the SonicWALL NSA/TZ security appliance at the data center.
Navigate to the WAN Acceleration > WFS Acceleration page.
Click the Shares tab.
Click Add New Server....
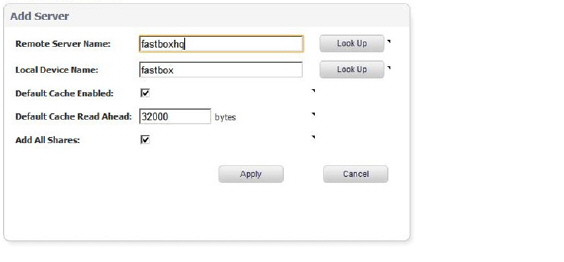
The Add Server Pop-up window is displayed.
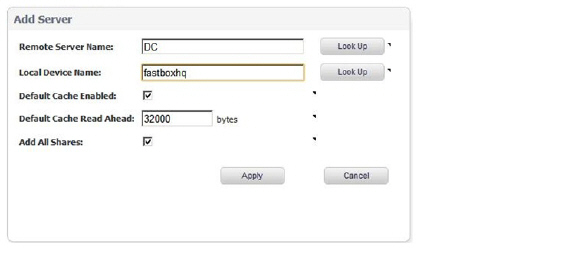
Do the following:
Remote Server Name: Text Field — Enter the host name of the DC/Share server.
Local Device Name: Text Field — Enter the domain name of the SonicWALL WXA series appliance on the local site or one of its SPN Aliases and must resolve to the public WFS IP address or select a local device name from the drop-down list.
Select the Add All Shares: Checkbox.
Deselect this to add shares manually.
Click Apply.
At the SonicWALL NSA/TZ security appliance farthest from (remote site) the domain controller, perform the following steps:
Login to the NSA/TZ security appliance at your remote site.
Navigate to the WAN Acceleration > WFS Acceleration page.
Click the Shares tab.
Click Add New Server....
Make sure the Remote Server Name and the Local Device Name (from step 4 for the data center site) text fields match.
Enter the information for this server, and then click Apply.
Explore the path \\fastbox\ on the PC located at the remote site.
After the first download of files, connection speed will improve because files are now cached on the WXA series appliance.
Automatically Joining the Domain for WFS Acceleration
To auto-join the SonicWALL WXA series appliances, perform the following steps:
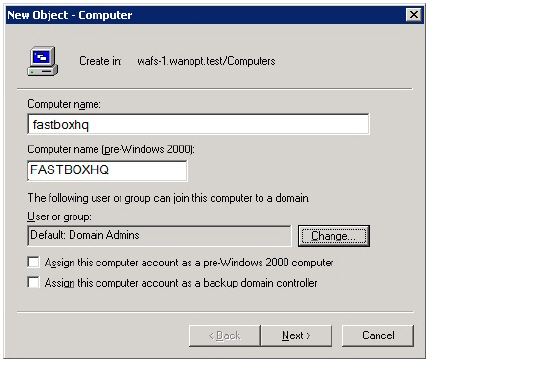
Access the domain controller and create a computer account. The computer account must use the default hostname or a hostname specified in the Domain Details tab (the name of the WXA series appliance). If a new hostname is entered in the Domain Details tab, it overrides the default hostname. The authentication code is the password for the computer account.
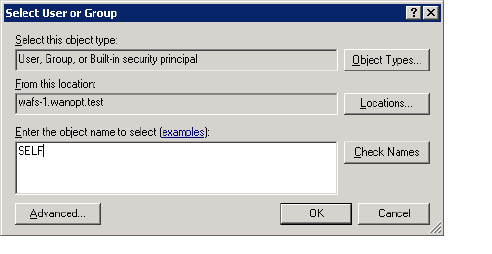
Click Change....
In the Enter the object name to select text field, enter SELF, and then click OK.
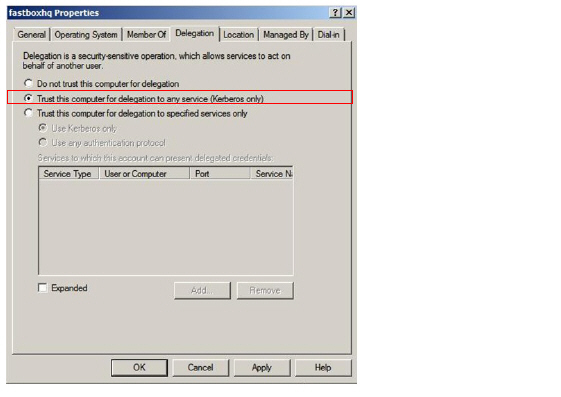
Right click on the computer account, go to Properties and select the setting Trusted for Delegation.
Open a cmd.exe window.
Set the password for the computer account, where ABCD-EFGH is the auth code.
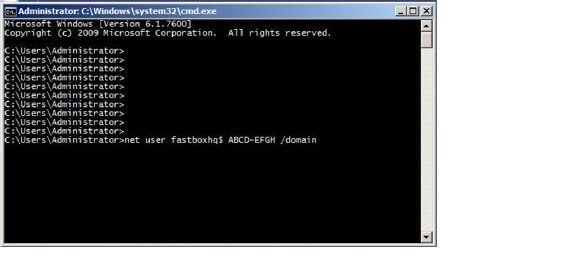
Note The password for the computer account must be the auth code found on the WAN Acceleration > Status page on the SonicWALL NSA/TZ security appliance.
At the SonicWALL NSA/TZ security appliance nearest (data center site) the domain controller, perform the following steps:
Login to the SonicWALL NSA/TZ security appliance at the data center.
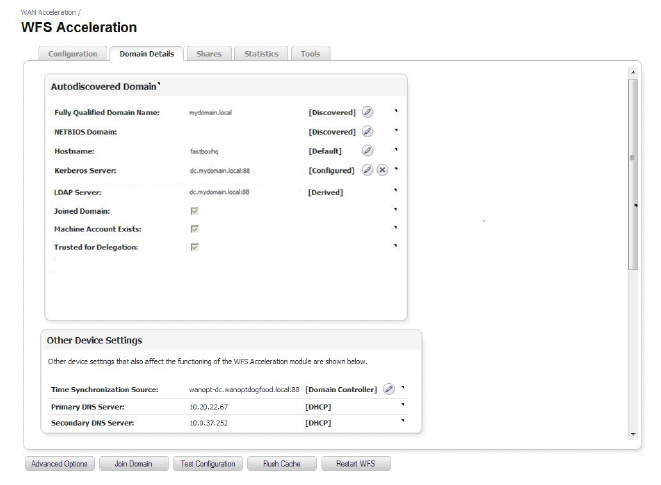
On the SonicWALL NSA/TZ security appliance, navigate to the WAN Acceleration > WFS Acceleration page.
Navigate to the WAN Acceleration > WFS Acceleration page.
Click Domain Details.
The Autodiscovered Domain Panel is displayed an populated with the information added in previous pages. If you do not see all checkboxes, refer to the Troubleshooting section of this document.
Click the Shares tab.
Click Add New Server....
The Add Server Pop-up window is displayed.
Remote Server Name: Text Field — Enter the host name of the DC/Share server.
Local Device Name: Text Field — Enter the domain name of the SonicWALL WXA series appliance on the local site or one of its SPN Aliases and must resolve to the public WFS IP address or select a local device name from the drop-down list.
Select the Add All Shares: Checkbox.
Deselect this to add shares manually.
Click Apply.
At the SonicWALL NSA/TZ security appliance farthest from (remote site) the domain controller, perform the following steps:
Login to the SonicWALL NSA/TZ security appliance at your remote site.
Navigate to the WAN Acceleration > WFS Acceleration page.
Click the Shares tab.
Click Add New Server....
Make sure the Remote Server Name and the Local Device Name (from step 4 for the data center site) text fields match.
Enter the information for this server, and then click Apply.
Explore the path \\fastbox\ on the PC located at the remote site.
After the first download of files, connection speed will improve because files are now cached on the WXA series appliance
Note In this configuration example, you may have more than one remote server in the data center. If Add All Shares is selected, there must be a new service principal name (SPN) Alias for each additional server. The SonicWALL WXA series appliance attempts to create the DNS entries automatically for each alias created. If DNS entries are not automatically created, they need to be added manually. Add new SPN Aliases in the domain controller by issuing setspn –A cifs/alias realname and setspn –A cifs/alias.fq.dn realname CLI commands.
Note If Add All Shares is not selected, the same local device name can have each manual share forwarded to a different server.
Verifying WAN Acceleration Configurations
This section details how to verify if the TCP Acceleration and WFS Acceleration on your SonicWALL WXA series appliance is configured correctly.
Verifying the TCP Acceleration Configuration
After you complete the step-by-step TCP Acceleration procedures, verify TCP Acceleration is working by checking the WAN Acceleration > Statistics Tab.
On the SonicWALL NSA/TZ series appliance user interface, navigate to the WAN Acceleration > Statistics Tab.
Figure 85:77 Verifying TCP Acceleration
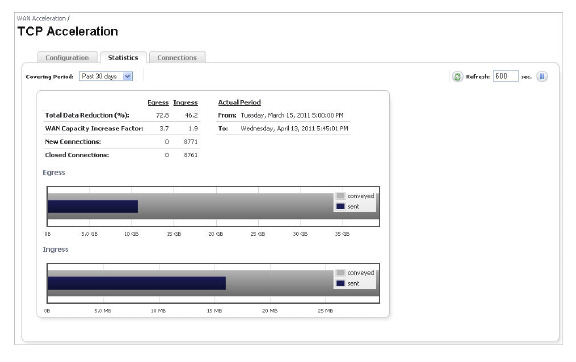
View the statistics data and graphs to verify TCP Acceleration.
This indicates if the SonicWALL WXA series appliance is using TCP Acceleration for data transfer.
If the Statistics tab’s data and graphs do not display any information, TCP Acceleration is not configured correctly or is disabled.
Refer to the Configuring WAN Acceleration and check the TCP Acceleration panel on the Status page for details.
Verifying the WFS Acceleration Configuration
After completing the step-by-step WFS Acceleration configuration procedures. Verify WFS Acceleration is working by two different methods:
Click the Test Configuration button in the WFS Acceleration > Domain Details tab.
Click the Run WFS Configuration Tests button in the WFS Acceleration > Tools tab.
Verify Using the WFS Acceleration > Domain Details Tab
To verify that the WFS Acceleration was successful using the WFS Acceleration > Domain Details tab, perform the following steps:
Navigate to the WAN Acceleration > WFS Acceleration page.
Select the Domain Details tab.
Click Test Configuration.
If the WFS Acceleration service is not functioning properly, refer to Configuring WAN Acceleration and check the configuration settings.
Verify Using the WFS Acceleration > Tools Tab
To verify that the WFS Acceleration service was successful using the WFS Acceleration > Tools tab, perform the following steps:
Navigate to the WAN Acceleration > WFS Acceleration.
Click the Tools tab.
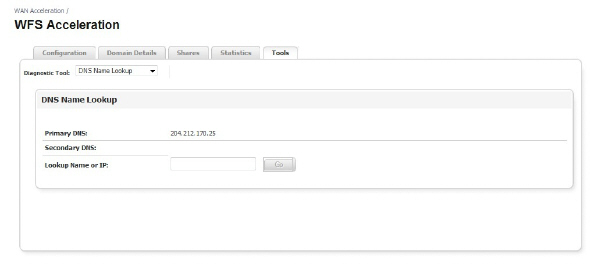
In the Diagnostic Tools drop-down, select Test WFS Configuration.

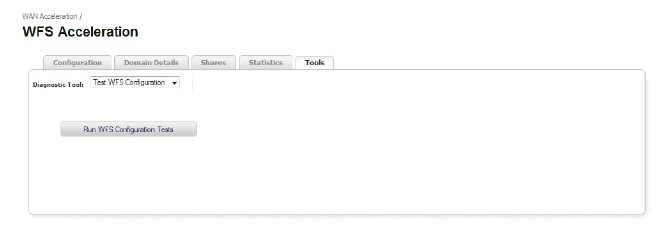
Click Run WFS Configuration Test.
The results display when the test is complete.
Troubleshooting WFS Acceleration
Problem: The Joined Domains checkbox is not selected in the Domain Details tab.
Solution:
Click Join Domain at the bottom of the page. When the Join Domain pop-up window is displayed, leave the fields empty, and then click Apply.
This action will force the WXA series appliance to join the domain.
Troubleshooting WAN Acceleration
Problem: When I click Create static DHCP lease for WXA on the WAN Acceleration > Status page, I get an error message.
Solution: If you changed any of the interface settings for the WXA series appliance, you must navigate to the WAN Acceleration > Advanced > Interface Settings tab and click Renew DHCP Lease.
If this does not work, click Reboot on the WAN Acceleration > Advanced > Device Settings tab to reboot the WXA series appliance.