SonicPoint_FairNet
SonicPoint_FairNet
SonicPoint > FairNet
This chapter details the SonicWALL FairNet feature and provides configuration examples for easy deployment. This chapter contains the following sections:
Understanding SonicPoint FairNet
This section is an overview of the SonicPoint FairNet feature and contains the following subsections:
What is SonicPoint FairNet?
The SonicPoint FairNet feature provides an easy-to-use method for network administrators to control the bandwidth of associated wireless clients and make sure it is distributed fairly between them. Administrators can configure the SonicPoint FairNet bandwidth limits for all wireless clients, specific IP address ranges, or individual clients to provide fairness and network efficiency.
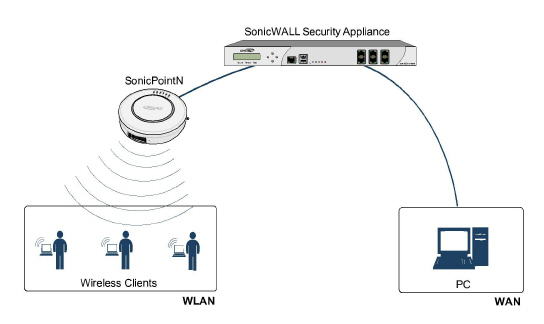
The illustration below is an example of a typical SonicPoint FairNet topology:
Figure 52:9: Typical FairNet Topology
Deployment Considerations
Consider the following when deploying the SonicPoint FairNet feature:
-
You must have a laptop or PC with a IEEE802.11b/g/n wireless network interface controller.
Supported Platforms
The SonicPoint FairNet feature is currently supported on the following appliance models:
-
SonicWALL TZ Series
-
SonicWALl NSA Series
-
SonicWALL E-Class NSA Series
Features in SonicPoint FairNet
This section details the features in SonicPoint FairNet.
Distributed Coordination Function
The Distributed Coordination Function (DCF) provides timing fairness for each client to access a medium with equal opportunity. However it can not guarantee the per-station data traffic fairness among all wireless clients. The SonicPoint FairNet feature is implemented on top of the existing 802.11 DCF to guarantee fair bandwidth among wireless clients regardless of the number and direction of flows.
Traffic Control
The traffic control feature decides if packets are queued or dropped (e.g. if the queue has reached some length limit, or if the traffic exceeds some rate limit). It can also decide in which order packets are sent (e.g. to give priority to certain owns) and it can delay the sending of packets (e.g. to limit the rate of outbound traffic). Once traffic control has released a packet for sending, the device driver picks it up and emits it on the network.
Management Interface Overview
This section describes the functions of the SonicPoint FairNet management interface.
Figure 52:10: SonicPoint > FairNet
|
Name
|
Description
|
|
Accept Button
|
Applies the latest configuration settings.
|
|
Cancel Button
|
Cancels any changed configuration settings.
|
|
Enable FairNet Checkbox
|
Enables the SonicPoint FairNet feature.
|
|
FairNet Policies Checkbox
|
Selects or deselects all the policies in the FairNet Polices table. Individual policies can also be selected in the policies list.
|
|
Direction Column
|
Displays the direction for each policy. The directions include:
|
|
Start IP Column
|
Displays the start point for the IP address range.
|
|
End IP Column
|
Displays the end point for the IP address range.
|
|
Min Rate (kbps) Column
|
The minimum bandwidth that clients are guaranteed. Minimum rate is 1Kbps.
|
|
Max Rate (kbps) Column
|
The maximum bandwidth that clients are guaranteed. Maximum rate is 54000Kbps.
|
|
Interface Column
|
Displays the interface that the SonicPoint FairNet policy applies to.
Note: This is the interface on the managing firewall that the SonicPoint appliance is connected to.
|
|
Enable Checkbox
|
Enables the selected SonicPoint FairNet policy.
|
|
Configure Button
|
Edits existing SonicPoint FairNet policies. See Figure 52:11 for details.
|
|
Add... Button
|
Adds a SonicPoint FairNet policy for an IP address or range of addresses. See Figure 52:11 for details.
|
|
Delete Button
|
Deletes the selected SonicPoint FairNet policies.
|
|
Figure 52:11: FairNet Policy
|
Name
|
Description
|
|
Enable Policy Checkbox
|
Enables the FairNet policy. This option is checked by default.
|
|
Direction Drop-down
|
Select whether the bandwidth limits for the policy apply to clients uploading content, downloading content, or in both directions.
-
Both Directions
-
Downlink (AP to Client)
-
Uplink (Client to AP)
|
|
Start IP Text Field
|
Enter the starting IP address that the FairNet policy applies to. The IP address must be on a subnet that is configured for a WLAN interface.
|
|
End IP Text Field
|
Enter the ending IP address that the FairNet policy applies to. The IP address must be on a subnet that is configured for a WLAN interface.
|
|
Min Rate (kbps) Text Field
|
Enter the minimum bandwidth that clients are guaranteed.
|
|
Max Rate (kbps) Text Feld
|
Enter the maximum bandwidth that clients are guaranteed.
|
|
Interface Drop-down
|
Selects the interface that the SonicPoint FairNet policy is applied to.
Note: This is the interface on the managing firewall that the SonicPoint appliance is connected to.
|
|
OK Button
|
Adds your policy to the FairNet Policies list.
|
|
Cancel Button
|
Cancels the information entered into the “FairNet Policy” pop-up window.
|
|
Configuring SonicPoint FairNet
This section contains an example FairNet configuration. To configure FairNet to provide more bandwidth in both directions, perform the following steps:
-
Navigate to the SonicPoint > FairNet page.
Figure 52:12: Configure SonicPoint > FairNet
-
Click the Add... button.
Figure 52:13: Add FairNet Policy
-
Make sure the Enable Policy checkbox is selected. This checkbox is enabled by default.
-
Click the Direction drop-down menu, then select Both Directions. This applies the policy to clients uploading content and downloading content.
-
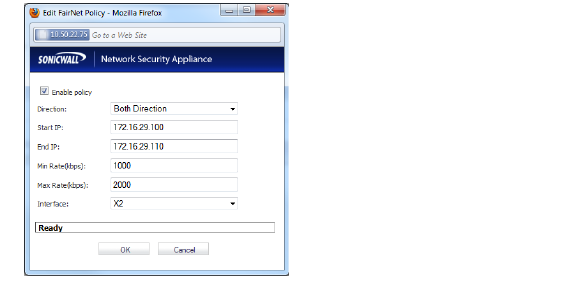
Click the Start IP text-box, then enter the starting IP address (172.16.29.100) for the FairNet policy.
-
Click the End IP text-box, then enter the ending IP address (172.16.29.110) for the FairNet policy.
Tip: The IP address range must be on a subnet that is configured for a WLAN interface.
-
Click the Min Rate(kbps) text-box, then enter the minimum bandwidth (1000 Kbps) for the FairNet policy.
-
Click the Max Rate(kbps) text-box, then enter the maximum bandwidth (2000 Kbps) for the FairNet policy.
-
Click the Interface drop-down, select the interface (X2) that the SonicPoint appliance is connected to.
-
Click the OK button.
-
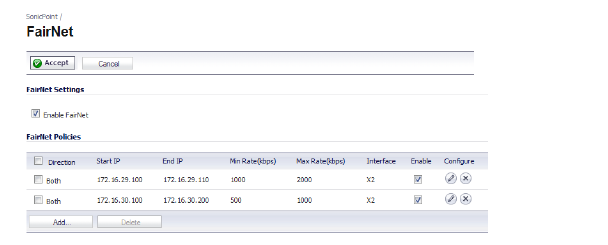
Click the Enable Fairnet checkbox.
-
Click the Accept button.
Your SonicWALL FairNet policy is now configured.