- Name or IP Address – The FQDN or the IP address of the LDAP server against which you wish to authenticate. If using a name, be certain that it can be resolved by your DNS server. Also, if using TLS with the ‘Require valid certificate from server’ option, the name provided here must match the name to which the server certificate was issued (i.e. the CN) or the TLS exchange will fail.
- Port Number – The default LDAP over TLS port number is TCP 636. The default LDAP (unencrypted) port number is TCP 389. If you are using a custom listening port on your LDAP server, specify it here.
- Server timeout – The amount of time, in seconds, that the SonicWALL will wait for a response from the LDAP server before timing out. Allowable ranges are 1 to 99999 (in case you’re running your LDAP server on a VIC-20 located on the moon), with a default of 10 seconds.
- Overall operation timeout – The amount of time, in minutes, to spend on any automatic operation. Some operations, such as directory configuration or importing user groups, can take several minutes, especially when multiple LDAP servers are in use. The default setting is 5 minutes.
- Select one of the following radio buttons:
- Anonymous Login – Some LDAP servers allow for the tree to be accessed anonymously. If your server supports this (Active Directory generally does not), then you may select this option.
- Give login name/location in tree – Select this option to build the distinguished name (dn) that is used to bind to the LDAP server from the “Login user name” and “User tree for login to server” fields according to the following rules:
- The first name component begins “cn=”
- The ‘location in tree’ components all use “ou=” (apart from certain Active Directory built-ins that begin with “cn=”)
- The domain components all use “dc=”
If the “User tree for login to server” field is given as a dn, you can also select this option if the bind dn conforms to the first bullet above, but not to the second and/or the third bullet.
- Give bind distinguished name – Select this option if the bind dn does not conform to the first bullet above (if the first name component does not begin with “cn=”). This option can always be selected if the dn is known. You must provide the bind dn explicitly if the bind dn does not conform to the first bullet above.
- Login user name – Specify a user name that has rights to log in to the LDAP directory. The login name will automatically be presented to the LDAP server in full ‘dn’ notation. This can be any account with LDAP read privileges (essentially any user account) – Administrative privileges are not required. Note that this is the user’s name, not their login ID (e.g. Jones Smith rather than jsmith).
- Login password – The password for the user account specified above.
- Protocol version – Select either LDAPv3 or LDAPv2. Most modern implementations of LDAP, including Active Directory, employ LDAPv3.
- Use TLS – Use Transport Layer Security (SSL) to log in to the LDAP server. It is strongly recommended that TLS be used to protected the username and password information that will be sent across the network. Most modern implementations of LDAP server, including Active Directory, support TLS. Deselecting this default setting will display an alert that you must accept to proceed.
- Send LDAP ‘Start TLS’ Request – Some LDAP server implementations support the Start TLS directive rather than using native LDAP over TLS. This allows the LDAP server to listen on one port (normally 389) for LDAP connections, and to switch to TLS as directed by the client. Active Directory does not use this option, and it should only be selected if required by your LDAP server.
- Require valid certificate from server – Validates the certificate presented by the server during the TLS exchange, matching the name specified above to the name on the certificate. Deselecting this default option will present an alert, but exchanges between the SonicWALL and the LDAP server will still use TLS – only without issuance validation.
- Local certificate for TLS – Optional, to be used only if the LDAP server requires a client certificate for connections. Useful for LDAP server implementations that return passwords to ensure the identity of the LDAP client (Active Directory does not return passwords). This setting is not required for Active Directory.
If your network uses multiple LDAP/AD servers with referrals, then select one as the primary server (probably the one that holds the bulk of the users) and use the above settings for that server. It will then refer the SonicWALL on to the other servers for users in domains other than its own. For the SonicWALL to be able to log in to those other servers, each server must have a user configured with the same credentials (user name, password and location in the directory) as the login to the primary server. This may entail creating a special user in the directory for the SonicWALL login. Note that only read access to the directory is required.
- LDAP Schema – Select one of the following:
- Microsoft Active Directory
- RFC2798 inetOrgPerson
- RFC2307 Network Information Service
- Samba SMB
- Novell eDirectory
- User defined
Selecting any of the predefined schemas will automatically populate the fields used by that schema with their correct values. Selecting User defined will allow you to specify your own values – use this only if you have a specific or proprietary LDAP schema configuration.
- Object class – Select the attribute that represents the individual user account to which the next two fields apply.
- Login name attribute – Select one of the following to define the attribute that is used for login authentication:
- sAMAccountName for Microsoft Active Directory
- inetOrgPerson for RFC2798 inetOrgPerson
- posixAccount for RFC2307 Network Information Service
- sambaSAMAccount for Samba SMB
- inetOrgPerson for Novell eDirectory
- Qualified login name attribute – Optionally select an attribute of a user object that sets an alternative login name for the user in name@domain format. This may be needed with multiple domains in particular, where the simple login name may not be unique across domains. This is set to mail for Microsoft Active Directory and RFC2798 inetOrgPerson.
- User group membership attribute – Select the attribute that contains information about the groups to which the user object belongs. This is memberOf in Microsoft Active Directory. The other predefined schemas store group membership information in the group object rather than the user object, and therefore do not use this field.
- Framed IP address attribute – Select the attribute that can be used to retrieve a static IP address that is assigned to a user in the directory. Currently it is only used for a user connecting via L2TP with the SonicWALL’s L2TP server. In the future this may also be supported for Global VPN Client. In Active Directory the static IP address is configured on the Dial-in tab of a user’s properties.
- User Group Objects – This section is auto-configured unless you select User Defined for the LDAP Schema.
- Object class – Specify the name associated with the group of attributes.
- Member attribute – Specify the attribute associated with a member.
- Select whether this attribute is a Distinguished name or User ID.
- Read from server – Click to read the user group object information from the LDAP server.
- Select whether you want to Automatically update the schema configuration or Export details of the schema.
- Primary Domain – The user domain used by your LDAP implementation. For AD, this will be the Active Directory domain name, e.g. yourADdomain.com. Changes to this field will, optionally, automatically update the tree information in the rest of the page. This is set to mydomain.com by default for all schemas except Novell eDirectory, for which it is set to o=mydomain.
- User tree for login to server – The tree in which the user specified in the Settings tab resides. For example, in Active Directory the ‘administrator’ account’s default tree is the same as the user tree.
- Trees containing users – The trees where users commonly reside in the LDAP directory. One default value is provided which can be edited, and up to a total of 64 DN values may be provided. The SonicWALL will search the directory using them all until a match is found, or the list is exhausted. If you have created other user containers within your LDAP or AD directory, you should specify them here.
- Trees containing user groups – Same as above, only with regard to user group containers, and a maximum of 32 DN values may be provided. These are only applicable when there is no user group membership attribute in the schema's user object, and are not used with AD.
All the above trees are normally given in URL format but can alternatively be specified as distinguished names (e.g. “myDom.com/Sales/Users” could alternatively be given as the DN “ou=Users,ou=Sales,dc=myDom,dc=com”). The latter form will be necessary if the DN does not conform to the normal formatting rules as per that example. In Active Directory the URL corresponding to the distinguished name for a tree is displayed on the Object tab in the properties of the container at the top of the tree.
Note: AD has some built-in containers that do not conform (e.g. the DN for the top level Users container is formatted as “cn=Users,dc=…”, using ‘cn’ rather than ‘ou’) but the SonicWALL knows about and deals with these, so they can be entered in the simpler URL format.
Ordering is not critical, but since they are searched in the given order it is most efficient to place the most commonly used trees first in each list. If referrals between multiple LDAP servers are to be used, then the trees are best ordered with those on the primary server first, and the rest in the same order that they will be referred.
Note: When working with AD, to determine the location of a user in the directory for the ‘User tree for login to server’ field, the directory can be searched manually from the Active Directory Users and Settings control panel applet on the server, or a directory search utility such as queryad.vbs in the Windows NT/2000/XP Resource Kit can be run from any PC in the domain.
- Auto-configure – This causes the SonicWALL to auto-configure the Trees containing users and Trees containing user groups fields by scanning through the directory/directories looking for all trees that contain user objects. To use auto-configure, first enter a value in the User tree for login to server field (unless anonymous login is set), and then click the Auto-configure button to bring up the following dialog:
In the Auto Configure dialog box, enter the desired domain in the Domain to search field.
Select one of the following:
- Append to existing trees – This selection will append newly located trees to the current configuration.
- Replace existing trees – This selection will start from scratch removing all currently configured trees first.
- Click OK.
The auto-configuration process may also locate trees that are not needed for user login. You can manually remove these entries.
If using multiple LDAP/AD servers with referrals, this process can be repeated for each, replacing the Domain to search value accordingly and selecting Append to existing trees on each subsequent run.
- Allow referrals – Select this option any time that user information is located on an LDAP server other than the configured primary one.
- Allow continuation references during user authentication – Select this option any time that individual directory trees have been manually configured to span multiple LDAP servers.
- Allow continuation references during directory auto-configuration – Select this option to allow the trees to be read from multiple LDAP servers in a single operation.
- Allow continuation references in domain searches – Select this option when using single-sign-on with users in multiple sub-domains having separate LDAP servers.
- Allow only users listed locally – Requires that LDAP users also be present in the SonicWALL local user database for logins to be allowed.
- User group membership can be set locally by duplicating LDAP user names – Allows for group membership (and privileges) to be determined by the intersection of local user and LDAP user configurations.
- Default LDAP User Group – A default group on the SonicWALL to which LDAP users will belong in addition to group memberships configured on the LDAP server.
- Import users – You can click this button to configure local users on the SonicWALL by retrieving the user names from your LDAP server. The Import users button launches a window containing the list of user names available for import to the SonicWALL.
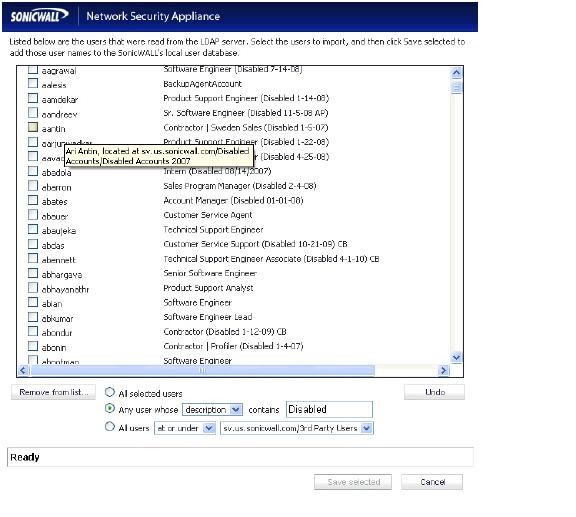
In the LDAP Import Users window, select the checkbox for each user that you want to import into the SonicWALL, and then click Save selected.
The list of users read from the LDAP server can be quite long, and you might not want to import all of them. A Remove from list button is provided, along with several methods of selecting unwanted users.You can use these options to reduce the list to a manageable size and then select the users to import.
Having users on the SonicWALL with the same name as existing LDAP users allows SonicWALL user privileges to be granted upon successful LDAP authentication.
- Import user groups – You can click this button to configure user groups on the SonicWALL by retrieving the user group names from your LDAP server. The Import user groups button launches a window containing the list of user group names available for import to the SonicWALL.
In the LDAP Import User Groups window, select the checkbox for each group that you want to import into the SonicWALL, and then click Save selected.
Having user groups on the SonicWALL with the same name as existing LDAP/AD user groups allows SonicWALL group memberships and privileges to be granted upon successful LDAP authentication.
Alternatively, you can manually create user groups on the LDAP/AD server with the same names as SonicWALL built-in groups (such as ‘Guest Services’, ‘Content Filtering Bypass’, ‘Limited Administrators’) and assign users to these groups in the directory. This also allows SonicWALL group memberships to be granted upon successful LDAP authentication.
The SonicWALL appliance can retrieve group memberships efficiently in the case of Active Directory by taking advantage of its unique trait of returning a ‘memberOf’ attribute for a user.
The RADIUS to LDAP Relay feature is designed for use in a topology where there is a central site with an LDAP/AD server and a central SonicWALL with remote satellite sites connected into it via low-end SonicWALL security appliances that may not support LDAP. In that case the central SonicWALL can operate as a RADIUS server for the remote SonicWALLs, acting as a gateway between RADIUS and LDAP, and relaying authentication requests from them to the LDAP server.
Additionally, for remote SonicWALLs running non-enhanced firmware, with this feature the central SonicWALL can return legacy user privilege information to them based on user group memberships learned via LDAP. This avoids what can be very complex configuration of an external RADIUS server such as IAS for those SonicWALLs.
- Enable RADIUS to LDAP Relay – Enables this feature.
- Allow RADIUS clients to connect via – Check the relevant checkboxes and policy rules will be added to allow incoming RADIUS requests accordingly.
- RADIUS shared secret – This is a shared secret common to all remote SonicWALLs.
- User groups for legacy VPN users – Defines the user group that corresponds to the legacy ‘Access to VPNs’ privileges. When a user in this user group is authenticated, the remote SonicWALL is notified to give the user the relevant privileges.
- User groups for legacy VPN client users – Defines the user group that corresponds to the legacy ‘Access from VPN client with XAUTH’ privileges. When a user in this user group is authenticated, the remote SonicWALL is notified to give the user the relevant privileges.
- User groups for legacy L2TP users – Defines the user group that corresponds to the legacy ‘Access from L2TP VPN client’ privileges. When a user in this user group is authenticated, the remote SonicWALL is notified to give the user the relevant privileges.
- User groups for legacy users with Internet access – Defines the user group that corresponds to the legacy ‘Allow Internet access (when access is restricted)’ privileges. When a user in this user group is authenticated, the remote SonicWALL is notified to give the user the relevant privileges.
Note: The ‘Bypass filters’ and ‘Limited management capabilities’ privileges are returned based on membership to user groups named ‘Content Filtering Bypass’ and ‘Limited Administrators’ – these are not configurable.