PANEL_ssoProps
PANEL_ssoProps
Configuring Single Sign-On
Configuring SSO is a process that includes installing and configuring the SonicWALL SSO Agent and/or the SonicWALL Terminal Services Agent (TSA), and configuring a SonicWALL security appliance running SonicOS Enhanced to use the SSO Agent or TSA. You can also configure SSO to use browser NTLM authentication with HTTP traffic, with or without the SSO Agent. For an introduction to SonicWALL SSO, see Single Sign-On Overview.
The following sections describe how to configure SSO:
Installing the SonicWALL SSO Agent
The SonicWALL SSO Agent is part of the SonicWALL Directory Connector. The SonicWALL SSO Agent must be installed on at least one, and up to eight, workstations or servers in the Windows domain that have access to the Active Directory server using VPN or IP. The SonicWALL SSO Agent must have access to your SonicWALL security appliance. To install the SonicWALL SSO Agent, perform the following steps:
-
Locate the SonicWALL Directory Connector executable file and double click it. It may take several seconds for the InstallShield to prepare for the installation.
-
On the Welcome page, click Next to continue.
-
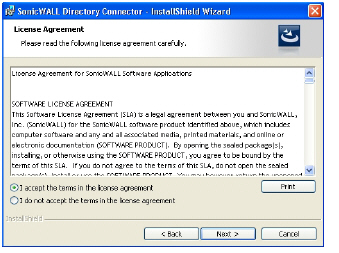
The License Agreement displays. Select I accept the terms in the license agreement and click Next to continue.
-
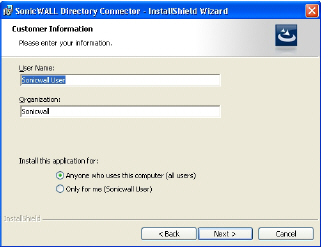
On the Customer Information page, enter your name in the User Name field and your organization name in the Organization field. Select to install the application for Anyone who uses this computer (all users) or Only for me. Click Next to continue.
-
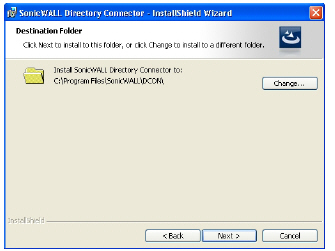
Select the destination folder. To use the default folder, C:\Program Files\SonicWALL\DCON, click Next. To specify a custom location, click Browse, select the folder, and click Next.
-
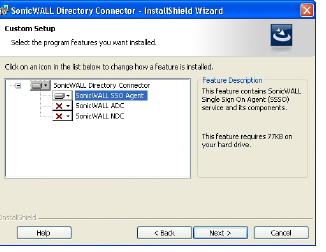
On the Custom Setup page, the installation icon
 is displayed by default next to the SonicWALL SSO Agent feature. Click Next.
-
Click Install to install SSO Agent.
Optionally, you can select SonicWALL NDC to enable SonicWALL SSO to work with Novell users if this server has network access to the eDirectory server. For information about installing SonicWALL NDC, see the SonicOS Enhanced 5.6 SSO Feature Module, available onhttp://www.sonicwall.com/us/Support.html
Optionally, you can also select SonicWALL ADC if this server belongs to an Active Directory domain, and will be used to communicate with a SonicWALL CSM appliance. For more information, see the SonicOS CF 2.6 Administrator’s Guide, available onhttp://www.sonicwall.com/us/Support.html
-
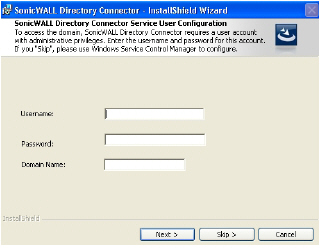
To configure a common service account that the SSO Agent will use to log into a specified Windows domain, enter the username of an account with administrative privileges in the Username field, the password for the account in the Password field, and the domain name of the account in the Domain Name field. Click Next.
Note: This section can be configured at a later time. To skip this step and configure it later, click Skip.
-
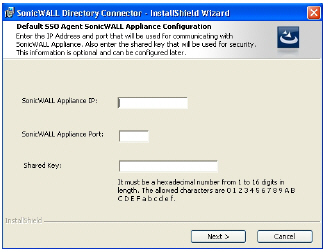
Enter the IP address of your SonicWALL security appliance in the SonicWALL Appliance IP field. Type the port number for the same appliance in the SonicWALL Appliance Port field. Enter a shared key (a hexadecimal number from 1 to 16 digits in length) in the Shared Key field. Click Next to continue.
Note: This information can be configured at a later time. To skip this step and configure it later, leave the fields blank and click Next.
The SonicWALL SSO Agent installs. The status bar displays.
-
When installation is complete, optionally check the Launch SonicWALL Directory Connector box to launch the SonicWALL Directory Connector, and click Finish.
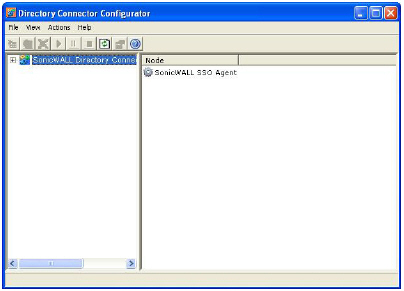
If you checked the Launch SonicWALL Directory Connector box, the SonicWALL Directory Connector will display.
Installing the SonicWALL Terminal Services Agent
Install the SonicWALL TSA on one or more terminal servers on your network within the Windows domain. The SonicWALL TSA must have access to your SonicWALL UTM security appliance, and the appliance must have access to the TSA. If you have a software firewall running on the terminal server, you may need to open up the UDP port number for incoming messages from the appliance.
SonicWALL TSA is available for download without charge from MySonicWALL. To install the SonicWALL TSA, perform the following steps:
-
On a Windows Terminal Server system, download one of the following installation programs, depending on your computer:
-
SonicWALL TSAInstaller32.msi (32 bit, version 3.0.28.1001 or higher)
-
SonicWALL TSAInstaller64.msi (64 bit, version 3.0.28.1001 or higher)
You can find these on http://www.mysonicwall.com.
-
Double-click the installation program to begin installation.
-
On the Welcome page, click Next to continue.
-
The License Agreement displays. Select I agree and click Next to continue.
-
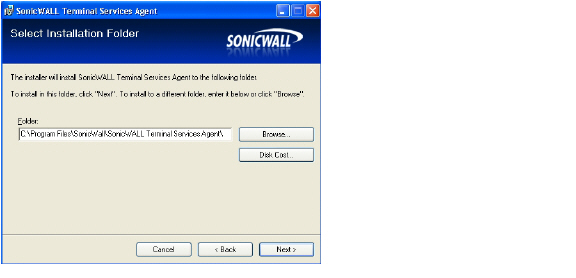
On the Select Installation Folder window, select the destination folder. To use the default folder, C:\Program Files\SonicWALL\SonicWALL Terminal Services Agent\, click Next. To specify a custom location, click Browse, select the folder, and click Next.
-
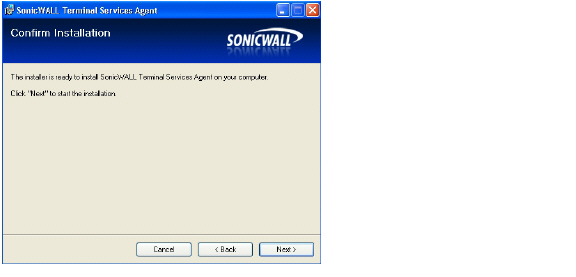
On the Confirm Installation window, click Next to start the installation.
-
Wait while the SonicWALL Terminal Services Agent installs. The progress bar indicates the status.
-
When installation is complete, click Close to exit the installer.
-
You must restart your system before starting the SonicWALL Terminal Services Agent. To restart immediately, click Yes in the dialog box. To restart later, click No.

Configuring the SonicWALL SSO Agent
The SonicWALL SSO Agent communicates with workstations using NetAPI or WMI, which both provide information about users that are logged into a workstation, including domain users, local users, and Windows services. WMI is pre-installed on Windows Server 2003, Windows XP, Windows ME, and Windows 2000. For other Windows versions, visit www.microsoft.com to download WMI. Verify that WMI or NetAPI is installed prior to configuring the SonicWALL SSO Agent.
The .NET Framework 2.0 must installed prior to configuring the SonicWALL SSO Agent. The .NET Framework can be downloaded from Microsoft at www.microsoft.com.
To configure the communication properties of the SonicWALL SSO Agent, perform the following tasks:
-
Launch the SonicWALL Configuration Tool by double-clicking the desktop shortcut or by navigating to Start > All Programs > SonicWALL > SonicWALL Directory Connector > SonicWALL Configuration Tool.
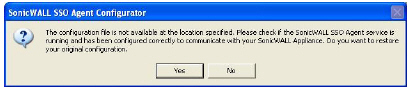
Note: If the IP address for a default SonicWALL security appliance was not configured, or if it was configured incorrectly, a pop up will display. Click Yes to use the default IP address (192.168.168.168) or click No to use the current configuration.
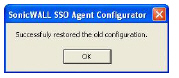
If you clicked Yes, the message Successfully restored the old configuration will display. Click OK.
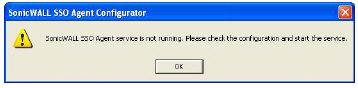
If you clicked No, or if you clicked Yes but the default configuration is incorrect, the message SonicWALL SSO Agent service is not running. Please check the configuration and start the service. will display. Click OK.

If the message SonicWALL SSO Agent service is not running. Please check the configuration and start the service displays, the SSO Agent service will be disabled by default. To enable the service, expand the SonicWALL Directory Connector Configuration Tool in the left navigation panel by clicking the + icon, highlight the SonicWALL SSO Agent underneath it, and click the button.
-
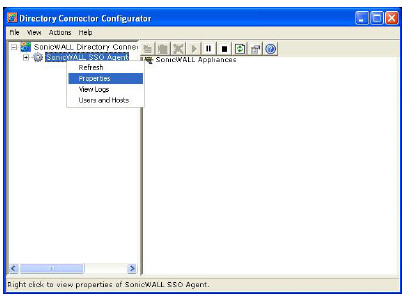
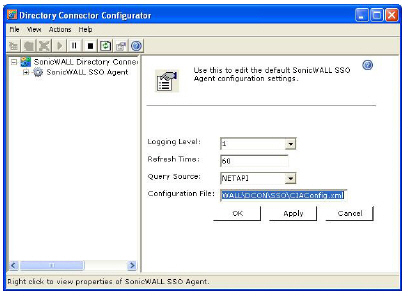
In the left-hand navigation panel, expand the SonicWALL Directory Connector Configuration Tool by clicking the + icon. Right click the SonicWALL SSO Agent and select Properties.
-
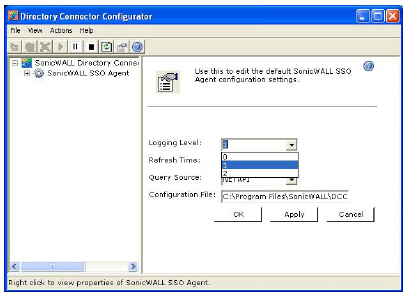
From the Logging Level pull-down menu, select the level of events to be logged in the Windows Event Log. The default logging level is 1. Select one of the following levels:
-
Logging Level 0 - Only critical events are logged.
-
Logging Level 1 - Critical and significantly severe events are logged.
-
Logging Level 2 - All requests from the appliance are logged, using the debug level of severity.
Note: When Logging Level 2 is selected, the SSO Agent service will terminate if the Windows event log reaches its maximum capacity.
-
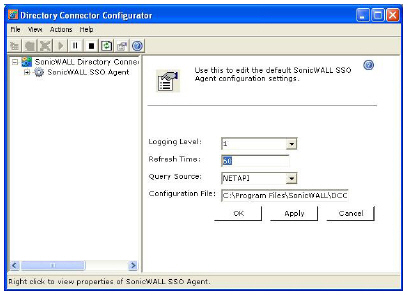
In the Refresh Time field, enter the frequency, in seconds, that the SSO Agent will refresh user log in status. The default is 60 seconds.
-
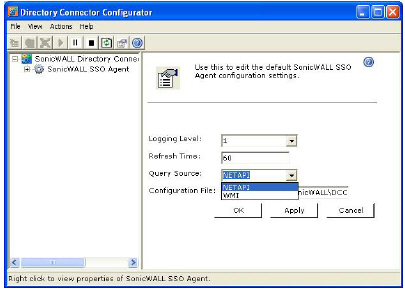
From the Query Source pull-down menu, select the protocol that the SSO Agent will use to communicate with workstations, either NETAPI or WMI.
Note: NetAPI will provide faster, though possibly slightly less accurate, performance. WMI will provide slower, though possibly more accurate, performance. With NetAPI, Windows reports the last login to the workstation whether or not the user is still logged in. This means that after a user logs out from his computer, the appliance will still show the user as logged in when NetAPI is used. If another user logs onto the same computer, then at that point the previous user is logged out from the SonicWALL.
WMI is pre-installed on Windows Server 2003, Windows XP, Windows Me, and Windows 2000. Both NetAPI and WMI can be manually downloaded and installed. NetAPI and WMI provide information about users that are logged into a workstation, including domain users, local users, and Windows services.
-
In the Configuration File field, enter the path for the configuration file. The default path is
C:\Program Files\SonicWALL\DCON\SSO\CIAConfig.xml.
-
Click Accept.
-
Click OK.
Adding a SonicWALL Security Appliance
Use these instructions to manually add a SonicWALL security appliance if you did not add one during installation, or to add additional SonicWALL security appliances. To add a SonicWALL security appliance, perform the following steps:
-
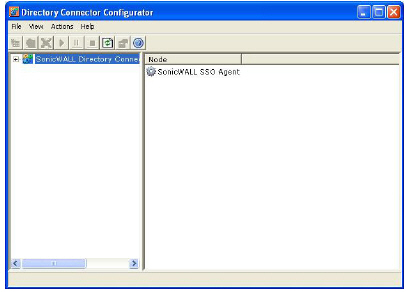
Launch the SonicWALL SSO Agent Configurator.
-
Expand the SonicWALL Directory Connector and SonicWALL SSO Agent trees in the left column by clicking the + button. Right click SonicWALL Appliances and select Add.
-
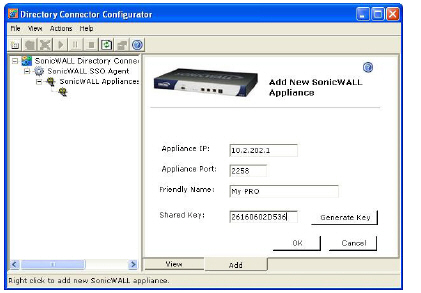
Enter the appliance IP address for your SonicWALL security appliance in the Appliance IP field. Enter the port for the same appliance in the Appliance Port field. The default port is 2258. Give your appliance a friendly name in the Friendly Name field. Enter a shared key in the Shared Key field or click Generate Key to generate a shared key. When you are finished, click OK.
Your appliance will display in the left-hand navigation panel under the SonicWALL Appliances tree.
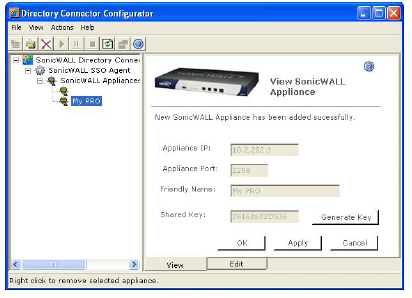
Editing Appliances in SonicWALL SSO Agent

You can edit all settings on SonicWALL security appliances previously added in SonicWALL SSO Agent, including IP address, port number, friendly name, and shared key. To edit a SonicWALL security appliance in SonicWALL SSO Agent, select the appliance from the left-hand navigation panel and click the edit icon above the left-hand navigation panel. You can also click the Edit tab at the bottom of the right-hand window.
Deleting Appliances in SonicWALL SSO Agent

To delete a SonicWALL security appliance you previously added in SonicWALL SSO Agent, select the appliance from the left-hand navigation panel and click the delete icon above the left-hand navigation panel.
Modifying Services in SonicWALL SSO Agent


You can start, stop, and pause SonicWALL SSO Agent services to SonicWALL security appliances. To pause services for an appliance, select the appliance from the left-hand navigation panel and click the pause button . To stop services for an appliance, select the appliance from the left-hand navigation panel and click the stop button . To resume services, click the start button .
Note: You may be prompted to restart services after making configuration changes to a SonicWALL security appliance in the SonicWALL SSO Agent. To restart services, press the stop button then press the start button.
Configuring the SonicWALL Terminal Services Agent
After installing the SonicWALL TSA and restarting your Windows Server system, you can double-click the SonicWALL TSA desktop icon created by the installer to launch it for configuration, to generate a Tech Support Report (TSR), or to see the status and version information.
See the following sections:
Adding a SonicWALL UTM Appliance to SonicWALL TSA Settings
Perform the following steps to add a SonicWALL UTM appliance to the SonicWALL TSA:
-
Double-click the SonicWALL TSA desktop icon.
-
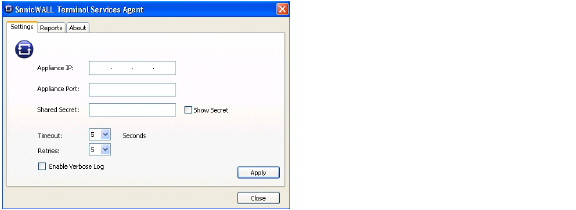
The SonicWALL Terminal Services Agent window displays. On the Settings tab, type the IP address of the SonicWALL UTM appliance into the Appliance IP field.
-
Type the communication port into the Appliance Port field. The default port is 2259, but a custom port can be used instead. This port must be open on the Windows Server system.
-
Type the encryption key into the Shared Secret field. Select the Show Secret checkbox to view the characters and verify correctness. The same shared secret must be configured on the SonicWALL UTM appliance.
-
In the Timeout drop-down list, select the number of seconds that the agent will wait for a reply from the appliance before retrying the notification. The range is 5 to 10 seconds, and the default is 5 seconds.
-
In the Retries drop-down list, select the number of times the agent will retry sending a notification to the appliance when it does not receive a reply. The range is 3 to 10 retries, and the default is 5.
-
To enable full details in log messages, select the Enable Verbose Log checkbox. Do this only to provide extra, detailed information in a Tech Support Report. Avoid leaving this enabled at other times because it may impact performance.
-
Click Apply. A dialog box indicates that the SonicWALL TSA service has restarted with the new settings.

Creating a SonicWALL TSA Tech Support Report
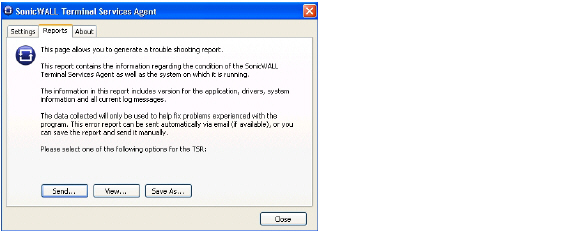
You can create a Tech Support Report (TSR) containing all current log messages and information about the agent, driver, and system settings to examine or to send to SonicWALL Technical Support for assistance.
Perform the following steps to create a TSR for the SonicWALL TSA:
-
Double-click the SonicWALL TSA desktop icon.
-
The SonicWALL Terminal Services Agent window displays. Click the Reports tab.
-
To generate the TSR and automatically email it to SonicWALL Technical Support, click Send.
-
To generate the TSR and examine it in your default text editor, click View.
-
To generate the TSR and save it as a text file, click Save As.
-
When finished, click Close.
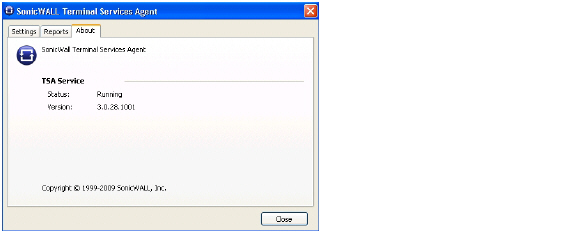
Viewing SonicWALL TSA Status and Version
To display the current status of the SonicWALL TSA service on your Windows Server system, or to view the version number of the SonicWALL TSA, perform the following steps:
-
Double-click the SonicWALL TSA desktop icon.
-
The SonicWALL Terminal Services Agent window displays. Click the About tab.
-
Click Close.
Configuring Your SonicWALL Security Appliance for SonicWALL SSO Agent
To use single sign-on, your SonicWALL security appliance must be configured to use either SonicWALL SSO Agent or Browser NTLM authentication only as the SSO method. SonicWALL SSO Agent is also the correct method to select when configuring the appliance to use the SonicWALL Terminal Services Agent.
The following procedure describes how to configure your SonicWALL security appliance to use SonicWALL SSO Agent. Perform the following steps:
-
Log in to your SonicWALL security appliance and navigate to Users > Settings.
-
In the Single-sign-on method drop-down menu, select SonicWALL SSO Agent. Use this choice to add and configure a TSA as well as an SSO Agent for the SSO method.
-
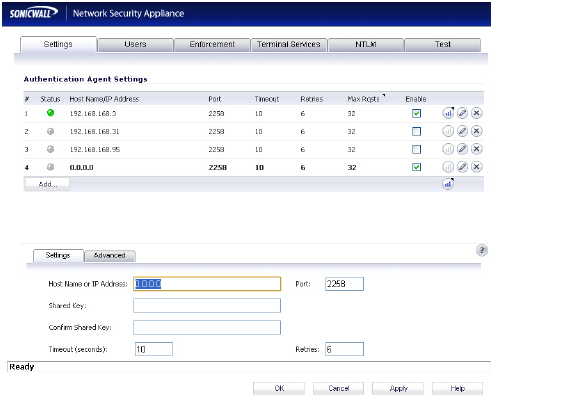
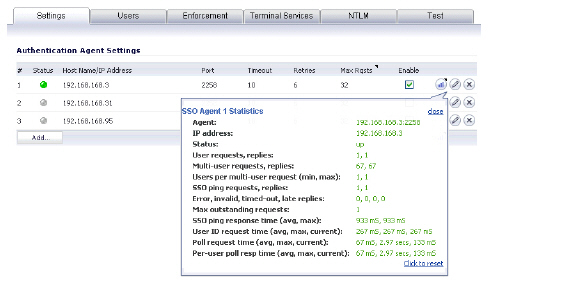
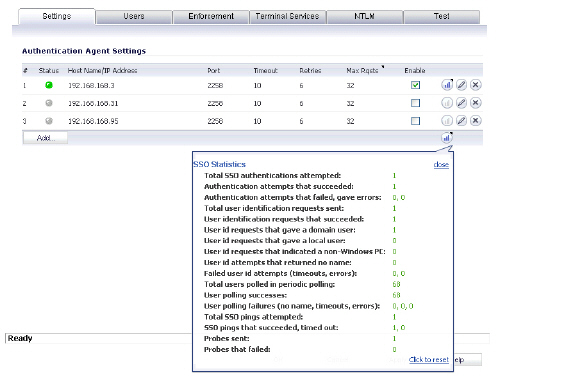
Click Configure.The Authentication Agent Settings page displays, showing any Authentication Agents already configured. The green LED next to the Agent’s IP address indicates that the agent is currently up and running. A red LED would indicate that the agent is down. A grey LED shows that the agent is disabled. The LEDs are dynamically updated using AJAX.
-
On the Authentication Agent Settings page, click the Add button to add an agent. The page is updated to display a new row in the table at the top, and two new tabs and their input fields in the lower half of the page.
-
In the Host Name or IP Address field, enter the name or IP address of the workstation on which SonicWALL SSO Agent is installed.
As you type in values for the fields, the row at the top is updated in red to highlight the new information.
-
In the Port field, enter the port number of the workstation on which SonicWALL SSO Agent is installed. The default port is 2258. Note that agents at different IP addresses can have the same port number.
-
In the Shared Key field, enter the shared key that you created or generated in the SonicWALL SSO Agent. The shared key must match exactly. Re-enter the shared key in the Confirm Shared Key field.
-
In the Timeout (seconds) field, enter a number of seconds before the authentication attempt times out. This field is automatically populated with the default of 10 seconds.
-
In the Retries field, enter the number of authentication attempts.
-
Click the Advanced tab in the lower half of the page.
-
In the Maximum requests to send at a time field, enter the maximum number of requests to send from the appliance to the agent at one time. The default is 32.
The agent processes multiple requests concurrently, spawning a separate thread in the agent PC to handle each. Sending too many requests at a time can overload the PC. On the other hand, if the number of requests to be sent from the appliance exceeds the maximum, then some requests will wait on an internal “ring buffer” queue. Too many requests waiting could lead to slow response times in Single Sign On authentication. For more information, see Tuning Single Sign-On Advanced Settings.
-
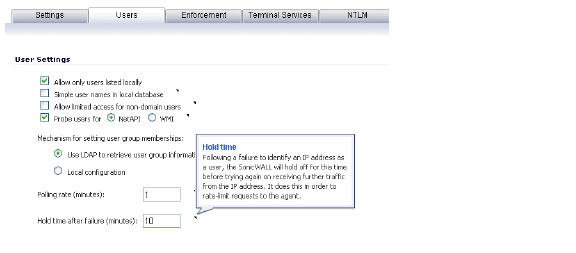
Click the Users tab. The User Settings page displays.
-
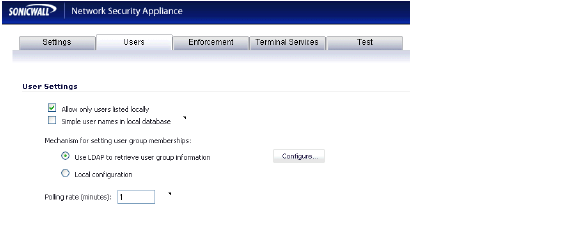
Check the box next to Allow only users listed locally to allow only users listed locally on the appliance to be authenticated.
-
Check the box next to Simple user names in local database to use simple user names. When selected, the domain component of a user name will be ignored. User names returned from the authentication agent typically include a domain component, for example, domain1/user1. If this box is not checked, user names in the local database must match exactly the full names returned from the agent, including the domain component.
-
Check the box next to Allow limited access for non-domain users to allow limited access to users who are logged in to a computer but not into a domain. These users will not be given membership in the Trusted Users user group, even when set locally, and so will not get any access set for Trusted Users. They are identified in logs as computer-name/user-name. When using the local user database to authenticate users, and the Simple user names in local database option is disabled, user names must be configured in the local database using the full computer-name/user-name identification.
-
If your network includes non-Windows devices or Windows computers with personal firewalls running, check the box next to Probe user for and select the radio button for either NetAPI or WMI depending on which is configured for the SSO Agent. This causes the SonicWALL network security appliance to probe for a response on the NetAPI/WMI port before requesting that the SSO Agent identify a user. If no response occurs, these devices will fail SSO immediately. Such devices do not respond to, or may block, the Windows networking messages used by the SSO Agent to identify a user.
-
In the Probe timeout field, enter the number of seconds that the firewall should wait for a response from the agent on the NetAPI/WMI port. The probe is considered failed after this period. The default is 5 seconds.
-
To enable probing on the NetAPI/WMI port without aborting the SSO attempt if the probes fail, select the Probe test mode checkbox. Probe test mode is used to ensure that the probes do not cause failures where SSO could have worked if they were not used. If probe failures are reported when SSO is working, then either the probe timeout is too short or something in the network may be blocking them. For example, if you have an Access Control List set on a router in your network to allow NetAPI from the agent’s IP address only, that ACL will block the probes to the NetAPI port from the appliance.
Probe test mode is useful for initial SSO deployment and troubleshooting. When Probe test mode is enabled, you can analyze the behavior by:
-
Checking the agent statistics for probe failures
-
Monitoring the console port for warnings that probes failed when SSO worked; these messages indicate the host address
If the statistics show 100% probe failures, then something is wrong in the network. If they show intermittent failures, you can try varying the Probe timeout setting to see if it helps.
-
To use LDAP to retrieve user information, select the Use LDAP to retrieve user group information radio button. Click Configure to configure the LDAP settings. The LDAP Configuration page displays. For configuration information for this page, refer to Advanced LDAP Configuration.
-
To use locally configured user group settings, select the Local configuration radio button.
-
In the Polling rate (minutes) field, enter a polling interval, in minutes. The security appliance will poll the workstation running SSO Agent once every interval to verify that users are still logged on. The default is 1.
-
In the Hold time after (minutes) field, enter a time, in minutes, that the security appliance will wait before trying again to identify traffic after an initial failure to do so. This feature rate-limits requests to the agent. The default is 1.
-
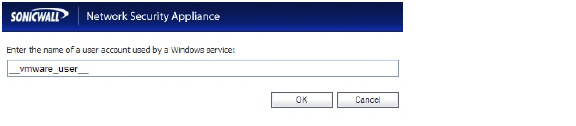
To populate the User names used by Windows services list, click the Add button. In the Service User name dialog box, type the service login name (the simple name only, without the domain or PC name) into the Enter the name of a user account used by a Windows service field and then click OK.
The purpose of this list is to distinguish the login names used by Windows services from real user logins. When the SSO agent queries Windows to find the user logged into a computer, Windows actually returns a list of user accounts that are/have been logged in to the computer and does not distinguish user logins from service logins, hence giving the SSO agent no way to determine that a login name belongs to a service. This may result in the SSO agent incorrectly reporting a service name instead of the actual user name.
You can enter up to 64 login names here that may be used by services on end-user computers. The SSO agent will ignore any logins using these names.
If, when using Single Sign On, you see unexpected user names shown on the Users > Status page, or logs of user login or user login failure with unexpected user names, those may be due to Windows service logins and those user names should be configured here so that the SSO agent will know to ignore them.
In cases where there are multiple SonicWALL appliances communicating with an SSO agent, the list of service account names should be configured on only one of them. The effect of configuring multiple lists on different appliances is undefined.
To edit a service account name, select the name, click Edit, make the desired changes in the Service User name dialog box, and then click OK.
To remove service account names, select one or more names and then click Remove.
-
Click on the Enforcement tab if you want to either trigger SSO on traffic from a particular zone, or bypass SSO for traffic from non-user devices such as internal proxy web servers or IP phones.
-
Under Per-Zone SSO Enforcement, select the checkboxes for any zones on which you want to trigger SSO to identify users when traffic is sent. If SSO is already required on a zone by Application Control or other policies, those checkboxes are pre-selected and cannot be cleared. If Guest Services is enabled on a zone, SSO cannot be enforced and you cannot select the checkbox.
These per-zone SSO enforcement settings are useful for identifying and tracking users in event logging and App Flow Monitor visualizations, even when SSO is not otherwise triggered by content filtering, IPS, or Application Control policies, or by firewall access rules requiring user authentication.
On zones where security services policies or firewall access rules are set to require user authentication, SSO will always be initiated for the affected traffic and it is not necessary to also enable SSO enforcement here.
-
To bypass SSO for traffic from certain devices or locations and apply the default content filtering policy to the traffic, select the appropriate address object or address group from the first pulldown menu under SSO Bypass. To bypass SSO for certain services or types of traffic, select the service from the second pulldown menu.
The first setting is used where traffic that would be subject to security services screening can emanate from a device other than a user's workstation (such as an internal proxy Web server or IP phone). It prevents the SonicWALL from attempting to identify such a device as a network user in order to select the content filtering policy to apply. The default content filtering policy will be used for all traffic from the selected IP addresses.
The second setting is appropriate for user traffic that does not need to be authenticated, and triggering SSO might cause an unacceptable delay for the service.
SSO bypass settings do not apply when SSO is triggered by firewall access rules requiring user authentication. To configure this type of SSO bypass, add access rules that do not require user authentication for the affected traffic. See Adding Access Rules for more information on configuring access rules.
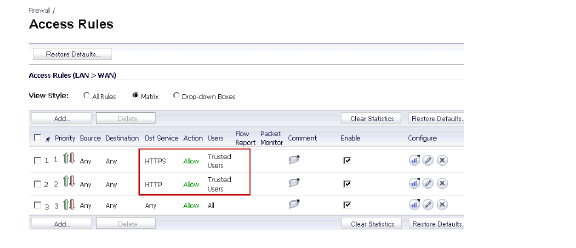
Note: By default, Linux and Mac users who are not authenticated by SSO via Samba are assigned the default content filtering policy. To redirect all such users who are not authenticated by SSO to manually enter their credentials, create an access rule from the WAN zone to the LAN zone for the HTTP service with Users Allowed set to All. Then configure the appropriate CFS policy for the users or user groups. See Adding Access Rules for more information on configuring access rules.
-
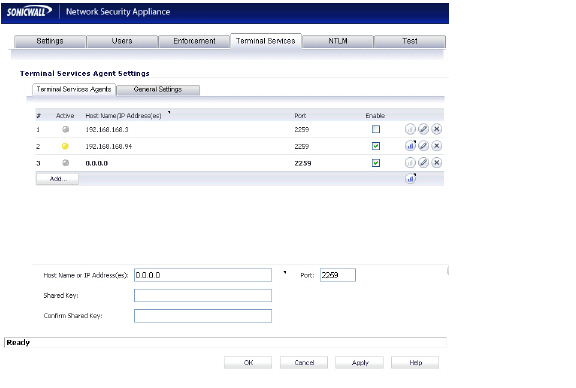
Click the Terminal Services tab. The Terminal Services Agent Settings page displays.
-
Within this page, on the Terminal Services Agents tab, click the Add button. The page is updated to display a new row in the table at the top, and new input fields in the lower half of the page.
For existing agents, a green LED-style icon next to an agent indicates that the agent is up and running. A red LED icon indicates that the agent is down. A yellow LED icon means that the TSA is idle and the appliance has not heard anything from it for 5 minutes or more. Because TSA sends notifications to the appliance rather than the appliance sending requests to the agent, a lack of notifications could mean that there is a problem, but more likely means simply that no user on the terminal server is currently doing anything.
-
In the Host Name or IP Address(es) field, enter the name or IP address of the terminal server on which SonicWALL TSA is installed. If the terminal server is multi-homed (has multiple IP addresses) and you are identifying the host by IP address rather than DNS name, enter all the IP addresses as a comma-separated list.
As you type in values for the fields, the row at the top is updated in red to highlight the new information.
-
In the Port field, enter the port number of the workstation on which SonicWALL TSA is installed. The default port is 2259. Note that agents at different IP addresses can have the same port number.
-
In the Shared Key field, enter the shared key that you created or generated in the SonicWALL TSA. The shared key must match exactly. Re-enter the shared key in the Confirm Shared Key field.
-
Click the General Settings tab.
-
The Allow traffic from services on the terminal server to bypass user authentication in access rules checkbox is selected by default. This allows traffic such as Windows updates or anti-virus updates, which is not associated with any user login session, to pass without authentication. If you clear this checkbox, traffic from services can be blocked if firewall access rules require user authentication. In this case, you can add rules to allow access for “All” to the services traffic destinations, or configure the destinations as HTTP URLs that can bypass user authentication in access rules.
-
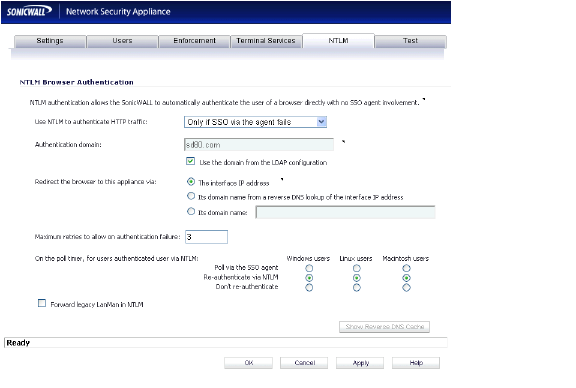
Click the NTLM tab. The NTLM Browser Authentication page displays. NTLM authentication is supported by Mozilla-based browsers and can be used as a supplement to identifying users via an SSO agent or, with some limitations, on its own without the agent. The SonicWALL appliance interacts directly with the browser to authenticate the user. Users logged in with domain credentials are authenticated transparently; in other cases the user may need to enter credentials to log in to the appliance, but should only need to do so once as the credentials are saved.
Consult the tooltips on this tab for additional details, and see How Does Browser NTLM Authentication Work? for more information.
-
Select one of the following choices from the Use NTLM to authenticate HTTP traffic pulldown list:
-
Never – Never use NTML authentication.
-
Before attempting SSO via the agent – Try to authenticate users with NTLM before using the SonicWALL SSO agent.
-
Only if SSO via the agent fails – Try to authenticate users via the SSO agent first; if that fails, try using NTLM.
-
For Authentication domain, do one of the following:
-
Enter the full DNS name of the SonicWALL appliance’s domain in the form “www.somedomain.com”
-
Select the Use the domain from the LDAP configuration checkbox to use the same domain that is used in the LDAP configuration.
Fully transparent authentication can only occur if the browser sees the appliance domain as the local domain.
-
For Redirect the browser to this appliance via, select one of the folllowing options to determine how a user’s browser is initially redirected to the SonicWALL appliance’s own Web server:
-
The interface IP address – Select this to redirect the browser to the IP address of the appliance Web server interface.
-
Its domain name from a reverse DNS lookup of the interface IP address – Enables the Show Reverse DNS Cache button at the bottom of the window; when clicked, a popup displays the appliance Web server’s Interface, IP Address, DNS Name, and TTL in seconds. Click the button to verify the domain name (DNS name) being used for redirecting the user’s browser.
-
Its domain name – Type in the Web server domain name to which the user’s browser should be redirected.
-
Enter a number of retries in the Maximum retries to allow on authentication failure.
-
To detect when users log out, select the polling method to be used by the appliance for Windows, Linux, and Macintosh users in the On the poll timer, for users authenticated user via NTLM options. Select the radio button for one of the following methods for users on each type of computer:
-
Poll via the SSO agent – If you are using an SSO Agent in your network, select this to use it to poll users; for users authenticated via NTLM, the user name that the agent learns must match the name used for the NTLM authentication, or the login session will be terminated. You may want to select a different polling method for Linux or Mac users, as those systems do not support the Windows networking requests used by the SSO agent.
-
Re-authenticate via NTLM – This method is transparent to the user if the browser is configured to store the domain credentials, or the user instructed the browser to save the credentials.
-
Don’t re-authenticate – If you select this option, logout will not be detected other than via the inactivity timeout.
-
If you are using older legacy servers that require legacy LAN Manager components to be included in NTLM messages, select the Forward legacy LanMan in NTLM checkbox. This may cause authentication to fail in newer Windows servers that don’t allow LanMan in NTLM by default because it is not secure.
-
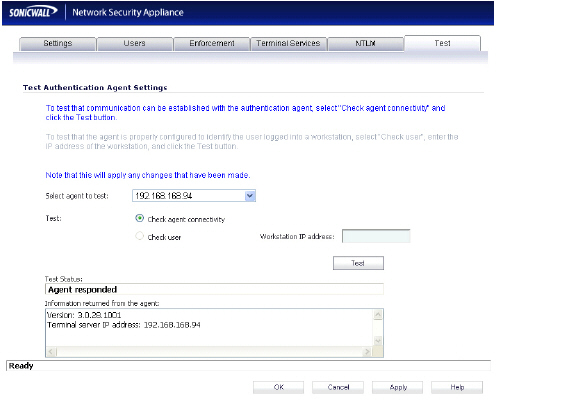
Click the Test tab. The Test Authentication Agent Settings page displays. You can test the connectivity between the appliance and an SSO agent or TSA. You can also test whether the SSO agent is properly configured to identify a user logged into a workstation.
Note: Performing tests on this page applies any changes that have been made.
-
If you have multiple agents configured, select the SSO agent or TSA to test from the Select agent to test drop-down list. The drop-down list includes SSO agents at the top, and TSA’s at the end under the heading --Terminal Server Agents--.
-
Select the Check agent connectivity radio button and then click the Test button. This will test communication with the authentication agent. If the SonicWALL security appliance can connect to the SSO agent, you will see the message Agent is ready. If testing a TSA, the Test Status field displays the message, and the version and server IP address are displayed in the Information returned from the agent field.
-
For SSO agents only, select the Check user radio button, enter the IP address of a workstation in the Workstation IP address field, then click Test. This will test if the SSO agent is properly configured to identify the user logged into a workstation.
Tip: If you receive the messages Agent is not responding or Configuration error, check your settings and perform these tests again.
-
When you are finished with all Authentication Agent configuration, click OK.
Configuring Your SonicWALL Appliance for Browser NTLM Authentication
To use single sign-on, your SonicWALL security appliance must be configured to use either SonicWALL SSO Agent or Browser NTLM authentication only as the SSO method.
The following procedure describes how to configure your SonicWALL security appliance to use Browser NTLM authentication only. Perform the following steps:
-
Log in to your SonicWALL security appliance and navigate to Users > Settings.
In the Single-sign-on method drop-down menu, select Browser NTLM authentication only.
-
Click Configure. The SonicWALL SSO Agent Configuration window displays.
-
Click the Settings tab. Configuration on the Settings tab is the same as the configuration for the NTLM tab when SonicWALL SSO Agent is selected as the Single-sign-on method. Refer to Step 34 in the procedure in Configuring Your SonicWALL Security Appliance for SonicWALL SSO Agent for detailed configuration instructions for this page.
-
Click the Users tab. The User Settings page displays.
-
Check the box next to Allow only users listed locally to allow only users listed locally on the appliance to be authenticated.
-
Check the box next to Simple user names in local database to use simple user names. When selected, the domain component of a user name will be ignored. User names returned from the authentication agent typically include a domain component, for example, domain1/user1. If this box is not checked, user names in the local database must match exactly the full names returned from the agent, including the domain component.
-
To use LDAP to retrieve user information, select the Use LDAP to retrieve user group information radio button. Click Configure to configure the LDAP settings. The LDAP Configuration page displays. For configuration information for this page, refer to Advanced LDAP Configuration.
-
To use locally configured user group settings, select the Local configuration radio button.
-
In the Polling rate (minutes) field, enter a polling interval, in minutes. The security appliance will poll the workstation running SSO Agent once every interval to verify that users are still logged on. The default is 1.
-
Configuration on the Enforcement, Terminal Services, and Test tabs is the same as for those tabs when SonicWALL SSO Agent is selected as the Single-sign-on method. Refer to the procedure in Configuring Your SonicWALL Security Appliance for SonicWALL SSO Agent for detailed configuration instructions for these pages.
-
When you are finished with configuration on all tabs, click OK.
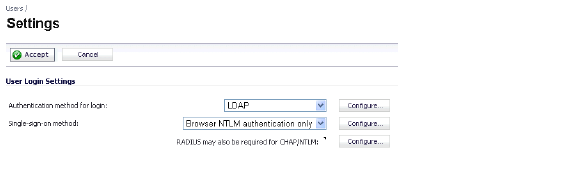
Configuring RADIUS for Use With NTLM
When LDAP is selected in the Authentication method for login field, RADIUS configuration is still required when using NTLM authentication. NTLM authentication requires MSCHAP, which is provided by RADIUS but not by LDAP.
The Configure button next to RADIUS may also be required for CHAP/NTLM is enabled when LDAP authentication is selected on the Users > Settings page.
If LDAP is configured, then it will be used for user group membership lookups after a user’s credentials provided by NTLM have been authenticated via RADIUS. Thus, when using NTLM it is not necessary to configure RADIUS to return user group membership information (which can be very complex to do with some RADIUS servers, such as IAS).
Note: Windows 7 and Vista machines require additional configuration to use RADIUS authentication with browser NTLM authentication via Internet Explorer. See the Configuring NTLMv2 Session Security on Windows .
To configure RADIUS settings, click the Configure button and follow the instructions in the Configuring RADIUS Authentication.
Configuring NTLMv2 Session Security on Windows
In Microsoft Windows 7 and Vista, Internet Explorer uses the NTLMv2 variant of NTLM by default. The NTLMv2 variant cannot be authenticated via RADIUS in the same way as NTLM. To use browser NTLM authentication as the SSO method with these versions of Windows, the Windows machines must be configured to use NTLMv2 Session Security instead of NTLMv2. NTLMv2 Session Security is a variant that is designed to be compatible with RADIUS/MSCHAPv2. This configuration is performed using Windows Group Policy.
To configure a Windows 7 or Vista machine to use NTLMv2 Session Security, perform the following steps:
-
To open Windows Group Policy, open the Control Panel and select Administrative Tools.
-
Select Local Security Policy to open the Local Security Policy window.
-
Expand Local Policies and click on Security Options.
-
Edit the Network Security: LAN Manager authentication level setting and select one of the following:
-
Send NTLM response only
-
Send LM & NTLM - use NTLMv2 session security if negotiated
-
To prevent the above setting from enabling NTLM more generally, do one or both of the following:
-
Set the Network Security: Restrict NTLM: NTLM authentication in this domain to Deny all.
-
Set the Network Security: Restrict NTLM: Outgoing NTLM traffic to remote servers to Deny all.
Then, do one or both of the following:
-
Add the SonicWALL appliance domain name or IP address in the Network Security: Restrict NTLM: Add remote server exceptions for NTLM authentication setting.
-
Add the SonicWALL appliance domain name or IP address in the Network Security: Restrict NTLM: Add server exceptions in this domain setting.
Advanced LDAP Configuration
If you selected Use LDAP to retrieve user group information on the Users tab in step 19 of Configuring Your SonicWALL Security Appliance for SonicWALL SSO Agent, you must configure your LDAP settings. To configure LDAP settings, perform the following steps:
-
On the Users tab in the SSO Configure window, click the Configure button next to the Use LDAP to retrieve user group information option.
-
The Settings tab displays. In the Name or IP address field, enter the name or IP address of your LDAP server.
-
In the Port Number field, enter the port number of your LDAP server. The default LDAP ports are:
-
Default LDAP port – 389
-
Default LDAP over TLS port – 636
-
In the Server timeout (seconds) field, enter a number of seconds the SonicWALL security appliance will wait for a response from the LDAP server before the attempt times out. Allowable values are 1 to 99999. The default is 10 seconds.
-
In the Overall operation timeout (minutes) field, enter a number of minutes the SonicWALL security appliance will spend on any automatic operation before timing out. Allowable values are 1 to 99999. The default is 5 minutes.
-
Select the Anonymous login radio button to log in anonymously. Some LDAP servers allow for the tree to be accessed anonymously. If your server supports this (MS AD generally does not), you may select this option.
Select Give login name / location in tree to access the tree with the login name.
Select Give bind distinguished name to access the tree with the distinguished name.
-
To log in with a user’s name and password, enter the user’s name in the Login user name field and the password in the Login password field. The login name will automatically be presented to the LDAP server in full ‘dn’ notation.
Note: Use the user’s name in the Login user name field, not a username or login ID. For example, John Doe would log in as John Doe, not jdoe.
-
Select the LDAP version from the Protocol version drop-down menu, either LDAP version 2 or LDAP version 3. Most implementations of LDAP, including AD, employ LDAP version 3.
-
Select the Use TLS (SSL) checkbox to use Transport Layer Security (SSL) to log in to the LDAP server. It is strongly recommended to use TLS to protect the username and password information that will be sent across the network. Most implementations of LDAP server, including AD, support TLS.
-
Select the Send LDAP ‘Start TLS’ request checkbox to allow the LDAP server to operate in TLS and non-TLS mode on the same TCP port. Some LDAP server implementations support the Start TLS directive rather than using native LDAP over TLS. This allows the LDAP server to listen on one port (normally 389) for LDAP connections, and to switch to TLS as directed by the client. AD does not use this option, and it should only be selected if required by your LDAP server.
Note: Only check the Send LDAP ‘Start TLS’ request box if your LDAP server uses the same port number for TLS and non-TLS.
-
Select the Require valid certificate from server checkbox to require a valid certificate from the server. Validates the certificate presented by the server during the TLS exchange, matching the name specified above to the name on the certificate. Deselecting this default option will present an alert, but exchanges between the SonicWALL security appliance and the LDAP server will still use TLS – only without issuance validation.
-
Select a local certificate from the Local certificate for TLS drop-down menu. This is optional, to be used only if the LDAP server requires a client certificate for connections. This feature is useful for LDAP server implementations that return passwords to ensure the identity of the LDAP client (AD does not return passwords). This setting is not required for AD.
-
Click Apply.
-
Click the Schema tab.
-
From the LDAP Schema drop-down menu, select one of the following LDAP schemas. Selecting any of the predefined schemas will automatically populate the fields used by that schema with their correct values. Selecting ‘user-defined’ will allow you to specify your own values – use this only if you have a specific or proprietary LDAP schema configuration.
-
Microsoft Active Directory
-
RFC2798 InetOrgPerson
-
RFC2307 Network Information Service
-
Samba SMB
-
Novell eDirectory
-
User defined
-
The Object class field defines which attribute represents the individual user account to which the next two fields apply. This will not be modifiable unless you select User defined.
-
The Login name attribute field defines which attribute is used for login authentication. This will not be modifiable unless you select User defined.
-
If the Qualified login name attribute field is not empty, it specifies an attribute of a user object that sets an alternative login name for the user in name@domain format. This may be needed with multiple domains in particular, where the simple login name may not be unique across domains. For Microsoft Active Directory, this is typically set to userPrincipalName for login using name@domain. This can also be set to mail for Active Directory and RFC2798 inetOrgPerson.
-
The User group membership attribute field contains the information in the user object of which groups it belongs to. This is memberOf in Microsoft Active Directory. The other predefined schemas store group membership information in the group object rather than the user object, and therefore do not use this field.
-
In the Additional user group ID attribute field, enter the attribute that contains the user’s primary group ID. This field is used to get primary user group information for user accounts, and works together with the Additional user group match attibute option. To enable database searches for the user group information, select the Use checkbox.
Windows has the concept of each user having a primary user group, which is normally Domain Users for domain users and Admin Users for administrators. However, an LDAP search for a user’s group memberships does not include that primary group in the list returned from Active Directory. Therefore, to allow setting rules and policies for the Domain Users or Admin Users groups, the appliance also needs to retrieve a user’s primary user group with a separate LDAP search.
An attribute must be used for the search, because in Active Directory the user’s primary group is not set by name as other user group memberships are. Instead, it is set in the user object by a primaryGroupID attribute that gives an ID number, that ID number being given in the user group object by a primaryGroupToken attribute.
To allow these user groups to be used on the appliance for applying group policies, after reading the user object with its user group memberships from LDAP, the appliance needs to perform an additional search for a user group with a primaryGroupToken attribute matching the user’s primaryGroupID attribute.
Use of these attributes is off by default, as there is additional time overhead in user group searches. The Use checkbox must be enabled to search for a user’s primary user group.
Although this is primarily for attributes of Active Directory, it can operate with any schema to allow a search for one additional user group by setting appropriate attribute values in the Additional user group ID attribute and Additional user group match attribute fields. These fields default to primaryGroupID and primaryGroupToken when Active Directory is selected.
-
The Framed IP address attribute field can be used to retrieve a static IP address that is assigned to a user in the directory. Currently it is only used for a user connecting using L2TP with the SonicWALL security appliance L2TP server. In future releases, this may also be supported for the SonicWALL Global VPN Client (GVC). In Active Director, the static IP address is configured on the Dial-in tab of a user’s properties.
-
The Object class field defines the type of entries that an LDAP directory may contain. A sample object class, as used by AD, would be ‘user’ or ‘group’.
-
The Member attribute field defines which attribute is used for login authentication.
-
The Additional user group match attribute field defines the attribute that contains the user group ID for the user. The Additional user group match attribute field works together with the Additional user group ID attribute field. For more information about these fields, see Step 20 above.
-
Select the Directory tab.
-
In the Primary Domain field, specify the user domain used by your LDAP implementation. For AD, this will be the Active Directory domain name, such as yourADdomain.com. Changes to this field will, optionally, automatically update the tree information in the rest of the page. This is set to mydomain.com by default for all schemas except Novell eDirectory, for which it is set to o=mydomain.
-
In the User tree for login to server field, specify the tree in which the user specified in the ‘Settings’ tab resides. For example, in AD the ‘administrator’ account’s default tree is the same as the user tree.
-
In the Trees containing users field, specify the trees where users commonly reside in the LDAP directory. One default value is provided that can be edited, a maximum of 64 DN values may be provided, and the SonicWALL security appliance searches the directory until a match is found, or the list is exhausted. If you have created other user containers within your LDAP or AD directory, you should specify them here.
-
In the Trees containing user groups specify the trees where user groups commonly reside in the LDAP directory. A maximum of 32 DN values may be provided. These are only applicable when there is no user group membership attribute in the schema's user object, and are not used with AD.
The above-mentioned trees are normally given in URL format but can alternatively be specified as distinguished names (for example, “myDom.com/Sales/Users” could alternatively be given as the DN “ou=Users,ou=Sales,dc=myDom,dc=com”). The latter form will be necessary if the DN does not conform to the normal formatting rules as per that example. In Active Directory the URL corresponding to the distinguished name for a tree is displayed on the Object tab in the properties of the container at the top of the tree.
Note: AD has some built-in containers that do not conform (for example, the DN for the top level Users container is formatted as “cn=Users,dc=…”, using ‘cn’ rather than ‘ou’) but the SonicWALL knows about and deals with these, so they can be entered in the simpler URL format.
Ordering is not critical, but since they are searched in the given order it is most efficient to place the most commonly used trees first in each list. If referrals between multiple LDAP servers are to be used, then the trees are best ordered with those on the primary server first, and the rest in the same order that they will be referred.
Note: When working with AD, to locate the location of a user in the directory for the ‘User tree for login to server’ field, the directory can be searched manually from the Active Directory Users and Settings control panel applet on the server, or a directory search utility such as queryad.vbs in the Windows NT/2000/XP Resource Kit can be run from any PC in the domain.
-
The Auto-configure button causes the SonicWALL security appliance to auto-configure the ‘Trees containing users’ and ‘Trees containing user groups’ fields by scanning through the directory/directories looking for all trees that contain user objects. The ‘User tree for login to server’ must first be set.
Select whether to append new located trees to the current configuration, or to start from scratch removing all currently configured trees first, and then click OK. Note that it will quite likely locate trees that are not needed for user login and manually removing such entries is recommended.
If using multiple LDAP/AD servers with referrals, this process can be repeated for each, replacing the ‘Domain to search’ accordingly and selecting ‘Append to existing trees’ on each subsequent run.
-
Select the Referrals tab.
-
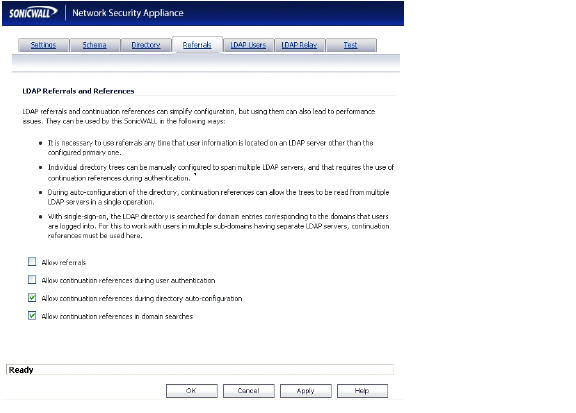
If multiple LDAP servers are in use in your network, LDAP referrals may be necessary. Select one or more of the following check boxes:
-
Allow referrals – Select when user information is located on an LDAP server other than the primary one.
-
Allow continuation references during user authentication – Select when individual directory trees span multiple LDAP servers.
-
Allow continuation references during directory auto-configuration – Select to read directory trees from multiple LDAP servers in the same operation.
-
Allow continuation references in domain searches – Select to search for sub-domains in multiple LDAP servers.
-
Select the LDAP Users tab.
-
Check the Allow only users listed locally box to require that LDAP users also be present in the SonicWALL security appliance local user database for logins to be allowed.
-
Check the User group membership can be set locally by duplicating LDAP user names box to allow for group membership (and privileges) to be determined by the intersection of local user and LDAP user configurations.
-
From the Default LDAP User Group drop-down menu, select a default group on the SonicWALL security appliance to which LDAP users will belong in addition to group memberships configured on the LDAP server.
Tip: Group memberships (and privileges) can also be assigned simply with LDAP. By creating user groups on the LDAP/AD server with the same name as SonicWALL security appliance built-in groups (such as Guest Services, Content Filtering Bypass, Limited Administrators) and assigning users to these groups in the directory, or creating user groups on the SonicWALL security appliance with the same name as existing LDAP/AD user groups, SonicWALL group memberships will be granted upon successful LDAP authentication.
The SonicWALL security appliance can retrieve group memberships more efficiently in the case of Active Directory by taking advantage of its unique trait of returning a ‘memberOf’ attribute for a user.
-
Click the Import user groups button to import user groups from the LDAP server. The names of user groups on the LDAP server need to be duplicated on the SonicWALL if they are to be used in policy rules, CFS policies, etc.
-
Select the LDAP Relay tab.
-
Select the Enable RADIUS to LDAP Relay checkbox to enable RADIUS to LDAP relay. The RADIUS to LDAP Relay feature is designed for use in a topology where there is a central site with an LDAP/AD server and a central SonicWALL security appliance with remote satellite sites connected into it using SonicWALL security appliances that may not support LDAP. In that case the central SonicWALL security appliance can operate as a RADIUS server for the remote SonicWALL security appliances, acting as a gateway between RADIUS and LDAP, and relaying authentication requests from them to the LDAP server.
Additionally, for remote SonicWALL security appliances running non-enhanced firmware, with this feature the central SonicWALL security appliance can return legacy user privilege information to them based on user group memberships learned using LDAP. This avoids what can be very complex configuration of an external RADIUS server such as IAS for those SonicWALL security appliances.
-
Under Allow RADIUS clients to connect via, select the relevant checkboxes and policy rules will be added to allow incoming RADIUS requests accordingly. The options are:
-
Trusted Zones
-
WAN Zone
-
Public Zones
-
Wireless Zones
-
VPN Zone
-
In the RADIUS shared secret field, enter a shared secret common to all remote SonicWALL security appliances.
-
In the User groups for legacy users fields, define the user groups that correspond to the legacy ‘VPN users,’ ‘VPN client users,’ ‘L2TP users’ and ‘users with Internet access’ privileges. When a user in one of the given user groups is authenticated, the remote SonicWALL security appliances will be informed that the user is to be given the relevant privilege.
Note: The ‘Bypass filters’ and ‘Limited management capabilities’ privileges are returned based on membership to user groups named ‘Content Filtering Bypass’ and ‘Limited Administrators’ – these are not configurable.
-
Select the Test tab.
The ‘Test’ page allows for the configured LDAP settings to be tested by attempting authentication with specified user and password credentials. Any user group memberships and/or framed IP address configured on the LDAP/AD server for the user will be displayed.
-
In the Username and Password fields, enter a valid LDAP login name for the LDAP server you configured.
-
Select Password authentication or CHAP (Challenge Handshake Authentication Protocol).
Note: CHAP only works with a server that supports retrieving user passwords using LDAP and in some cases requires that the LDAP server to be configured to store passwords reversibly. CHAP cannot be used with Active Directory.
-
Click Test. Status and information returned from the LDAP server are displayed in the Test Status, Message from LDAP, and Returned User Attributes fields.
Tuning Single Sign-On Advanced Settings
This section provides detailed information to help you tune the advanced SSO settings on your SonicWALL appliance. See the following sections:
Overview
When a user first tries to send traffic through a SonicWALL that is using SSO, the appliance sends a “who is this” request to SonicWALL SSO Agent. The agent queries the user’s PC via Windows networking, and returns the user name to the SonicWALL appliance. If the user name matches any criteria set in the policies, then the user is considered as “logged on” by the SonicWALL. When users are logged into the SonicWALL using SSO, the SSO feature also provides detection of logouts. To detect logouts, the appliance repeatedly polls the agent to check if each user is still logged in. This polling, along with the initial identification requests, could potentially result in a large loading on the SonicWALL SSO Agent application and the PC on which it is running, especially when very large numbers of users are connecting.
The SonicWALL SSO feature utilizes a rate-limiting mechanism to prevent the appliance from swamping the agent with these user requests. Both automatic calculations and a configurable setting on the appliance govern how this rate-limiting operates. The SonicWALL SSO feature automatically calculates the maximum number of user requests contained in each message to the agent that can be processed in the poll period, based on recent polling response times. Also, the timeout on a multi-user request is automatically set to be long enough to reduce the likelihood of an occasional long timeout during polling. The configurable setting controls the number of requests to send to the agent at a time, and can be tuned to optimize SSO performance and prevent potential problems. This section provides a guide to choosing suitable settings.
The potential for problems resulting from overloading the agent can be reduced by running the agent on a dedicated high-performance PC, and possibly also by using multiple agents on separate PCs, in which case the load will be shared between them. The latter option also provides redundancy in case one of the agent PCs fails. The agent should run on a Windows Server PC (some older workstations could be used but changes in later Windows 2000/XP/Vista workstation releases and in service packs for the older versions added a TCP connection rate limiting feature that interferes with operation of the SSO agent).
About the Advanced Settings
The Maximum requests to send at a time setting is available on the Advanced tab of the SSO agent configuration.
This setting controls the maximum number of requests that can be sent from the appliance to the agent at the same time. The agent processes multiple requests concurrently, spawning a separate thread in the PC to handle each. Sending too many requests at a time can overload the PC on which the agent is running. If the number of requests to send exceeds the maximum, then some are placed on an internal “ring buffer” queue (see Using the Single Sign-On Statistics in the TSR and Viewing SSO Mouseover Statistics and Tooltips). Requests waiting on the ring buffer for too long could lead to slow response times in SSO authentication.
This setting works in conjunction with the automatically calculated number of user requests per message to the agent when polling to check the status of logged in users. The number of user requests per message is calculated based on recent polling response times. SonicOS adjusts this number as high as possible to minimize the number of messages that need to be sent, which reduces the load on the agent and helps reduce network traffic between the appliance and the agent. However, the number is kept low enough to allow the agent to process all of the user requests in the message within the poll period. This avoids potential problems such as timeouts and failures to quickly detect logged out users.
Viewing SSO Mouseover Statistics and Tooltips
The SSO Configuration page provides mouseover statistics about each agent, and mouseover tooltips for many fields. On the Settings tab, a green LED-style icon next to an agent indicates that the agent is up and running. A red LED icon indicates that the agent is down.

To view the statistics for a particular agent, hover your mouse pointer over the statistics icon to the right of the SSO agent. This also works for individual TSAs on the Terminal Services tab.
To view the statistics for all SSO activity on the appliance, hover your mouse pointer over the statistics icon at the bottom of the table, in the same row as the Add button.
To close the statistics display, click close.
To clear all the displayed values, click Click to reset.
To view the tooltips available for many fields in the SSO configuration screens, hover your mouse pointer over the triangular icon to the right of the field. The tooltip will display until you move your mouse pointer away.
Using the Single Sign-On Statistics in the TSR
A rich set of SSO performance and error statistics is included in the Tech Support Report (TSR). These can be used to gauge how well SSO is performing in your installation. Download the TSR on the System > Diagnostics page and search for the title “SSO operation statistics”. The following are the counters to look at in particular:
-
Under Users currently connected, the TSR can include a list of all currently logged in local and remote users, regardless of how they were authenticated. By selecting the Current Users and Detail of Users options on the System > Diagnostics page before generating the TSR, eight to nine lines of detailed information are provided in the TSR for each user. Or, you can opt for just one summary line per user by selecting Current Users and clearing Detail of Users. If the Current Users checkbox is not selected, then the users list is omitted from the TSR.
When Detail of Users is selected, numerous details are provided, varying with the type of user. They include timers, privileges, management mode if managing, group memberships, CFS policies, VPN client networks, and other information. Disabling this option when there are thousands of users logged in could greatly decrease the size of the TSR file that is created, versus one that includes the detailed users list.
When Detail of Users is not selected, the user summary includes the IP address, user name, type of user and, for administrative users who are currently managing, their management mode. For example:
Users currently connected:
192.168.168.1: Web user admin logged in (managing in Config mode)
192.168.168.9: Auto user Administrator (SD80\Administrator) auto logged in
-
Under SSO ring buffer statistics, look at Ring buffer overflows and Maximum time spent on ring. If the latter approaches or exceeds the polling rate, or if any ring buffer overflows are shown, then requests are not being sent to the agent quickly enough. Also, if the Current requests waiting on ring is constantly increasing, that would indicate the same. This means that the Maximum requests to send at a time value should be increased to send requests faster. However, that will increase the load on the agent, and if the agent cannot handle the additional load, then problems will result, in which case it may be necessary to consider moving the agent to a more powerful PC or adding additional agents.
-
Under SSO operation statistics, look at Failed user id attempts with time outs and Failed user id attempts with other errors. These should be zero or close to it – significant failures shown here indicate a problem with the agent, possibly because it cannot keep up with the number of user authentications being attempted.
-
Also under SSO operation statistics, look at the Total users polled in periodic polling, User polling failures with time outs, and User polling failures with other errors. Seeing some timeouts and errors here is acceptable and probably to be expected, and occasional polling failures will not cause problems. However, the error rate should be low (an error rate of about 0.1% or less should be acceptable). Again, a high failure rate here would indicate a problem with the agent, as above.
-
Under SSO agent statistics, look at the Avg user ID request time and Avg poll per-user resp time. These should be in the region of a few seconds or less – something longer indicates possible problems on the network. Note, however, that errors caused by attempting to authenticate traffic from non-Windows PCs via SSO (which can take a significantly long time) can skew the Avg user ID request time value, so if this is high but Avg poll per-user resp time looks correct, that would indicate the agent is probably experiencing large numbers of errors, likely due to attempting to authenticate non-Windows devices – see below, #7.
-
If using multiple agents, then also under SSO agent statistics look at the error and timeout rates reported for the different agents, and also their response times. Significant differences between agents could indicate a problem specific to one agent that could be addressed by upgrading or changing settings for that agent in particular.
-
Traffic from devices other than PCs can trigger SSO identification attempts and that can cause errors and/or timeouts to get reported in these statistics. This can be avoided by configuring an address object group with the IP addresses of such devices, and doing one or both of the following:
-
If using Content Filtering, select that address object with the Bypass the Single Sign On process for traffic from setting on the Enforcement tab of the SSO configuration.
-
If access rules are set to allow only authenticated users, set separate rules for that address object with Users Allowed set to All.
For related information, see the White Listing IP Addresses to Bypass SSO and Authentication .
To identify the IP addresses concerned, look in the TSR and search for “IP addresses held from SSO attempts”. This lists SSO failures in the preceding period set by the Hold time after failure setting.
Note: If any of the listed IP addresses are for are Mac/Linux PCs, see the Accommodating Mac and Linux Users.
To limit the rate of errors due to this you can also extend the Hold time after failure setting on the Users tab.
For information about viewing SSO statistics on the SSO configuration page, see Viewing SSO Mouseover Statistics and Tooltips.
Examining the Agent
If the above statistics indicate a possible problem with the agent, a good next step would be to run Windows Task Manager on the PC on which the agent is running and look at the CPU usage on the Performance tab, plus the CPU usage by the “CIAService.exe” process on the Processes tab. If the latter is using a large percentage of the CPU time and the CPU usage is spiking close to 100%, this is an indication that the agent is getting overloaded. To try to reduce the loading you can decrease the Maximum requests to send at a time setting; see Using the Single Sign-On Statistics in the TSR above, #2.
Remedies
If the settings cannot be balanced to avoid overloading the agent’s PC while still being able to send requests to the agent fast enough, then one of the following actions should be taken:
-
Consider reducing the polling rate configured on the Users tab by increasing the poll time. This will reduce the load on the agent, at the cost of detecting logouts less quickly. Note that in an environment with shared PCs, it is probably best to keep the poll interval as short as possible to avoid problems that could result from not detecting logouts when different users use the same PC, such as the initial traffic from the second user of a PC possibly being logged as sent by the previous user.
-
Move the agent to a higher-performance, dedicated PC.
-
Configure an additional agent or agents.
Configuring Firewall Access Rules
Enabling SonicWALL SSO affects policies on the Firewall > Access Rules page of the SonicOS Enhanced management interface. Rules set under Firewall > Access Rules are checked against the user group memberships returned from a SSO LDAP query, and are applied automatically.
See the following sections for more information:
Automatically Generated Rules for SonicWALL SSO
When a SonicWALL SSO agent or TSA is configured in the SonicOS Enhanced management interface, a Firewall access rule and corresponding NAT policy are created to allow the replies from the agent into the LAN. These rules use either a SonicWALL SSO Agents or SonicWALL Terminal Services Agents address group object, which has a member address object for each configured agent. The member address objects are automatically added to and deleted from the group object as agents are added or deleted. The member address objects are also updated automatically as an agent’s IP address changes, including when an IP address is resolved via DNS (where an agent is given by DNS name).
If SonicWALL SSO agents or TSAs are configured in different zones, the Firewall access rule and NAT policy are added to each applicable zone. The same SonicWALL SSO Agents or SonicWALL Terminal Services Agents address group is used in each zone.
Note: Do not enable Guest Services in the same zone where SonicWALL SSO is being used. Enabling Guest Services will disable SSO in that zone, causing users who have authenticated via SSO to lose access. Create a separate zone for Guest Services.
Accommodating Mac and Linux Users
Mac and Linux systems do not support the Windows networking requests that are used by the SonicWALL SSO agent, and hence require Samba 3.5 or newer to work with SonicWALL SSO.
Using SSO on Mac and Linux With Samba
For Windows users, SonicWALL SSO is used by a SonicWALL appliance to automatically authenticate users in a Windows domain. It allows the users to get access through the appliance with correct filtering and policy compliance without the need to identify themselves via any additional login process after their Windows domain login.
Samba is a software package used by Linux/Unix or Mac machines to give their users access to resources in a Windows domain (via Samba’s smbclient utility) and/or to give Windows domain users access to resources on the Linux or Mac machine (via a Samba server).
A user working on a Linux PC or Mac with Samba in a Windows domain can be identified by SonicWALL SSO, but it requires proper configuration of the Linux/Mac machine, the SSO Agent, and possibly some reconfiguration of the appliance. For example, the following configuration is necessary:
-
To use SonicWALL SSO with Linux/Mac users, the SonicWALL SSO Agent must be configured to use NetAPI rather than WMI to get the user login information from the user's machine.
-
For Samba to receive and respond to the requests from the SonicWALL SSO Agent, it must be set up as a member of the domain and the Samba server must be running and properly configured to use domain authentication.
These and other configuration details are described in the following technote:http://www.sonicwall.com/downloads/Using_SSO_with_Samba_TechNote.pdf
SonicWALL SSO is supported by Samba 3.5 or newer.
Note: If multiple users log into a Linux PC, access to traffic from that PC is granted based on the most recent login.
Using SSO on Mac and Linux Without Samba
Without Samba, Mac and Linux users can still get access, but will need to log in to the SonicWALL appliance to do so. This can cause the following problems:
-
Traffic from Mac or Linux systems might keep triggering SSO identification attempts unless the user logs in. This could potentially be a performance overhead to the SSO system if there are a large number of such systems, although the effect would be somewhat mitigated by the “hold after failure” timeout.
-
If per-user Content Filtering (CFS) policies are used without policy rules with user level authentication, the default CFS policy will be applied to users of Mac and Linux systems unless they manually log in first.
-
If policy rules are set requiring user level authentication, Web browser connections from users of Mac and Linux systems will be redirected to the login page after the SSO failure, but the failure may initiate a timeout that would cause a delay for the user.
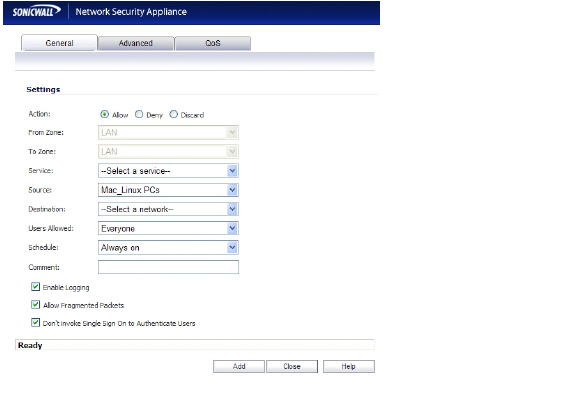
To avoid these problems, the Don't invoke Single Sign On to Authenticate Users checkbox is available when configuring Firewall access rules by clicking Add on the Firewall > Access Rules page (with View Style set to All Rules). This checkbox is visible only when SonicWALL SSO is enabled and when the Users Allowed field on the Add Rule page is not set to All. If this checkbox is selected, SSO will not be attempted for traffic that matches the rule, and unauthenticated HTTP connections that match it will be directed straight to the login page. Typically, the Source field would be set to an address object containing the IP addresses of Mac and Linux systems.
In the case of CFS, a rule with this checkbox enabled can be added “in front of” CFS so that HTTP sessions from Mac and Linux systems are automatically redirected to log in, avoiding the need for these users to log in manually.
Note: Do not select the Don't invoke Single Sign On to Authenticate Users option for use with devices that are allowed to bypass the user authentication process entirely. Any devices that may be affected by an access rule when this option is enabled must be capable of logging in manually. A separate access rule should be added for such devices, with Users Allowed set to All.
White Listing IP Addresses to Bypass SSO and Authentication
If you have IP addresses that should always be allowed access without requiring user authentication, they can be white-listed.
To white-list IP addresses so that they do not require authentication and can bypass SSO:
-
On the Network > Address Objects page, create an Address Group containing the IP addresses to be white-listed.
-
If you have access rules requiring user authentication for certain services, then add an additional rule for the same services on the Firewall > Access Rules page. Set the Source to the Address Group you just created, and set Users Allowed to All.
-
If you also want those IP addresses to bypass SSO for services such as CFS, IPS, App Rules, DPI-SSL, or Anti-Spyware, then navigate to Users > Settings, select SSO Agent for the Single-sign-on method and click Configure. On the Enforcement tab, select the Address Group you created in the Bypass the Single Sign On process for traffic from field.
The default CFS policy will be applied to users at these IP addresses, and no IPS policies or App Control policies that include particular users will be applied to them.
This method is appropriate for small numbers of IP addresses or to white-list subnets or IP address ranges. It will work for large numbers of separate IP addresses, but could be rather inefficient.
Forcing Users to Log In When SSO Fails with CFS, IPS, App Control
You can use Access Rules to force users to log in via the Web UI when they cannot be identified via Single Sign-On (SSO). Users need to be identfied for CFS, IPS, App Rules, or other policies to be correctly applied. An Access Rule can make the SonicWALL prompt the user for username and password.
If there are multiple CFS policies, or if IPS, App Rules, App Control, Anti-Spyware or DPI-SSL have policies that are set to include/exclude certain users/user groups, then SSO is initiated to identify users. By default, if SSO fails to identify a user, the user is given access through the firewall while constrained by the default CFS policy or without the IPS policy, App Rule, or other policy being applied.
You can use Access Rules in conjunction with the above services to force all users to log in via the Web UI with username/password when SSO fails, before they are allowed access through the firewall. Set an access rule that requires users to be authenticated, and that rule will initiate SSO. In this case, if SSO fails to identify the user they are blocked and, in the case of HTTP, redirected to the login page.
That can be done in one of two ways. The source zone is shown as LAN here, but can be any applicable zone(s):
-
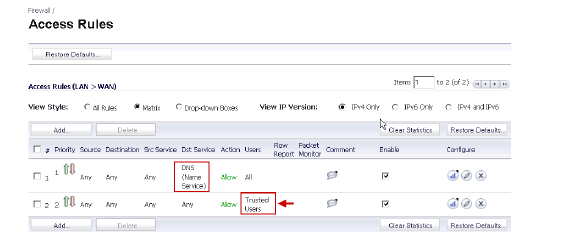
Change Users Allowed in the default LAN -> WAN rule to Everyone or Trusted Users. These are authenticated users. Then add rules to allow out traffic that you do not want to be blocked for unidentified users (such as DNS, email, ...) with Users Allowed set to All.
-
Leave the default LAN -> WAN rule allowing All users, and add a rule to allow HTTP and HTTPS from addresses Any to Any with Users Allowed set to Everyone or Trusted Users. You can also include other services along with HTTP/HTTPS if you do not want those being used by unauthenticated users.
Of these, option 1 is the more secure option, but is also the more likely to cause problems by blocking unforeseen things that should be allowed access without authentication.
Allowing ICMP Pings from a Terminal Server
In Windows, outgoing ICMP pings from users on the Terminal Server are not sent via a socket and so are not seen by the TSA, and hence the appliance will receive no notifications for them. Therefore, if firewall rules are using user level authentication and pings are to be allowed through, you must create separate access rules to allow them from “All”.
About Firewall Access Rules
Firewall access rules provide the administrator with the ability to control user access. Rules set under Firewall > Access Rules are checked against the user group memberships returned from a SSO LDAP query, and are applied automatically. Access rules are network management tools that allow you to define inbound and outbound access policy, configure user authentication, and enable remote management of the SonicWALL security appliance. The SonicOS Firewall > Access Rules page provides a sortable access rule management interface.
Note: More specific policy rules should be given higher priority than general policy rules. The general specificity hierarchy is source, destination, service. User identification elements, for example, user name and corresponding group permissions, are not included in defining the specificity of a policy rule.
By default, SonicWALL security appliance’s stateful packet inspection allows all communication from the LAN to the Internet, and blocks all traffic to the LAN from the Internet.
Additional network access rules can be defined to extend or override the default access rules. For example, access rules can be created that block certain types of traffic such as IRC from the LAN to the WAN, or allow certain types of traffic, such as Lotus Notes database synchronization, from specific hosts on the Internet to specific hosts on the LAN, or restrict use of certain protocols such as Telnet to authorized users on the LAN.
Note: The ability to define network access rules is a powerful tool. Using custom access rules can disable firewall protection or block all access to the Internet. Use caution when creating or deleting network access rules.
For detailed information about access rules, see Firewall > Access Rules.
Managing SonicOS with HTTP Login from a Terminal Server
The SonicWALL UTM appliance normally grants access through policies based on authentication credentials supplied via HTTP login for one user at an IP address. For users on a terminal server, this method of authenticating one user per IP address is not possible. However, HTTP login is still allowed from a terminal server only for the purpose of administration of the appliance, subject to the following limitations and requirements:
-
Internet access from the terminal server is controlled from the TSA, and HTTP login does not override that – a user on a terminal server is not granted any access through the appliance based on credentials supplied via HTTP login.
-
HTTP login from a terminal server is allowed only for the built-in admin account and other user accounts with administrator privileges. An attempt to log in with a non-administrative account will fail with the error “Not allowed from this location.”
-
On successful HTTP login, an administrative user is taken straight to the management interface. The small “User Login Status” page is not displayed.
-
The administrative user account used for HTTP login from the terminal server does not need to be the same user account that was used for login to the terminal server. It is shown on the appliance as an entirely separate login session.
-
Only one user at a time can manage the appliance from a given terminal server. If two users attempt to do so simultaneously, the most recently logged in user takes precedence, and the other user will see the error “This is not the browser most recently used to log in.”
-
On a failure to identify a user due to communication problems with the TSA, an HTTP browser session is not redirected to the Web login page (as happens on a failure in the SSO case). Instead, it goes to a new page with the message “The destination that you were trying to reach is temporarily unavailable due to network problems.”
Viewing and Managing SSO User Sessions
This section provides information to help you manage SSO on your SonicWALL appliance. See the following sections:
Logging Out SSO Users

The Users > Status page displays Active User Sessions on the SonicWALL security appliance. The table lists User Name, IP Address, Session Time, Time Remaining, Inactivity Remaining, Settings, and Logout. For users authenticated using SonicWALL SSO Agent, the message Auth. by SSO Agent will display. To logout a user, click the delete icon next to the user’s entry.
Note: Changes in a user’s settings, configured under Users > Settings, will not be reflected during that user’s current session; you must manually log the user out for changes to take effect. The user will be transparently logged in again, with the changes reflected.
Configuring Additional SSO User Settings
The Users > Settings page provides the administrator with configuration options for user session settings, global user settings, and acceptable use policy settings, in addition to SSO and other user login settings.
The Enable login session limit and corresponding Login session limit (minutes) settings under User Session Settings apply to users logged in using SSO. SSO users will be logged out according to session limit settings, but will be automatically and transparently logged back in when they send further traffic.
Note: Do not set the login session limit interval too low. This could potentially cause performance problems, especially for deployments with many users.
Changes applied in the Users > Settings page during an active SSO session will not be reflected during that session.
Tip: You must log the user out for changes to take effect. The user will immediately and automatically be logged in again, with the changes made.
Viewing SSO and LDAP Messages with Packet Monitor
In SonicOS Enhanced 5.6 and above, the Packet Monitor feature available on System > Packet Monitor provides two checkboxes to enable capture of decrypted messages to and from the SSO agent, and decrypted LDAP over TLS (LDAPS) messages.
In SonicOS Enhanced 5.5, this functionality was introduced in the Packet Capture feature available on System > Packet Capture.
Capturing SSO Messages
To capture decrypted messages to or from the SSO authentication agent, perform the following steps:
-
Click the Configuration button in the System > Packet Monitor page
-
Click the Advanced Monitor Filter tab
-
Select the Monitor intermediate Packets checkbox.
-
Select the Monitor intermediate decrypted Single Sign On agent messages checkbox.
-
Click OK.
The packets will be marked with (sso) in the ingress/egress interface field. They will have dummy Ethernet, TCP, and IP headers, so some values in these fields may not be correct.
This will enable decrypted SSO packets to be fed to the packet monitor, but any monitor filters will still be applied to them.
Captured SSO messages are displayed fully decoded on the System > Packet Monitor screen.
Capturing LDAP Over TLS Messages
To capture decrypted LDAP over TLS (LDAPS) packets, perform the following steps:
-
Click the Configuration button in the System > Packet Monitor page
-
Click the Advanced Monitor Filter tab
-
Select the Monitor intermediate Packets checkbox.
-
Select the Monitor intermediate decrypted LDAP over TLS packets checkbox.
-
Click OK.
The packets will be marked with (ldp) in the ingress/egress interface field. They will have dummy Ethernet, TCP, and IP headers, so some values in these fields may not be correct. The LDAP server port will be set to 389 so that an external capture analysis program (such as Wireshark) will know to decode these packets as LDAP. Passwords in captured LDAP bind requests will be obfuscated. The LDAP messages are not decoded in the Packet Monitor display, but the capture can be exported and displayed in WireShark to view them decoded.
This will enable decrypted LDAPS packets to be fed to the packet monitor, but any monitor filters will still be applied to them.
Note: LDAPS capture only works for connections from the SonicWALL appliance’s LDAP client, and will not display LDAP over TLS connections from an external LDAP client that pass through the appliance.
Configuring Multiple Administrator Support
This section contains the following subsections:
Configuring Additional Administrator User Profiles
To configure additional administrator user profiles, perform the following steps:
-
While logged in as admin, navigate to the Users > Local Users page.
-
Click the Add User button.
-
Enter a Name and Password for the user.
-
Click on the Group Membership tab.
-
Select the appropriate group to give the user Administrator privileges:
-
Limited Administrators - The user has limited administrator configuration privileges.
-
SonicWALL Administrators - The user has full administrator configuration privileges.
-
SonicWALL Read-Only Admins - The user can view the entire management interface, but cannot make any changes to the configuration.
-
Click the right arrow button and click OK.
-
To configure the multiple administrator feature such that administrators are logged out when they are preempted, navigate to the System > Administration page.
-
Select the Log out radio button for the On preemption by another administrator option and click Accept.
Configuring Administrators Locally when Using LDAP or RADIUS
When using RADIUS or LDAP authentication, if you want to ensure that some or all administrative users will always be able to manage the appliance, even if the RADIUS or LDAP server becomes unreachable, then you can use the RADIUS + Local Users or LDAP + Local Users option and configure the accounts for those particular users locally.
For users authenticated by RADIUS or LDAP, create user groups named SonicWALL Administrators and/or SonicWALL Read-Only Admins on the RADIUS or LDAP server (or its back-end) and assign the relevant users to those groups. Note that in the case of RADIUS you will probably need special configuration of the RADIUS server to return the user group information – see the SonicWALL RADIUS documentation for details.
When using RADIUS or LDAP authentication, if you want to keep the configuration of administrative users local to the appliance whilst having those users authenticated by RADIUS/LDAP, perform these steps:
-
Navigate to the Users > Settings page.
-
Select either the RADIUS + Local Users or LDAP + Local Users authentication method.
-
Click the Configure button.
-
For RADIUS, click on the RADIUS Users tab and select the Local configuration only radio button and ensure that the Memberships can be set locally by duplicating RADIUS user names checkbox is checked.
-
For LDAP, click on the LDAP Users tab and select the User group membership can be set locally by duplicating LDAP user names checkbox.
-
Then create local user accounts with the user names of the administrative users (note no passwords need be set here) and add them to the relevant administrator user groups.
Preempting Administrators
When an administrator attempts to log in while another administrator is logged in, the following message is displayed. The message displays the current administrator’s user name, IP address, phone number (if it can be retrieved from LDAP), and whether the administrator is logged in using the GUI or CLI.
This window gives you three options:
-
Continue - Preempts the current administrator. The current administrator is dropped to non-config mode and you are given full administrator access.
-
Non-config - You are logged into the appliance in non-config mode. The current administrator’s session is not disturbed.
-
Cancel - Returns to the authentication screen.
Activating Configuration Mode
When logging in as a user with administrator rights (that is not the admin user), the User Login Status popup window is displayed.
To go to the SonicWALL user interface, click the Manage button. You will be prompted to enter your password again. This is a safeguard to protect against unauthorized access when administrators are away from their computers and do not log out of their session.
Disabling the User Login Status Popup
You can disable the User Login Status popup window if you prefer to allow certain users to log in solely for the purpose of managing the appliance, rather than for privileged access through the appliance. To disable the popup window, select the Members go straight to the management UI on web login checkbox when adding or editing the local group.
If you want some user accounts to be administrative only, while other users need to log in for privileged access through the appliance, but also with the ability to administer it (that is, some go straight to the management interface on login, while others get the User Login Status popup window with a Manage button), this can be achieved as follows:
-
Create a local group with the Members go straight to the management UI on web login checkbox selected.
-
Add the group to the relevant administrative group, but do not select this checkbox in the administrative group.
-
Add those user accounts that are to be administrative-only to the new user group. The User Login Status popup window is disabled for these users.
-
Add the user accounts that are to have privileged and administrative access directly to the top-level administrative group.
To switch from non-config mode to full configuration mode, perform the following steps:
-
Navigate to the System > Administration page.
-
In the Web Management Settings section, click on the Configuration mode button. If there is not currently an administrator in configuration mode, you will automatically be entered into configuration mode.
-
If another administrator is in configuration mode, the following message displays.
-
Click the Continue button to enter configuration mode. The current administrator is converted to read-only mode and you are given full administrator access.
Verifying Multiple Administrators Support Configuration
User accounts with administrator and read-only administrators can be viewed on the Users > Local Groups page.
Administrators can determine which configuration mode they are in by looking at either the top right corner of the management interface or at the status bar of their browser.
To display the status bar in Firefox and Internet Explorer, click on the View menu and enable status bar. By default, Internet Explorer 7.0 and Firefox 2.0 do not allow Web pages to display text in the status bar. To allow status bar messages in Internet Explorer, go to Tools > Internet Options, select the Security tab, click on the Custom Level button, scroll to the bottom of the list, and select Enable for Allow Status Bar Updates Via Script.
To allow status bar messages in Firefox, go to Tools > Options, select the Content tab, click the Advanced button, and select the checkbox for Change Status Bar Text in the pop-up window that displays.
When the administrator is in full configuration mode, no message is displayed in the top right corner and the status bar displays Done.
When the administrator is in read-only mode, the top right corner of the interface displays Read-Only Mode.
The status bar displays Read-only mode - no changes can be made.
When the administrator is in non-config mode, the top right of the interface displays Non-Config Mode. Clicking on this text links to the System > Administration page where you can enter full configuration mode.
The status bar displays Non-config mode - configuration changes not allowed.
Viewing Multiple Administrator Related Log Messages
Log messages are generated for the following events:
-
A GUI or CLI user begins configuration mode (including when an admin logs in).
-
A GUI or CLI user ends configuration mode (including when an admin logs out).
-
A GUI user begins management in non-config mode (including when an admin logs in and when a user in configuration mode is preempted and dropped back to read-only mode).
-
A GUI user begins management in read-only mode.
A GUI user terminates either of the above management sessions (including when an admin logs out).