Policies_LDAP_Settings_Snwls
With the added support of Lightweight Directory Access Protocol (LDAP), administrators and permitted users are able to efficiently manage Users and Groups from the server. Administrators can configure their policies to apply to a specific User Directory LDAP Schema.
To configure LDAP Settings, navigate to the LDAP > Settings page, located on the Policies tab. The section below provides the steps to configure LDAP Settings.
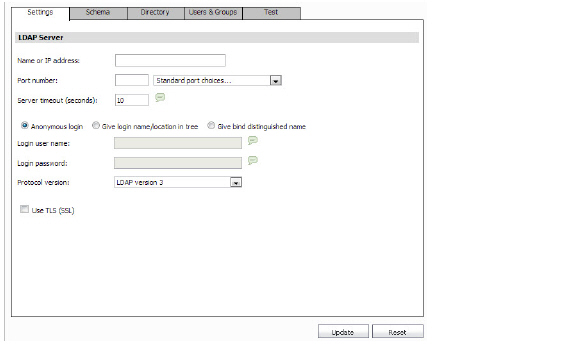
On the LDAP > Settings page, navigate to the Settings tab. Configure the following fields:
• Name or IP address—Enter the name or IP address for the LDAP Server.
• Port Number—Enter the TCP port number running the LDAP service. You can also choose one of the Standard Port Choices from the drop-down list. The default LDAP port is 389.
• Server Timeout—Specify the connection timeout period value in seconds. After this period of time, the client will stop attempting to connect to the server.
• Select the Authentication Method from the following choices:
– Anonymous login—This option allows you to login without the LDAP server authenticating information, or “binding” to the server.
– Give login name/location in tree—With this option selected, you will have to provide the user’s distinguished name under the Login User Name as well as the Login Password. Be aware that this is different from the user login ID. For example, John Doe may have a user login ID as ‘jdoe’. However, you would enter ‘John Doe’ in this field. When selecting this option, you will also need to provide User Tree for Login to Server, located on the LDAP > Settings > Directory tab.
– Give bind distinguished name—With this option selected, you will have to provide the Bind Distinguished Name and Login Password. The bind distinguished name is the full distinguished name (DN) used to bind to the LDAP server.
• Protocol Version—Select the LDAP version from the drop-down list.
• Use TLS (SSL)—Select the Use TLS (SSL) checkbox to enable the authentication of servers and clients and encryption of messages on LDAP.
Click Update to save these settings.
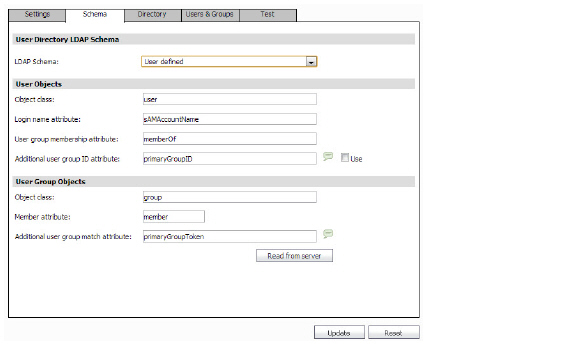
On the LDAP > Settings page, navigate to the Schema tab. Select the LDAP Schema from the drop-down list. Selecting any of the predefined schemas will automatically populate the fields used by that schema with their correct values.
If the LDAP Schema you wish to use is not an option in the drop-down list, select User Defined. The following fields are available for you to configure:
User Objects
• Object Class—This defines which attribute represents the individual user account to which the next two files apply.
• Login Name Attribute—The LDAP attribute that corresponds to the User ID.
• User Group Membership Attribute—The LDAP attribute that lists the groups or mailing lists that the user is a member of.
• Additional User Group ID Attribute—The LDAP attribute that allows for a schema to set additional memberships for a user. If the Use checkbox for this field is selected, then when a user object is found with one or more instances of the specified attribute, a search for additional user groups matching the specified attribute is made in the LDAP directory. Note that this attribute may be inefficient to the load performance of your LDAP server.
User Group Objects
• Object Class—The object class of the group for the LDAP schema.
• Member Attribute—The LDAP attribute that corresponds to group members.
• Additional User Group Match Attribute—The LDAP attribute that allows for a schema to set additional memberships for a user group. If a group is found with this attribute set to the specified value, then the user will also be made a member of that group. Note that this attribute may be inefficient to the load performance of your LDAP server.
• Read from Server—Click this button to retrieve the LDAP schema from the LDAP server. You can then select to Automatically update the schema configuration or Export details of the schema. Click OK.
Click Update to save these settings.
On the LDAP > Settings page, navigate to the Directory tab. Depending on the Authentication Method you specified on the Settings tab, you may have to enter the Primary Domain and User Tree for Login to Server fields.
If you selected Anonymous Login or Give bind distinguished name, you will only need to specify the Primary Domain.
If you selected Give login name/location in tree, specify the Primary Domain and the User Tree for Login to Server fields. This specifies the tree in the directory that includes the user object for the user that you configured on the Settings tab.
Click Update to save these settings.
On the LDAP > Settings page, navigate to the Users & Groups tab. The LDAP User Settings section allows you to Mirror LDAP Users and User Groups Automatically by selecting the checkbox, and then specifying the Refresh Period in hours.
Click Update to save these settings.
On the LDAP > Settings page, navigate to the Test tab. This tab allows you to test the LDAP settings you have configured. Enter a valid LDAP User name and Password, then click the Test button. After clicking the Test button, the client will retrieve any messages from the LDAP Server, as well as returned user attributes in the appropriate fields.