SSLVPNvirtualOffice
The SSL VPN > Virtual Office page displays the Virtual Office web portal inside of the SonicOS UI.
Topics:
• Accessing the SonicWALL SSL VPN Portal
Accessing the SonicWALL SSL VPN Portal
To view the SonicWALL SSL VPN Virtual Office web portal, navigate to the IP address of the SonicWALL security appliance. Click the link at the bottom of the Login page that says “Click here for sslvpn login.”
Topics:
NetExtender is compatible with Dell SonicWALL SRA and SSL-VPN Series products as well as Windows, Mac OS, and Linux platforms. To use NetExtender, clients must meet the prerequisites described in the most recent version of the Dell SonicWALL SRA User Guide, available on http://www.sonicwall.com/us/en/support/3893.html
SonicWALL NetExtender is a software application that enables remote users to securely connect to the remote network. With NetExtender, remote users can virtually join the remote network. Users can mount network drives, upload and download files, and access resources in the same way as if they were on the local network. Both GUI and CLI interfaces are supported; for CLI commands, see Appendix A: CLI Guide.
How to install NetExtender on a Windows platform topics:
• Installing NetExtender Using the Mozilla Firefox Browser
• Installing NetExtender Using the Internet Explorer Browser
• Installing NetExtender Using the Chrome Browser
How to use NetExtender on a Windows platform topics:
• Launching NetExtender Directly from Your Computer
• Configuring NetExtender Properties
• Configuring NetExtender Connection Scripts
• Configuring Batch File Commands
• Configuring NetExtender Advanced Properties
• Configuring NetExtender Packet Capture Properties
• Verifying NetExtender Operation from the System Tray
• Using the NetExtender Command Line Interface
How to install and use NetExtender on a MacOS platform topics:
• Installing NetExtender on MacOS
How to install and use NetExtender on a Linux platform topic:
• Installing NetExtender on Linux
Installing NetExtender Using the Mozilla Firefox Browser
To use NetExtender for the first time using the Mozilla Firefox browser, perform the following:
1. Navigate to the IP address of the SonicWALL security appliance. Click the link at the bottom of the Login page that says “Click here for sslvpn login.” The Welcome to the SonicWALL Virtual Office login page displays.
2. Click the NetExtender button.
3. The first time you launch NetExtender, it will automatically install the NetExtender stand-alone application on your computer.
• If the Software Installation window is displayed, go to Step 5.
• If a warning message is displayed in a yellow banner at the top of your Firefox banner, click the Edit Options... button.
4. The Allowed Sites - Software Installation window is displayed, with the address of the Virtual Office server in the address window. Click Allow to allow Virtual Office to install NetExtender, and click Close.
5. Return to the Virtual Office window and click NetExtender again. The Software Installation window is displayed.
After a five second countdown, the Install button will become active.
6. Click the Install button.
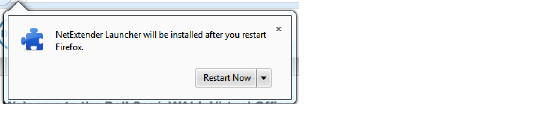
The portal will automatically install the NetExtender stand-alone application on your computer. If an older version of NetExtender is installed on the computer, the NetExtender launcher removes the old version and installs the new version.
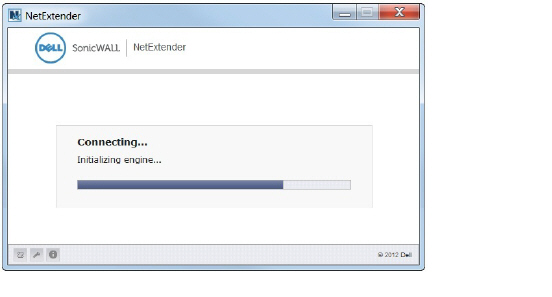
7. Once the NetExtender application is installed, a message appears instructing you to restart Firefox. Click the Restart Now button.
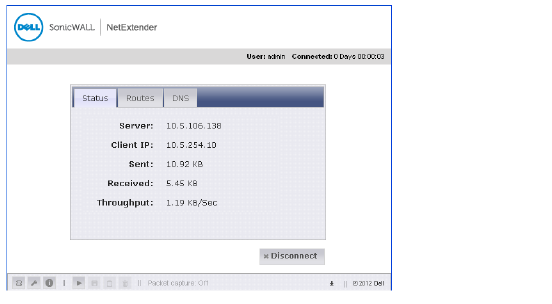
8. When Firefox restarts, the NetExtender Status window displays, indicating that NetExtender successfully connected.
The Status tab indicates what operating state the NetExtender client is in:
|
The NetExtender ![]() icon is displayed in the task bar. A balloon icon in the system tray appears, indicating NetExtender has successfully installed.
icon is displayed in the task bar. A balloon icon in the system tray appears, indicating NetExtender has successfully installed.

Note Closing the windows (clicking on the x icon in the upper right corner of the window) will not close the NetExtender session, but will minimize it to the system tray for continued operation.
Installing NetExtender Using the Internet Explorer Browser
SonicWALL SSL VPN NetExtender is fully compatible with Microsoft Windows operating systems and supports the same functionality as with other Windows operating systems. NetExtender is also compatible with the Mac OS X Lion 10.7.
Note It may be necessary to restart your computer when installing NetExtender on Windows Vista and Windows 7.
Internet Explorer Prerequisites
It is recommended that you add the URL or domain name of your SonicWALL security appliance to Internet Explorer’s trusted sites list. This will simplify the process of installing NetExtender and logging in, by reducing the number of security warnings you will receive.
To add a site to Internet Explorer’s trusted sites list, complete the following procedure:
1. In Internet Explorer, go to Tools > Internet Options.
2. Click on the Security tab.
3. Click on the Trusted Sites icon and click on the Sites button to open the Trusted sites window.
4. Enter the URL or domain name of your SonicWALL security appliance in the Add this Web site to the zone field and click Add.
5. Click Close in the Trusted Sites window.
6. Click OK in the Internet Options window.
Installing NetExtender from Internet Explorer
To install and launch NetExtender for the first time using the Internet Explorer browser, perform the following:
1. Navigate to the IP address of the SonicWALL security appliance. Click the link at the bottom of the Login page that says “Click here for sslvpn login.”
2. Click the NetExtender button.

3. A User Account Control window may appear asking “Do you want to allow this program to make changes to this computer?” Click Yes.
4. The first time you launch NetExtender, you must first add the SSL VPN portal to your list of trusted sites as described in To add a site to Internet Explorer’s trusted sites list, complete the following procedure:. If you have not done so, the follow message will display.

Note Click Instructions to add SSL VPN server address into trusted sites for help.
5. Add the SSL VPN portal to your list of trusted sites as described in To add a site to Internet Explorer’s trusted sites list, complete the following procedure:
6. Return to the SSL VPN portal and click on the NetExtender button. The portal will automatically install the NetExtender stand-alone application on your computer. The NetExtender installer window opens.
If an older version of NetExtender is installed on the computer, the NetExtender launcher will remove the old version and then install the new version.
7. If a warning message that NetExtender has not passed Windows Logo testing is displayed, click Continue Anyway. SonicWALL testing has verified that NetExtender is fully compatible with Windows Vista, XP, and above.
8. When NetExtender completes installing, the NetExtender Status window displays, indicating that NetExtender successfully connected.
Note The information provided in the NetExtender Status window is described in the table on Installing NetExtender Using the Mozilla Firefox Browser
Installing NetExtender Using the Chrome Browser
To install and launch NetExtender for the first time using the Chrome browser, perform the following:
1. Navigate to the IP address of the SonicWALL security appliance. Click the link at the bottom of the Login page that says “Click here for sslvpn login.”
2. Click the NetExtender button.
3. Pull the NetExtender plug-in to Chrome Extensions.
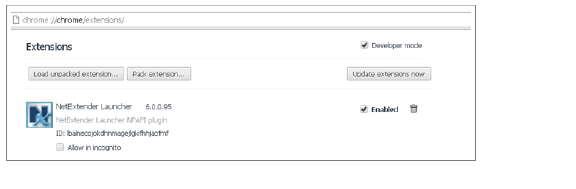
4. Return to the SRA portal and click the NetExtender button. The portal will automatically install the NetExtender stand-alone application on your computer. The NetExtender installer window opens.
If an older version of NetExtender is installed on the computer, the NetExtender launcher will remove the old version and then install the new version.
5. When NetExtender completes installing, the NetExtender Status window displays, indicating that NetExtender successfully connected.
Note The information provided in the NetExtender Status window is described in the table on Installing NetExtender Using the Mozilla Firefox Browser.
Launching NetExtender Directly from Your Computer
After the first access and installation of NetExtender, you can launch NetExtender directly from your computer without first navigating to the SSL VPN portal.
To launch NetExtender, complete the following procedure:
1. Navigate to Start > All Programs.
2. Select the SonicWALL SSL VPN NetExtender folder, and then click on SonicWALL SSL VPN NetExtender. The NetExtender login window is displayed.
3. The IP address of the last server you connected to is displayed in the Server field. To display a list of recent servers you have connected to, click on the arrow next to the field.
4. Enter your username and password.
5. The last domain you connected to is displayed in the Domain field. To connect to a different domain, enter it in the Domain field.
Note The NetExtender client will report an error message if the provided domain is invalid when you attempt to connect. Please keep in mind that domain names are case-sensitive.
6. The pull-down menu at the bottom of the window provides three options for remembering your username and password:
– Save user name & password if server allows
– Save user name only if server allows
– Always ask for user name & password
Tip Having NetExtender save your user name and password can be a security risk and should not be enabled if there is a chance that other people could use your computer to access sensitive information on the network.
Select one of the options.
7. Click Connect to launch NetExtender.
Configuring NetExtender Properties
Complete the following procedure to configure NetExtender properties:
1. Right click on the NetExtender  icon in the system tray and click on Properties... The NetExtender Properties window is displayed.
Connection Profiles in the left menu pane displays the SSL VPN connection profiles you have used, including the IP address of the server, the domain, and the username.
2. To create a shortcut on your desktop that will launch NetExtender with the specified profile, highlight the profile and click Create Shortcut.
3. To delete a profile, highlight it by clicking on it and then click the Remove button. Click the Remove All button to delete all connection profiles.
4. Clicking Settings in the left menu pane allows you to customize the behavior of NetExtender.
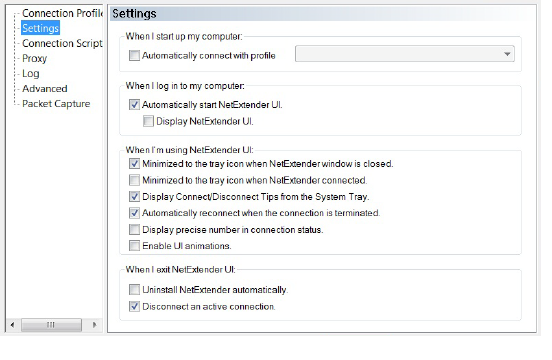
5. To have NetExtender automatically connect when you start your computer, check the Automatically connect with Connection Profile checkbox and select the appropriate connection profile from the pull-down menu.
Note Only connection profiles that allow you to save your username and password can be set to automatically connect.
6. To have NetExtender launch when you log in to your computer, check the Automatically start NetExtender UI. NetExtender will start, but will only be displayed in the system tray.
To have the NetExtender also display the log-in window, also check the Display NetExtender UI checkbox.
7. Select Minimize to the tray icon when NetExtender window is closed to have the NetExtender icon display in the system tray. If this option is not checked, you will only be able to access the NetExtender UI through Window’s program menu.
8. Select Display Connect/Disconnect Tips from the System Tray to have NetExtender display tips when you mouse over the NetExtender icon.
9. Select Automatically reconnect when the connection is terminated to have NetExtender attempt to reconnect when it loses connection.
10. Select Display precise number in connection status to display precise byte value information in the connection status.
11. Select the Enable UI animations check box to enable the sliding animation effects in the UI.
12. Select Uninstall NetExtender automatically to have NetExtender uninstall every time you end a session.
13. Select Disconnect an active connection to have NetExtender log out of all of your SSL VPN sessions when you exit a NetExtender session
14. Click OK to save your changes.
Configuring NetExtender Connection Scripts
SonicWALL SSL VPN provides users with the ability to run batch file scripts when NetExtender connects and disconnects. The scripts can be used to map or disconnect network drives and printers, launch applications, or open files or websites.
To configure NetExtender Connection Scripts, perform the following tasks.
1. Right click on the NetExtender icon in the system tray and click on Properties... The NetExtender Properties window is displayed.
2. Click Connection Scripts.
3. To enable the domain login script, select the Attempt to execute domain login script checkbox. When enabled, NetExtender will attempt to contact the domain controller and execute the login script.
Optionally, you may now also select to Hide the console window. If this check box is not selected, the DOS console window will remain open while the script runs.
Note Enabling this feature may cause connection delays while remote client’s printers and drives are mapped. Make sure the domain controller and any machines in the logon script are accessible via NetExtender routes.
4. To enable the script that runs when NetExtender connects, select the Automatically execute the batch file “NxConnect.bat” checkbox.
Optionally, you may now also select to Hide the console window. If this check box is not selected, the DOS console window will remain open while the script runs.
5. To enable the script that runs when NetExtender disconnects, select the Automatically execute the batch file “NxDisconnect.bat” checkbox.
6. Click OK to save your changes.
Configuring Batch File Commands
NetExtender Connection Scripts can support any valid batch file commands. For more information on batch files, see the following Wikipedia entry: http://en.wikipedia.org/wiki/.bat. The following tasks provide an introduction to some commonly used batch file commands.
To configure the script that runs when NetExtender connects, follow these steps:
1. Right click on the NetExtender icon in the system tray and click on Properties... The NetExtender Properties window is displayed.
2. Click Connection Scripts.
3. To configure the script that runs when NetExtender disconnects, click the Edit “NxDisconnect.bat” button. The NxConnect.bat file is displayed.
By default, the NxConnect.bat file contains examples of commands that can be configured, but no actual commands.
4. To add commands, scroll to the bottom of the file.
5. To map a network drive, enter a command in the following format:
net use drive-letter\\server\share password /user:Domain\name
For example, if the drive letter is z, the server name is engineering, the share is docs, the password is 1234, the user’s domain is eng and the username is admin, the command would be the following:
net use z\\engineering\docs 1234 /user:eng\admin
6. To disconnect a network drive, enter a command in the following format:
net use drive-letter: /delete
For example, to disconnect network drive z, enter the following command:
net use z: /delete
7. To map a network printer, enter a command in the following format:
net use LPT1 \\ServerName\PrinterName /user:Domain\name
For example, if the server name is engineering, the printer name is color-print1, the domain name is eng, and the username is admin, the command would be the following:
net use LPT1 \\engineering\color-print1 /user:eng\admin
8. To disconnect a network printer, enter a command in the following format:
net use LPT1 /delete
9. To launch an application enter a command in the following format:
C:\Path-to-Application\Application.exe
For example, to launch Microsoft Outlook, enter the following command:
C:\Program Files\Microsoft Office\OFFICE11\outlook.exe
10. To open a website in your default browser, enter a command in the following format:
start http://www.website.com
11. To open a file on your computer, enter a command in the following format:
C:\Path-to-file\myFile.doc
12. When you have finished editing the scripts, save the file and close it.
SonicWALL SSL VPN supports NetExtender sessions using proxy configurations. Currently, only HTTPS proxy is supported. When launching NetExtender from the web portal, if your browser is already configured for proxy access, NetExtender automatically inherits the proxy settings.
To manually configure NetExtender proxy settings, perform the following tasks.
1. Right click on the NetExtender icon in the system tray and click on Properties... The NetExtender Properties window is displayed.
2. Click on Proxy.
3. Select the Enable proxy settings checkbox.
4. NetExtender provides three options for configuring proxy settings:
• Automatically detect settings - To use this setting, the proxy server must support Web Proxy Auto Discovery Protocol (WPAD), which can push the proxy settings script to the client automatically.
• Use automatic configuration script - If you know the location of the proxy settings script, select this option and enter the URL of the scrip in the Address field.
• Use proxy server - Select this option to enter the Address and Port of the proxy server. Optionally, you can enter an IP address or domain in the BypassProxy field to allow direct connections to those addresses that bypass the proxy server. If required, enter a User name and Password for the proxy server. If the proxy server requires a username and password, but you do not specify them in the Properties window, a NetExtender pop-up window will prompt you to enter them when you first connect.
5. Click the Internet Explorer proxy settings button to open Internet Explorer’s proxy settings.
6. Make changes as appropriate.
7. Click OK to save your changes.
Configuring NetExtender Log Properties
1. Within the NetExtender Properties dialog box, click Log. The available options provide basic control over the NetExtender Log and Debug Log.
2. To establish the size of the NetExtender Log, select either the Unlimited log file size radio button or the Set maximum log file size to radio button. If you choose to set a maximum size in MB, use the adjoining up and down  arrows. The current size of the log file is displayed.
3. To clear the NetExtender Log, select the Clear NetExtender Log button.
4. To Enable the NetExtender Debug Log, select the corresponding check box. The current size of the log file is displayed.
To clear the debug log, select the Clear Debug Log button.
5. Click the Log Viewer... button to view the current NetExtender log.
Note An example of the NetExtender log is detailed in Viewing the NetExtender Log.
6. Click OK to save your changes.
Configuring NetExtender Advanced Properties
NetExtender allows you to customize the link speed that the NetExtender adapter reports to the operating system.
1. Within the NetExtender Properties dialog box, click Advanced. The available options allow you to adjust advanced settings on NetExtender network properties and protocols.
2. To select a virtual link speed to report, select either the Report the underlying network speed to OS radio button, or select the Report a fixed speed at bps to OS radio button and designate a speed.
Note You can click the Advanced Network Properties button to make adjustments. However, modifying these settings may impact NetExtender performance and/or functionality. It is recommended to only make changes here if advised to do so by Dell SonicWALL support.
3. Click OK to save your changes.
Configuring NetExtender Packet Capture Properties
Note You must have Administrator privileges to change packet capture settings.
1. Within the NetExtender Properties dialog box, click Packet Capture. The available options allow you to enable and disable packet capture and data compression on NetExtender.
2. To enable packet capture, check the Enable NetExtender packet capture check box. To disable packet capture, uncheck this check box.
3. If packet capture is enabled, clear all captured packet data when NetExtender exits by checking the Clear the capture when NetExtender exits check box. To retain packet data, uncheck this check box.
4. If you need to troubleshoot the SSL-encrypted traffic between NetExtender and the UTM box, select the Enable capture cache checkbox. When this option is enabled, NetExtender will write down all traffic over SSL into a pcap file, under the NetExtender installation directory. The packet captured will be removed automatically if you enable Clear the capture when NetExtender exits; otherwise, the file remains on the hard drive.
5. To enable data compression of captured packets, check the Enable data compression check box. To disable data compression the next time NetExtender is connected, uncheck this box.
6. If packet capture is enabled when NetExtender connects and you want to disable data compression immediately (instead of waiting until the next time NetExtender is connected), check the Attempt to disable data compression during packet capture check box.
7. Click OK to save your changes.
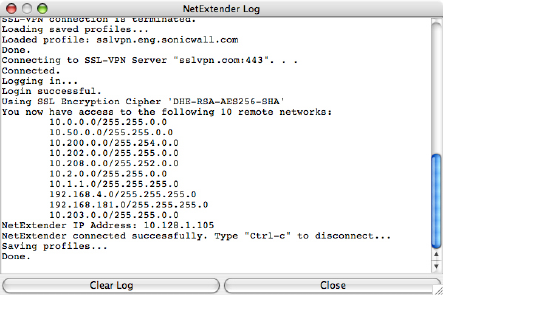
The NetExtender log displays information on NetExtender session events. The log is a file named NetExtender.dbg. It is stored in the directory: C:\Program Files\SonicWALL\SSL VPN\NetExtender. To view the NetExtender log, right click on the NetExtender icon in the system tray, and then click View Log.
To view details of a log message, double-click on a log entry, or go to View > Log Detail to open the Log Detail pane.
To save the log, either click the Export icon or go to Log > Export.
To filter the log to display entries from a specific duration of time, go to the Filter menu and select the cutoff threshold.
To filter the log by type of entry, go to Filter > Level and select one of the level categories. The available options are Fatal, Error, Warning, and Info, in descending order of severity. The log displays all entries that match or exceed the severity level. For example, when selecting the Error level, the log displays all Error and Fatal entries, but not Warning or Info entries.
To view the Debug Log, either click the Debug Log icon or go to Log > Debug Log.
Note It may take several minutes for the Debug Log to load. During this time, the Log window will not be accessible, although you can open a new Log window while the Debug Log is loading.
To clear the log, click on Log > Clear Log.
To disconnect NetExtender, perform the following steps:
1. Right click on the NetExtender icon in the system tray to display the NetExtender icon menu and click Disconnect.
2. Wait several seconds. The NetExtender session disconnects.
You can also disconnect by double clicking on the NetExtender icon to open the NetExtender window and then clicking the Disconnect button.
When NetExtender becomes disconnected, the NetExtender window displays and gives you the option to either Reconnect or Close NetExtender.
You can configure NetExtender to automatically notify users when an updated version of NetExtender is available. Users are prompted to click OK, and NetExtender downloads and installs the update from the SonicWALL security appliance.
If auto-update notification is not configured, users should periodically launch NetExtender from the Virtual Office to ensure they have the latest version.
Before connecting to the new version of NetExtender, you may be required to reset your password by suppling your old password, along with providing and re-verifying a new one.
NetExtender supports various two-factor authentication methods, including one-time password and those that combine the pin/password and passcode/tokencode, such as RSA’s pin-mode authentication.
Topics:
• Combined Password/Passcode Authentication
If you have configured one-time passwords to be required to connect through NetExtender, users will be asked to provide this information before connecting.
For more information about one-time passwords, see One-Time Password.
Combined Password/Passcode Authentication
If you have configured a combined pin/password and passcode/tokencode authentication mode, such as RSA pin-mode authentication, to be required to connect through NetExtender, users will be asked whether they want to create their own pin, or receive one that is system-generated.

Once the pin has been accepted, you must wait for the token to change before logging in to NetExtender with the new passcode.
The NetExtender utility is automatically installed on your computer. To remove NetExtender, click on Start > All Programs, click on SonicWALL SSL VPN NetExtender, and then click on Uninstall.
You can also configure NetExtender to automatically uninstall when your session is disconnected. To do so, perform the following steps:
1. Right click on the NetExtender icon in the system tray and click on Preferences... The NetExtender Preferences window is displayed.
2. Click on the Settings tab.
3. Select Uninstall NetExtender automatically to have NetExtender uninstall every time you end a session.
Verifying NetExtender Operation from the System Tray
To view options in the NetExtender system tray, right click on the NetExtender icon in the system tray. The following are some tasks you can perform with the system tray.
To display the routes that NetExtender has installed on your system, click the Route Information option in the system tray menu. The system tray menu displays the default route and the associated subnet mask.
Displaying Connection Information
You can display connection information by mousing over the NetExtender icon in the system tray.
Using the NetExtender Command Line Interface
To launch the NetExtender CLI, perform the following tasks:
1. Launch the Windows Command Prompt by going to the Start menu, select Run, enter cmd, and click OK.
2. Change directory to where NetExtender is installed. To do this, you first must move up to the root drive by entering the cd .. command. Repeat this command until you are at the root drive. Then enter cd Program Files\SonicWALL\SSL-VPN\NetExtender.
Note The specific command directory may be different on your computer. Use Windows Explorer to find the directory path where NetExtender is located.
The commands available in the NetExtender CLI and their options can be found in Appendix A: CLI Guide.
Installing NetExtender on MacOS
SonicWALL SSL VPN supports NetExtender on MacOS. To use NetExtender, clients must meet the prerequisites described in the most recent version of the Dell SonicWALL SRA User Guide, available on
http://www.sonicwall.com/us/en/support/3893.html
To install NetExtender on your MacOS system, perform the following tasks:
1. Navigate to the IP address of the SonicWALL security appliance. Click the link at the bottom of the Login page that says “Click here for sslvpn login.”
2. Click the NetExtender button.
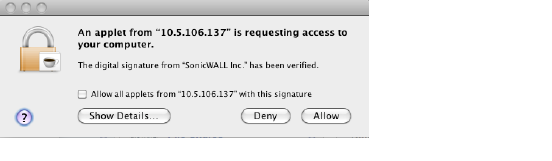
3. The Virtual Office displays the status of NetExtender installation. A pop-up window may appear, prompting you to accept a certificate. Click Trust.
4. A second pop-up window may appear, prompting you to accept a certificate. Click Allow.
5. When NetExtender is successfully installed and connected, the NetExtender status window displays.
1. To launch NetExtender, go the Applications folder in the Finder and double click on NetExtender.app.
2. The first time you connect, you must enter the server name or IP address in the SSL VPN Server field.
3. Enter your username and password.
4. The first time you connect, you must enter the domain name. The domain name is case-sensitive.
5. Click Connect.
6. You can instruct NetExtender to remember your profile server name in the future. In the Save profile pull-down menu, you can select the following:
• Save name and password (if allowed)
• Save username only (if allowed)
• Do not save profile.
Tip Having NetExtender save your user name and password can be a security risk and should not be enabled if there is a chance that other people could use your computer to access sensitive information on the network.
7. When NetExtender is connected, the NetExtender icon is displayed in the status bar at the top right of your display. Click on the icon to display NetExtender options.
8. To display a summary of your NetExtender session, click Connection Status.
9. To view the routes that NetExtender has installed, select the Routes tab in the main NetExtender window.
10. To view the NetExtender Log, go to Window > Log.
11. To generate a diagnostic report with detailed information on NetExtender performance, go to Help > Generate diagnostic report.
12. Click Save to save the diagnostic report using the default nxdiag.txt file name in your NetExtender directory.
Installing NetExtender on Linux
SonicWALL SSL VPN supports NetExtender on Linux. To use NetExtender, clients must meet the prerequisites described in the most recent version of the Dell SonicWALL SRA User Guide, available on
http://www.sonicwall.com/us/en/support/3893.html
Note Open source Java Virtual Machines (VMs) are not currently supported. If you do not have the recommended Java release, you can use the command-line interface version of NetExtender.
Note You must be logged in as root to install NetExtender, although many Linux systems will allow the sudo ./install command to be used if you are not logged in as root.
To install NetExtender on your Linux system, perform the following tasks:
1. Navigate to the IP address of the SonicWALL security appliance. Click the link at the bottom of the Login page that says “Click here for sslvpn login.”
2. Click the NetExtender button. A pop-up window indicates that you have chosen to open a .tgz file. Click OK to save it to your default download directory.
3. To install NetExtender from the CLI, navigate to the directory where you saved the .tgz and enter the tar -zxf NetExtender.tgz command.
4. Enter the cd netExtenderClient command.
5. Enter su -C “ ./install” to install NetExtender.
6. Enter your username and password.
7. The installer will ask if you want non-root users to be able to run NetExtender. Enter either y for yes or n for no.
Note To allow non-root users to run NetExtender, the installer will set PPPD to run as root. This may be considered a security risk.
To use NetExtender on a Linux computer, perform the following tasks:
1. After NetExtender is installed, there are two methods to launch it:
– Click the NetExtender icon in the Applications menu, under either the Internet or Network category.
– Enter the netExtenderGui command.
2. The first time you connect, you must enter the Dell SonicWALL SRA server name in the Server field. NetExtender will remember the server name in the future.
3. Enter your username and password.
4. The first time you connect, you must enter the domain name. The domain name is case-sensitive. NetExtender will remember the domain name in the future.
5. To view the NetExtender routes, select the Routes tab in the main NetExtender window.
6. To view the NetExtender DNS server information, select the DNS tab in the main NetExtender window.
7. To configure NetExtender Preferences, select NetExtender > Preferences.
8. The following NetExtender settings can be configured:
• Automatically reconnect when the connection is terminated
• Uninstall NetExtender automatically when exiting the application
• DNS server options:
– Try remote DNS servers first, then try local DNS servers
– Only use remote DNS servers
– Only use local DNS servers
9. Clicking Advanced in the NetExtender Preferences window provides two additional options:
• MTU - Sets the Maximum Transmission Unit (MTU) size, which is the largest packet size that a router can forward without needing to fragment the packet.
• PPP Sync Mode - Specifies synchronous PPP. By default, this option is disabled and asynchronous PPP is used.
10. To view the NetExtender Log, go to NetExtender > Log.
11. To generate a diagnostic report with detailed information on NetExtender performance, go to Help > Generate diagnostic report.
12. Click Save to save the diagnostic report using the default nxdiag.txt file name in your NetExtender directory.