Network_ARP
ARP (Address Resolution Protocol) maps layer 3 (IP addresses) to layer 2 (physical or MAC addresses) to enable communications between hosts residing on the same subnet. ARP is a broadcast protocol that can create excessive amounts of network traffic on your network. To minimize the broadcast traffic, an ARP cache is maintained to store and reuse previously learned ARP information. Add new diagram here: SuperMassive Network Diagram
The Static ARP feature allows for static mappings to be created between layer 2 MAC addresses and layer 3 IP addresses, but also provides the following capabilities:
• Publish Entry - Enabling the Publish Entry option in the Add Static ARP window causes the SonicWALL device to respond to ARP queries for the specified IP address with the specified MAC address. This can be used, for example, to have the SonicWALL device reply for a secondary IP address on a particular interface by adding the MAC address of the SonicWALL. See the Secondary Subnet section that follows.
• Bind MAC Address - Enabling the Bind MAC Address option in the Add Static ARP window binds the MAC address specified to the designated IP address and interface. This can be used to ensure that a particular workstation (as recognized by the network card's unique MAC address) can only the used on a specified interface on the SonicWALL. Once the MAC address is bound to an interface, the SonicWALL will not respond to that MAC address on any other interface. It will also remove any dynamically cached references to that MAC address that might have been present, and it will prohibit additional (non-unique) static mappings of that MAC address.
• Update IP Address Dynamically - The Update IP Address Dynamically setting in the Add Static ARP window is a sub-feature of the Bind MAC Address option. This allows for a MAC address to be bound to an interface when DHCP is being used to dynamically allocate IP addressing. Enabling this option will blur the IP Address field, and will populate the ARP Cache with the IP address allocated by the SonicWALL's internal DHCP server, or by the external DHCP server if IP Helper is in use.
Secondary Subnets with Static ARP
The Static ARP feature allows for secondary subnets to be added on other interfaces, and without the addition of automatic NAT rules.
Adding a Secondary Subnet using the Static ARP Method
1. Add a 'published' static ARP entry for the gateway address that will be used for the secondary subnet, assigning it the MAC address of the SonicWALL interface to which it will be connected.
2. Add a static route for that subnet, so that the SonicWALL regards it as valid traffic, and knows to which interface to route that subnet's traffic.
3. Add Access Rules to allow traffic destined for that subnet to traverse the correct network interface.
4. Optional: Add a static route on upstream device(s) so that they know which gateway IP to use to reach the secondary subnet.
Add new diagram here: SuperMassive Network Diagram Consider the following network example:
To support the above configuration, first create a published static ARP entry for 192.168.50.1, the address which will serve as the gateway for the secondary subnet, and associate it with the appropriate LAN interface. From the Network > ARP page, select the Add button in the Static ARP Entries section, and add the following entry:
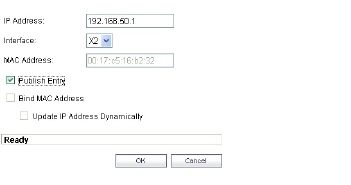
The entry will appear in the table.

Navigate to the Network > Routing page, and add a static route for the 192.168.50.0/24 network, with the 255.255.255.0 subnet mask on the X3 Interface.
To allow the traffic to reach the 192.168.50.0/24 subnet, and to allow the 192.168.50.0/24 subnet to reach the hosts on the LAN, navigate to the Firewall > Access Rules page, and add appropriate Access Rules to allow traffic to pass.
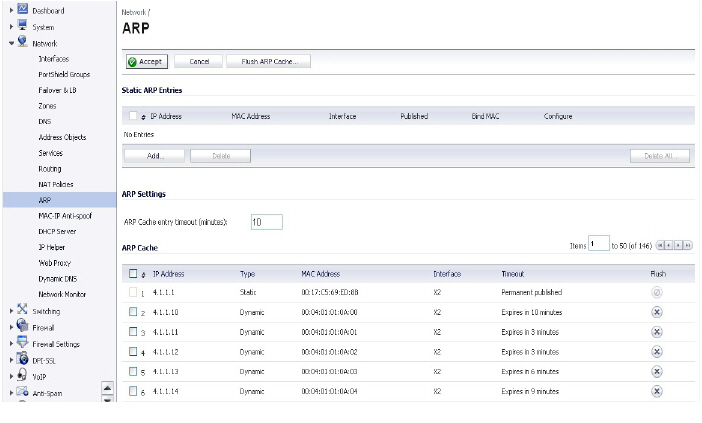
Navigating and Sorting the ARP Cache Table
The ARP Cache table provides easy pagination for viewing a large number of ARP entries. You can navigate a large number of ARP entries listed in the ARP Cache table by using the navigation control bar located at the top right of the ARP Cache table.
The navigation control bar includes four buttons. The far left button displays the first page of the table. The far right button displays the last page. The inside left and right arrow buttons moved the previous or next page respectively.
You can enter the policy number (the number listed before the policy name in the # Name column) in the Items field to move to a specific ARP entry. The default table configuration displays 50 entries per page. You can change this default number of entries for tables on the System > Administration page.
You can sort the entries in the table by clicking on the column header. The entries are sorted by ascending or descending order. The arrow to the right of the column entry indicates the sorting status. A down arrow means ascending order. An up arrow indicates a descending order.
Navigating and Sorting the ARP Cache Table Entries
The ARP Cache table provides easy pagination for viewing a large number of ARP entries. You can navigate a large number of ARP entries listed in the ARP Cache table by using the navigation control bar located at the top right of the ARP Cache table. Navigation control bar includes four buttons. The far left button displays the first page of the table. The far right button displays the last page. The inside left and right arrow buttons moved the previous or next page respectively.
You can enter the policy number (the number listed before the policy name in the # Name column) in the Items field to move to a specific ARP entry. The default table configuration displays 50 entries per page. You can change this default number of entries for tables on the System > Administration page.
You can sort the entries in the table by clicking on the column header. The entries are sorted by ascending or descending order. The arrow to the right of the column entry indicates the sorting status. A down arrow means ascending order. An up arrow indicates a descending order.
It is sometimes necessary to flush the ARP cache if the IP address has changed for a device on the network. Since the IP address is linked to a physical address, the IP address can change but still be associated with the physical address in the ARP Cache. Flushing the ARP Cache allows new information to be gathered and stored in the ARP Cache. Click Flush ARP Cache to clear the information.
To configure a specific length of time for the entry to time out, enter a value in minutes in the ARP Cache entry time out (minutes) field.