Single_Sign_On
RADIUS Accounting for Single-Sign-On
(SuperMassive 9000 Series Only)
RADIUS Accounting is specified by RFC 2866 as a mechanism for a network access server (NAS) to send user login session accounting messages to an accounting server. These messages are sent at user login and logoff. Optionally, they can also be sent periodically during the user’s session.
When a customer uses a third-part network access appliance to perform user authentication (typically for remote or wireless access) and the appliance supports RADIUS accounting, a Dell SonicWALL UTM appliance can act as the RADIUS Accounting Server, and can use RADIUS Accounting messages sent from the customer's network access server for single sign-on (SSO) in the network.
When a remote user connects through a third-party appliance, the third-party appliance sends an accounting message to the Dell SonicWALL UTM appliance (configured as a RADIUS accounting server). The Dell SonicWALL UTM appliance adds the user to its internal database of logged in users based on the information in the accounting message.
When the user logs out, the third-party appliance sends another accounting message to the Dell SonicWALL UTM appliance. The Dell SonicWALL UTM appliance then logs the user out.
Note When a network access server (NAS) sends RADIUS accounting messages, it does not require the user to be authenticated by RADIUS. The NAS can send RADIUS accounting messages even when the third-party appliance is using LDAP, its local database, or any other mechanism to authenticate users.
RADIUS accounting messages are not encrypted. RADIUS accounting is inherently secure against spoofing because it uses a request authenticator and a shared secret. RADIUS accounting requires that a list of the network access servers (NASs), that can send RADIUS Accounting messages, be configured on the UTM appliance. This configuration supplies the IP address and shared secret for each NAS.
RADIUS Accounting Messages
RADIUS accounting uses two types of accounting messages:
• Accounting-Request
• Accounting-Response
An Accounting-Request can send one of three request types specified by the Status-Type attribute:
• Start—sent when a user logs in.
• Stop—sent when a user logs out.
• Interim-Update—sent periodically during a user login session.
Accounting messages follow the RADIUS standard specified by RFC 2866. Each message contains a list of attributes and an authenticator that is validated by a shared secret.
The following attributes, that are relevant to SSO, are sent in Accounting-Requests:
• Status-Type—The type of accounting request (Start, Stop, or Interim-Update).
• User-Name—The user’s login name. The format is not specified by the RFC and can be a simple login name or a string with various values such as login name, domain, or distinguished name (DN).
• Framed-IP-Address—The user's IP address. If NAT is used, this must be the user’s internal IP address.
• Calling-Station-Id—A string representation of the user's IP address, used by some appliances such as Aventail.
• Proxy-State—A pass-though state used for forwarding requests to another RADIUS accounting server.
SonicWALL Compatibility with Third Party Network Appliances
For SonicWALL UTM appliances to be compatible with third party network appliances for SSO via RADIUS Accounting, the third party appliance must be able to do the following:
• Support RADIUS Accounting.
• Send both Start and Stop messages. Sending Interim-Update messages is not required.
• Send the user’s IP address in either the Framed-IP-Address or Calling-Station-Id attribute in both Start and Stop messages.
Note In the case of a remote access server using NAT to translate a user’s external public IP address, the attribute must provide the internal IP address that is used on the internal network, and it must be a unique IP address for the user. If both attributes are being used, the Framed-IP-Address attribute must use the internal IP address, and the Calling-Station-Id attribute should use the external IP address.
The user’s login name should be sent in the User-Name attribute of Start messages and Interim-Update messages. The user’s login name can also be sent in the User-Name attribute of Stop messages, but is not required. The User-Name attribute must contain the user’s account name and may include the domain also, or it must contain the user’s distinguished name (DN).
Proxy Forwarding
A Dell SonicWALL UTM appliance acting as a RADIUS accounting server can proxy-forward requests to up to four other RADIUS accounting servers for each network access server (NAS). Each RADIUS accounting server is separately configurable for each NAS.
To avoid the need to re-enter the configuration details for each NAS, the UI on the Dell SonicWALL UTM appliance allows you to select the forwarding for each NAS from a list of configured servers.
The proxy forwarding configuration for each NAS client includes timeouts and retries. How to forward requests to two or more servers can be configured by selecting the following options:
• try the next server on a timeout
• forward each request to all the servers
Non-Domain Users
Users reported to a RADIUS accounting server are determined to be local (non-domain) users in the following cases:
• The user name was sent without a domain, and it is not configured to look up domains for the server via LDAP.
• The user name was sent without a domain, and it is configured to look up domains for the server via LDAP, but the user name was not found.
• The user name was sent with a domain, but the domain was not found in the LDAP database.
• The user name was sent without a domain, but the user name was not found in the LDAP database.
A non-domain user authenticated by RADIUS accounting is subject to the same constraints as one authenticated by the other SSO mechanisms, and the following restrictions apply:
• The user will only be logged in if “Allow limited access for non-domain users” is set.
• The user will not be made a member of the Trusted Users group.
IPv6 Considerations
In RADIUS accounting, these attributes are used to contain the user's IPv6 address:
• Framed-Interface-Id / Framed-IPv6-Prefix
• Framed-IPv6-Address
Currently, all these IPv6 attributes are ignored.
Some devices pass the IPv6 address as text in the Calling-Station-ID attribute.
The Calling-Station-ID is also ignored if it does not contain a valid IPv4 address.
RADIUS accounting messages that contain an IPv6 address attribute and no IPv4 address attribute are forwarded to the proxy server. If no proxy server is configured, IPv6 attributes discarded.
RADIUS Accounting Server
RADIUS accounting normally uses UDP port 1646 or 1813. UDP port 1813 is the IANA-specified port. UDP port 1646 is an older unofficial standard port. The DELL SonicWALL UTM appliance listens on port 1812 by default. Other port numbers can be configured for the RADIUS accounting port, but the UTM appliance can only listen on only one port. So, if you are using multiple network access servers (NASs), they must all be configured to communicate on the same port number.
Configuring RADIUS Accounting for SSO
RADIUS accounting for SSO is configured on the Users > Settings page, which has buttons for configuring RADIUS, SSO, and LDAP.
To configure RADIUS accounting for SSO:
1. Go to the Users > Settings page.
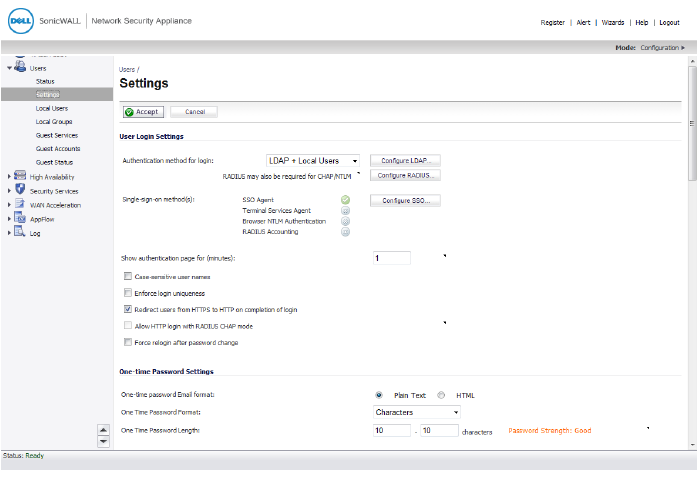
2. Click the Configure SSO button.
The SSO Authentication Configuration dialog appears.
3. Click the RADIUS Accounting tab.

4. To enable RADIUS accounting for SSO, select the Enable SSO by RADIUS accounting option.
5. In the Port number box, enter the UDP port number on which to listen for RADIUS accounting messages.
6. To add a new RADIUS client, click the Add button.
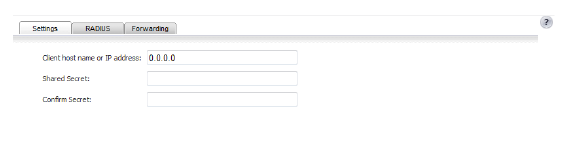
The Settings, RADIUS, and Forwarding tabs appear in the lower half of the screen.
You can repeat these steps for each RADIUS accounting client that you want to add.
Each RADIUS accounting client that you add is listed in the RADIUS Accounting
Single-Sign-On panel.
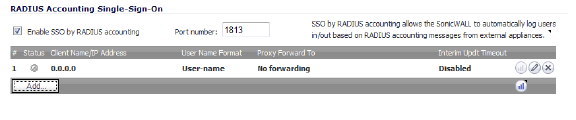
The Status column shows the current status for each RADIUS accounting client listed
in the panel as follows:
Green—the client is active
Yellow—the client is idle
7. Under the Settings tab, in the Client host name or IP address box, enter the name or the IP address for the RADIUS client host.
8. In the Shared Secret box and the Confirm Secret box, enter your shared secret for the client.
9. Under the RADIUS tab, from the User-Name attribute format box, select the format for the user name login.
10. If you want it, select the Log user out if no accounting interim updates are received option.
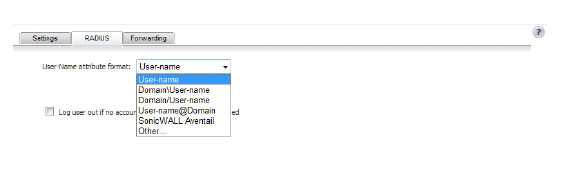
If you select Other as the User-Name attribute format, this panel shows two additional fields:
• Format
• Components
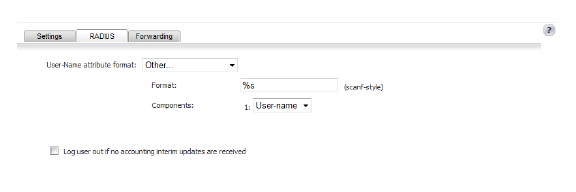
In the Format box, you enter a limited scanf-style string.
From the Component box, you select one of the following items:
• Not used
• User-Name
• Doman
• DN
The components that you enter as a limited scanf-style string in the Format box consist of one or more of the following items:
• User-Name
• Doman
• Fully qualified distinguished name (DN)
To specify a non-standard format, enter the format in the Format box as a scanf-style string, with either a "%s" or "%[...]" directive for each component.
In the Format box, you must tell the UTM appliance what the network access device (NAS) will be sending in the User-Name attribute. This format is not specified by the RADIUS Accounting RFC. Devices are not constrained as to what they can send in this attribute. So, its content can be very variable. What you set here specifies how the appliance must decode the User-Name attribute to extract the user name, domain, and/or DN. There are some pre-defined formats for the common cases, but if those do not match what your network access server sends, then you must select Other as the User-Name attribute format and enter a customized format.
When you select Other, these fields are set to the format string and components of the previously selected format. So, first select the pre-defined format that most closely matches what your network access server sends. Then, change to Other, and that will give you a good starting point for entering your customized format.
Note You can double click in the Components box to display the Tooltip box with instructions on how to enter the scanf-style format.
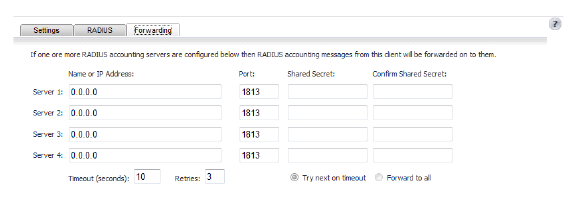
Under the Forwarding tab, you can enter up to four RADIUS accounting servers.
11. Under the Forwarding tab, enter the IP addresses, ports, and shared secrets for the RADIUS accounting servers, you want the client to forward messages to.
12. In the Timeout box and Retries box, enter the timeout period in seconds and the number of retries.
Single Sign-On Scalability
To determine which users have logged out, the Dell SonicWALL network security appliance polls the SSO Agent by sending requests to multiple logged-in users in a single request message to the SSO Agent.
To configure the number of user requests the firewall can send in a single request message to the SSO Agent:
1. Click the SSO Agents tab.
2. Click the Add button.
The SSO Authentication Configuration dialog appears.
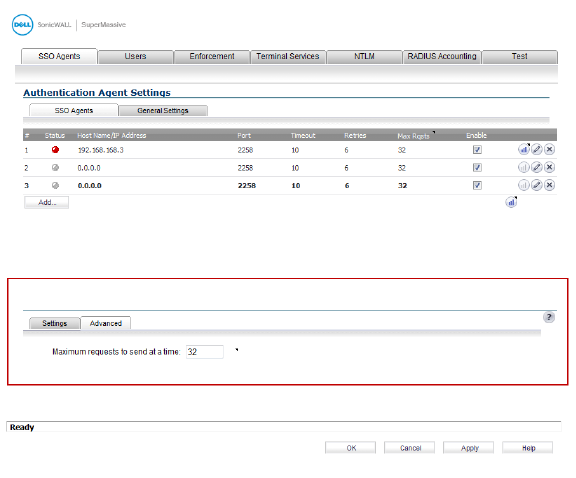
3. Click the Advanced tab.
4. In the Maximum requests to send at a time box, enter the maximum number of user requests the firewall can send to the SSO agent in a single request message.
5. Click OK.
Configuring Multiple Administrator Support
This section contains the following subsections:
• Configuring Additional Administrator User Profiles
• Configuring Administrators Locally when Using LDAP or RADIUS
• Activating Configuration Mode
• Verifying Multiple Administrators Support Configuration
• Viewing Multiple Administrator Related Log Messages
Configuring Additional Administrator User Profiles
To configure additional administrator user profiles, perform the following steps:
1. While logged in as admin, navigate to the Users > Local Users page.
2. Click the Add User button.
3. Enter a Name and Password for the user.
4. Click on the Group Membership tab.
Select the appropriate group to give the user Administrator privileges:
• Limited Administrators - The user has limited administrator configuration privileges.
• SonicWALL Administrators - The user has full administrator configuration privileges.
• SonicWALL Read-Only Admins - The user can view the entire management interface, but cannot make any changes to the configuration.
6. Click the right arrow button and click OK.
7. To configure the multiple administrator feature such that administrators are logged out when they are preempted, navigate to the System > Administration page.
8. Select the Log out radio button for the On preemption by another administrator option and click Accept.
Configuring Administrators Locally when Using LDAP or RADIUS
When using RADIUS or LDAP authentication, if you want to ensure that some or all administrative users will always be able to manage the appliance, even if the RADIUS or LDAP server becomes unreachable, then you can use the RADIUS + Local Users or LDAP + Local Users option and configure the accounts for those particular users locally.
For users authenticated by RADIUS or LDAP, create user groups named SonicWALL Administrators and/or SonicWALL Read-Only Admins on the RADIUS or LDAP server (or its back-end) and assign the relevant users to those groups. Note that in the case of RADIUS you will probably need special configuration of the RADIUS server to return the user group information – see the SonicWALL RADIUS documentation for details.
When using RADIUS or LDAP authentication, if you want to keep the configuration of administrative users local to the appliance whilst having those users authenticated by RADIUS/LDAP, perform these steps:
1. Navigate to the Users > Settings page.
2. Select either the RADIUS + Local Users or LDAP + Local Users authentication method.
3. Click the Configure button.
4. For RADIUS, click on the RADIUS Users tab and select the Local configuration only radio button and ensure that the Memberships can be set locally by duplicating RADIUS user names checkbox is checked.
5. For LDAP, click on the LDAP Users tab and select the User group membership can be set locally by duplicating LDAP user names checkbox.
6. Then create local user accounts with the user names of the administrative users (note no passwords need be set here) and add them to the relevant administrator user groups.
When an administrator attempts to log in while another administrator is logged in, the following message is displayed. The message displays the current administrator’s user name, IP address, phone number (if it can be retrieved from LDAP), and whether the administrator is logged in using the GUI or CLI.
This window gives you three options:
• Continue - Preempts the current administrator. The current administrator is dropped to non-config mode and you are given full administrator access.
• Non-config - You are logged into the appliance in non-config mode. The current administrator’s session is not disturbed.
• Cancel - Returns to the authentication screen.
When logging in as a user with administrator rights (that is not the admin user), the User Login Status popup window is displayed.
To go to the SonicWALL user interface, click the Manage button. You will be prompted to enter your password again. This is a safeguard to protect against unauthorized access when administrators are away from their computers and do not log out of their session.
Disabling the User Login Status Popup
You can disable the User Login Status popup window if you prefer to allow certain users to log in solely for the purpose of managing the appliance, rather than for privileged access through the appliance. To disable the popup window, select the Members go straight to the management UI on web login checkbox when adding or editing the local group.
If you want some user accounts to be administrative only, while other users need to log in for privileged access through the appliance, but also with the ability to administer it (that is, some go straight to the management interface on login, while others get the User Login Status popup window with a Manage button), this can be achieved as follows:
1. Create a local group with the Members go straight to the management UI on web login checkbox selected.
2. Add the group to the relevant administrative group, but do not select this checkbox in the administrative group.
3. Add those user accounts that are to be administrative-only to the new user group. The User Login Status popup window is disabled for these users.
4. Add the user accounts that are to have privileged and administrative access directly to the top-level administrative group.
To switch from non-config mode to full configuration mode, perform the following steps:
1. Navigate to the System > Administration page.
In the Web Management Settings section, click on the Configuration mode button. If there is not currently an administrator in configuration mode, you will automatically be entered into configuration mode.
3. If another administrator is in configuration mode, the following message displays.
Click the Continue button to enter configuration mode. The current administrator is converted to read-only mode and you are given full administrator access.
Verifying Multiple Administrators Support Configuration
User accounts with administrator and read-only administrators can be viewed on the Users > Local Groups page.
Administrators can determine which configuration mode they are in by looking at either the top right corner of the management interface or at the status bar of their browser.
To display the status bar in Firefox and Internet Explorer, click on the View menu and enable status bar. By default, Internet Explorer 7.0 and Firefox 2.0 do not allow Web pages to display text in the status bar. To allow status bar messages in Internet Explorer, go to Tools > Internet Options, select the Security tab, click on the Custom Level button, scroll to the bottom of the list, and select Enable for Allow Status Bar Updates Via Script.
To allow status bar messages in Firefox, go to Tools > Options, select the Content tab, click the Advanced button, and select the checkbox for Change Status Bar Text in the pop-up window that displays.
When the administrator is in full configuration mode, no message is displayed in the top right corner and the status bar displays Done.
When the administrator is in read-only mode, the top right corner of the interface displays Read-Only Mode.
The status bar displays Read-only mode - no changes can be made.
When the administrator is in non-config mode, the top right of the interface displays Non-Config Mode. Clicking on this text links to the System > Administration page where you can enter full configuration mode.
The status bar displays Non-config mode - configuration changes not allowed.
Viewing Multiple Administrator Related Log Messages
Log messages are generated for the following events:
• A GUI or CLI user begins configuration mode (including when an admin logs in).
• A GUI or CLI user ends configuration mode (including when an admin logs out).
• A GUI user begins management in non-config mode (including when an admin logs in and when a user in configuration mode is preempted and dropped back to read-only mode).
• A GUI user begins management in read-only mode.
A GUI user terminates either of the above management sessions (including when an admin logs out).