CLIguide
The SonicOS Enterprise Command Line Interface (E-CLI) provides a concise and powerful way to configure Dell SonicWALL network security appliances without using the SonicOS Web based management interface. You can use the CLI commands individually on the command line, or in scripts for automating configuration tasks.
This appendix contains a categorized listing of Command Line Interface (CLI) commands for SonicOS 6.1 firmware. Each command is described, and where appropriate, an example of usage is included.
For a listing of Command Line Interface (CLI) commands for SonicOS 6.1 firmware, refer to the SonicOS 6.1 CLI Reference Guide.
This introduction contains the following sections:
• Input Data Format Specification
• Editing and Completion Features
• Logging in to the SonicOS CLI
• Configuring the Dell SonicWALL Network Security Appliance
• Example: Configuring a Site-to-Site VPN Using the CLI
Note The complete SonicWALL CLI Command Reference is included in the SonicOS online help. To access the Command Reference, click the Help button from the SonicOS GUI, and then navigate to Appendices > CLI Guide.
Bold text indicates a command executed by interacting with the user interface.
Courier bold text indicates commands and text entered using the CLI.
Italic text indicates the first occurrence of a new term, as well as a book title, and also emphasized text. In this command summary, items presented in italics represent user-specified information.
Items within angle brackets (“< >”) are required information.
Items within square brackets (“[ ]”) are optional information.
Items separated by a “pipe” (“|”) are options. You can select any of them.
Note Though a command string may be displayed on multiple lines in this guide, it must be entered on a single line with no carriage returns except at the end of the complete command.
Input Data Format Specification
The table below describes the data formats acceptable for most commands. H represents one or more hexadecimal digit (0-9 and A-F). D represents one or more decimal digit.
Table 21
|
Input Data Formats
The firewall name, configurable via the SonicOS Web UI on the System > Administration page, is used in the prompts throughout the CLI, rather than the generic product name like NSA3600 or SM9600.
This allows the administrator to more easily identify which firewall is currently being managed, and to identify which firewalls are being used for which departments in a business structure. For example, the administrator could name several NSA3600s with names like Marketing, Tech Pubs, Engineering, Testing, etc.
If no firewall name is configured, the default is the serial number or MAC address of the device, resulting in a prompt such as:
C0EAE4599008>
In the examples in this document, we use NSA3600 as the configured name of the device and consequently as the prompt in the examples.
Editing and Completion Features
You can use individual keys and control-key combinations to assist you with the CLI. The table below describes the key and control-key combination functions.
Table 22
|
Key Reference
Most configuration commands require completing all fields in the command. For commands with several possible completing commands, the Tab or ? key display all options.
: : : : myDevice> show [TAB]
|
The Tab key can also be used to finish a command if the command is uniquely identified by user input.
myDevice> show al [TAB]
displays
myDevice> show alerts
Additionally, commands can be abbreviated as long as the partial commands are unique. The following text:
myDevice> sho int inf
is an acceptable abbreviation for
myDevice> show interface info
The CLI configuration manager allows you to control hardware and firmware of the appliance through a discreet mode and submode system. The commands for the appliance fit into the logical hierarchy shown below.
To configure items in a submode, activate the submode by entering a command in the mode above it.
For example, to set the default LAN interface speed or duplex, you must first enter configure, then interface x0 lan. To return to the higher Configuration mode, simply enter end or finished.
SonicWALL Internet Security appliances allow easy, flexible configuration without compromising the security of their configuration or your network.
The SonicWALL CLI currently uses the administrator’s password to obtain access. SonicWALL devices are shipped with a default password of password. Setting passwords is important in order to access the SonicWALL and configure it over a network.
If you are unable to connect to your device over the network, you can use the command restore to reset the device to factory defaults during a serial configuration session.
CAUTION The restore command erases all the settings on the appliance, leaving it in a factory default state.
Management Methods for the SonicWALL Network Security Appliance
You can configure the SonicWALL appliance using one of three methods:
• Using a serial connection and the configuration manager
– An IP address assignment is not necessary for appliance management.
– A device must be managed while physically connected via a serial cable.
• Web browser-based User Interface
– An IP address must have been assigned to the appliance for management or use the default of 192.168.168.168.
Initiating a Management Session using the CLI
Serial Management and IP Address Assignment
Follow the steps below to initiate a management session via a serial connection and set an IP address for the device.
Note The default terminal settings on the SonicWALL and modules is 80 columns by 25 lines. To ensure the best display and reduce the chance of graphic anomalies, use the same settings with the serial terminal software. The device terminal settings can be changed, if necessary. Use the standard ANSI setting on the serial terminal software.
1. Attach the included null modem cable to the appliance port marked CONSOLE. Attach the other end of the null modem cable to a serial port on the configuring computer.
2. Launch any terminal emulation application that communicates with the serial port connected to the appliance. Use these settings:
• 115,200 baud
• 8 data bits
• no parity
• 1 stop bit
• no flow control
3. Press Enter/Return. Initial information is displayed followed by a DEVICE NAME> prompt.
Initiating an SSH Management Session via Ethernet
Note This option works for customers administering a device that does not have a cable for console access to the CLI.
Follow the steps below to initiate an SSH management session through an Ethernet connection from a client to the appliance.
1. Attach an Ethernet cable to the interface port marked XO. Attach the other end of the Ethernet cable to an Ethernet port on the configuring computer.
2. Launch any terminal emulation application (such as PuTTY) that communicates via the Ethernet interface connected to the appliance.
3. Within the emulation application, enter the IP destination address for the appliance and enter 22 as the port number.
4. Select SSH as the connection type and open a connection.
When the connection is established, log in to the security appliance:
1. At the User prompt enter the Admin’s username. Only the admin user will be able to login from the CLI. The default Admin username is admin. The default can be changed.
2. At the Password prompt, enter the Admin’s password. If an invalid or mismatched username or password is entered, the CLI prompt will return to User:, and a “CLI administrator login denied due to bad credentials” error message will be logged. There is no lockout facility on the CLI.
Configuring the Dell SonicWALL Network Security Appliance
You can configure the Dell SonicWALL network security appliance using one of three methods:
• Configuring Features using the CLI on a Serial Connection via the Console Port
• Configuring Features using the CLI in an SSH Management Session via Ethernet
• Configuring Features using the Management Interface (Web UI)
Note To use the CLI on a serial connection or in an SSH management session, you need to use a terminal emulation application (such as Tera Term) or an SSH Client application (such as PuTTY). You can find suitable, free terminal emulators on the Internet.
Configuring Features using the CLI on a Serial Connection via the Console Port
You do not need to assign an IP address to the firewall to use the CLI on a serial connection to the Console port.
Note The default terminal settings on the firewall are 80 columns by 25 lines. To ensure the best display and reduce the chance of graphic anomalies, use the same settings with the serial terminal software. The device terminal settings can be changed, if necessary. Use the standard ANSI setting on the serial terminal software.
To configure features using the CLI on a serial connection via the console port:
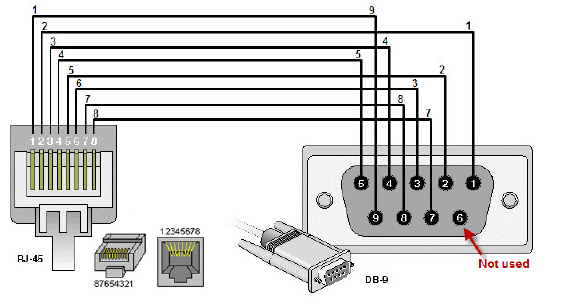
1. Attach an RJ-45 to DB-9 serial cable to the appliance port marked CONSOLE. Attach the other end of the cable to a serial port on the configuring computer.

The RJ-45 to DB-9 serial cable pin assignments are as follows:
|
The RJ-45 to DB-9 serial cable pin diagram is shown below:
2. Launch a terminal emulation application that communicates with the serial port connected to the appliance. Use these settings:
• 115,200 baud
• 8 data bits
• no parity
• 1 stop bit
• no flow control
3. Press Enter/Return. Initial information is displayed followed by a DEVICE NAME> prompt.
Configuring Features using the CLI in an SSH Management Session via Ethernet
You can use an SSH client to access the CLI by connecting to the appliance with an Ethernet cable. This option is useful for customers that do not have access to an RJ-45 to DB-9 serial cable for the Console port on the firewall.
To use SSH management, you must assign an IP address to X0 (LAN) or X1 (WAN), or use the default LAN IP address of 192.168.168.168.
To configure features using the CLI in an SSH management session via Ethernet:
1. Attach an Ethernet cable to the interface port marked X0. Attach the other end of the Ethernet cable to an Ethernet port on the configuring computer.
2. Launch a terminal emulation application or SSH client that communicates via Ethernet.
3. In the emulation application, enter the IP destination address for the X0 interface and enter 22 as the port number.
4. Select SSH as the connection type and open a connection.
Configuring Features using the Management Interface (Web UI)
You can manage the appliance securely from your Web browser using HTTPS by connecting to either the LAN or WAN IP address of the appliance, directly or over the network. Refer to the SonicOS 6.1 Administrator's Guide for complete information about the SonicOS management interface (Web UI).
There are a number of features in SonicOS that cannot be configured using the CLI. The following features can only be configured in the SonicOS management interface (Web UI):
|
SafeMode
SafeMode is a limited Web management interface that provides a way to upload firmware from your computer and reboot the appliance.
The SafeMode feature allows you to recover quickly from uncertain configuration states with a simplified management interface that includes the same settings available on the System > Settings page.
For instructions on how to restart your firewall in SafeMode, refer to the Getting Started Guide for your appliance.
Note You cannot use the CLI commands in SafeMode.
Example: Configuring a Site-to-Site VPN Using the CLI
This section describes how to create a VPN policy using the Command Line Interface. You can configure all of the parameters using the CLI, and enable the VPN without using the Web management interface.
Note In this example, the VPN policy on the other end has already been created.
CLI Access
1. Use a DB9 to RJ45 connector to connect the serial port of your PC to the console port of your firewall.
2. Using a terminal emulator program (such as PuTTY or Tera Term) use the following parameters:
• 115,200 baud
• 8 bits
• No parity
• 1 stop bit
• No flow control
3. You may need to hit return two to three times to get to a command prompt, which will look similar to the following:
• NSA3600>
or
• SM9200>
4. If you have used any other CLI, such as Unix shell or Cisco IOS, this process should be relatively easy and similar. It has auto-complete so you do not have to type in the entire command.
5. When you need to make a configuration change, you must be in configure mode. To enter configure mode, type configure.
• NSA3600> configure
• (config[NSA3600])>
6. The command prompt changes and adds the word config to distinguish it from the normal mode. Now you can configure all the settings, enable and disable the VPNs, and configure the firewall.
Configuration
In this example, a site-to-site VPN is configured between two NSA 3600 appliances, with the following settings:
Local NSA 3600 (home):
WAN IP: 10.50.31.150
LAN subnet: 192.168.61.0
Mask 255.255.255.0
Remote NSA 3600 (office):
WAN IP: 10.50.31.104
LAN subnet: 192.168.15.0
Mask: 255.255.255.0
Authentication Method: IKE using a Pre-Shared Key
Phase 1 Exchange: Main Mode
Phase 1 Encryption: 3DES
Phase 1 Authentication SHA1
Phase 1 DH group: 2
Phase 1 Lifetime: 28800
Phase 2 Protocol: ESP
Phase 2 Encryption: 3DES
Phase 2 Authentication: SHA1
Phase 2 Lifetime: 28800
No PFS
1. In configure mode, create an address object for the remote network, specifying the name, zone assignment, type, and address. In this example, we use the name OfficeLAN:
(config[NSA3600]> address-object Office LAN
(config-address-object[OfficeLAN])>
Note The prompt has changed to indicate the configuration mode for the address object.
(config-address-object[OfficeLAN])> zone VPN
(config-address-object[OfficeLAN])> network 192.168.15.0 255.255.255.0
(config-address-object[OfficeLAN])> finished
2. To display the address object, type the command show address-object [name]:
NSA3600 > show address-object OfficeLAN
The output will be similar to the following:
address-object OfficeLAN
network 192.168.15.0 255.255.255.0
zone VPN
3. To create the VPN policy, type the command:
vpn policy [name] [authentication method]
(config[NSA3600])> vpn policy OfficeVPN pre-shared
(config-vpn[OfficeVPN])>
Note The prompt changes to indicate the configuration mode for the VPN policy. All the settings regarding this VPN will be entered here.
4. Configure the Pre-Shared Key. In this example, the Pre-Shared Key is sonicwall:
(config-vpn[OfficeVPN])> pre-shared-secret sonicwall
5. Configure the IPSec gateway:
(config-vpn[OfficeVPN])> gw ip-address 10.50.31.104
6. Define the local and the remote networks:
(config-vpn[OfficeVPN])> network local address-object "LAN Primary Subnet"
(config-vpn[OfficeVPN])> network remote address-object "OfficeLAN"
7. Configure the IKE and IPSec proposals:
(config-vpn[OfficeVPN])> proposal ike main encr triple-des auth sha1 dh 2
: lifetime 28800
(config-vpn[OfficeVPN])> proposal ipsec esp encr triple-des auth sha1 dh no
: lifetime 28800
8. In the Advanced tab in the UI configuration, enable keepalive on the VPN policy:
(config-vpn[OfficeVPN])> advanced keepalive
9. To enable the VPN policy, use the command vpn enable [name]:
(config[NSA3600])> vpn enable "OfficeVPN"
10. Use the finished command to save the VPN policy and exit from the VPN configure mode:
(config-vpn[OfficeVPN])> finished
(config[NSA3600])>
The configuration is complete.
Note The command prompt goes back to the configure mode prompt.
Viewing a VPN Configuration
To view a list of all the configured VPN policies:
1. Type the command show vpn policy. The output will be similar to the following:
(config[NSA3600])> show vpn policy
Policy: WAN GroupVPN (Disabled)
Key Mode: Pre-shared
Pre Shared Secret: DE65AD2228EED75A
Proposals:
IKE: Aggressive Mode, 3DES SHA, DH Group 2, 28800 seconds
IPSEC: ESP, 3DES SHA, No PFS, 28800 seconds
Advanced:
Allow NetBIOS OFF, Allow Multicast OFF
Management: HTTP OFF, HTTPS OFF
Lan Default GW: 0.0.0.0
Require XAUTH: ON, User Group: Trusted Users
Client:
Cache XAUTH Settings: Never
Virtual Adapter Settings: None
Allow Connections To: Split Tunnels
Set Default Route OFF, Apply VPN Access Control List OFF
Require GSC OFF
Use Default Key OFF
Policy: OfficeVPN (Enabled)
Key Mode: Pre-shared
Primary GW: 10.50.31.104
Secondary GW: 0.0.0.0
Pre Shared Secret: sonicwall
IKE ID:
Local: IP Address
Peer: IP Address
Network:
Local: LAN Primary Subnet
Remote: OfficeLAN
Proposals:
IKE: Main Mode, 3DES SHA, DH Group 2, 28800 seconds
IPSEC: ESP, 3DES SHA, No PFS, 28800 seconds
Advanced:
Keepalive ON, Add Auto-Rule ON, Allow NetBIOS OFF
Allow Multicast OFF
Management: HTTP ON, HTTPS ON
User Login: HTTP ON, HTTPS ON
Lan Default GW: 0.0.0.0
Require XAUTH: OFF
Bound To: Zone WAN
2. To view the configuration for a specific policy, specify the policy name in double quotes.
For example:
(config[NSA3600])> show vpn policy "OfficeVPN"
The output will be similar to the following:
Policy: OfficeVPN (Enabled)
Key Mode: Pre-shared
Primary GW: 10.50.31.104
Secondary GW: 0.0.0.0
Pre Shared Secret: sonicwall
IKE ID:
Local: IP Address
Peer: IP Address
Network:
Local: LAN Primary Subnet
Remote: OfficeLAN
Proposals:
IKE: Main Mode, 3DES SHA, DH Group 2, 28800 seconds
IPSEC: ESP, 3DES SHA, No PFS, 28800 seconds
Advanced:
Keepalive ON, Add Auto-Rule ON, Allow NetBIOS OFF
Allow Multicast OFF
Management: HTTP ON, HTTPS ON
User Login: HTTP ON, HTTPS ON
Lan Default GW: 0.0.0.0
Require XAUTH: OFF
Bound To: Zone WAN
3. Type the command show vpn sa [name] to see the active SA:
(config[NSA3600])> show vpn sa "OfficeVPN"
Policy: OfficeVPN
IKE SAs
GW: 10.50.31.150:500 --> 10.50.31.104:500
Main Mode, 3DES SHA, DH Group 2, Responder
Cookie: 0x0ac298b6328a670b (I), 0x28d5eec544c63690 (R)
Lifetime: 28800 seconds (28783 seconds remaining)
IPsec SAs
GW: 10.50.31.150:500 --> 10.50.31.104:500
(192.168.61.0 - 192.168.61.255) --> (192.168.15.0 - 192.168.15.255)
ESP, 3DES SHA, In SPI 0xed63174f, Out SPI 0x5092a0b2
Lifetime: 28800 seconds (28783 seconds remaining)