System_systemAdministrationView
The System Administration page provides settings for the configuration of the Dell SonicWALL Security Appliance for secure and remote management.
You can manage the firewall using a variety of methods, including HTTPS, SNMP or Dell SonicWALL Global Management System (SonicWALL GMS).
This section contains the following subsections:
• Administrator Name & Password
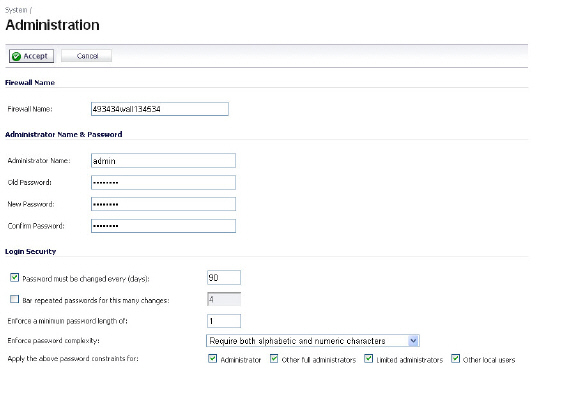
The Firewall Name uniquely identifies the Dell SonicWALL Security Appliance and defaults to the serial number of the Dell SonicWALL network security appliance. The serial number is also the MAC address of the unit. To change the Firewall Name, type a unique alphanumeric name in the Firewall Name field. It must be at least 8 characters in length.
The Administrator Name can be changed from the default setting of admin to any word using alphanumeric characters up to 32 characters in length. To create a new administrator name, type the new name in the Administrator Name field. Click Accept for the changes to take effect on the firewall.
Changing the Administrator Password
To set a new password for Dell SonicWALL Management Interface access, type the old password in the Old Password field, and the new password in the New Password field. Type the new password again in the Confirm New Password field and click Accept. Once the firewall has been updated, a message confirming the update is displayed at the bottom of the browser window.
Tip It is recommended you change the default password “password” to your own custom password.
One-Time Password
One-Time Password (OTP) is a two-factor authentication scheme that utilizes system-generated, random passwords in addition to standard user name and password credentials. Once users submit the correct basic login credentials, the system generates a one-time password which is sent to the user at a pre-defined email address. The user must retrieve the one-time password from their email, then enter it at the login screen.
The internal Dell SonicWALL Web-server now only supports SSL version 3.0 and TLS with strong ciphers (12 -bits or greater) when negotiating HTTPS management sessions. SSL implementations prior to version 3.0 and weak ciphers (symmetric ciphers less than 128-bits) are not supported. This heightened level of HTTPS security protects against potential SSLv2 rollback vulnerabilities and ensures compliance with the Payment Card Industry (PCI) and other security and risk-management standards.
Tip By default, Mozilla Firefox 2.0 and Microsoft Internet Explorer 7.0 enable SSL 3.0 and TLS, and disable SSL 2.0. You should use only the most recent Web browser releases. If you are using a previous release of these browsers, you should enable SSL 3.0 and TLS and disable SSL 2.0. In Internet Explorer, go to Tools > Internet Options, click on the Advanced tab, and scroll to the bottom of the Settings menu. In Firefox, go to Tools > Options, click on the Advanced tab, and then click on the Encryption tab.
SonicOS password constraint enforcement configuration ensures that administrators and users are using secure passwords. This password constraint enforcement can satisfy the confidentiality requirements as defined by current information security management systems or compliance requirements, such as Common Criteria and the Payment Card Industry (PCI) standard.
The Password must be changed every (days) setting requires users to change their passwords after the designated number of days has elapsed. When a user attempts to login with an expired password, a pop-up window will prompt the user to enter a new password. The User Login Status window now includes a Change Password button so that users can change their passwords at any time.
The Bar repeated passwords for this many changes setting requires users to use unique passwords for the specified number of password changes.
The Enforce a minimum password length of setting sets the shortest allowed password.
The Enforce password complexity pull-down menu provides the following options:
• Require both alphabetic and numeric characters
• Require alphabetic, numeric, and symbolic characters
The Apply these password constraints for checkboxes specify which classes of users the password constraints are applied to. The administrator checkbox refers to the default administrator with the username admin.
The Log out the Administrator Inactivity Timeout after inactivity of (minutes) setting allows you to set the length of inactivity time that elapses before you are automatically logged out of the Management Interface. By default, the Dell SonicWALL Security Appliance logs out the administrator after five minutes of inactivity. The inactivity timeout can range from 1 to 99 minutes. Click Accept, and a message confirming the update is displayed at the bottom of the browser window.
Tip If the Administrator Inactivity Timeout is extended beyond five minutes, you should end every management session by clicking Logout to prevent unauthorized access to the firewall’s Management Interface.
The Enable administrator/user lockout setting locks administrators out of accessing the appliance after the specified number of incorrect login attempts.
• Failed login attempts per minute before lockout specifies the number of incorrect login attempts within a one minute time frame that triggers a lockout.
• Lockout Period (minutes) specifies the number of minutes that the administrator is locked out.
The On preemption by another administrator setting configures what happens when one administrator preempts another administrator using the Multiple Administrators feature. The preempted administrator can either be converted to non-config mode or logged out. For more information on Multiple Administrators, see Multiple Administrator Support Overview.
• Drop to non-config mode - Select to allow more than one administrator to access the appliance in non-config mode without disrupting the current administrator.
• Log Out - Select to have the new administrator preempt the current administrator.
Allow preemption by a lower priority administrator after inactivity of (minutes) - Enter the number of minutes of inactivity by the current administrator that will allow a lower-priority administrator to preempt.
Enable inter-administrator messaging - Select to allow administrators to send text messages through the management interface to other administrators logged into the appliance. The message will appear in the browser’s status bar.
Messaging polling interval (seconds) - Sets how often the administrator’s browser will check for inter-administrator messages. If there are likely to be multiple administrators who need to access the appliance, this should be set to a reasonably short interval to ensure timely delivery of messages.
Enable Administrator/User Lockout
You can configure the firewall to lockout an administrator or a user if the login credentials are incorrect. Select the Enable Administrator/User Lockout on login failure checkbox to prevent users from attempting to log into the firewall without proper authentication credentials. Type the number of failed attempts before the user is locked out in the Failed login attempts per minute before lockout field. Type the length of time that must elapse before the user attempts to log into the firewall again in the Lockout Period (minutes) field.
CAUTION If the administrator and a user are logging into the firewall using the same source IP address, the administrator is also locked out of the firewall. The lockout is based on the source IP address of the user or administrator.
The SonicWALL security appliance can be managed using HTTP or HTTPS and a Web browser. HTTP web-based management is disabled by default. Use HTTPS to log into the SonicOS management interface with factory default settings.
If you wish to use HTTP management, an Allow management via HTTP checkbox is available to allow the administrator to enable/disable HTTP management globally:
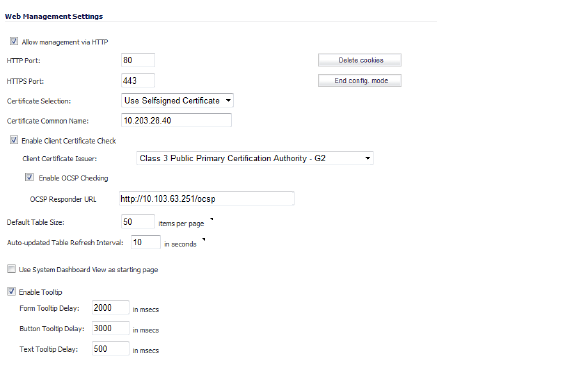
The default port for HTTPS management is 443. You can add another layer of security for logging into the SonicWALL security appliance by changing the default port. To configure another port for HTTPS management, type the preferred port number into the Port field, and click Update. For example, if you configure the HTTPS Management Port to be 700, then you must log into the SonicWALL using the port number as well as the IP address, for example, <https://192.168.168.1:700> to access the SonicWALL.
The default port for HTTP is port 80, but you can configure access through another port. Type the number of the desired port in the Port field, and click Accept. However, if you configure another port for HTTP management, you must include the port number when you use the IP address to log into the SonicWALL security appliance. For example, if you configure the port to be 76, then you must type <LAN IP Address>:76 into the Web browser, i.e. <http://192.168.168.1:76>.
The Certificate Selection menu allows you to use a self-signed certificate (Use Self-signed Certificate), which allows you to continue using a certificate without downloading a new one each time you log into the SonicWALL security appliance. You can also choose Import Certificate to select an imported certificate from the System > Certificates page to use for authentication to the management interface.
The Delete Cookies button removes all browser cookies saved by the SonicWALL appliance. Deleting cookies will cause you to lose any unsaved changes made in the Management interface.
To see the Dashboard > Top Global Malware page first when you login, select the Use System Dashboard View as starting page checkbox.
Client Certificate Check with Common Access Card
On the System > Administration page, under Web Management Settings, system administrators can enable a Client Certificate Check for use with or without a Common Access Card (CAC).
A Common Access Card (CAC) is a United States Department of Defense (DoD) smart card used by military personnel and other government and non-government personnel that require highly secure access over the internet. A CAC uses PKI authentication and encryption.
Note Using a CAC requires an external card reader that is connected on a USB port.
The Client Certificate Check was developed for use with a CAC; however, it is useful in any scenario that requires a client certificate on an HTTPS/SSL connection. CAC support is available for client certification only on HTTPS connections.
Note CACs may not work with browsers other than Microsoft Internet Explorer.
The Enable Client Certificate Check box allows you to enable or disable client certificate checking and CAC support on the SonicWALL security appliance.
The Client Certificate Issuer drop-down menu contains a list of the Certification Authority (CA) certificate issuers that are available to sign the client certificate. If the appropriate CA is not in the list, you need to import that CA into the SonicWALL security appliance.
The Enable OCSP Checking box allows you to enable or disable the Online Certificate Status Protocol (OCSP) check for the client certificate to verify that the certificate is still valid and has not been revoked.
The OCSP Responder URL field contains the URL of the server that will verify the status of the client certificate. The OCSP Responder URL is usually embedded inside the client certificate and does not need to be entered. If the client certificate does not have an OCSP link, you can enter the URL link. The link should point to the Common Gateway Interface (CGI) on the server side which processes the OCSP checking. For example: http://10.103.63.251/ocsp
If you use the client certificate check without a CAC, you must manually import the client certificate into the browser.
If you use the Client Certificate Check with a CAC, the client certificate is automatically installed on the browser by middleware. When you begin a management session through HTTPS, the certificate selection window is displayed asking you to confirm the certificate.
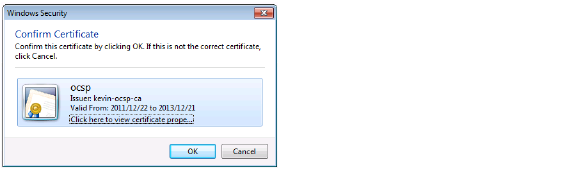
After you select the client certificate from the drop-down menu, the HTTPS/SSL connection is resumed, and the SonicWALL security appliance checks the Client Certificate Issuer to verify that the client certificate is signed by the CA. If a match is found, the administrator login page is displayed. If no match is found, the browser displays a standard browser connection fail message, such as:
.....cannot display web page!
If OCSP is enabled, before the administrator login page is displayed, the browser performs an OCSP check and displays the following message while it is checking.
Client Certificate OCSP Checking.....
If a match is found, the administrator login page is displayed, and you can use your administrator credentials to continue managing the SonicWALL security appliance.
If no match is found, the browser displays the following message:
OCSP Checking fail! Please contact system administrator!
When using the client certificate feature, these situations can lock the user out of the SonicWALL security appliance:
• Enable Client Certificate Check is checked, but no client certificate is installed on the browser.
• Enable Client Certificate Check is checked and a client certificate is installed on the browser, but either no Client Certificate Issuer is selected or the wrong Client Certificate Issuer is selected.
• Enable OSCP Checking is enabled, but either the OSCP server is not available or a network problem is preventing the SonicWALL security appliance from accessing the OSCP server.
To restore access to a user that is locked out, the following CLI commands are provided:
• web-management client-cert disable
• web-management ocsp disable
Changing the Default Size for Management Interface Tables
The Dell SonicWALL Management Interface allows you to control the display of large tables of information across all tables in the management Interface. You can change the default table page size in all tables displayed in the Management Interface from the default 50 items per page to any size ranging from 1 to 5,000 items. Some tables, including Active Connections Monitor, VPN Settings, and Log View, have individual settings for items per page which are initialized at login to the value configured here. Once these pages are viewed, their individual settings are maintained. Subsequent changes made here will only affect these pages following a new login.
To change the default table size:
1. Enter the desired number of items per page in the Default Table Size field.
2. Enter the desired interval for background automatic refresh of Monitor tables (including Process Monitor, Active Connections Monitor, and Interface Traffic Statistics) in seconds in the Auto-updated Table Refresh Interval field.
3. Click Accept.
Tooltips
SonicOS introduced embedded tool tips for many elements in the SonicOS UI. These Tooltips are small pop-up windows that are displayed when you hover your mouse over a UI element. They provide brief information describing the element. Tooltips are displayed for many forms, buttons, table headings and entries.
Note Not all UI elements have Tooltips. If a Tooltip does not display after hovering your mouse over an element for a couple of seconds, you can safely conclude that it does not have an associated Tooltip.
When applicable, Tooltips display the minimum, maximum, and default values for form entries. These entries are generated directly from the SonicOS firmware, so the values will be correct for the specific platform and firmware combination you are using.
The behavior of the Tooltips can be configured on the System > Administration page.
Tooltips are enabled by default. To disable Tooltips, clear the Enable Tooltip checkbox. The duration of time before Tooltips display can be configured:
• Form Tooltip Delay - Duration in milliseconds before Tooltips display for forms (boxes where you enter text).
• Button Tooltip Delay - Duration in milliseconds before Tooltips display for radio buttons and checkboxes.
• Text Tooltip Delay - Duration in milliseconds before Tooltips display for UI text.
If you use SSH to manage the firewall, you can change the SSH port for additional security. The default SSH port is 22.
You can manage the Dell SonicWALL Security Appliance using SNMP or Dell SonicWALL Global Management System. This section contains the following subsections:
For more information on Dell SonicWALL Global Management System, go to http://www.sonicwall.com.