 is displayed by default next to the SonicWALL SSO Agent feature. Click Next.
 PANEL_ssoProps
Configuring SSO is a process that includes installing and configuring the SonicWALL SSO Agent and/or the SonicWALL Terminal Services Agent (TSA), and configuring a firewall running SonicOS to use the SSO Agent or TSA. For an introduction to SonicWALL SSO, see Single Sign-On Overview on page 678. The following sections describe how to configure SSO:
• Installing the SonicWALL SSO Agent on page 718
• Installing the SonicWALL Terminal Services Agent on page 722
• Configuring the SonicWALL SSO Agent on page 724
– Adding a Dell SonicWALL Network Security Appliance on page 728
– Editing Appliances in SonicWALL SSO Agent on page 729
– Deleting Appliances in SonicWALL SSO Agent on page 729
– Modifying Services in SonicWALL SSO Agent on page 729
• Configuring the SonicWALL Terminal Services Agent on page 729
– Adding a Dell SonicWALL Network Security Appliance to SonicWALL TSA Settings on page 729
– Creating a SonicWALL TSA Trouble Shooting Report on page 730
– Viewing SonicWALL TSA Status and Version on page 731
• Configuring SonicOS to Use the SonicWALL SSO Agent on page 731
• Advanced LDAP Configuration on page 744
• Tuning Single Sign-On Advanced Settings on page 749
– About the Advanced Settings on page 749
– Viewing SSO Mouseover Statistics and Tooltips on page 750
– Using the Single Sign-On Statistics in the TSR on page 752
– Examining the Agent on page 753
• Configuring Firewall Access Rules on page 753
– Automatically Generated Rules for SonicWALL SSO on page 753
– Accommodating Mac and Linux Users on page 754
– Allowing ICMP Pings from a Terminal Server on page 755
– About Firewall Access Rules on page 755
• Managing SonicOS with HTTP Login from a Terminal Server on page 756
• Viewing and Managing SSO User Sessions on page 756
– Logging Out SSO Users on page 757
– Configuring Additional SSO User Settings on page 757
– Viewing SSO and LDAP Messages with Packet Monitor on page 757
Installing the SonicWALL SSO Agent
The SonicWALL SSO Agent is part of the SonicWALL Directory Connector. The SonicWALL SSO Agent must be installed on at least one, and up to eight, workstations or servers in the Windows domain that have access to the Active Directory server using VPN or IP. The SonicWALL SSO Agent must have access to your firewall.
To install the SonicWALL SSO Agent, perform the following steps:
1. Locate the SonicWALL Directory Connector executable file and double click it. It may take several seconds for the InstallShield to prepare for the installation.
2. On the Welcome page, click Next to continue.
3. The License Agreement displays. Select I accept the terms in the license agreement and click Next to continue.

4. On the Customer Information page, enter your name in the User Name field and your organization name in the Organization field. Select to install the application for Anyone who uses this computer (all users) or Only for me. Click Next to continue.

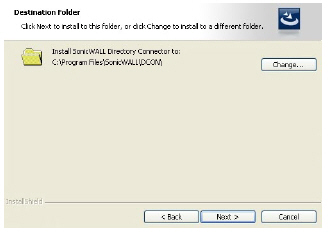
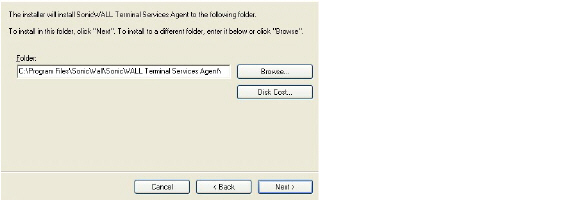
5. Select the destination folder. To use the default folder, C:\Program Files\SonicWALL\DCON, click Next. To specify a custom location, click Browse, select the folder, and click Next.
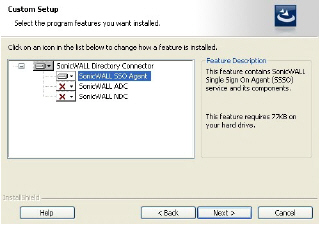
6. On the Custom Setup page, the installation icon is displayed by default next to the SonicWALL SSO Agent feature. Click Next.
7. Click Install to install SSO Agent.
8. To configure a common service account that the SSO Agent will use to log into a specified Windows domain, enter the username of an account with administrative privileges in the Username field, the password for the account in the Password field, and the domain name of the account in the Domain Name field. Click Next.
Note This section can be configured at a later time. To skip this step and configure it later,
click Skip.

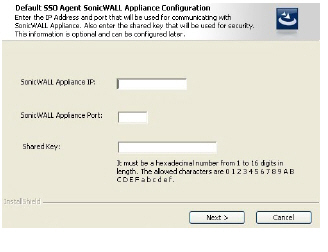
9. Enter the IP address of your firewall in the SonicWALL Appliance IP field. Type the port number for the same appliance in the SonicWALL Appliance Port field. Enter a shared key (a hexadecimal number from 1 to 16 digits in length) in the Shared Key field. Click Next to continue.
Note This information can be configured at a later time. To skip this step and configure it later, leave the fields blank and click Next.
The SonicWALL SSO Agent installs. The status bar displays.
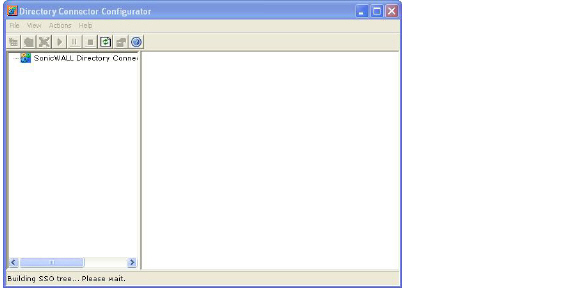
10. When installation is complete, optionally check the Launch SonicWALL Directory Connector box to launch the SonicWALL Directory Connector, and click Finish.
If you checked the Launch SonicWALL Directory Connector box, the SonicWALL Directory Connector will display.
Installing the SonicWALL Terminal Services Agent
Install the SonicWALL TSA on one or more terminal servers on your network within the Windows domain. The SonicWALL TSA must have access to your SonicWALL security appliance, and the appliance must have access to the TSA. If you have a software firewall running on the terminal server, you may need to open up the UDP port number for incoming messages from the appliance.
SonicWALL TSA is available for download without charge from MySonicWALL. To install the SonicWALL TSA, perform the following steps:
1. On a Windows Terminal Server system, download one of the following installation programs, depending on your computer:
– SonicWALL TSAInstaller32.msi (32 bit, version 3.0.28.1001 or higher)
– SonicWALL TSAInstaller64.msi (64 bit, version 3.0.28.1001 or higher)
You can find these on http://www.mysonicwall.com.
2. Double-click the installation program to begin installation.
3. On the Welcome page, click Next to continue.
4. The License Agreement displays. Select I agree and click Next to continue.
5. On the Select Installation Folder window, select the destination folder. To use the default folder, C:\Program Files\SonicWALL\SonicWALL Terminal Services Agent\, click Next. To specify a custom location, click Browse, select the folder, and click Next.
6. On the Confirm Installation window, click Next to start the installation.

7. Wait while the SonicWALL Terminal Services Agent installs. The progress bar indicates the status.
8. When installation is complete, click Close to exit the installer.
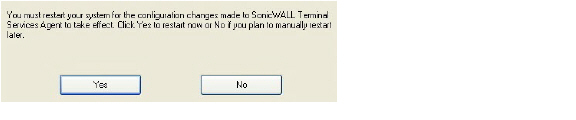
9. You must restart your system before starting the SonicWALL Terminal Services Agent. To restart immediately, click Yes in the dialog box. To restart later, click No.
Configuring the SonicWALL SSO Agent
The SonicWALL SSO Agent communicates with workstations using NetAPI or WMI, which both provide information about users that are logged into a workstation, including domain users, local users, and Windows services. WMI is pre-installed on Windows Server 2003, Windows XP, Windows ME, and Windows 2000. For other Windows versions, visit www.microsoft.com to download WMI. Verify that WMI or NetAPI is installed prior to configuring the SonicWALL SSO Agent.
The .NET Framework 2.0 must installed prior to configuring the SonicWALL SSO Agent. The .NET Framework can be downloaded from Microsoft at www.microsoft.com.
To configure the communication properties of the SonicWALL SSO Agent, perform the following tasks:
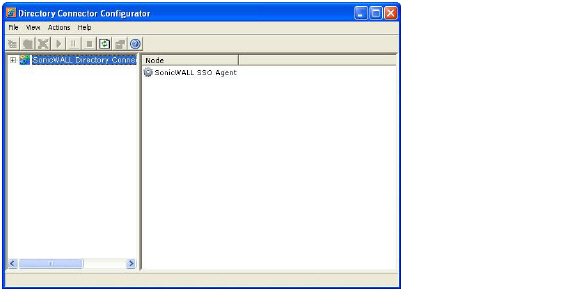
1. Launch the SonicWALL Configuration Tool by double-clicking the desktop shortcut or by navigating to Start > All Programs > SonicWALL > SonicWALL Directory Connector > SonicWALL Configuration Tool.
Note If the IP address for a default firewall was not configured, or if it was configured incorrectly, a pop up will display. Click Yes to use the default IP address (192.168.168.168) or click No to use the current configuration.

If you clicked Yes, the message Successfully restored the old configuration will display. Click OK.

If you clicked No, or if you clicked Yes but the default configuration is incorrect, the message SonicWALL SSO Agent service is not running. Please check the configuration and start the service. will display. Click OK.

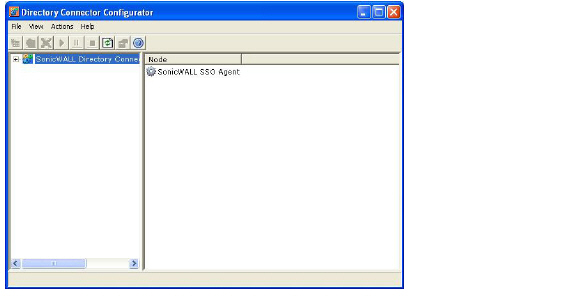
If the message SonicWALL SSO Agent service is not running. Please check the configuration and start the service displays, the SSO Agent service will be disabled by default. To enable the service, expand the SonicWALL Directory Connector Configuration Tool in the left navigation panel by clicking the + icon, highlight the SonicWALL SSO Agent underneath it, and click the  button.
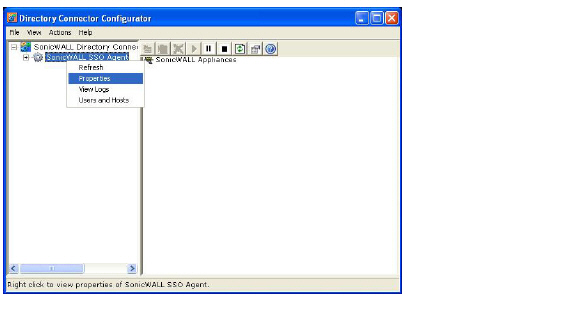
2. In the left-hand navigation panel, expand the SonicWALL Directory Connector Configuration Tool by clicking the + icon. Right click the SonicWALL SSO Agent and select Properties.
3. From the Logging Level pull-down menu, select the level of events to be logged in the Windows Event Log. The default logging level is 1. Select one of the following levels:
– Logging Level 0 - Only critical events are logged.
– Logging Level 1 - Critical and significantly severe events are logged.
– Logging Level 2 - All requests from the appliance are logged, using the debug level of severity.
Note When Logging Level 2 is selected, the SSO Agent service will terminate if the Windows event log reaches its maximum capacity.
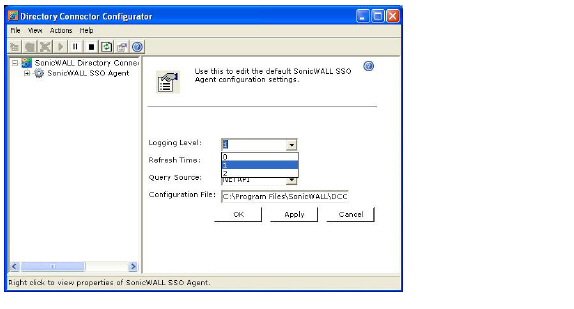
4. In the Refresh Time field, enter the frequency, in seconds, that the SSO Agent will refresh user log in status. The default is 60 seconds.
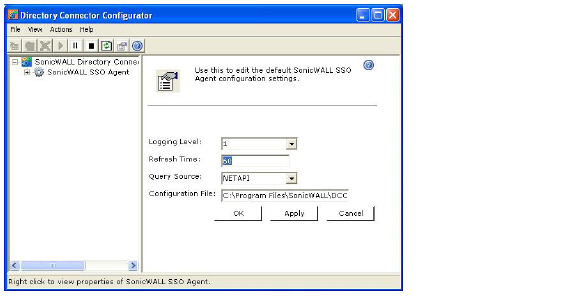
5. From the Query Source pull-down menu, select the protocol that the SSO Agent will use to communicate with workstations, either NETAPI or WMI.
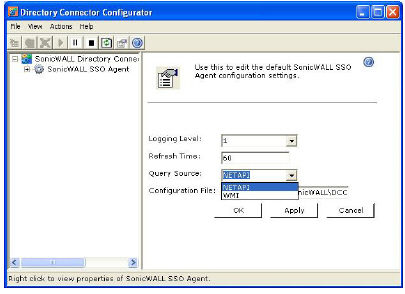
Note NetAPI will provide faster, though possibly slightly less accurate, performance. WMI will provide slower, though possibly more accurate, performance. With NetAPI, Windows reports the last login to the workstation whether or not the user is still logged in. This means that after a user logs out from his computer, the appliance will still show the user as logged in when NetAPI is used. If another user logs onto the same computer, then at that point the previous user is logged out from the SonicWALL.
WMI is pre-installed on Windows Server 2003, Windows XP, Windows Me, and Windows 2000. Both NetAPI and WMI can be manually downloaded and installed. NetAPI and WMI provide information about users that are logged into a workstation, including domain users, local users, and Windows services.
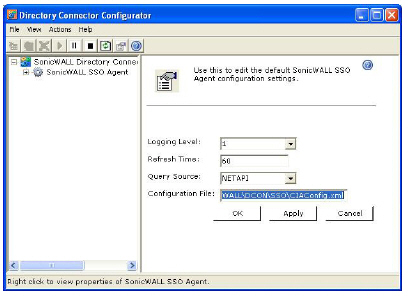
6. In the Configuration File field, enter the path for the configuration file. The default path is
C:\Program Files\SonicWALL\DCON\SSO\CIAConfig.xml.
7. Click Accept.
8. Click OK.
Adding a Dell SonicWALL Network Security Appliance
Use these instructions to manually add a firewall if you did not add one during installation, or to add additional firewalls.
To add a firewall, perform the following steps:
1. Launch the SonicWALL SSO Agent Configurator.
2. Expand the SonicWALL Directory Connector and SonicWALL SSO Agent trees in the left column by clicking the + button. Right click SonicWALL Appliance and select Add.

3. Enter the appliance IP address for your Dell SonicWALL network security appliance in the Appliance IP field. Enter the port for the same appliance in the Appliance Port field. The default port is 2258. Give your appliance a friendly name in the Friendly Name field. Enter a shared key in the Shared Key field or click Generate Key to generate a shared key. When you are finished, click OK.
Your appliance will display in the left-hand navigation panel under the Dell SonicWALL Appliance tree.
Editing Appliances in SonicWALL SSO Agent
You can edit all settings on firewalls previously added in SonicWALL SSO Agent, including IP address, port number, friendly name, and shared key. To edit a firewall in SonicWALL SSO Agent, select the appliance from the left-hand navigation panel and click the edit icon  above the left-hand navigation panel. You can also click the Edit tab at the bottom of the right-hand window.
Deleting Appliances in SonicWALL SSO Agent
To delete a firewall you previously added in SonicWALL SSO Agent, select the appliance from the left-hand navigation panel and click the delete icon above the left-hand navigation panel.
Modifying Services in SonicWALL SSO Agent
You can start, stop, and pause SonicWALL SSO Agent services to firewalls. To pause services for an appliance, select the appliance from the left-hand navigation panel and click the pause button  . To stop services for an appliance, select the appliance from the left-hand navigation panel and click the stop button
  . To resume services, click the start button
  .
.
Note You may be prompted to restart services after making configuration changes to a firewall in the SonicWALL SSO Agent. To restart services, press the stop button then press the start button.
Configuring the SonicWALL Terminal Services Agent
After installing the SonicWALL TSA and restarting your Windows Server system, you can double-click the SonicWALL TSA desktop icon created by the installer to launch it for configuration, to generate a trouble shooting report (TSR), or to see the status and version information.
See the following sections:
• Adding a Dell SonicWALL Network Security Appliance to SonicWALL TSA Settings on page 729
• Creating a SonicWALL TSA Trouble Shooting Report on page 730
• Viewing SonicWALL TSA Status and Version on page 731
Adding a Dell SonicWALL Network Security Appliance to SonicWALL TSA Settings
Perform the following steps to add a Dell SonicWALL network security appliance to the SonicWALL TSA:
1. Double-click the SonicWALL TSA desktop icon.
2. The SonicWALL Terminal Services Agent window displays. On the Settings tab, type the IP address of the firewall into the Appliance IP field.
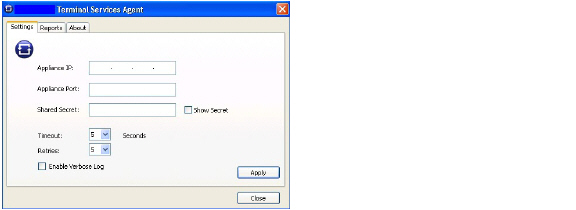
3. Type the communication port into the Appliance Port field. The default port is 2259, but a custom port can be used instead. This port must be open on the Windows Server system.
4. Type the encryption key into the Shared Secret field. Select the Show Secret checkbox to view the characters and verify correctness. The same shared secret must be configured on the firewall.
5. In the Timeout drop-down list, select the number of seconds that the agent will wait for a reply from the appliance before retrying the notification. The range is 5 to 10 seconds, and the default is 5 seconds.
6. In the Retries drop-down list, select the number of times the agent will retry sending a notification to the appliance when it does not receive a reply. The range is 3 to 10 retries, and the default is 5.
7. To enable full details in log messages, select the Enable Verbose Log checkbox. Do this only to provide extra, detailed information in a trouble shooting report. Avoid leaving this enabled at other times because it may impact performance.
8. Click Apply. A dialog box indicates that the SonicWALL TSA service has restarted with the new settings.

Creating a SonicWALL TSA Trouble Shooting Report
You can create a trouble shooting report (TSR) containing all current log messages and information about the agent, driver, and system settings to examine or to send to SonicWALL Technical Support for assistance.
Perform the following steps to create a TSR for the SonicWALL TSA:
1. Double-click the SonicWALL TSA desktop icon.
2. The SonicWALL Terminal Services Agent window displays. Click the Reports tab.
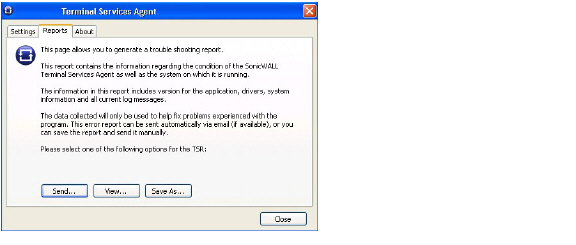
3. To generate the TSR and automatically email it to SonicWALL Technical Support, click Send.
4. To generate the TSR and examine it in your default text editor, click View.
5. To generate the TSR and save it as a text file, click Save As.
6. When finished, click Close.
Viewing SonicWALL TSA Status and Version
To display the current status of the SonicWALL TSA service on your Windows Server system, or to view the version number of the SonicWALL TSA, perform the following steps:
1. Double-click the SonicWALL TSA desktop icon.
2. The SonicWALL Terminal Services Agent window displays. Click the About tab.

3. Click Close.
Configuring SonicOS to Use the SonicWALL SSO Agent
Use the following procedure to configure your firewall to use the SonicWALL SSO Agent:
1. Go to Users > Settings.
2. In the Single-sign-on method(s) section, select SonicWALL SSO Agent. Use this choice to add and configure a TSA as well as an SSO Agent for the SSO method.
Click Configure SSO.The SSO Authentication Configuration page displays. Click the SSO Agents tab at the top left, and on the SSO Agents tab under Authentication Agent Settings you can view any SSO Agents already configured. The green LED next to the Agent’s IP address indicates that the agent is currently up and running. A red LED would indicate that the agent is down. A grey LED shows that the agent is disabled. The LEDs are dynamically updated using AJAX.
Click the Add button to create an agent. The page is updated to display a new row in the table at the top, and two new tabs (Settings and Advanced) in the lower half of the page.

5. Enter the following information in the Settings tab:
• For Host Name or IP Address, enter the name or IP address of the workstation on which SonicWALL SSO Agent is installed.
As you type in values for the fields, the row at the top is updated in red to highlight the new information.
• At Port, enter the port number that the SonicWALL SSO Agent is using to communicate with the appliance. The default port is 2258. Note that agents at different IP addresses can have the same port number.
• At Shared Key, enter the shared key that you created or generated in the SonicWALL SSO Agent. The shared key must match exactly. Re-enter the shared key in the Confirm Shared Key field.
• At Timeout (seconds), enter a number of seconds before the authentication attempt times out. This field is automatically populated with the default of 10 seconds.
• At Retries, enter the number of authentication attempts. The default is 6.
6. Click the Advanced tab and then enter the following information:
• At Maximum requests to send at a time, enter the maximum number of requests to send from the appliance to the agent at one time. The default is 32.
The agent processes multiple requests concurrently, spawning a separate thread in the agent PC to handle each. Sending too many requests at a time can overload the PC. On the other hand, if the number of simultaneous requests sent from the appliance is too low, some requests will have to wait, possibly causing ring buffer overflows. Too many requests waiting could lead to slow response times in Single Sign On authentication. For more information about checking for ring buffer overflows and related statistics in the SonicOS TSR, see Tuning Single Sign-On Advanced Settings on page 749.
7. Click the General Settings tab under Authentication Agent Settings to configure the following options:
• Select the Enable SSO agent authentication checkbox to use the SSO Agent for user authentication.
• Select the Try next agent on getting no name from NetAPI/WMI checkbox to force a retry of the authentication via a different SSO agent if there is no response or error from the first agent. This only affects agents using NetAPI/WMI.
• Select the Don't block user traffic while waiting for SSO checkbox to use the default policy while the user is being identified. This prevents browsing delays.
• Select the Including for checkbox and either the All access rules or the Selected access rules radio button to allow traffic affected by access rules that require user authentication, while waiting for user identification.
CAUTION Caution: This can temporarily allow access that would not be allowed when the user is identified.
8. Click the Users tab to display the User Settings page to specify the following options:
Select the Allow only users listed locally checkbox to allow only users listed locally on the appliance to be authenticated.
• Select the Simple user names in local database checkbox to use simple user names. When selected, the domain component of a user name will be ignored. User names returned from the authentication agent typically include a domain component, for example, domain1/user1. If this box is not checked, user names in the local database must match exactly the full names returned from the agent, including the domain component.
• Select the Allow limited access for non-domain users checkbox to allow limited access to users who are logged in to a computer but not into a domain. These users will not be given membership in the Trusted Users user group, even when set locally, and so will not get any access set for Trusted Users. They are identified in logs as computer-name/user-name.
When using the local user database to authenticate users, and the Simple user names in local database option is disabled, user names must be configured in the local database using the full computer-name/user-name identification.
• If your network includes non-Windows devices or Windows computers with personal firewalls running, select the Probe user for checkbox and then select either NetAPI over NetBIOS, NetAPI over TCP, or WMI depending on which is configured for the SSO Agent. This causes the firewall to probe for a response on the NetAPI/WMI port before requesting that the SSO Agent identify a user. If no response occurs, these devices will fail SSO immediately. Such devices do not respond to, or may block, the Windows networking messages used by the SSO Agent to identify a user. The Probe timeout (seconds) is set to 5 seconds by default.
• Select the Probe test mode checkbox to allow testing that SSO probes are functioning correctly during SSO without interfering with user authentications. Probes are sent after initiating user authentication through the SSO agent.
• To use LDAP to retrieve user information, select the Use LDAP to retrieve user group information radio button. Click Configure to configure the LDAP settings. The LDAP Configuration page displays. For configuration information for this page, refer to Advanced LDAP Configuration on page 744.
• To use locally configured user group settings, select the Local configuration radio button.
• At Polling rate (minutes) field, enter a polling interval, in minutes (the default is 1). The security appliance will poll the workstation running SSO Agent once every interval to verify that users are still logged on.
• At Hold time after (minutes) field, enter a time, in minutes, that the security appliance will wait before trying again to identify traffic after an initial failure to do so. This feature rate-limits requests to the agent. The default is 1.
• Select the Poll the same agent that authenticated the user checkbox if the network topology requires that particular agents be used depending on the location of users, rather than polling any agent to determine if the user is still logged in.
• At after finding no user, enter the number of minutes that the appliance should wait before trying again if it gets errors from the SSO agent or when the agent reports that no user is logged in.
9. To populate the User names used by Windows services list, click the Add button. In the Service User name dialog box, type the service login name (the simple name only, without the domain or PC name) into the Enter the name of a user account used by a Windows service field and then click OK.
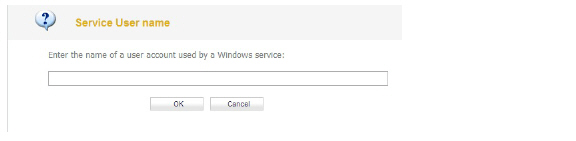
The purpose of this list is to distinguish the login names used by Windows services from real user logins. When the SSO agent queries Windows to find the user logged into a computer, Windows actually returns a list of user accounts that are/have been logged in to the computer and does not distinguish user logins from service logins, hence giving the SSO agent no way to determine that a login name belongs to a service. This may result in the SSO agent incorrectly reporting a service name instead of the actual user name.
You can enter up to 64 login names here that may be used by services on end-user computers. The SSO agent will ignore any logins using these names.
If, when using Single Sign On, you see unexpected user names shown on the Users > Status page, or logs of user login or user login failure with unexpected user names, those may be due to Windows service logins and those user names should be configured here so that the SSO agent will know to ignore them.
In cases where there are multiple firewalls communicating with an SSO agent, the list of service account names should be configured on only one of them. The effect of configuring multiple lists on different appliances is undefined.
10. To edit an existing service account name, select the name, click Edit. Make the desired changes in the Service User name dialog box and then click OK.
To remove service account names, select one or more names and then click Remove.
11. Click the Enforcement tab if you want to either trigger SSO on traffic from a particular zone, or bypass SSO for traffic from non-user devices such as internal proxy web servers or IP phones.
Under Per-Zone SSO Enforcement, select the checkboxes for any zones on which you want to trigger SSO to identify users when traffic is sent. If SSO is already required on a zone by Application Control or other policies, those checkboxes are pre-selected and cannot be cleared. If Guest Services is enabled on a zone, SSO cannot be enforced and you cannot select the checkbox.
These per-zone SSO enforcement settings are useful for identifying and tracking users in event logging and AppFlow Monitor visualizations, even when SSO is not otherwise triggered by content filtering, IPS, or Application Control policies, or by firewall access rules requiring user authentication.
On zones where security services policies or firewall access rules are set to require user authentication, SSO will always be initiated for the affected traffic and it is not necessary to also enable SSO enforcement here.
– To bypass SSO for traffic from certain devices or locations and apply the default content filtering policy to the traffic, select the appropriate address object or address group from the first pull-down menu under SSO Bypass. To bypass SSO for certain services or types of traffic, select the service from the second pull-down menu.
The first setting is used where traffic that would be subject to security services screening can emanate from a device other than a user's workstation (such as an internal proxy Web server or IP phone). It prevents the SonicWALL from attempting to identify such a device as a network user in order to select the content filtering policy to apply. The default content filtering policy will be used for all traffic from the selected IP addresses.
The second setting is appropriate for user traffic that does not need to be authenticated, and triggering SSO might cause an unacceptable delay for the service.
SSO bypass settings do not apply when SSO is triggered by firewall access rules requiring user authentication. To configure this type of SSO bypass, add access rules that do not require user authentication for the affected traffic. See Adding Access Rules on page 397 for more information on configuring access rules.
Note By default, Linux and Mac users who are not authenticated by SSO via Samba are assigned the default content filtering policy. To redirect all such users who are not authenticated by SSO to manually enter their credentials, create an access rule from the WAN zone to the LAN zone for the HTTP service with Users Allowed set to All. Then configure the appropriate CFS policy for the users or user groups. See Adding Access Rules on page 397 for more information on configuring access rules.
12. Click the Terminal Services tab to display the Terminal Services Agent Settings page.
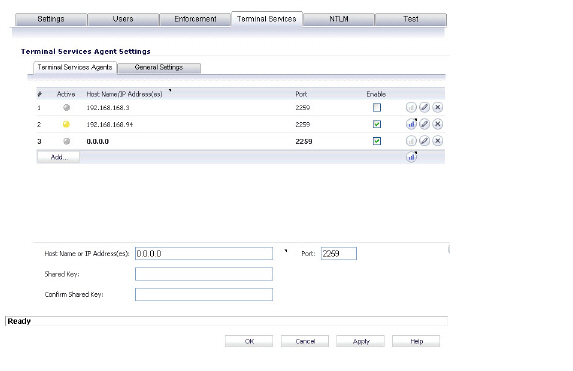
– Click the Terminal Services Agents tab and then click the Add button. The page is updated to display a new row in the table at the top, and new input fields in the lower half of the page.For existing agents, a green LED-style icon next to an agent indicates that the agent is up and running. A red LED icon indicates that the agent is down. A yellow LED icon means that the TSA is idle and the appliance has not heard anything from it for 5 minutes or more. Because TSA sends notifications to the appliance rather than the appliance sending requests to the agent, a lack of notifications could mean that there is a problem, but more likely means simply that no user on the terminal server is currently active.
– In the Host Name or IP Address(es) field, enter the name or IP address of the terminal server on which SonicWALL TSA is installed. If the terminal server is multi-homed (has multiple IP addresses) and you are identifying the host by IP address rather than DNS name, enter all the IP addresses as a comma-separated list.
– As you type in values for the fields, the row at the top is updated in red to highlight the new information.
– At Port, enter the port number that the SonicWALL TSA is using to communicate with the appliance. The default port is 2259. Note that agents at different IP addresses can have the same port number.
– In the Shared Key field, enter the shared key that you created or generated in the SonicWALL TSA. The shared key must match exactly. Re-enter the shared key in the Confirm Shared Key field.
13. Click the General Settings tab under Terminal Services Agent Settings to configure the following options:
– Select the Enable Terminal Services agent authentication checkbox to use the TSA for user authentication.
– The Allow traffic from services on the terminal server to bypass user authentication in access rules checkbox is selected by default. This allows traffic such as Windows updates or anti-virus updates, which is not associated with any user login session, to pass without authentication. If you clear this checkbox, traffic from services can be blocked if firewall access rules require user authentication. In this case, you can add rules to allow access for “All” to the services traffic destinations, or configure the destinations as HTTP URLs that can bypass user authentication in access rules.
14. Click the NTLM tab. The NTLM Browser Authentication page displays.
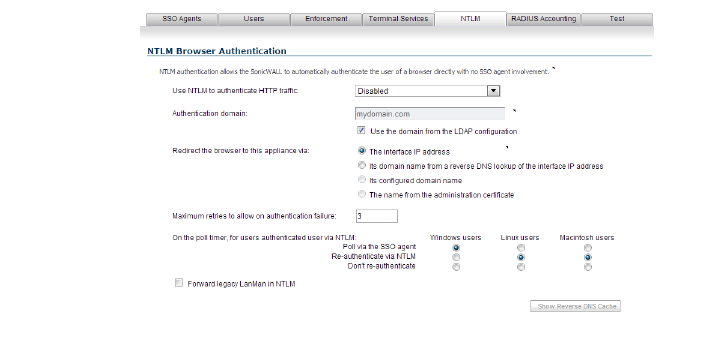
NTLM authentication is supported by Mozilla-based browsers and can be used as a supplement to identifying users via an SSO agent or, with some limitations, on its own without the agent. The firewall interacts directly with the browser to authenticate the user. Users logged in with domain credentials are authenticated transparently; in other cases the user may need to enter credentials to login to the appliance, but should only need to do so once as the credentials are saved.
Consult the tooltips on this tab for additional details, and see How Does Browser NTLM Authentication Work? on page 685 for more information.
– Select one of the following choices from the Use NTLM to authenticate HTTP traffic pull-down list:
: •: Never – Never use NTML authentication
: •: Before attempting SSO via the agent – Try to authenticate users with NTLM before using the SonicWALL SSO agent
: •: Only if SSO via the agent fails – Try to authenticate users via the SSO agent first; if that fails, try using NTLM
– For Authentication domain, do one of the following:
: •: Enter the full DNS name of the firewall’s domain in the form “www.somedomain.com”
: •: Select the Use the domain from the LDAP configuration checkbox to use the same domain that is used in the LDAP configuration.
Fully transparent authentication can only occur if the browser sees the appliance domain as the local domain.
– For Redirect the browser to this appliance via, select one of the following options to determine how a user’s browser is initially redirected to the firewall’s own Web server:
: •: The interface IP address – Select this to redirect the browser to the IP address of the appliance Web server interface.
: •: Its domain name from a reverse DNS lookup of the interface IP address – Enables the Show Reverse DNS Cache button at the bottom of the window; when clicked, a popup displays the appliance Web server’s Interface, IP Address, DNS Name, and TTL in seconds. Click the button to verify the domain name (DNS name) being used for redirecting the user’s browser.
: •: Its configured domain name – Use the firewall's domain name as configured on the System > Administration page.
: •: The name from the administration certificate – Use the imported certificate that is selected for HTTPS Web Management on the System > Administration page.
– Enter a number of retries in the Maximum retries to allow on authentication failure.
– To detect when users log out, select the polling method to be used by the appliance for Windows, Linux, and Macintosh users in the On the poll timer, for users authenticated user via NTLM options. Select the radio button for one of the following methods for users on each type of computer:
: •: Poll via the SSO agent – If you are using an SSO Agent in your network, select this to use it to poll users; for users authenticated via NTLM, the user name that the agent learns must match the name user for the NTLM authentication, or the login session will be terminated. You may want to select a different polling method for Linux or MacOS users, as those systems do not support the Windows networking requests used by the SSO agent.
: •: Re-authenticate via NTLM – This method is transparent to the user if the browser is configured to store the domain credentials, or the user instructed the browser to save the credentials.
: •: Don’t re-authenticate – If you select this option, logout will not be detected other than via the inactivity timeout.
– If you are using older legacy servers that require legacy LAN Manager components to be included in NTLM messages, select the Forward legacy LanMan in NTLM checkbox. This may cause authentication to fail in newer Windows servers that don’t allow LanMan in NTLM by default because it is not secure.
15. Click the RADIUS Accounting tab to display the RADIUS Accounting Single-Sign-On page.
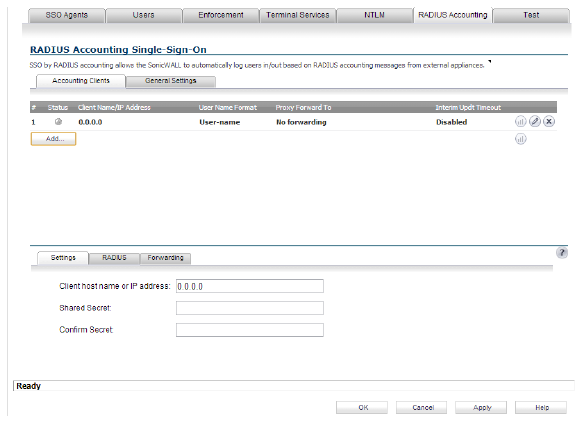
Single Sign-On by RADIUS accounting allows the appliance to act as a RADIUS accounting server for external third-party appliances, and to log users in or out based on the accounting messages from those devices. SonicOS can also forward the accounting messages to another RADIUS accounting server.
16. Click the Test tab to display the Test Authentication Agent Settings page.
Note Performing tests on this page applies any changes that have been made.
You can test the connectivity between the appliance and an SSO agent or TSA. You can also test whether the SSO agent is properly configured to identify a user logged into a workstation.If you have multiple agents configured, select the SSO agent or TSA to test from the Select agent to test drop-down list. The drop-down list includes SSO agents at the top, and TSA’s at the end under the heading --Terminal Server Agents--.
– Select the Check agent connectivity radio button and then click the Test button. This will test communication with the authentication agent. If the firewall can connect to the SSO agent, you will see the message Agent is ready. If testing a TSA, the Test Status field displays the message, and the version and server IP address are displayed in the Information returned from the agent field.

• For SSO agents only, select the Check user radio button, enter the IP address of a workstation in the Workstation IP address field, then click Test. This will test if the SSO agent is properly configured to identify the user logged into a workstation.
Tip If you receive the messages Agent is not responding or Configuration error, check your settings and perform these tests again.
17. When you are finished with all Authentication Agent configuration, click OK.