firewall_bwm
Bandwidth management (BWM) is a means of allocating bandwidth resources to critical applications on a network.
SonicOS offers an integrated traffic shaping mechanism through its outbound (Egress) and inbound (Ingress) BWM interfaces. Egress BWM can be applied to traffic sourced from Trusted and Public zones travelling to Untrusted and Encrypted zones. Ingress BWM can be applied to traffic sourced from Untrusted and Encrypted zones travelling to Trusted and Public zones.
This section contains the following subsections:
• Understanding Bandwidth Management
• Configuring the Firewall Settings > BWM Page
• Advanced Bandwidth Management
• Configuring Advanced Bandwidth Management
• Upgrading to Advanced Bandwidth Management
• Glossary
Note Although BWM is a fully integrated Quality of Service (QoS) system, wherein classification and shaping is performed on the single SonicWALL appliance, effectively eliminating the dependency on external systems and thus obviating the need for marking, it is possible to concurrently configure BWM and QoS (layer 2 and/or layer 3 marking) settings on a single Access Rule. This allows those external systems to benefit from the classification performed on the firewall even after it has already shaped the traffic. Refer to Firewall Settings > QoS Mapping for BWM QoS details.
Understanding Bandwidth Management
The Dell SonicWALL network security appliance uses BWM to control ingress and egress traffic. BWM allows network administrators to guarantee minimum bandwidth and prioritize traffic based on access rules created in the Firewall > Access Rules page of the management interface. By controlling the amount of bandwidth to an application or user, the network administrator can prevent a small number of applications or users to consume all available bandwidth. Balancing the bandwidth allocated to different network traffic and then assigning priorities to traffic can improve network performance.
The SonicOS provides eight priority queues as follows:
• 0 – Realtime
• 1 – Highest
• 2 – High
• 3 – Medium High
• 4 – Medium
• 5 – Medium Low
• 6 – Low
• 7 – Lowest
Three types of bandwidth management are available and can be selected on the Firewall Settings > BWM page:
|
When Global bandwidth management is enabled on an interface, all traffic to and from that interface is bandwidth managed. If the bandwidth management type is None, and there are three traffic types that are using an interface, and the link capacity of the interface is 100 Mbps, the cumulative capacity for all three types of traffic is 100 Mbps.
If the bandwidth management type is Global, and the available ingress and egress traffic is configured at 10 Mbps, then by default, all three traffic types are sent to the medium priority queue. The medium priority queue, by default, has a guaranteed bandwidth of 50 percent and a maximum bandwidth of 100 percent. If no Global bandwidth management policies are configured, the cumulative link capacity for each traffic type is 10 Mbps.
Note BWM rules each consume memory for packet queuing, so the number of allowed queued packets and rules on SonicOS is limited by platform (values are subject to change).
Configuring the Firewall Settings > BWM Page
BWM works by first enabling bandwidth management in the Firewall Settings > BWM page, enabling BWM on an interface/firewall/app rule, and then allocating the available bandwidth for that interface on the ingress and egress traffic. It then assigns individual limits for each class of network traffic. By assigning priorities to network traffic, applications requiring a quick response time, such as Telnet, can take precedence over traffic requiring less response time, such as FTP.
To view the BWM configuration, navigate to the Firewall Settings > BWM page.
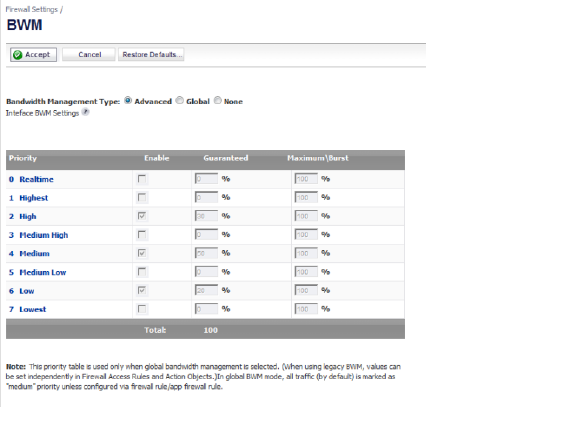
This page consists of the following entities:
• Bandwidth Management Type Option:
– Advanced — Any zone can have guaranteed and maximum bandwidth and prioritized traffic assigned per interface.
– Global — All zones can have assigned guaranteed and maximum bandwidth to services and have prioritized traffic.
– None — Disables BWM.
• Priority Column — Displays the priority number and name.
• Enable Checkbox — When checked, the priority queue is enabled.
• Guaranteed and Maximum\Burst Text Field — Enables the guaranteed and maximum/burst rates. The corresponding Enable checkbox must be checked in order for the rate to take effect. These rates are identified as a percentage. The configured bandwidth on an interface is used in calculating the absolute value. The sum of all guaranteed bandwidth must not exceed 100%, and the guaranteed bandwidth must not be greater than the maximum bandwidth per queue.
Note When you change the Bandwidth Management Type from Global to Advanced, the default BWM actions that are in use in any App Rules policies are automatically converted to Advanced BWM settings. When you change the Type from Advanced to Global, the default BWM actions are converted to BWM Global-Medium. The firewall does not store your previous action priority levels when you switch the Type back and forth. You can view the conversions on the Firewall > App Rules page.
Note The default settings for this page consists of three priorities with preconfigured guaranteed and maximum bandwidth. The medium priority has the highest guaranteed value since this priority queue is used by default for all traffic not governed by a BWM-enabled policy.
Note The defaults are set by SonicWALL to provide BWM ease-of-use. It is recommended that you review the specific bandwidth needs and enter the values on this page accordingly.
Action Objects define how the App Rules policy reacts to matching events. You can customize an action or select one of the predefined default actions. The predefined actions are displayed in the App Control Policy Settings page when you add or edit a policy from the App Rules page.
Custom BWM actions behave differently than the default BWM actions. Custom BWM actions are configured by adding a new action object from the Firewall > Action Objects page and selecting the Bandwidth Management action type. Custom BWM actions and policies using them retain their priority level setting when the Bandwidth Management Type is changed from Global to Advanced, and from Advanced to Global.
A number of BWM action options are also available in the predefined, default action list. The BWM action options change depending on the Bandwidth Management Type setting on the Firewall Settings > BWM page. If the Bandwidth Management Type is set to Global, all eight levels of BWM are available. If the Bandwidth Management Type is set to Advanced, no priorities are set. The priorities are set by configuring a bandwidth object under Firewall > Bandwidth Objects.
The following table lists the predefined default actions that are available when adding a policy.
|
Global Bandwidth Management can be configured using the following methods:
• Configuring Global Bandwidth Management
• Configuring Global BWM on an Interface
• Configuring BWM in an Access Rules
• Configuring BWM in an Action Object
• Configuring Application Rules
• Configuring App Flow Monitor
• Elemental Bandwidth Settings
• Zone-Free Bandwidth Management
• Enabling Advanced Bandwidth Management
• Configuring Bandwidth Policies
• Setting Interface Bandwidth Limitations
Configuring Global Bandwidth Management
To set the Bandwidth Management type to Global:
1. On the Dell SonicWALL Security Appliance, go to Firewall Settings > BWM.
2. Set the Bandwidth Management Type option to Global.

3. Enable the priorities that you want by selecting the appropriate checkboxes in the Enable column.
Note You must enable the priorities in this dialog to be able to configure these priorities in Access Rules, App Rules, and Action Objects.
4. Enter the Guaranteed bandwidth percentage that you want for each selected priority.
5. Enter the Maximum\Burst bandwidth percentage that you want for each selected priority.
6. Click Accept.
Configuring Global BWM on an Interface
To configure Global BWM on an interface:
1. On the Dell SonicWALL Security Appliance, go to Network > Interfaces.
2. Click the Configure button for the appropriate interface.
3. Click the Advanced tab.
4. Under Bandwidth Management, select the Enable Interface Egress Bandwidth Limitation option.
5. When this option is selected, the total egress traffic on the interface is limited to the amount specified in the Enable Interface Ingress Bandwidth Limitation box. When this option is not selected, no bandwidth limitation is set at the interface level, but egress traffic can still be shaped using other options.
6. In the Maximum Interface Egress Bandwidth (kbps) box, enter the maximum egress bandwidth for the interface (in kilobytes per second).
7. Select the Enable Interface Ingress Bandwidth Limitation option.
8. When this option is selected, the total ingress traffic is limited to the amount specified in the Maximum Interface Ingress Bandwidth box. When this option is not selected, no bandwidth limitation is set at the interface level, but ingress traffic can still be shaped using other options.
9. In the Maximum Interface Ingress Bandwidth (kbps) box, enter the maximum ingress bandwidth for the interface (in kilobytes per second).
10. Click OK.
Configuring BWM in an Access Rules
You can configure BWM in each Access Rule. This method configures the direction in which to apply BWM and sets the priority queue.
Note Before you can configure any priorities in an Access Rule, you must first enable the priorities that you want to use on the Firewall Settings > BWM page. Refer to the Firewall Settings > BWM page to determine which priorities are enabled. If you select a Bandwidth Priority that is not enabled on the Firewall Settings > BWM page, the traffic is automatically mapped to priority 4 (Medium). See Configuring Global Bandwidth Management.
Priorities are listed in the Access Rules dialog Bandwidth Priority list as follows:
• 0 Realtime
• 1 Highest
• 2 High
• 3 Medium High
• 4 Medium
• 5 Medium Low
• 6 Low
• 7 Lowest
To configure BWM in an Access Rule:
1. Navigate to the Firewall > Access Rules page.
2. Click the Configure icon for the rule you want to edit.
The Edit Rule General tab dialog is displayed.
3. Click the BWM tab.

4. Select the Enable Egress Bandwidth Management ( 'allow' rules only) option.
5. Select the appropriate egress priority from the Bandwidth Priority list.
6. Select the Enable Ingress Bandwidth Management ( 'allow' rules only) option.
7. Select the appropriate ingress priority from the Bandwidth Priority list.
8. Click OK.
Configuring BWM in an Action Object
If you do not want to use the predefined Global BWM actions or policies, you have the option to create a new one that fits your needs.
To create a new BWM action object for Global bandwidth management, perform the following steps:
1. Navigate to the Firewall > Action Objects page.
2. Click Add New Action Object at the bottom of the page.
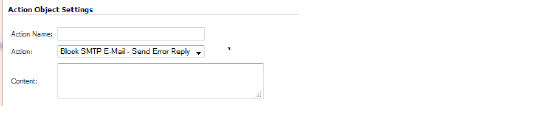
The Action Object Settings dialog is displayed.
3. In the Action Name field, enter a name for the action object.
4. In the Action list, select Bandwidth Management.
5. Select the Enable Egress Bandwidth Management option.
6. In the Bandwidth Priority list, select the egress priority you want.
7. Select the Enable Ingress Bandwidth Management option.
8. In the Bandwidth Priority list, select the ingress priority you want.
9. Click OK.
Configuring BWM in an Application Rule allows you to create policies that regulate bandwidth consumption by specific file types within a protocol, while allowing other file types to use unlimited bandwidth. This enables you to distinguish between desirable and undesirable traffic within the same protocol.
Application Rule BWM supports the following Policy Types:
• SMTP Client
• HTTP client
• HTTP Server
• FTP Client
• FTP Client File Upload
• FTP Client File Download
• FTP Data Transfer
• POP3 Client
• POP3 Server
• Custom Policy
• IPS Content
• App Control Content
• CFS
Note You must first enable BWM as follows before you can configure BWM in an Application Rule.
Before you configure BWM in an App Rule:
1. Enable the priorities you want to use in Firewall Settings > BWM. See Configuring Global Bandwidth Management.
2. Enable BWM in an Action Object. See the Configuring BWM in an Action Object.
3. Configure BWM on the Interface. See the Configuring Global BWM on an Interface respectively.
To configure BWM in an Application Rule:
1. Navigate to the Firewall > App Rules page.
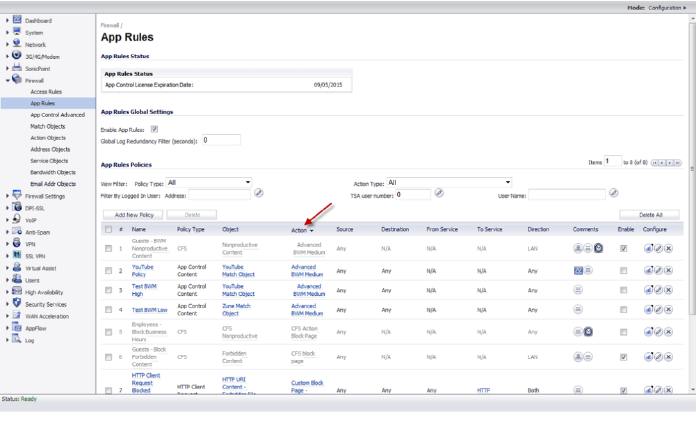
2. Under App Rules Policies, in the Heading row, click Action.
The page will sort by Action type.
3. Click the Configure icon in the Configure column for the policy you want to configure.
The App Control Policy Settings dialog is displayed.
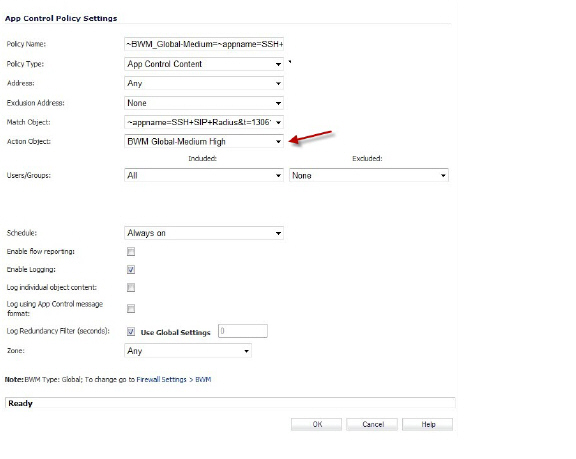
4. In the Action Object list, select the BWM action object that you want.
5. Click OK.
BWM can also be configured from the App Flow Monitor page by selecting a service type application or a signature type application and then clicking the Create Rule button. The Bandwidth Management options available there depend on the enabled priority levels in the Global Priority Queue table on the Firewall Settings > BWM page. The priority levels enabled by default are High, Medium, and Low.
Note You must have Dell SonicWALL Application Visualization enabled before proceeding.
To configure BWM using the App Flow Monitor, perform the following steps:
1. Navigate to the Dashboard > App Flow Monitor page.
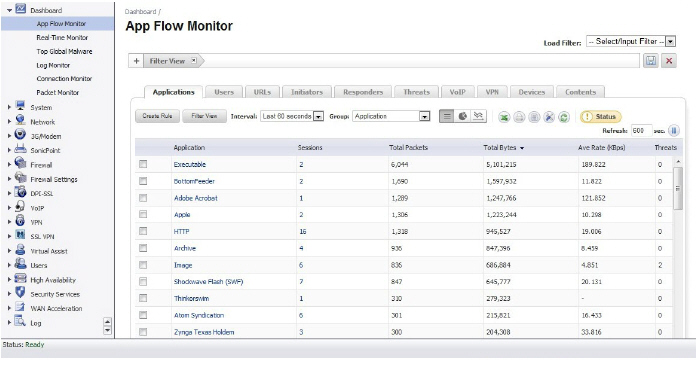
2. Check the service-based applications or signature-based applications to which you want to apply global BWM.
Note General applications cannot be selected. Service-based applications and signature-based applications cannot be mixed in a single rule.
Note Create rule for service-based applications will result in creating a firewall access rule and create rule for signature-based applications will create an application control policy.
3. Click Create Rule. The Create Rule window is displayed. There are slight differences between rules for service-based application options and for signature-based application options.
4. Select the Bandwidth Manage radio button, and then select a global BWM priority.
5. Click Create Rule. A confirmation window is displayed. There are slight differences between the items created for service-based application options and for signature-based application options.
6. Click OK.
7. Navigate to Firewall > Access Rules page (for service-based applications) and Firewall > App Rules (for signature-based applications) to verify that the rule was created.
Note For service-based applications, the new rule is identified with a tack in the Comments column and a prefix in Service column of ~services=<service name>. For example, ~services=NTP&t=1306361297.
For signature-based applications, the new rule is identified with a prefix, ~BWM_Global-<priority>=~catname=<app_name> in the Name column and in the Object column prefix ~catname=<app_name>.
Advanced Bandwidth Management enables you to manage specific classes of traffic based on their priority and maximum bandwidth settings. Advanced Bandwidth Management consists of three major components:
• Classifier – classifies packets that pass through the firewall into the appropriate traffic class.
• Estimator – estimates and calculates the bandwidth used by a traffic class during a time interval to determine if that traffic class has available bandwidth.
• Scheduler – schedules traffic for transmission based on the bandwidth status of the traffic class provided by the estimator.
This graphic illustrates the basic concepts of Advanced Bandwidth Management.
Bandwidth management configuration is based on policies that specify bandwidth limitations for traffic classes. A complete bandwidth management policy consists of two parts: a classifier and a bandwidth rule.
A bandwidth rule specifies the actual parameters, such as priority, guaranteed bandwidth, maximum bandwidth, and per-IP bandwidth management, and is configured in a bandwidth object. Bandwidth rules identify and organize packets into traffic classes by matching specific criteria.
A classifier is an access rule or application rule in which a bandwidth object is enabled. Access rules and application rules are configured for specific interfaces or interface zones.
The first step in bandwidth management is that all packets that pass through the SonicOS firewall are assigned a classifier (class tag). The classifiers identify packets as belonging to a particular traffic class. Classified packets are then passed to the BWM engine for policing and shaping. The SonicOS uses two types of classifiers:
• Access Rules
• Application Rules
A rule that has sub elements is known as a parent rule.
The following table shows the parameters that are configured in a bandwidth object:
|
After packets have been tagged with a specific traffic class, the BWM engine gathers them for policing and shaping based on the bandwidth settings that have been defined in a bandwidth object, enabled in an access rule, and attached to application rules.
Classifiers also identify the direction of packets in the traffic flow. Classifiers can be set for either the egress, ingress, or both directions. For Bandwidth Management, the terms ingress and egress are defined as follows:
• Ingress – Traffic from initiator to responder in a particular traffic flow.
• Egress – Traffic from responder to initiator in a particular traffic flow.
For example, a client behind Interface X0 has a connection to a server which is behind Interface X1. The following table shows:
• Direction of traffic flow in each direction for client and server
• Direction of traffic on each interface
• Direction indicated by the BWM classifier
|
To be compatible with traditional bandwidth management settings in WAN zones, the terms inbound and outbound are still supported to define traffic direction. These terms are only applicable to active WAN zone interfaces.
• Outbound – Traffic from LAN\DMZ zone to WAN zone (Egress).
• Inbound – Traffic from WAN zone to LAN\DMZ zone (Ingress).
Elemental bandwidth settings provide a method of allowing a single BWM rule to apply to the individual elements of that rule. Per-IP Bandwidth Management is an “Elemental” feature that is a sub-option of Bandwidth Object. When Per-IP BWM is enabled, the elemental bandwidth settings are applied to each individual IP under its parent rule.
The Elemental Bandwidth Settings feature enables a bandwidth object to be applied to individual elements under a parent traffic class. Elemental Bandwidth Settings is a sub-option of Firewall > Bandwidth Objects, the parent rule or traffic class. The following table shows the parameters that are configured under Elemental Bandwidth Settings; see Configuring Bandwidth Objects.
|
When you enable Per-IP Bandwidth Management, each individual IP under its parent rule will be applied to the elemental bandwidth settings.
Zone-Free Bandwidth Management
The zone-free bandwidth management feature enables bandwidth management on all interfaces regardless of their zone assignments. Previously, bandwidth management only applied to these zones:
• LAN/DMZ to WAN/VPN
• WAN/VPN to LAN/DMZ
In SonicOS 6.2, zone-free bandwidth management can be performed across all interfaces regardless of zone.
Zone-free bandwidth management allows administrators to configure the maximum bandwidth limitation independently, in either the ingress or egress direction, or both, and apply it to any interfaces using Access Rules and Application Rules.
Note Interface bandwidth limitation is only available on physical interfaces. Failover and load balancing configuration does not affect interface bandwidth limitations.
Traditionally, SonicOS bandwidth management distributes traffic to 8 queues based on the priority of the traffic class of the packets. These 8 queues operate with strict priority queuing. Packets with the highest priority are always transmitted first.
Strict priority queuing can cause high priority traffic to monopolize all of the available bandwidth on an interface, and low priority traffic will consequently be stuck in its queue indefinitely. Under strict priority queuing, the scheduler always gives precedence to higher priority queues. This can result in bandwidth starvation to lower priority queues.
Weighted Fair queuing (WFQ) alleviates the problem of bandwidth starvation by servicing packets from each queue in a round robin manner, so that all queues are serviced fairly within a given time interval. High priority queues get more service and lower priority queues get less service. No queue gets all the service because of its high priority, and no queue is left unserviced because of its low priority.
For example, Traffic Class A is configured as Priority 1 with a maximum bandwidth of 400 kbps. Traffic Class B is configured as Priority 3 with a maximum bandwidth of 600 kbps. Both traffic classes are queued to an interface that has a maximum bandwidth of only 500kbps. Both queues will be serviced based on their priority in a round robin manner. So, both queues will be serviced, but Traffic Class A will be transmitted faster than Traffic Class B.
The following table shows the shaped bandwidth for each consecutive sampling interval:
| |||||||||||||||||||||||||||||||||||||||
Configuring Advanced Bandwidth Management
Advanced Bandwidth Management is configured as follows:
• Enabling Advanced Bandwidth Management
• Configuring Bandwidth Policies
• Setting Interface Bandwidth Limitations
Enabling Advanced Bandwidth Management
To enable Advanced Bandwidth Management:
1. On the Dell SonicWALL Security Appliance, go to Firewall Settings > BWM.
2. Set the Bandwidth Management Type option to Advanced.

3. Click Accept.
Note When Advanced BWM is selected, the priorities fields are disabled and cannot be set here. Under Advanced BWM, the priorities are set in bandwidth policies. See Configuring Bandwidth Policies.
Configuring Bandwidth Policies
Bandwidth policies are configured as follows:
• Configuring a Bandwidth Object
• Enabling Elemental Bandwidth Management
• Enabling a Bandwidth Object in an Access Rule
• Enabling a Bandwidth Object in an Action Object
Configuring a Bandwidth Object
To configure a bandwidth object:
1. On the Dell SonicWALL Security Appliance, go to Firewall > Bandwidth Objects.
2. Do one of the following:
• Click the Add button to create a new Bandwidth Object.
• Click the Configure button of the Bandwidth Object you want to change.
3. Click the General tab.
4. In the Name box, enter a name for this bandwidth object.
5. In the Guaranteed Bandwidth box, enter the amount of bandwidth that this bandwidth object will guarantee to provide for a traffic class (in kbps or Mbps).
6. In the Maximum Bandwidth box, enter the maximum amount of bandwidth that this bandwidth object will provide for a traffic class.
Note The actual allocated bandwidth may be less than this value when multiple traffic classes compete for a shared bandwidth.
7. In the Traffic Priority box, enter the priority that this bandwidth object will provide for a traffic class. The highest priority is 0. The lowest priority is 7.
When multiple traffic classes compete for shared bandwidth, classes with the highest priority are given precedence.
8. In the Violation Action box, enter the action that this bandwidth object will provide (delay or drop) when traffic exceeds the maximum bandwidth setting.
9. Delay specifies that excess traffic packets will be queued and sent when possible.
10. Drop specifies that excess traffic packets will be dropped immediately.
11. In the Comment box, enter a text comment or description for this bandwidth object.
12. Click OK.
Enabling Elemental Bandwidth Management
Elemental Bandwidth Management enables the SonicOS to enforce bandwidth rules and policies on each individual IP that passes through the firewall.
To enable elemental bandwidth management in a bandwidth object:
1. On the Dell SonicWALL Security Appliance, go to Firewall > Bandwidth Objects.
2. Click the Configure button of the Bandwidth Object you want to change.
3. Click the Elemental tab.
4. Select the Enable Per-IP Bandwidth Management option.
When enabled, the maximum elemental bandwidth setting applies to each individual IP under the parent traffic class.
5. In the Maximum Bandwidth box, enter the maximum elemental bandwidth that can be allocated to a protocol under the parent traffic class.
6. Click OK.
Enabling a Bandwidth Object in an Access Rule
Bandwidth objects (and their configurations) can be enabled in Access Rules.
To enable a bandwidth object in an Access Rule:
1. On the Dell SonicWALL Security Appliance, go to Firewall > Access Rules.
2. Do one of the following:
• Click the Add button to create a new Access Rule.
• Click the Configure button for the appropriate Access Rule.
3. Click the BWM tab.
4. To enable a bandwidth object for the egress direction, under Bandwidth Management, select the Enable Egress Bandwidth Management box.
5. From the Select a Bandwidth Object list, select the bandwidth object you want for the egress direction.
6. To enable a bandwidth object for the ingress direction, under Bandwidth Management, select the Enable Ingress Bandwidth Management box.
7. From the Select a Bandwidth Object list, select the bandwidth object you want for the ingress direction.
8. To enable bandwidth usage tracking, select the Enable Tracking Bandwidth Usage option.
9. Click OK.
Enabling a Bandwidth Object in an Action Object
To enable a bandwidth object in an action object:
1. On the Dell SonicWALL Security Appliance, go to Firewall > Action Objects.
2. If creating a new action object, in the Action Name list, click on the Add New Action Object button. the Add/Edit Action Object window displays.
3. Enter a name for the action object in the Action Name field.
4. From the Action list, select Bandwidth Management, which allows control and monitoring of application-level bandwidth usage.
The options on the Add/Edit Action Object window change.
5. In the Bandwidth Aggregation Method list, select the appropriate bandwidth aggregation method.
6. To enable bandwidth management in the egress direction, select the Enable Egress Bandwidth Management option.
7. From the Bandwidth Object list, select the bandwidth object for the egress direction.
8. To enable bandwidth management in the ingress direction, select the Enable Ingress Bandwidth Management option.
9. From the Bandwidth Object list, select the bandwidth object for the ingress direction.
10. To enable bandwidth usage tracking, select the Enable Tracking Bandwidth Usage option.
11. Click OK.
Setting Interface Bandwidth Limitations
To set the bandwidth limitations for an interface:
1. On the Dell SonicWALL Security Appliance, go to Network > Interfaces.
2. Click the Configure button for the appropriate interface.
3. Click the Advanced tab.
4. Under Bandwidth Management, select the Enable Interface Egress Bandwidth Limitation option.
When this option is selected, the total egress traffic on the interface is limited to the amount specified in the Enable Interface Ingress Bandwidth Limitation box. When this option is not selected, no bandwidth limitation is set at the interface level, but egress traffic can still be shaped using other options.
5. In the Maximum Interface Egress Bandwidth (kbps) box, enter the maximum egress bandwidth for the interface (in kilobytes per second).
6. Select the Enable Interface Ingress Bandwidth Limitation option.
When this option is selected, the total ingress traffic is limited to the amount specified in the Maximum Interface Ingress Bandwidth box. When this option is not selected, no bandwidth limitation is set at the interface level, but ingress traffic can still be shaped using other options.
7. In the Maximum Interface Ingress Bandwidth (kbps) box, enter the maximum ingress bandwidth for the interface (in kilobytes per second).
8. Click OK.
Upgrading to Advanced Bandwidth Management
Advanced Bandwidth Management uses Bandwidth Objects as the configuration method. Bandwidth objects are configured under Firewall > Bandwidth Objects, and can then be enabled in Access Rules.
Traditional Bandwidth Management configuration is not compatible with SonicOS 6.2 firmware. However, to ensure that customers can maintain their current network settings, customers can use the Advanced Bandwidth Management Upgrade feature, when they install the SonicOS 6.2 firmware.
The Advanced Bandwidth Upgrade feature automatically converts all active, valid, traditional BWM configurations to the Bandwidth Objects design model.
In traditional BWM configuration, the BWM engine only affects traffic when it is transmitted through the primary WAN interface or the active load balancing WAN interface. Traffic that does not pass through these interfaces, is not subject to bandwidth management regardless of the Access Rule or App Rule settings.
Under Advanced Bandwidth Management, the BWM engine can enforce Bandwidth Management settings on any interface.
During the Advanced Bandwidth Management Upgrade process, the SonicOS translates the traditional BWM settings into a default Bandwidth Object and links it to the original classifier rule (Access Rule or App Rule). The auto-generated default Bandwidth Object inherits all the BWM parameters for both the Ingress and Egress directions.
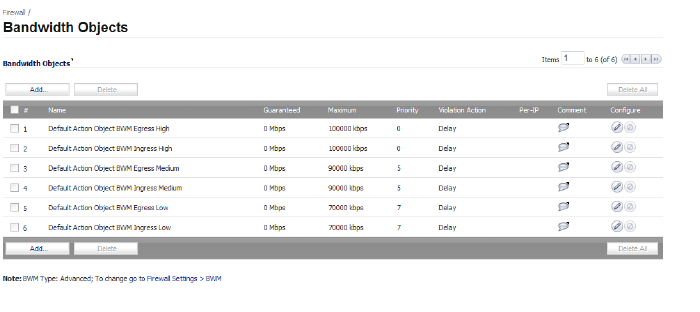
The two following graphics show the traditional BWM settings. The graphic that follows them shows the new Bandwidth Objects which are automatically generated during the Advanced Bandwidth Management Upgrade process.
This graphic shows the traditional Access Rule settings from the Firewall > Access Rules > Configure dialog.

This graphic shows the traditional Action Object settings from the Firewall > Action Object > Configure dialog.

This graphic shows the four new Bandwidth Objects which are automatically generated during the Advanced Bandwidth Management Upgrade process. These settings can be viewed on the Firewall > Bandwidth Objects screen.

Bandwidth Management (BWM): Refers to any of a variety of algorithms or methods used to shape traffic or police traffic. Shaping often refers to the management of outbound traffic, while policing often refers to the management of inbound traffic (also known as admission control). There are many different methods of bandwidth management, including various queuing and discarding techniques, each with their own design strengths. Dell SonicWALL employs a Token Based Class Based Queuing method for inbound and outbound BWM, as well as a discard mechanism for certain types of inbound traffic.
Guaranteed Bandwidth: A declared percentage of the total available bandwidth on an interface which will always be granted to a certain class of traffic. Applicable to both inbound and outbound BWM. The total Guaranteed Bandwidth across all BWM rules cannot exceed 100% of the total available bandwidth. SonicOS 5.0 and higher enhances the Bandwidth Management feature to provide rate limiting functionality. You can now create traffic policies that specify maximum rates for Layer 2, 3, or 4 network traffic. The Guaranteed Bandwidth can also be set to 0%.
Ingress BWM: The ability to shape the rate at which traffic enters a particular interface. For TCP traffic, actual shaping occurs when the rate of the ingress flow can be adjusted by the TCP Window Adjustment mechanism. For UDP traffic, a discard mechanism is used since UDP has no native feedback controls.
Maximum Bandwidth: A declared percentage of the total available bandwidth on an interface defining the maximum bandwidth to be allowed to a certain class of traffic. Applicable to both inbound and outbound BWM. Used as a throttling mechanism to specify a bandwidth rate limit. The Bandwidth Management feature is enhanced to provide rate limiting functionality. You can now create traffic policies that specify maximum rates for Layer 2, 3, or 4 network traffic. This enables bandwidth management in cases where the primary WAN link fails over to a secondary connection that cannot handle as much traffic.The Maximum Bandwidth can be set to 0%, which will prevent all traffic.
Egress BWM: Conditioning the rate at which traffic is sent out an interface. Outbound BWM uses a credit (or token) based queuing system with 8 priority rings to service different types of traffic, as classified by Access Rules.
Priority: An additional dimension used in the classification of traffic. SonicOS uses eight priority values (0 = highest, 7 = lowest) to comprise the queue structure used for BWM. Queues are serviced in the order of their priority.
Queuing: To effectively make use of the available bandwidth on a link. Queues are commonly employed to sort and separately manage traffic after it has been classified.