Security_Services_GeoIP
Topics:
• Security Services > Geo-IP Filter
• Security Services > Botnet Filter
Security Services > Geo-IP Filter
The Geo-IP Filter feature allows you to block connections to or from a geographic location. The Dell/SonicWALL network security appliance uses IP address to determine to the location of the connection.
Topics:
• Configuring Geo-IP Filtering
• Customizing Web Block Page Settings
• Using Geo-IP Filter Diagnostics
To configure Geo-IP Filtering, perform the following steps:
1. Navigate to Security Services > Geo-IP Filter page.
2. To block connections to and from specific countries, select the Block connections to/from countries listed in the table below option. If this option is enabled, all connections to/from the selected list of countries will be blocked. You can specify an exclusion list to exclude this behavior for selected IPs, as described below in 8..
3. Select one of the following two modes for Geo-IP Filtering:
• All Connections: All connections to and from the firewall are filtered. This option is enabled by default.
• Firewall Rule-Based Connections: Only connections that match an access rule configured on the firewall are filtered for blocking.
4. If you want to block all connections to public IPs when the Geo-IP database is not downloaded, select the Block all connections to public IPs if GeoIP DB is not downloaded option.
5. To log Geo-IP Filter-related events, select Enable logging.
6. Under Countries, in the Blocked Country table, select the countries to be blocked. Clicking the checkbox at the top of the table selects all countries, and then you can select countries to be excluded from blocking by deselecting them.
7. If you want to block any countries that are not listed, select the Block ALL UNKNOWN countries option. All connections to unknown public IPs will be blocked.
8. Optionally, you can configure an exclusion list of all connections to approved IP addresses by doing one of these:
• Select an address object or address group from the Geo-IP Exclusion Object pull-down menu or create.
• Create a new address object or address group by selecting Create new address object… or Create new address group… from the Geo-IP Exclusion Object pull-down menu.
The Geo-IP Exclusion Object is a network address object group that specifies a group or a range of IP addresses to be excluded from the Geo-IP filter blocking. All IP addresses in the address object or group will be allowed, even if they are from a blocked country.
For example, if all IP addresses coming from Country A are set to be blocked and an IP address from Country A is detected, but it is in the Geo-IP Exclusion Object list, then traffic to and from this IP address will be allowed to pass.
For this feature to work correctly, the country database must be downloaded to the appliance. The Status indicator at the top right of the page turns yellow if this download fails. Green status indicates that the database has been successfully downloaded. Click the Status button to display more information.
For the country database to be downloaded, the appliance must be able to resolve the address, geodnsd.global.sonicwall.com.
When a user attempts to access a web page that is from a blocked country, a block page is displayed on the user’s web browser.
Note If a connection to a blocked country is short-lived and the firewall does not have a cache for the IP address, then the connection may not be blocked immediately. As a result, connections to blocked countries may occasionally appear in the App Flow Monitor. However, additional connections to the same IP address will be blocked immediately.
9. Click the Accept button at the top of the page to enable your changes.
Customizing Web Block Page Settings
The Geo-IP Filter has a default message that is displayed when a page is blocked. You can have the message display detailed information, such as the reason why this IP address is blocked as well as the IP address and the country from which it was detected.You also can create a custom message and include a custom logo by following these steps:
1. Scroll to the Customize Web Block Page Settings section of the Security Services > Geo-IP Filter page.
2. Ensure the Include Geo-IP Filter Block Details option is selected. When enabled, this option shows block details such as reason for the block, IP address, and country. When disabled, no information is displayed.
3. Do one of the following:
• To use the default message, This site has been blocked by the network administrator., click the Default Blocked Page button and then go to 5..
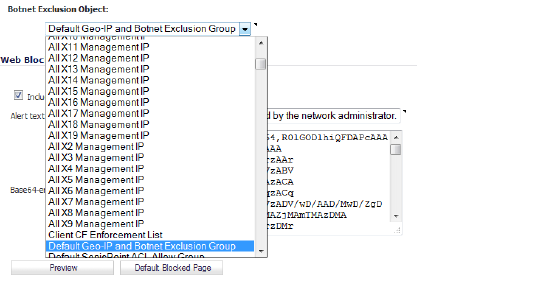
• Specify a custom message to be displayed in the Geo-IP Filter Block page in the Alert text field. Your message can be up to 100 characters long.
4. Optionally, in the Base64-encoded Logo Icon field, you can specify a Base 64-encoded GIF icon to be displayed the default Dell logo.
Note Ensure the icon is valid and make the size as small as possible. The recommended size is 400 x 65.
5. To see a preview of your customized message and logo (or the default message), click the Preview button. The Web Site Blocked window displays.
6. Close the Web Site Blocked window.
7. Click the Accept button.
Using Geo-IP Filter Diagnostics
The Security Services > Geo-IP Filter page has a Diagnostics section with several tools:
• Check GEO Location Server Lookup
When you click on the Show Resolved Locations button, a pop-up table of resolved IP addresses displays with this information:
• Index
• IP Address
• Country
The Geo-IP Cache Statistics table contains this information:
• Location Server IP
• Resolved Entries
• Unresolved Entries
• Current Entry Count
• Max. Entry Count
• Location Map Count
Check GEO Location Server Lookup
The Geo-IP Filter also provides the ability to look up IP addresses to determine:
• Domain name or IP address
• The country of origin and whether it is classified as a Botnet server
Note The similar Botnet Location Server Lookup tool can also be accessed from the System Services > Botnet Filter page.
The Geo Location and Botnet Server Lookup tool can also be accessed from the System > Diagnostics page.
To look up a GEO server, perform the following steps:
1. Scroll to the Check GEO Location Server Lookup section at the bottom of the Security Services > GEO-IP Filter page.
2. Enter the IP address in the Lookup IP field.
3. Click Go. Details on the IP address are displayed below the Result heading.

Security Services > Botnet Filter
The Botnet Filtering feature allows you to block connections to or from Botnet command and control servers.
Topics:
• Configuring Botnet Filtering
• Customizing Web Block Page Settings
• Using Botnet Filter Diagnostics
To configure Botnet filtering, perform the following steps:
1. Navigate to the Security Services > Botnet Filter page.
2. To block all servers that are designated as Botnet command and control servers, select the Block connections to/from Botnet Command and Control Servers option. All connection attempts to/from Botnet command and control servers will be blocked. To exclude selected IPs from this blocking behavior, use exclusion lists as described in the following steps.
3. Select one of the following two modes for Botnet Filtering:
• All Connections: All connections to and from the firewall are filtered. This is the default Botnet block mode.
• Firewall Rule-Based Connections: Only connections that match an access rule configured on the firewall are filtered.
4. If you want to block all connections when the Botnet database is not downloaded, select the Block all connections to public IPs if BOTNET DB is not downloaded.
5. Select Enable logging to log Botnet Filter-related events.
6. Optionally, you can configure an exclusion list of all IPs belonging to the configured address object/address group. All IPs belonging to the list will be excluded from being blocked. To enable an exclusion list, select an address object or address group from the Botnet Exclusion Object pull-down menu.
7. Click the Accept button at the top of the page to enable your changes.
Customizing Web Block Page Settings
The Botnet Filter has a default message that is displayed when a page is blocked. You can create a custom message and include a custom logo by following these steps:
1. Scroll to the Customize Web Block Page Settings section of the Security Services > Botnet Filter page.
2. Ensure the Include Botnet Filter Block Details option is selected. When enabled, this option shows block details such as reason for the block, IP address, and country. When disabled, this option hides all information.
3. Specify a custom message to be displayed in the Botnet Filter Block page in the Alert text field. Your message can be up to 100 characters long. The default message is This site has been blocked by the network administrator.
4. Optionally, in the Base64-encoded Logo Icon field, you can specify a Base 64-encoded GIF icon to be displayed as well.
Note Ensure the icon is valid and make the size as small as possible. The recommended size is 400 x 65.
5. To see a preview of your customized message and logo (or the default message), click the Preview button. The Web Site Blocked window displays.
6. Close the Web Site Blocked window.
7. Click the Accept button.
Using Botnet Filter Diagnostics
The Security Services > Botnet Filter page has a Diagnostics section containing:
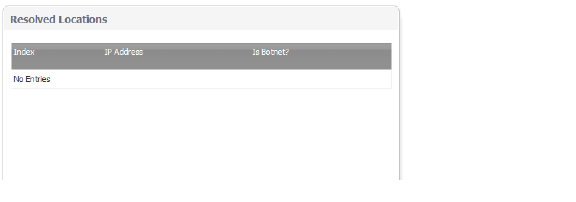
When you click on the Show Resolved Locations button, a table of resolved IP addresses displays with this information:
• Index
• IP Address
• Is Botnet? (whether the location is a Botnet command and control server)
• Domain
The Geo-IP Cache Statistics table contains this information:
• Location Server IP
• Resolved Entries
• Unresolved Entries
• Current Entry Count
• Max. Entry Count
• Location Map Count

The Botnet Filter also provides the ability to look up IP addresses to determine:
• Domain name or IP address
• Country of origin and whether the server is classified as a Botnet server
Note The Botnet Server Lookup tool can also be accessed from the System > Diagnostics page.
To look up a Botnet server, perform the following steps:
1. Scroll to the Check BOTNET Server Lookup section at the bottom of the Security Services > Botnet Filter page.
2. Enter the IP address in the Lookup IP field,
3. Click Go. Details on the IP address are displayed below the Result heading.
Note If you believe that a certain address is marked as a botnet incorrectly, or if you believe an address should be marked as a botnet, report this issue at the SonicWALL Botnet IP Status Lookup tool by either clicking on the link in the Note at the bottom of the Security Services > Botnet Filter page or going to: http://botnet.global.sonicwall.com/