Services_Bookmarks
Services > Bookmarks
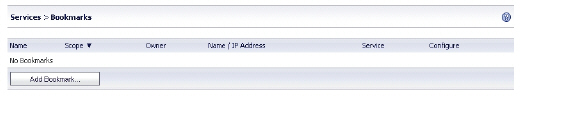
The Services > Bookmarks page within the Web-based management interface provides a single interface for viewing bookmarks and access to configure bookmarks for users and groups.
Adding or Editing a Bookmark
To add a bookmark, navigate to the Services > Bookmarks screen within the management interface and select the Add Bookmark... button. The Add Bookmark window opens.
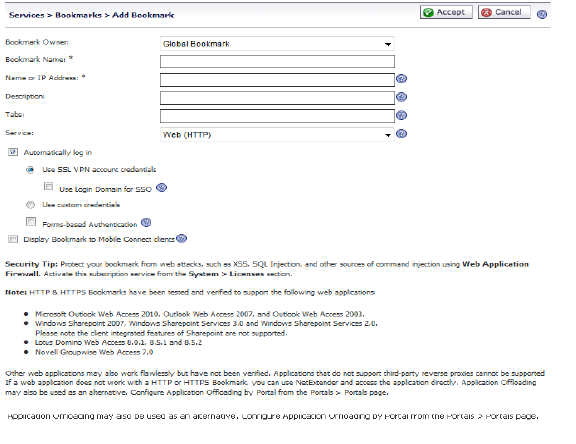
Complete the following steps to add a service bookmark:
1. Use the Bookmark Owner drop-down menu to select whether the bookmark is owned as a Global Bookmark, a Local Domain group bookmark, or a bookmark assigned to an individual User.
2. Fill-in the Bookmark Name field with a friendly name for the service bookmark.
3. Fill-in the Name or IP Address field with hostname, IP address, or IPv6 address for the desired bookmark. IPv6 addresses should begin with “[“ and end with “]”.
Note IPv6 is not supported for File Shares (CIFS) bookmarks.
Some services can run on non-standard ports, and some expect a path when connecting. Depending on the choice in the Service field, format the Name or IP Address field like one of the examples shown in the following table.
|
Service Type
|
Format
|
Example for Name or IP Address Field
|
|
RDP - ActiveX
RDP - Java
|
IP Address
IPv6 Address
IP:Port (non-standard)
FQDN
Host name
|
10.20.30.4
2008::1:2:3:4
10.20.30.4:6818
JBJONES-PC.sv.us.sonicwall.com
JBJONES-PC
|
|
VNC
|
IP Address
IPv6 Address
IP:Port (mapped to session)
FQDN
Host name
Note: Do not use session or display number instead of port.
|
10.20.30.4
2008::1:2:3:4
10.20.30.4:5901 (mapped to session 1)
JBJONES-PC.sv.us.sonicwall.com
JBJONES-PC
Note: Do not use 10.20.30.4:1
Tip: For a bookmark to a Linux server, see the Tip below this table.
|
|
FTP
|
IP Address
IPv6 Address
IP:Port (non-standard)
FQDN
Host name
|
10.20.30.4
2008::1:2:3:4
10.20.30.4:6818 or [2008::1:2:3:4]:6818
JBJONES-PC.sv.us.sonicwall.com
JBJONES-PC
|
|
Telnet
|
IP Address
IPv6 Address
IP:Port (non-standard)
FQDN
Host name
|
10.20.30.4
2008::1:2:3:4
10.20.30.4:6818 or [2008::1:2:3:4]:6818
JBJONES-PC.sv.us.sonicwall.com
JBJONES-PC
|
|
SSHv1
SSHv2
|
IP Address
IPv6 Address
IP:Port (non-standard)
FQDN
Host name
|
10.20.30.4
2008::1:2:3:4
10.20.30.4:6818 or [2008::1:2:3:4]:6818
JBJONES-PC.sv.us.sonicwall.com
JBJONES-PC
|
|
HTTP
HTTPS
|
URL
IP Address of URL
IPv6 Address
URL:Path or File
IP:Path or File
URL:Port
IP:Port
URL:Port:Path or File
IP:Port:Path or File
|
www.sonicwall.com
204.212.170.11
2008::1:2:3:4
www.sonicwall.com/index.html
204.212.170.11/folder/
www.sonicwall.com:8080
204.212.170.11:8080 or [2008::1:2:3:4]:8080
www.sonicwall.com:8080/folder/index.html
204.212.170.11:8080/index.html
|
|
File Shares
|
Host\Folder\
Host\File
FQDN\Folder
FQDN\File
IP\Folder\
IP\File
|
server-3\sharedfolder\
server-3\inventory.xls
server-3.company.net\sharedfolder\
server-3company.net\inventory.xls
10.20.30.4\sharedfolder\
10.20.30.4\status.doc
Note: Use backslashes even on Linux or Mac computers; these use the Windows API for file sharing.
|
|
Citrix
(Citrix Web Interface)
|
IP Address
IPv6 Address
IP:Port
IP:Path or File
IP:Port:Path or File
FQDN
URL:Path or File
URL:Port
URL:Port:Path or File
Note: Port refers to the HTTP(S) port of Citrix Web Interface, not to the Citrix client port.
|
172.55.44.3
2008::1:2:3:4
172.55.44.3:8080 or [2008::1:2:3:4]:8080
172.55.44.3/folder/file.html
172.55.44.3:8080/report.pdf
www.citrixhost.company.net
www.citrixhost.net/folder/
www.citrixhost.company.com:8080
www.citrixhost.com:8080/folder/index.html
|
|
Tip When creating a Virtual Network Computing (VNC) bookmark to a Linux server, you must specify the port number and server number in addition to the Linux server IP the Name or IP Address field in the form of ipaddress:port:server. For example, if the Linux server IP address is 192.168.2.2, the port number is 5901, and the server number is 1, the value for the Name or IP Address field would be 192.168.2.2:5901:1.
4. Use the Service drop-down menu to select the desired bookmark service. Use the following information for the chosen service to complete the building of the bookmark.
Terminal Services (RDP - ActiveX) or Terminal Services (RDP - Java)
Note If you select Terminal Services (RDP - ActiveX) while using a browser other than Internet Explorer, the selection is automatically switched to Terminal Services (RDP - Java). A popup dialog box notifies you of the switch.
– In the Screen Size drop-down list, select the default terminal services screen size to be used when users execute this bookmark.
Because different computers support different screen sizes, when you use a remote desktop application, you should select the size of the screen on the computer from which you are running a remote desktop session. Additionally, you may want to provide a path to where your application resides on your remote computer by typing the path in the Application Path field.
– In the Colors drop-down list, select the default color depth for the terminal service screen when users execute this bookmark.
– Optionally, enter the local path for this application in the Application and Path field.
– In the Start in the following folder field, optionally enter the local folder in which to execute application commands.
– Select the Login as console/admin session check box to allow login as console or admin. Login as admin replaces login as console in RDC 6.1 and newer.
– Select the Enable wake-on-LAN check box to enable waking up a computer over the network connection. Selecting this check box causes the following new fields to be displayed:
: •: MAC/Ethernet Address – Enter one or more MAC addresses, separated by spaces, of target hosts to wake.
: •: Wait time for boot-up (seconds) – Enter the number of seconds to wait for the target host to fully boot up before cancelling the WOL operation.
: •: Send WOL packet to host name or IP address – To send the WOL packet to the hostname or IP of this bookmark, select the Send WOL packet to host name or IP address check box, which can be applied in tandem with a MAC address of another machine to wake.
– Check the Server is TS Farm check box if the bookmark will be used to launch a terminal service farm. A terminal service bookmark requires the client to have a compatible client installed to connect to the terminal server.
– For RDP - ActiveX on Windows clients, expand Show client redirect options and select any of the redirect check boxes Redirect Printers, Redirect Drives, Redirect Ports, or Redirect SmartCards to redirect those devices on the local network for use in this bookmark session. You can hover your mouse pointer over these options to display tooltips that indicate requirements for certain actions.
To see local printers show up on your remote machine (Start > Settings > Control Panel > Printers and Faxes), select Redirect Ports as well as Redirect Printers.
– For RDP - Java on Windows clients, or on Mac clients running Mac OS X 10.5 or above with RDC installed, expand Show advance Windows options and select the check boxes for any of the following redirect options: Redirect Printers, Redirect Drives, Redirect Ports, Redirect SmartCards, Redirect clipboard, or Redirect plug and play devices to redirect those devices or features on the local network for use in this bookmark session. You can hover your mouse pointer over the Help icon  next to certain options to display tooltips that indicate requirements.
To see local printers show up on your remote machine (Start > Settings > Control Panel > Printers and Faxes), select Redirect Ports as well as Redirect Printers.
Select the check boxes for any of the following additional features for use in this bookmark session: Display connection bar, Auto reconnection, Desktop background, Window drag, Menu/window animation, Themes, or Bitmap caching.
If the client application will be RDP 6 (Java), you can select any of the following options as well: Dual monitors, Font smoothing, Desktop composition, or Remote Application.
Remote Application monitors server and client connection activity; to use it, you need to register remote applications in the Windows 2008 RemoteApp list. If Remote Application is selected, the Java Console will display messages regarding connectivity with the Terminal Server.
– Optionally select Automatically log in and select Use SSL-VPN account credentials to forward credentials from the current SRA session for login to the RDP server. Select Use custom credentials to enter a custom username, password, and domain for this bookmark. For more information about custom credentials, see Creating Bookmarks with Custom SSO Credentials.
Virtual Network Computing (VNC)
– In the Encoding drop-down menu, select the desired encoding transfer format.
– Optionally, if available, use the Compression Level drop-down menu to select the desired compression level for data.
– Optionally, if available, select the JPEG image file quality level using the JPEG Image Quality drop-down menu.
– In the Cursor Shape Updates drop-down menu, select to either Enable, Disable, or Ignore these updates.
– Enable or disable the CopyRect function using the associated check box.
– Enable or disable the use of only Restricted Colors by using the associated check box.
– Enable or disable the ability to reverse control of mouse buttons two and three using the associated check box.
– Enable the View Only check box to control to prevent taking control over VNC.
– Enable the Share Desktop check box to allow desktop view to be shared over VNC.
Citrix Portal (Citrix)
– In the Resource Window Size drop-down list, select the default screen size to be used for Citrix sessions when users execute this bookmark.
– Optionally, select HTTPS Mode to use HTTPS to securely access the Citrix Portal. HTTPS mode is used to encrypt communication between the SRA device and the Citrix server using the SSL protocol.
– Optionally, select Always use Java in Internet Explorer to use Java to access the Citrix Portal when using Internet Explorer. Without this setting, a Citrix ActiveX client or plugin must be used with IE. This setting lets users avoid installing a Citrix client or plugin specifically for IE browsers. Java is used with Citrix by default on other browsers and also works with IE. Enabling this check box leverages this portability.
– Optionally, select Always use specified Citrix ICA Server and specify the IP address in the ICA Server Address field that appears. This setting allows you to specify the Citrix ICA Server address for the Citrix ICA session. By default, the bookmark uses the information provided in the ICA configuration on the Citrix server.
Web (HTTP)
– Optionally select Automatically log in and select Use SSL-VPN account credentials to forward credentials from the current SRA session for login to the Web server. Select Use custom credentials to enter a custom username, password, and domain for this bookmark. For more information about custom credentials, see Creating Bookmarks with Custom SSO Credentials.
Secure Web (HTTPS)
– Optionally select Automatically log in and select Use SSL-VPN account credentials to forward credentials from the current SRA session for login to the secure Web server. Select Use custom credentials to enter a custom username, password, and domain for this bookmark. For more information about custom credentials, see Creating Bookmarks with Custom SSO Credentials.
File Shares (CIFS)
– To allow users to use a Java Applet for File Shares that mimics Windows functionality, select the Use File Shares Java Applet check box.
– Optionally select Automatically log in and select Use SSL-VPN account credentials to forward credentials from the current SRA session for login to the RDP server. Select Use custom credentials to enter a custom username, password, and domain for this bookmark. For more information about custom credentials, see Creating Bookmarks with Custom SSO Credentials.
When creating a File Share, do not configure a Distributed File System (DFS) server on a Windows Domain Root system. Because the Domain Root allows access only to Windows computers in the domain, doing so will disable access to the DFS file shares from other domains. The SRA appliance is not a domain member and will not be able to connect to the DFS shares.
DFS file shares on a stand-alone root are not affected by this Microsoft restriction.
File Transfer Protocol (FTP)
– Expand Show advanced server configuration to select an alternate value in the Character Encoding drop-down list. The default is Standard (UTF-8).
– Optionally select Automatically log in and select Use SSL-VPN account credentials to forward credentials from the current SRA session for login to the FTP server. Select Use custom credentials to enter a custom username, password, and domain for this bookmark. For more information about custom credentials, see Creating Bookmarks with Custom SSO Credentials.
Telnet
– No additional fields
Secure Shell version 1 (SSHv1)
– No additional fields
Secure Shell version 2 (SSHv2)
– Optionally select the Automatically accept host key check box.
– If using an SSHv2 server without authentication, such as a Dell SonicWALL firewall, you can select the Bypass username check box.
5. To display the bookmark (Desktop, Web, and Terminal services only) on mobile devices using Mobile Connect 2.0 or higher, check the Display Bookmark to Mobile Connect clients check box.
Note Support varies by device and third party applications on the mobile device.
6. Click OK to update the configuration. Once the configuration has been updated, the new user bookmark will be displayed in the Services >Bookmarks window.
Editing a Bookmark
To edit a service bookmark, navigate to the Services > Bookmarks screen. Click on the pencil icon in the Configure column. A new Edit Bookmark window will open with the bookmark’s current configuration. Make all desired adjustments and select OK. The edited bookmark will still display in the Services > Bookmarks window.
Deleting a Bookmark
To delete a configured bookmark, navigate to the Services > Bookmarks screen. Click on the “X” icon in the Configure column. A dialog box will open and ask if you are sure you want to delete the specified bookmark. Click OK to delete the bookmark. The bookmark will no longer appear in the Services > Bookmarks screen.