user_virtualOffice
If the SSL VPN gateway uses a self-signed SSL certificate for HTTPS authentication, then it is recommended to install the certificate before establishing a NetExtender connection. If you are unsure whether the certificate is self-signed or generated by a trusted root Certificate Authority, Dell SonicWALL recommends that you import the certificate.
If using Internet Explorer, the easiest way to import the certificate is to click the Import Certificate button at the bottom of the Virtual Office home page. The following warning messages may be displayed:
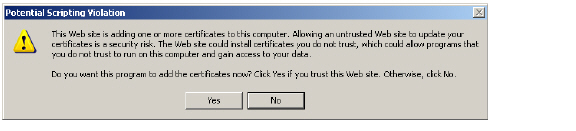
Click Yes. The certificate will be imported.
Note Certificates can only be imported through this method if you are using Internet Explorer. Certificates for other browsers such as Chrome or Firefox must be imported manually.
Using Two-Factor Authentication
The following sections describe how to log in to the SSL VPN Virtual Office portal using two-factor authentication:
Before you can log in using two-factor authentication, you must meet the following prerequisites:
• Your Administrator has created your user account.
• You have an account with a two-factor authentication server that conforms to the RFC standard.
The following sections describe how users log in to the Dell SonicWALL SRA appliance using the two types of two-factor authentication:
• RSA Two-Factor User Authentication Process
• VASCO Two-Factor User Authentication Process
• Other RADIUS Server Two-Factor Authentication Process
RSA Two-Factor User Authentication Process
The following sections describe user tasks when using RSA two-factor authentication to log in to the Dell SonicWALL SSL VPN Virtual Office:
• Logging into the SSL VPN Virtual Office Using RSA Two-Factor Authentication
• Waiting for the Next Token Mode
Logging into the SSL VPN Virtual Office Using RSA Two-Factor Authentication
To log in to the Dell SonicWALL SSL VPN Virtual Office using RSA two-factor authentication, perform the following steps.
1. Enter the IP address of the SRA appliance in your computers browser. The authentication window is displayed.
Enter your username in the Username field.
3. The first time you log in to the Virtual office, your entry in the password field depends on whether your system requires a PIN:
– If you already have a PIN, enter the passcode in the Password field. The passcode is the user PIN and the SecurID token code. For example, if the user’s PIN is 8675 and the token code is 30966673, then the passcode is 867530966673.
– If a PIN is required, but you do not yet have a PIN, enter the SecurID token code in the Password field. You will be prompted to create a PIN.
– If the RSA server does not require a PIN, simply enter the SecurID token code.
Note Consult with your network Administrator to determine if your configuration requires a PIN.
4. Select the appropriate Domain. If manually entering the Domain, it is case-sensitive.
5. Click Login.
The RSA Authentication Manager automatically determines when users are required to create a new PIN. will determines that user associated with a particular token requires a new PIN. The SRA appliance prompts the user to enter new PIN.
Enter the PIN in the New PIN field and again in the Confirm PIN field and click OK. The PIN must be between 4 and 8 characters long.
The RSA Authentication Manager verifies that the new PIN is an acceptable PIN. If the PIN is accepted, the user is prompted to log in with the new passcode.
Waiting for the Next Token Mode
If user authentication fails three consecutive times, the RSA server requires the user to generate and enter a new token. To complete authentication, the user is prompted to wait for the token to change and enter the next token.
VASCO Two-Factor User Authentication Process
The following sections describe user tasks when using RSA two-factor authentication:
• Logging into the SSL VPN Virtual Office Using VASCO Two-Factor Authentication
Logging into the SSL VPN Virtual Office Using VASCO Two-Factor Authentication
To log in to the Dell SonicWALL SSL VPN Virtual Office using VASCO two-factor authentication, perform the following steps:
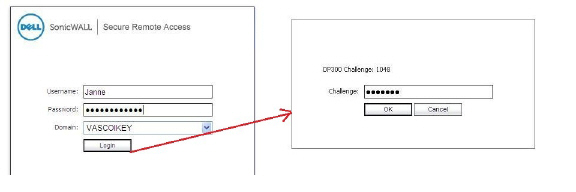
1. Enter the IP address of the SRA appliance in your computer’s browser. The authentication window is displayed.
Enter your username in the Username field.
3. Enter the passcode in the Password field. Your entry in the password field depends on whether your system requires a PIN:
– If you already have a PIN, enter the passcode in the Password field. The passcode is the user PIN and the VASCO Digipass token code. For example, if the user’s PIN is 8675 and the token code is 30966673, then the passcode is 867530966673.
– If a PIN is required, but you do not yet have a PIN, enter the VASCO Digipass code in the Password field. You will be prompted to create a PIN.
– If the RSA server does not require a PIN, simply enter the VASCO Digipass code.
Note Consult with your network Administrator to determine if your configuration requires a PIN.
4. Select the appropriate Domain. If manually entering the Domain, it is case-sensitive.
5. Click Login.
Other RADIUS Server Two-Factor Authentication Process
To log in to the Virtual Office using another type of RADIUS server for two-factor authentication, perform the following steps:
1. Enter the IP address of the SRA appliance in your computers browser. The authentication window is displayed.
Enter your username in the Username field.
3. Enter your password in the Password field.
4. Select the appropriate Domain. If manually entering the Domain, it is case-sensitive.
5. Click Login.
6. You will be prompted to enter additional information, the details of which will depend on the type of RADIUS server used. The example below shows an M.ID RADIUS server, which first prompts you to “Please enter the M.ID PIN.” Enter the PIN in the Challenge field and click OK.
You will then be prompted to “Please enter the M.ID Passcode.” Enter the passcode received through email or text message in the Challenge field and click OK.
The following sections describe how to use one-time passwords:
• Verifying User One-Time Password Configuration,
Users must have a user account enabled in the SSL VPN management interface. Only users enabled by the Administrator to use the One-Time Password feature will need to perform the following configuration tasks. The Administrator must enable a correct email address that is accessible by the user. Users cannot enable the One-Time Password feature and they must be able to access the SSL VPN Virtual Office portal.
To use the One-Time Password feature, perform the following steps:
1. If you are not logged into the SSL VPN Virtual Office user interface, open a Web browser and type the Virtual Office interface URL in the Location or Address bar and press Enter. Type in your user name in the User Name field and your password in the Password field, then select the appropriate domain from the Domain drop-down menu. Click Login.
2. The prompt “A temporary password has been sent to user@email.com” will appear, displaying your pre-configured email account.
Login to your email account to retrieve the one-time password.
4. Type or paste the one-time password into the Password: field where prompted and click Login.
5. You will be logged in to the Virtual Office.
One-time passwords are immediately deleted after a successful login, and cannot be used again. Unused one-time passwords will expire according to each user’s timeout policy.
Configuring One-Time Passwords for SMS-Capable Phones
One-Time Passwords can be configured to be sent via email directly to SMS-capable phones. Contact your cell phone service provider for further information about enabling SMS.
Below is a list of SMS email formats for selected major carriers, where 4085551212 represents a 10-digit telephone number and area code.
Note These SMS email formats are for reference only. These email formats are subject to change and may vary. You may need additional service or information from your provider before using SMS. Contact the SMS provider directly to verify these formats and for further information on SMS services, options, and capabilities.
• Verizon: 4085551212@vtext.com
• Sprint: 4085551212@messaging.sprintpcs.com
• AT&T: 4085551212@mobile.att.net
• Cingular: 4085551212@mobile.mycingular.com
• T-Mobile: 4085551212@tmomail.net
• Nextel: 4085551212@messaging.nextel.com
• Virgin Mobile: 4085551212@vmobl.com
• Qwest: 4085551212@qwestmp.com
For a more complete list, see the Dell SonicWALL SSL VPN Administrator's Guide.
Verifying User One-Time Password Configuration
If you are successfully logged in to Virtual Office, you have correctly used the One-Time Password feature.
If you cannot login using the One-Time Password feature, verify the following:
• Are you able to login to the Virtual Office without being prompted to check your email for a one-time password? You have not been enabled to use the One-Time Password feature. Contact your SSL VPN Administrator.
• Is your email address correct? If your email address has been entered incorrectly, contact your SSL VPN Administrator to correct it.
• Is there no email with a one-time password? Wait a few minutes and refresh your email inbox. Check your spam filter. If there is no email after several minutes, try to login again to generate a new one-time password.
• Have you accurately typed the one-time password in the correct field? Re-type or copy and paste the one-time password.